

5 mins read
|
06-30-2026
How to create CRUD Models in Magento 2
Vinh Jacker | 03-17-2025

CRUD Models in Magento 2 can manage data in database easily, you don’t need to write many lines of code to create a CRUD. CRUD stands for Create, Read, Update and Delete. In the previous post, we discussed about Creating Controllers in Magento 2
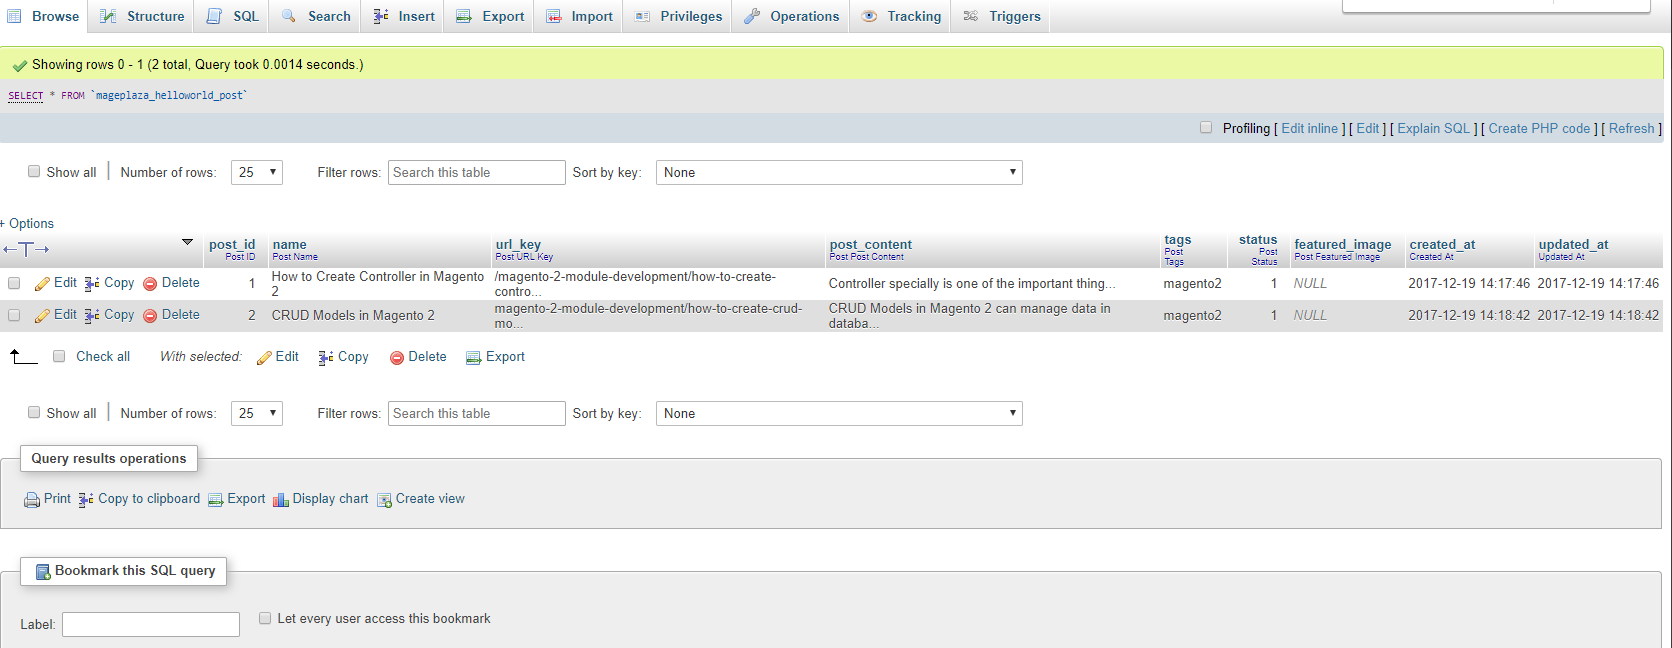
Before learning this post, let’s decide how the table we work with will look. I will create a table mageplaza_helloworld_post and take the following columns:
post_id- the post unique identifiername- the name of the posturl_key- url of the postpost_content- the content of the posttags- the tag of the poststatus- the status of the postfeatured_image- the image of the postcreated_at- the date created of the postupdated_at- the date updated of the post
To create Model in Magento 2
- Step 1: Setup Script
- Step 2: Create Model
- Step 3: Create
- Step 4: Create Resource Model Collection
- Step 5: Factory Object
Step 1: Setup Script
Firstly, we will create database table for our CRUD models. To do this we need to insert the setup file:
app/code/Mageplaza/HelloWorld/Setup/InstallSchema.php
This file will execute only one time when installing the module. Let put this content for this file to create above table:
<?php
namespace Mageplaza\HelloWorld\Setup;

class InstallSchema implements \Magento\Framework\Setup\InstallSchemaInterface
{

	public function install(\Magento\Framework\Setup\SchemaSetupInterface $setup, \Magento\Framework\Setup\ModuleContextInterface $context)
	{
		$installer = $setup;
		$installer->startSetup();
		if (!$installer->tableExists('mageplaza_helloworld_post')) {
			$table = $installer->getConnection()->newTable(
				$installer->getTable('mageplaza_helloworld_post')
			)
				->addColumn(
					'post_id',
					\Magento\Framework\DB\Ddl\Table::TYPE_INTEGER,
					null,
					[
						'identity' => true,
						'nullable' => false,
						'primary'  => true,
						'unsigned' => true,
					],
					'Post ID'
				)
				->addColumn(
					'name',
					\Magento\Framework\DB\Ddl\Table::TYPE_TEXT,
					255,
					['nullable => false'],
					'Post Name'
				)
				->addColumn(
					'url_key',
					\Magento\Framework\DB\Ddl\Table::TYPE_TEXT,
					255,
					[],
					'Post URL Key'
				)
				->addColumn(
					'post_content',
					\Magento\Framework\DB\Ddl\Table::TYPE_TEXT,
					'64k',
					[],
					'Post Post Content'
				)
				->addColumn(
					'tags',
					\Magento\Framework\DB\Ddl\Table::TYPE_TEXT,
					255,
					[],
					'Post Tags'
				)
				->addColumn(
					'status',
					\Magento\Framework\DB\Ddl\Table::TYPE_INTEGER,
					1,
					[],
					'Post Status'
				)
				->addColumn(
					'featured_image',
					\Magento\Framework\DB\Ddl\Table::TYPE_TEXT,
					255,
					[],
					'Post Featured Image'
				)
				->addColumn(
						'created_at',
						\Magento\Framework\DB\Ddl\Table::TYPE_TIMESTAMP,
						null,
						['nullable' => false, 'default' => \Magento\Framework\DB\Ddl\Table::TIMESTAMP_INIT],
						'Created At'
				)->addColumn(
					'updated_at',
					\Magento\Framework\DB\Ddl\Table::TYPE_TIMESTAMP,
					null,
					['nullable' => false, 'default' => \Magento\Framework\DB\Ddl\Table::TIMESTAMP_INIT_UPDATE],
					'Updated At')
				->setComment('Post Table');
			$installer->getConnection()->createTable($table);

			$installer->getConnection()->addIndex(
				$installer->getTable('mageplaza_helloworld_post'),
				$setup->getIdxName(
					$installer->getTable('mageplaza_helloworld_post'),
					['name','url_key','post_content','tags','featured_image'],
					\Magento\Framework\DB\Adapter\AdapterInterface::INDEX_TYPE_FULLTEXT
				),
				['name','url_key','post_content','tags','featured_image'],
				\Magento\Framework\DB\Adapter\AdapterInterface::INDEX_TYPE_FULLTEXT
			);
		}
		$installer->endSetup();
	}
}
This content is showing how the table created, you can edit it to make your own table. Please note that Magento will automatically run this file for the first time when installing the module. If you installed the module before, you will need to upgrade module and write the table create code to the UpgradeSchema.php in that folder and change attribute setup_version greater than current setup version in module.xml at app/code/Mageplaza/HelloWorld/etc/module.xml.
Contents would be:
File: app/code/Mageplaza/HelloWorld/etc/module.xml
<?xml version="1.0"?>
<config xmlns:xsi="http://www.w3.org/2001/XMLSchema-instance" xsi:noNamespaceSchemaLocation="urn:magento:framework:Module/etc/module.xsd">
    <module name="Mageplaza_HelloWorld" setup_version="1.1.0">
    </module>
</config>
In module.xml file, we changed the attribute to 1.1.0 greater than setup_version in How to Create Module in Magento 2
File: app/code/Mageplaza/HelloWorld/Setup/UpgradeSchema.php
<?php
namespace Mageplaza\HelloWorld\Setup;

use Magento\Framework\Setup\UpgradeSchemaInterface;
use Magento\Framework\Setup\SchemaSetupInterface;
use Magento\Framework\Setup\ModuleContextInterface;

class UpgradeSchema implements UpgradeSchemaInterface
{
	public function upgrade( SchemaSetupInterface $setup, ModuleContextInterface $context ) {
		$installer = $setup;

		$installer->startSetup();

		if(version_compare($context->getVersion(), '1.1.0', '<')) {
			if (!$installer->tableExists('mageplaza_helloworld_post')) {
				$table = $installer->getConnection()->newTable(
					$installer->getTable('mageplaza_helloworld_post')
				)
					->addColumn(
						'post_id',
						\Magento\Framework\DB\Ddl\Table::TYPE_INTEGER,
						null,
						[
							'identity' => true,
							'nullable' => false,
							'primary'  => true,
							'unsigned' => true,
						],
						'Post ID'
					)
					->addColumn(
						'name',
						\Magento\Framework\DB\Ddl\Table::TYPE_TEXT,
						255,
						['nullable => false'],
						'Post Name'
					)
					->addColumn(
						'url_key',
						\Magento\Framework\DB\Ddl\Table::TYPE_TEXT,
						255,
						[],
						'Post URL Key'
					)
					->addColumn(
						'post_content',
						\Magento\Framework\DB\Ddl\Table::TYPE_TEXT,
						'64k',
						[],
						'Post Post Content'
					)
					->addColumn(
						'tags',
						\Magento\Framework\DB\Ddl\Table::TYPE_TEXT,
						255,
						[],
						'Post Tags'
					)
					->addColumn(
						'status',
						\Magento\Framework\DB\Ddl\Table::TYPE_INTEGER,
						1,
						[],
						'Post Status'
					)
					->addColumn(
						'featured_image',
						\Magento\Framework\DB\Ddl\Table::TYPE_TEXT,
						255,
						[],
						'Post Featured Image'
					)
					->addColumn(
						'created_at',
						\Magento\Framework\DB\Ddl\Table::TYPE_TIMESTAMP,
						null,
						['nullable' => false, 'default' => \Magento\Framework\DB\Ddl\Table::TIMESTAMP_INIT],
						'Created At'
					)->addColumn(
						'updated_at',
						\Magento\Framework\DB\Ddl\Table::TYPE_TIMESTAMP,
						null,
						['nullable' => false, 'default' => \Magento\Framework\DB\Ddl\Table::TIMESTAMP_INIT_UPDATE],
						'Updated At')
					->setComment('Post Table');
				$installer->getConnection()->createTable($table);

				$installer->getConnection()->addIndex(
					$installer->getTable('mageplaza_helloworld_post'),
					$setup->getIdxName(
						$installer->getTable('mageplaza_helloworld_post'),
						['name','url_key','post_content','tags','featured_image'],
						\Magento\Framework\DB\Adapter\AdapterInterface::INDEX_TYPE_FULLTEXT
					),
					['name','url_key','post_content','tags','featured_image'],
					\Magento\Framework\DB\Adapter\AdapterInterface::INDEX_TYPE_FULLTEXT
				);
			}
		}

		$installer->endSetup();
	}
}
After this please run this command line:
php bin/magento setup:upgrade
When you run upgrade completed, please continue run deploy like this
php bin/magento setup:static-content:deploy
Now checking your database, you will see a table with name mageplaza_helloworld_post and above columns. If this table is not created, it may be because you ran the above command line before you add content to InstallSchema.php. To fix this, you need remove the information that let Magento know your module has installed in the system. Please open the table ‘setup_module’, find and remove a row has module equals to mageplaza_helloworld_post. After this, run the command again to install the table.
This InstallSchema.php is used to create database structure. If you want to install the data to the table which you was created, you need to use InstallData.php file:
app/code/Mageplaza/HelloWorld/Setup/InstallData.php
Please take a look in some InstallData file in Magento to know how to use it. This’s some file you can see:
- vendor/magento/module-tax/Setup/InstallData.php
- vendor/magento/module-customer/Setup/InstallData.php
- vendor/magento/module-catalog/Setup/InstallData.php
As I said above, those install file will be used for first time install the Magento 2 module. If you want to change the database when upgrade module, please try to use UpgradeSchema.php and UpgradeData.php.
Step 2: Create Model
Model is a huge path of MVC architecture. In Magento 2 CRUD, models have many different functions such as manage data, install or upgrade module. In this tutorial, I only talk about data management CRUD. We have to create Model, Resource Model Collection to manage data in table: mageplaza_helloworld_post as I mentioned above.
Now we will create the model file:
app/code/Mageplaza/HelloWorld/Model/Post.php
And this is the content of that file:
<?php
namespace Mageplaza\HelloWorld\Model;
class Post extends \Magento\Framework\Model\AbstractModel implements \Magento\Framework\DataObject\IdentityInterface
{
	const CACHE_TAG = 'mageplaza_helloworld_post';

	protected $_cacheTag = 'mageplaza_helloworld_post';

	protected $_eventPrefix = 'mageplaza_helloworld_post';

	protected function _construct()
	{
		$this->_init('Mageplaza\HelloWorld\Model\ResourceModel\Post');
	}

	public function getIdentities()
	{
		return [self::CACHE_TAG . '_' . $this->getId()];
	}

	public function getDefaultValues()
	{
		$values = [];

		return $values;
	}
}
This model class will extends AbstractModel class Magento\Framework\Model\AbstractModel and implements \Magento\Framework\DataObject\IdentityInterface. The IdentityInterface will force Model class define the getIdentities() method which will return a unique id for the model. You must only use this interface if your model required cache clear after database operation and render information to the frontend page.
The _construct() method will be called whenever a model is instantiated. Every CRUD model have to use the _construct() method to call _init() method. This _init() method will define the resource model which will actually fetch the information from the database. As above, we define the resource model Mageplaza\Post\Model\ResourceModel\Post
The last thing about model is some variable which you should you in your model:
$_eventPrefix- a prefix for events to be triggered$_eventObject- a object name when access in event$_cacheTag- a unique identifier for use within caching
Step 3: Create Resource Model
As you know, the model file contain overall database logic, it do not execute sql queries. The resource model will do that. Now we will create the Resource Model for this table:
app/code/Mageplaza/HelloWorld/Model/ResourceModel/Post.php
Content for this file:
<?php
namespace Mageplaza\HelloWorld\Model\ResourceModel;


class Post extends \Magento\Framework\Model\ResourceModel\Db\AbstractDb
{

	public function __construct(
		\Magento\Framework\Model\ResourceModel\Db\Context $context
	)
	{
		parent::__construct($context);
	}

	protected function _construct()
	{
		$this->_init('mageplaza_helloworld_post', 'post_id');
	}

}
Every CRUD resource model in Magento must extends abstract class \Magento\Framework\Model\ResourceModel\Db\AbstractDb which contain the functions for fetching information from database.
Like model class, this resource model class will have required method _construct(). This method will call _init() function to define the table name and primary key for that table. In this example, we have table mageplaza_helloworld_post and the primary key post_id.
Step 4: Create Resource Model Collection - Get Model Collection
The collection model is considered a resource model which allows us to filter and fetch a collection table data. The collection model will be placed in:
app/code/Mageplaza/HelloWorld/Model/ResourceModel/Post/Collection.php
The content for this file:
<?php
namespace Mageplaza\HelloWorld\Model\ResourceModel\Post;

class Collection extends \Magento\Framework\Model\ResourceModel\Db\Collection\AbstractCollection
{
	protected $_idFieldName = 'post_id';
	protected $_eventPrefix = 'mageplaza_helloworld_post_collection';
	protected $_eventObject = 'post_collection';

	/**
	 * Define resource model
	 *
	 * @return void
	 */
	protected function _construct()
	{
		$this->_init('Mageplaza\HelloWorld\Model\Post', 'Mageplaza\HelloWorld\Model\ResourceModel\Post');
	}

}
The CRUD collection class must extends from \Magento\Framework\Model\ResourceModel\Db\Collection\AbstractCollection and call the _init() method to init the model, resource model in _construct() function.
Step 5: Factory Object
We are done with creating the database table, CRUD model, resource model, and collection. So how to use them?
In this part, we will talk about Factory Object for model. As you know in OOP, a factory method will be used to instantiate an object. In Magento, the Factory Object do the same thing.
The Factory class name is the name of Model class and is append with the ‘Factory’ word. So for our example, we will have PostFactory class. You must not create this class. Magento will create it for you. Whenever Magento’s object manager encounters a class name that ends in the word ‘Factory’, it will automatically generate the Factory class in the var/generation folder if the class does not already exist. You will see the factory class in
var/generation/<vendor_name>/<module_name>/Model/ClassFactory.php
In this case, it will be:
var/generation/Mageplaza/HelloWorld/Model/PostFactory.php
To instantiate a model object we will use automatic constructor dependency injection to inject a factory object, then use factory object to instantiate the model object.
For example, we will call the model to get data in controller.
app/code/Mageplaza/HelloWorld/Controller/Index/Index.php
Content for this file:
<?php
namespace Mageplaza\HelloWorld\Controller\Index;
class Index extends \Magento\Framework\App\Action\Action
{
protected $_pageFactory;
protected $_postFactory;
public function __construct(
\Magento\Framework\App\Action\Context $context,
\Magento\Framework\View\Result\PageFactory $pageFactory,
\Mageplaza\HelloWorld\Model\PostFactory $postFactory
)
{
$this->_pageFactory = $pageFactory;
$this->_postFactory = $postFactory;
return parent::__construct($context);
}
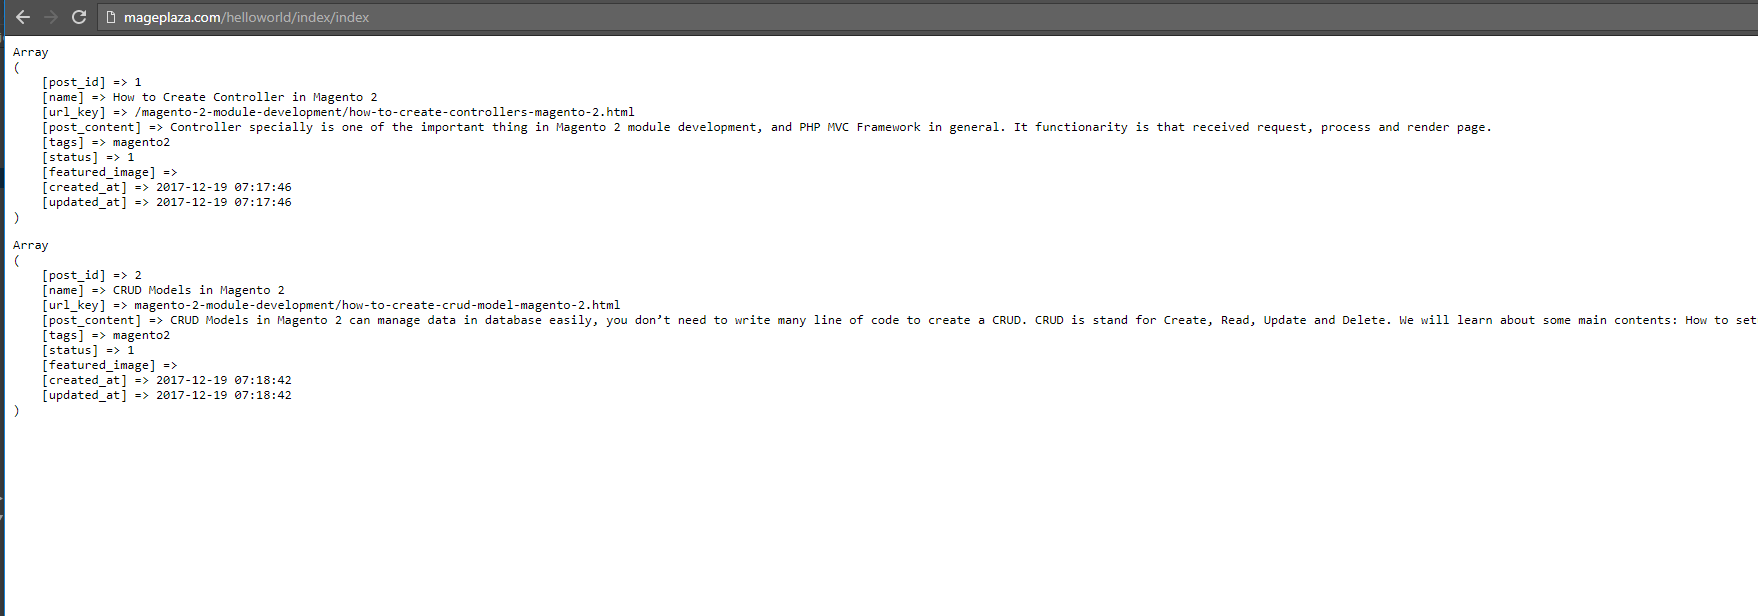
public function execute()
{
$post = $this->_postFactory->create();
$collection = $post->getCollection();
foreach($collection as $item){
echo "<pre>";
print_r($item->getData());
echo "</pre>";
}
exit();
return $this->_pageFactory->create();
}
}
As you see in this controller, the PostFactory object will be created in the _construct() function. In the execute() function, we use $post = $this->_postFactory->create(); to create the model object.
Now, You need to go to phpmyadmin and open mageplaza_helloworld_post table to add some records to test post model work.
After completing, let’s open browser and navigate to
http://<yourhost.com>/helloworld/index/index
and see the result.
Available sample model on Github
If you got this error message: Exception printing is disabled by default for security reasons, this topic might help you.
Website Support
& Maintenance Services
& Maintenance Services
Make sure your store is not only in good shape but also thriving with a professional team yet at an affordable price.
Get Started
Related Post
x

Jacker is the Chief Technology Officer (CTO) at Mageplaza, bringing over 10 years of experience in Magento, Shopify, and other eCommerce platforms. With deep technical expertise, he has led numerous successful projects, optimizing and scaling online stores for global brands. Beyond his work in eCommerce development, he is passionate about running and swimming.
Related Post


How to Enable DebugView in GA4 for your Magento 2 store - Mageplaza
Step-by-step guide to enabling GA4 DebugView for Magento 2 merchants — verify your GA4 events are firing correctly before trusting your data.
9 mins read
|
06-09-2026

Table Rate Shipping in eCommerce: A Practical Guide
Master Magento 2 Table Rate Shipping. Learn how to configure an accurate, automated shipping matrix to optimize your checkout and boost sales.
11 mins read
|
06-02-2026
3 mins read
|
05-30-2026

Google Analytics Ecommerce Reports for Magento Merchants: What to track & Tips
A practical guide to GA4 ecommerce reports for Magento merchants, covering what to track, how to read each report, and specific tips to turn data into revenue decisions.
19 mins read
|
05-20-2026

5 Ways to Hide Products on Shopify (2026 Guide)
Explore the best 5 ways to hide products on Shopify. Learn how to manage visibility, protect pricing, and create a tailored shopping experience for buyers.
19 mins read
|
05-16-2026
5 mins read
|
06-30-2026
How to Enable DebugView in GA4 for your Magento 2 store - Mageplaza
Step-by-step guide to enabling GA4 DebugView for Magento 2 merchants — verify your GA4 events are firing correctly before trusting your data.
9 mins read
|
06-09-2026
Table Rate Shipping in eCommerce: A Practical Guide
Master Magento 2 Table Rate Shipping. Learn how to configure an accurate, automated shipping matrix to optimize your checkout and boost sales.
11 mins read
|
06-02-2026
3 mins read
|
05-30-2026
Google Analytics Ecommerce Reports for Magento Merchants: What to track & Tips
A practical guide to GA4 ecommerce reports for Magento merchants, covering what to track, how to read each report, and specific tips to turn data into revenue decisions.
19 mins read
|
05-20-2026
5 Ways to Hide Products on Shopify (2026 Guide)
Explore the best 5 ways to hide products on Shopify. Learn how to manage visibility, protect pricing, and create a tailored shopping experience for buyers.
19 mins read
|
05-16-2026