

6 mins read
|
04-30-2026
How to customize a checkout step in Magento 2
Vinh Jacker | 03-17-2025
How to edit the custom style of checkout step
Customize the style of a checkout step means removing , disabling or adding a component in the checkout page.
Using custom checkout steps enables you to create special checkout steps that are visible to your customers and support them during the checkout process.
Since the topic covers quite a wide range, We will start with the example from Magento Official Devdocs document. And then we will add our own component (newsletter register component)
Related Topics
- Add a custom checkout field in Magento 2
- Magento 2 checkout extension
- How to add a new input form to checkout
- How to add a new step in checkout page
Customize the style of a checkout step.
You should know how to create a basic Magento 2 module. All of customized files will be inside this module.
Let’s begin.
Step 1: Understand the example from Devdocs document.
Devdocs gives us the example from Magento Shipping module which creates a policy component.
Here is the code that adds the component to the layout.
<item name="shipping_policy" xsi:type="array">
  <item name="component" xsi:type="string">Magento_Shipping/js/view/checkout/shipping/shipping-policy</item>
</item>
As you can see, the component is just a javascript file (js). Let’s open it vendor/magento/module-shipping/view/frontend/web/js/view/checkout/shipping/shipping-policy.js
/**
 * Copyright © 2013-2017 Magento, Inc. All rights reserved.
 * See COPYING.txt for license details.
 */
define([
    'uiComponent',
    'Magento_Shipping/js/model/config'

], function (Component, config) {
    'use strict';

    return Component.extend({
        defaults: {
            template: 'Magento_Shipping/checkout/shipping/shipping-policy'
        },
        config: config()
    });
});
Not much here, it just defines its template vendor/magento/module-shipping/view/frontend/web/template/checkout/shipping/shipping-policy.html
So to conclude, a component contains a js and take a html file as its template.
Step 2: Add our new Newsletter Register component.
Step 2.1: Create a js file.
Create the newsletter.js file under Mageplaza/HelloWorld/view/frontend/web/js/view directory.
The code:
define(
    [
        'ko',
        'uiComponent'
    ],
    function (ko, Component) {
        "use strict";

        return Component.extend({
            defaults: {
                template: 'Mageplaza_HelloWorld/newsletter'
            },
            isRegisterNewsletter: true
        });
    }
);
Step 2.2: Create the template html file.
Create the newsletter.html file under Mageplaza/HelloWorld/view/frontend/web/template directory.
The code:
<div class="col-mp mp-12">
    <input type="checkbox" name="newsletter" data-bind="checked: isRegisterNewsletter, attr: {id: 'place-order-newsletter'}"/>
    <label data-bind="attr: {for: 'place-order-newsletter'}"><span data-bind="i18n: 'Register for newsletter'"></span></label>
</div>
Step 2.3: Add our component to the checkout page’s layout.
Add the following code to Mageplaza/HelloWorld/view/frontend/layout/checkout_index_index.xml
We add our component just before the shippingMethod form.
<page xmlns:xsi="http://www.w3.org/2001/XMLSchema-instance" layout="1column" xsi:noNamespaceSchemaLocation="urn:magento:framework:View/Layout/etc/page_configuration.xsd">
    <body>
        <referenceBlock name="checkout.root">
                <arguments>
                    <argument name="jsLayout" xsi:type="array">
                        <item name="components" xsi:type="array">
                            <item name="checkout" xsi:type="array">
                                <item name="children" xsi:type="array">
                                    <item name="steps" xsi:type="array">
                                        <item name="children" xsi:type="array">
                                            <!-- Modifying an existing step-->
                                            <item name="shipping-step" xsi:type="array">
                                                <item name="children" xsi:type="array">
                                                    <item name="shippingAddress" xsi:type="array">
                                                        <item name="children" xsi:type="array">
                                                            <item name="before-form" xsi:type="array">
                                                                <item name="children" xsi:type="array">
                                                                    <item name="newsletter" xsi:type="array">
                                                                        <item name="component" xsi:type="string">Mageplaza_HelloWorld/js/view/newsletter</item>
                                                                    </item>
                                                                </item>
                                                            </item>
                                                        </item>
                                                    </item>
                                                </item>
                                            </item>

                                        </item>
                                    </item>
                                </item>
                            </item>
                        </item>
                    </argument>
                </arguments>
        </referenceBlock>
    </body>
</page>
Clean cache, refresh your browser, the result will appear like this
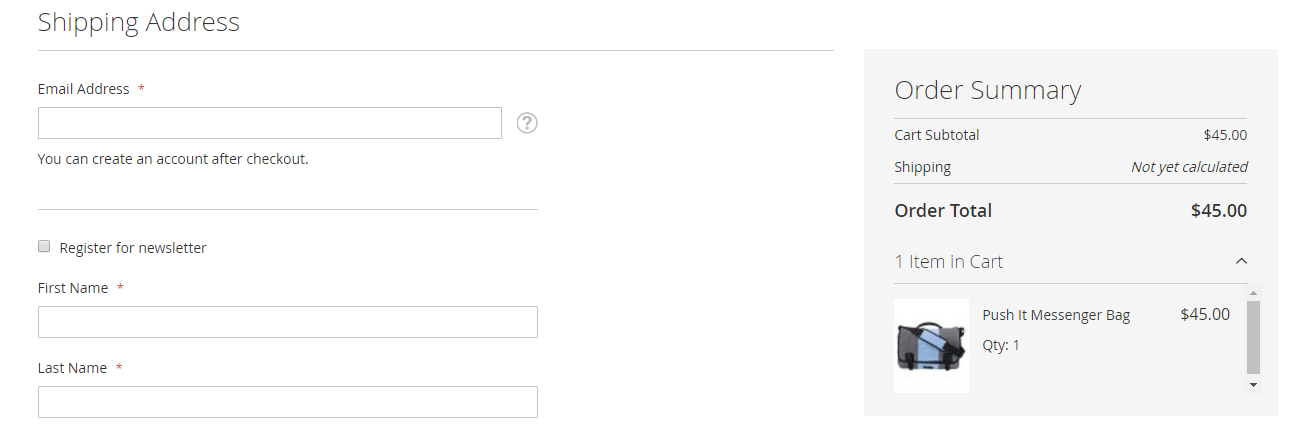
Step 2.4: Disable newsletter register component.
Here is the code to disable a component.
<item name="config" xsi:type="array">
       <item name="componentDisabled" xsi:type="boolean">true</item>
</item>
How it is in the whole node
<item name="newsletter" xsi:type="array">
       <item name="component" xsi:type="string">Mageplaza_HelloWorld/js/view/newsletter</item>
       <item name="config" xsi:type="array">
             <item name="componentDisabled" xsi:type="boolean">true</item>
       </item>
</item>
Step 2.5: Remove our component.
To remove a component, you need to create a plugin for the \Magento\Checkout\Block\Checkout\LayoutProcessor::process method. And implement the around method. This is what Devdocs advices.
As suggested, we implement the aroundProcess method and add the following code
public function aroundProcess($subject, $proceed, $jsLayout)
{
        unset($jsLayout['components']['checkout']['children']['steps']['children']['shipping-step']['children']['shippingAddress']['children']['before-form']['children']['newsletter']);
        $returnValue = $proceed($jsLayout);
        return $returnValue;
}
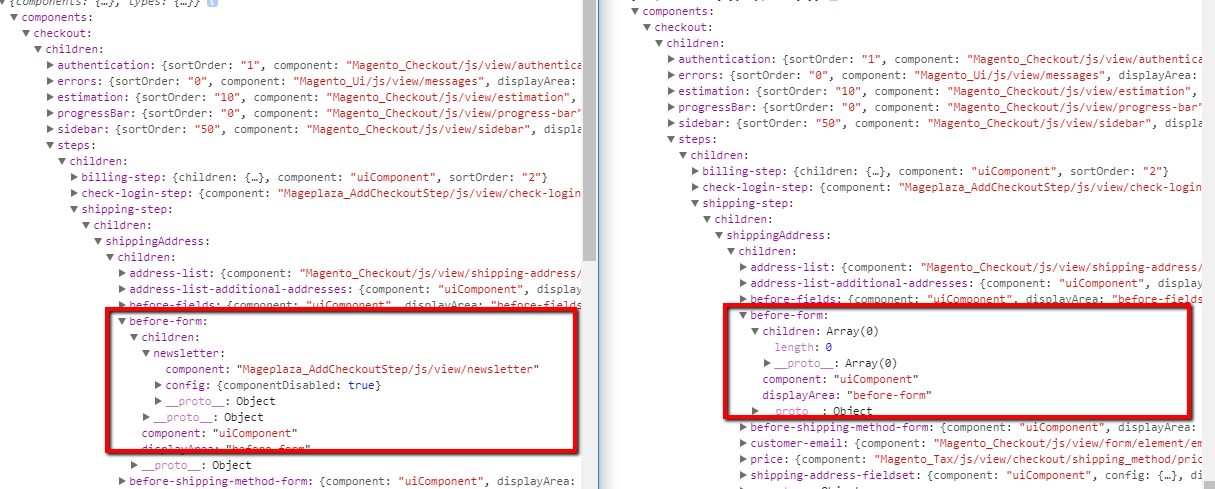
Here is the difference between Disabling and Removing a component when rendering in real time
Conclusion
This tutorial has shown you how to customize a checkout step in Magento 2, using the newsletter register component as an example to demonstrate adding, disabling, or removing elements from the checkout flow. By applying similar techniques, you can tailor each step to fit your store’s needs and create a smoother customer experience. If you’d like to go further and capture additional customer details during checkout, our guide on adding custom fields to Magento 2 checkout programmatically will walk you through the entire process from setup to data persistence
x

Jacker is the Chief Technology Officer (CTO) at Mageplaza, bringing over 10 years of experience in Magento, Shopify, and other eCommerce platforms. With deep technical expertise, he has led numerous successful projects, optimizing and scaling online stores for global brands. Beyond his work in eCommerce development, he is passionate about running and swimming.
Related Post

Magento 2 Abandoned Cart Tracking: How to Measure Recovery Performance
Learn how to track and measure abandoned cart recovery performance in Magento 2 such as KPIs, native reporting gaps, and how to use Mageplaza's built-in ACE reports to find what's working and optimize your emails.
15 mins read
|
03-17-2025

What is a Hyvä Developer? What They Do, Cost & How to Choose (2026) - Mageplaza
Learn what a Hyvä developer does, how much it costs, and how to choose the right one. A complete guide for Magento merchants planning a Hyvä project.
15 mins read
|
04-21-2026
How to Build Customer Loyalty in E-commerce: 7 Proven Strategies
Discover how to build a customer loyalty system that drives repeat purchases and long-term growth, with actionable tactics for every store size.
17 mins read
|
04-20-2026

GTM Debugging on Magento: A Complete Troubleshooting Guide
GTM not working on your Magento store? This guide shows you exactly where tracking breaks and how to fix it, from product pages to order confirmation.
15 mins read
|
04-20-2026

Google Analytics Ecommerce Reports for Magento Merchants: What to track & Tips
A practical guide to GA4 ecommerce reports for Magento merchants, covering what to track, how to read each report, and specific tips to turn data into revenue decisions.
19 mins read
|
04-20-2026
6 mins read
|
04-30-2026
Magento 2 Abandoned Cart Tracking: How to Measure Recovery Performance
Learn how to track and measure abandoned cart recovery performance in Magento 2 such as KPIs, native reporting gaps, and how to use Mageplaza's built-in ACE reports to find what's working and optimize your emails.
15 mins read
|
03-17-2025
What is a Hyvä Developer? What They Do, Cost & How to Choose (2026) - Mageplaza
Learn what a Hyvä developer does, how much it costs, and how to choose the right one. A complete guide for Magento merchants planning a Hyvä project.
15 mins read
|
04-21-2026
How to Build Customer Loyalty in E-commerce: 7 Proven Strategies
Discover how to build a customer loyalty system that drives repeat purchases and long-term growth, with actionable tactics for every store size.
17 mins read
|
04-20-2026
GTM Debugging on Magento: A Complete Troubleshooting Guide
GTM not working on your Magento store? This guide shows you exactly where tracking breaks and how to fix it, from product pages to order confirmation.
15 mins read
|
04-20-2026
Google Analytics Ecommerce Reports for Magento Merchants: What to track & Tips
A practical guide to GA4 ecommerce reports for Magento merchants, covering what to track, how to read each report, and specific tips to turn data into revenue decisions.
19 mins read
|
04-20-2026