


6 mins read
|
04-30-2026
How to Add Sticky Header Component in Magento 2
Vinh Jacker | 03-17-2025

In today’s guide, we’ll explore how to add the Sticky Header Component in Magento 2.
A sticky header remains fixed at the top of the page even as the user scrolls down. It typically includes essential elements such as the main menu, top links, shopping cart, and logo, ensuring they are always accessible. In a Magento 2 store, the sticky header can also facilitate shopping by displaying product details like the name, image, price, and an add-to-cart option, regardless of how far the user has scrolled on the product page.
You’ll notice this sticky header feature on the Magento 2 Admin product management page, providing constant access to key functionalities.
Sticky Header Component allows keeping Header on the fixed-top during the scrolling by the user. That is supported by Sticky, one of the popular effects you can set for the header in your website. With the sticky header component, it is easier for better tracking. It’s also convenient for customers because they can add any product to the cart even when they are scrolling down the product page to view product details. Specifically, as you go to the product management workplace, you will see the sticky header component:
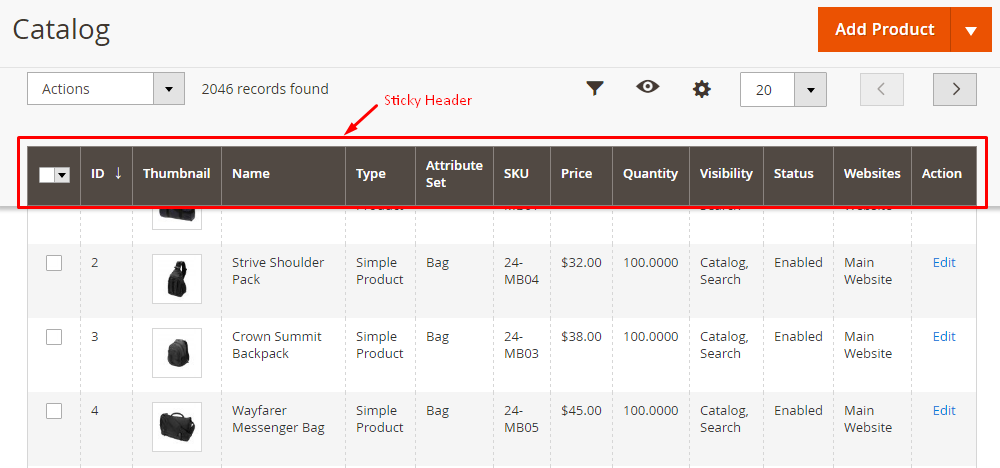
So how is the sticky header component created in Magento 2?
Magento 2 Sticky Header Component
- The sticky is applied for the display of the grid with the configuration:
<container name="sticky">
   <argument name="data" xsi:type="array">
       <item name="config" xsi:type="array">
           <item name="component" xsi:type="string">Magento_Ui/js/grid/sticky/sticky</item>
           <item name="toolbarProvider" xsi:type="string">...</item>
           <item name="listingProvider" xsi:type="string">...</item>
       </item>
   </argument>
</container>
- You can open the CMS page grid
vendor\magento\module-cms\view\adminhtml\ui_component\cms_page_listing.xmlto get more details
<container name="sticky">
   <argument name="data" xsi:type="array">
       <item name="config" xsi:type="array">
           <item name="component" xsi:type="string">Magento_Ui/js/grid/sticky/sticky</item>
           <item name="toolbarProvider" xsi:type="string">cms_page_listing.cms_page_listing.listing_top</item>
           <item name="listingProvider" xsi:type="string">cms_page_listing.cms_page_listing.cms_page_columns</item>
       </item>
   </argument>
</container>
- To change the template of the sticky header, you can use the following configuration:
<container name="listing_top">
   <argument name="data" xsi:type="array">
       <item name="config" xsi:type="array">
           <item name="template" xsi:type="string">ui/grid/toolbar</item>
           <item name="stickyTmpl" xsi:type="string">ui/grid/sticky/toolbar</item>
       </item>
   </argument>
</container>
By using the above settings, you will be able to activate the sticky header component on your Magento 2 site. Thanks for your reading!
Related Post
Conclusion
Follow this tutorial to add sticky header component in Magento 2. If you have any issue while following this tutorial or want to discuss more this topic, feel free to leave your opinion in the comments.
Thank you for reading!
x

Jacker is the Chief Technology Officer (CTO) at Mageplaza, bringing over 10 years of experience in Magento, Shopify, and other eCommerce platforms. With deep technical expertise, he has led numerous successful projects, optimizing and scaling online stores for global brands. Beyond his work in eCommerce development, he is passionate about running and swimming.
Related Post

Magento 2 Abandoned Cart Tracking: How to Measure Recovery Performance
Learn how to track and measure abandoned cart recovery performance in Magento 2 such as KPIs, native reporting gaps, and how to use Mageplaza's built-in ACE reports to find what's working and optimize your emails.
15 mins read
|
03-17-2025

What is a Hyvä Developer? What They Do, Cost & How to Choose (2026) - Mageplaza
Learn what a Hyvä developer does, how much it costs, and how to choose the right one. A complete guide for Magento merchants planning a Hyvä project.
15 mins read
|
04-21-2026

How to Build Customer Loyalty in E-commerce: 7 Proven Strategies
Discover how to build a customer loyalty system that drives repeat purchases and long-term growth, with actionable tactics for every store size.
17 mins read
|
04-20-2026

GTM Debugging on Magento: A Complete Troubleshooting Guide
GTM not working on your Magento store? This guide shows you exactly where tracking breaks and how to fix it, from product pages to order confirmation.
15 mins read
|
04-20-2026

Google Analytics Ecommerce Reports for Magento Merchants: What to track & Tips
A practical guide to GA4 ecommerce reports for Magento merchants, covering what to track, how to read each report, and specific tips to turn data into revenue decisions.
19 mins read
|
04-20-2026
6 mins read
|
04-30-2026
Magento 2 Abandoned Cart Tracking: How to Measure Recovery Performance
Learn how to track and measure abandoned cart recovery performance in Magento 2 such as KPIs, native reporting gaps, and how to use Mageplaza's built-in ACE reports to find what's working and optimize your emails.
15 mins read
|
03-17-2025
What is a Hyvä Developer? What They Do, Cost & How to Choose (2026) - Mageplaza
Learn what a Hyvä developer does, how much it costs, and how to choose the right one. A complete guide for Magento merchants planning a Hyvä project.
15 mins read
|
04-21-2026
How to Build Customer Loyalty in E-commerce: 7 Proven Strategies
Discover how to build a customer loyalty system that drives repeat purchases and long-term growth, with actionable tactics for every store size.
17 mins read
|
04-20-2026
GTM Debugging on Magento: A Complete Troubleshooting Guide
GTM not working on your Magento store? This guide shows you exactly where tracking breaks and how to fix it, from product pages to order confirmation.
15 mins read
|
04-20-2026
Google Analytics Ecommerce Reports for Magento Merchants: What to track & Tips
A practical guide to GA4 ecommerce reports for Magento merchants, covering what to track, how to read each report, and specific tips to turn data into revenue decisions.
19 mins read
|
04-20-2026