


5 mins read
|
07-30-2026
16 Steps to Speed Up Magento 2 to Optimize Your Store
Vinh Jacker | 03-17-2025
In the digital age, there are various ecommerce CMSs available in the market such as Shopify, Woocommerce, Magento, etc. Among those platforms, Magento can be considered as the most popular and widely used ecommerce platforms because it is the most robust, flexible, and best performance oriented alternative one. As a result, Magento 2, the latest update of this platform, become the first choice for a majority of ecommerce startups and online stores.
However, you can still have problems using Magento 2, and the most noticeable one is the slow speed of it. If you know where the problem is, fixing it can be done with ease. In this article, I will share with you the reasons which make Magento 2 slow, and how to speed up Magento 2 Store..
Why Magento 2 is slow
Magento’s speed is a critical aspect of user experience and can impact sales and search engine rankings. Magento is highly regarded as a top-tier CMS, favored for its unique functionality, outstanding features, and rapid performance. Although Magento demonstrates high performance with its default data, adding extra features, customizations, and third-party modules can lead to a decline in speed.
Here’s an in-depth look at why Magento is slow:
Inadequate Hosting
Resource Requirements: Magento is resource-intensive and requires adequate SSD storage, RAM, and SSL certificates.
Scalability: As your eCommerce store grows, the initial hosting may no longer suffice. Upgrading to a hosting solution tailored to Magento’s needs is essential for maintaining speed.
Poorly Configured Cache
Caching offloads resource-intensive tasks from the server, allowing for more efficient use of server resources. Given that server response times are largely contingent on the volume of requests and available resources, an improperly configured cache can extend load times, adversely affecting the user experience.
Code-Stuffed Theme & Extension
Additional code and features from themes and extensions can cause conflicts and slowdowns. Carefully choosing themes and extensions can prevent future performance issues. To identify specific reasons, you can use speed testing tools like Google PageSpeed Insights and GTmetrix. These tools provide detailed reports and actionable tips to improve Magento’s speed.
Say Goodbye to Slow Page Loading
Get Website Performance Audit. Speed it up - earn more sales & customer satisfaction.

16 steps to Speed up Magento 2
There are various ways which could help you to increase the speed of your Magento store. However, the basic requirement of running a Magento 2 is the thing that you need to know first. Besides, you also need to be aware of some Magento speed best practices in order to run a smooth Magento website. Below are several ways which you can refer to optimize your Magento website:
Step 1: Optimize Server and System Requirements
Server and System requirements can be considered as the two most important factors which can help you increase the speed of your Magento 2 website.
Server Requirements: Because Magento is a quite powerful store, instead of shared hosting for Magento, you should host your Magento store on a dedicated server or VPS hosting.
Step 2: Update latest version of Magento 2
When it comes to optimizing the speed of Magento, one of the most simple ways that you cannot forget to use is updating the latest version of it. Whenever Magento releases a new version, the performance, as well as other tweaks, will be improved significantly. Consequently, it is highly recommended that you upgrade your Magento 2 store to the latest version to improve the speed of your store’s site.
Related: The Ultimate Guide to Upgrade Magento 2
Step 3: Enable Varnish Cache
There are several practices which need to be implemented to speed up Magento site including the cache.
Below I will guide you the way to enable Varnish Cache in order to improve Magento 2 loading speed.
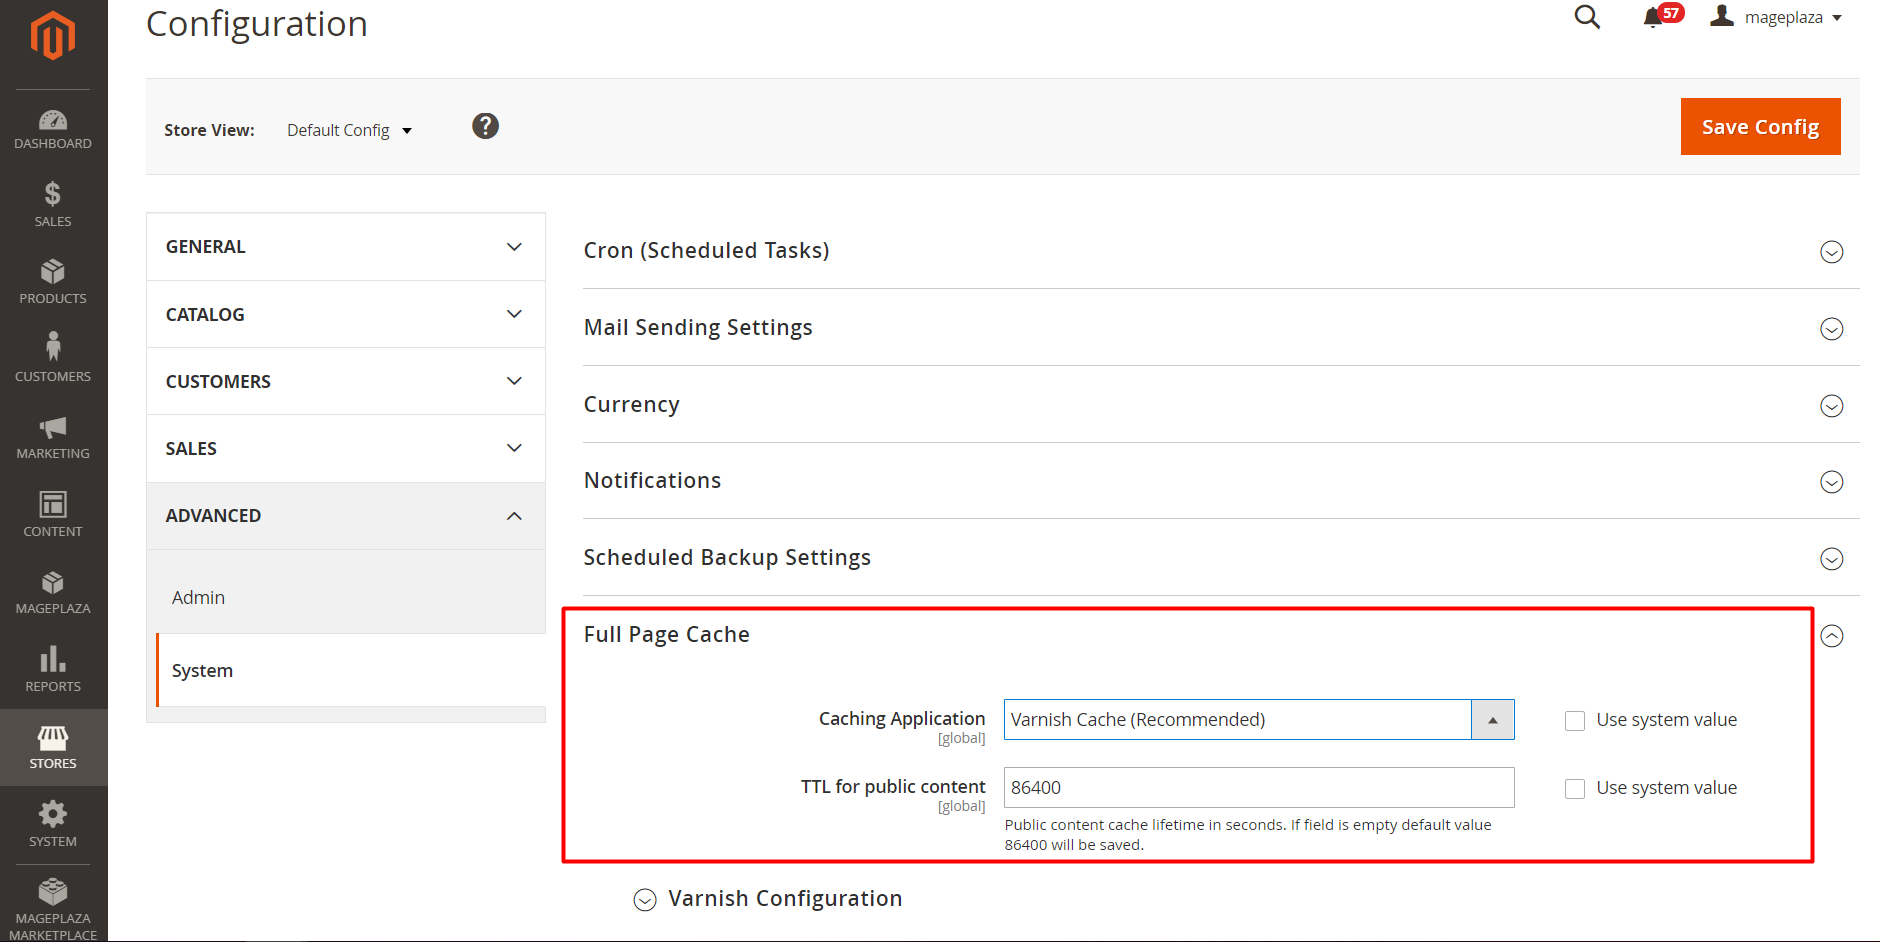
From the Admin panel, go to Store > Configuration > Advanced. Under the Advanced tab, click System, you will see the Full Page Cache section. In this section, you change the Caching Application field value from Built-in Cache to Varnish Caching.
Step 4: Configure Memcached
Elasticsearch delivers rapid full-text search functionality by operating its indexing service on the server, resulting in swift web content searches without scanning the entire database. For merchants managing extensive product catalogs, Elasticsearch serves as a solution to enhance search result and catalog page speed. In Magento 2.4.x and newer releases, Elasticsearch comes pre-enabled with default settings. However, for earlier versions, you can configure it using the following steps:
- Navigate to Stores → Settings → Configuration.
- Go to Catalog → Catalog → Catalog Search.
- Select Elasticsearch from the Search Engine.
- Click Save Config.
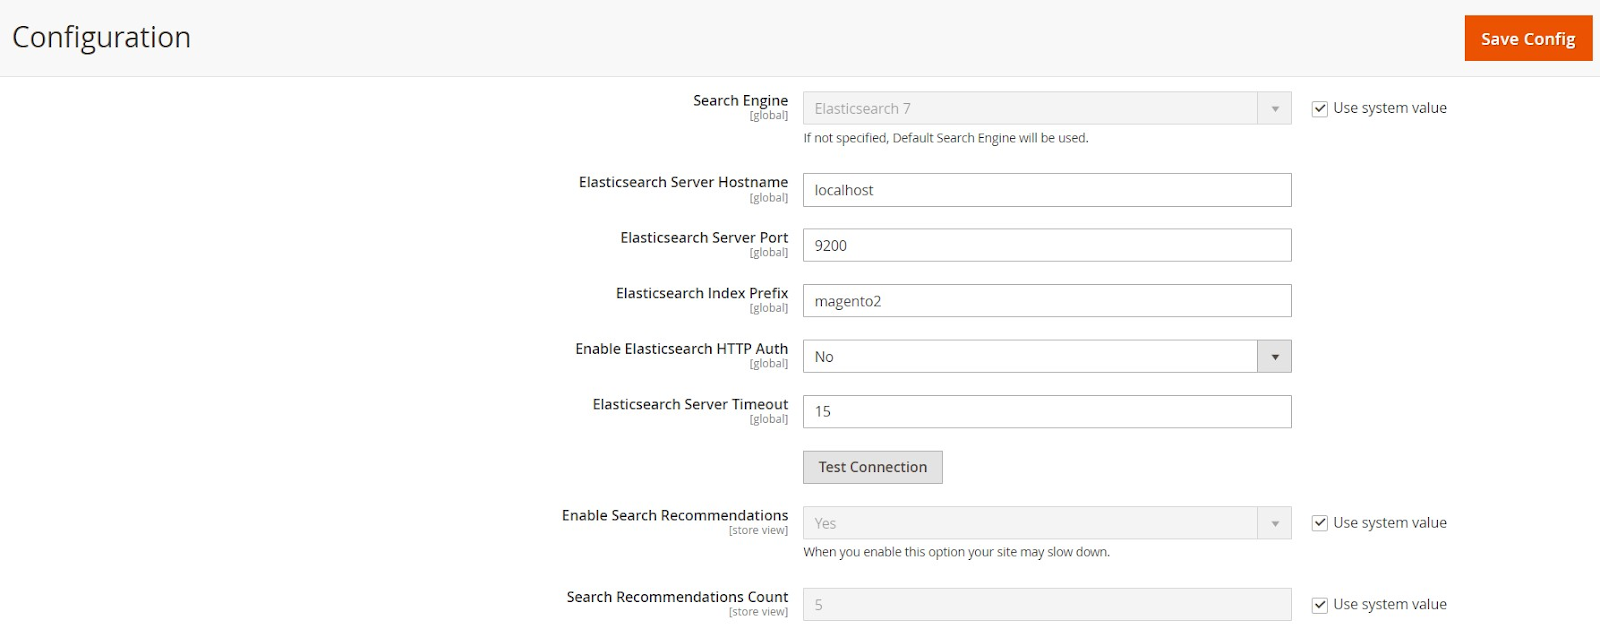
For more details, please refer to our blog: How To Configure Elasticsearch in Magento 2.
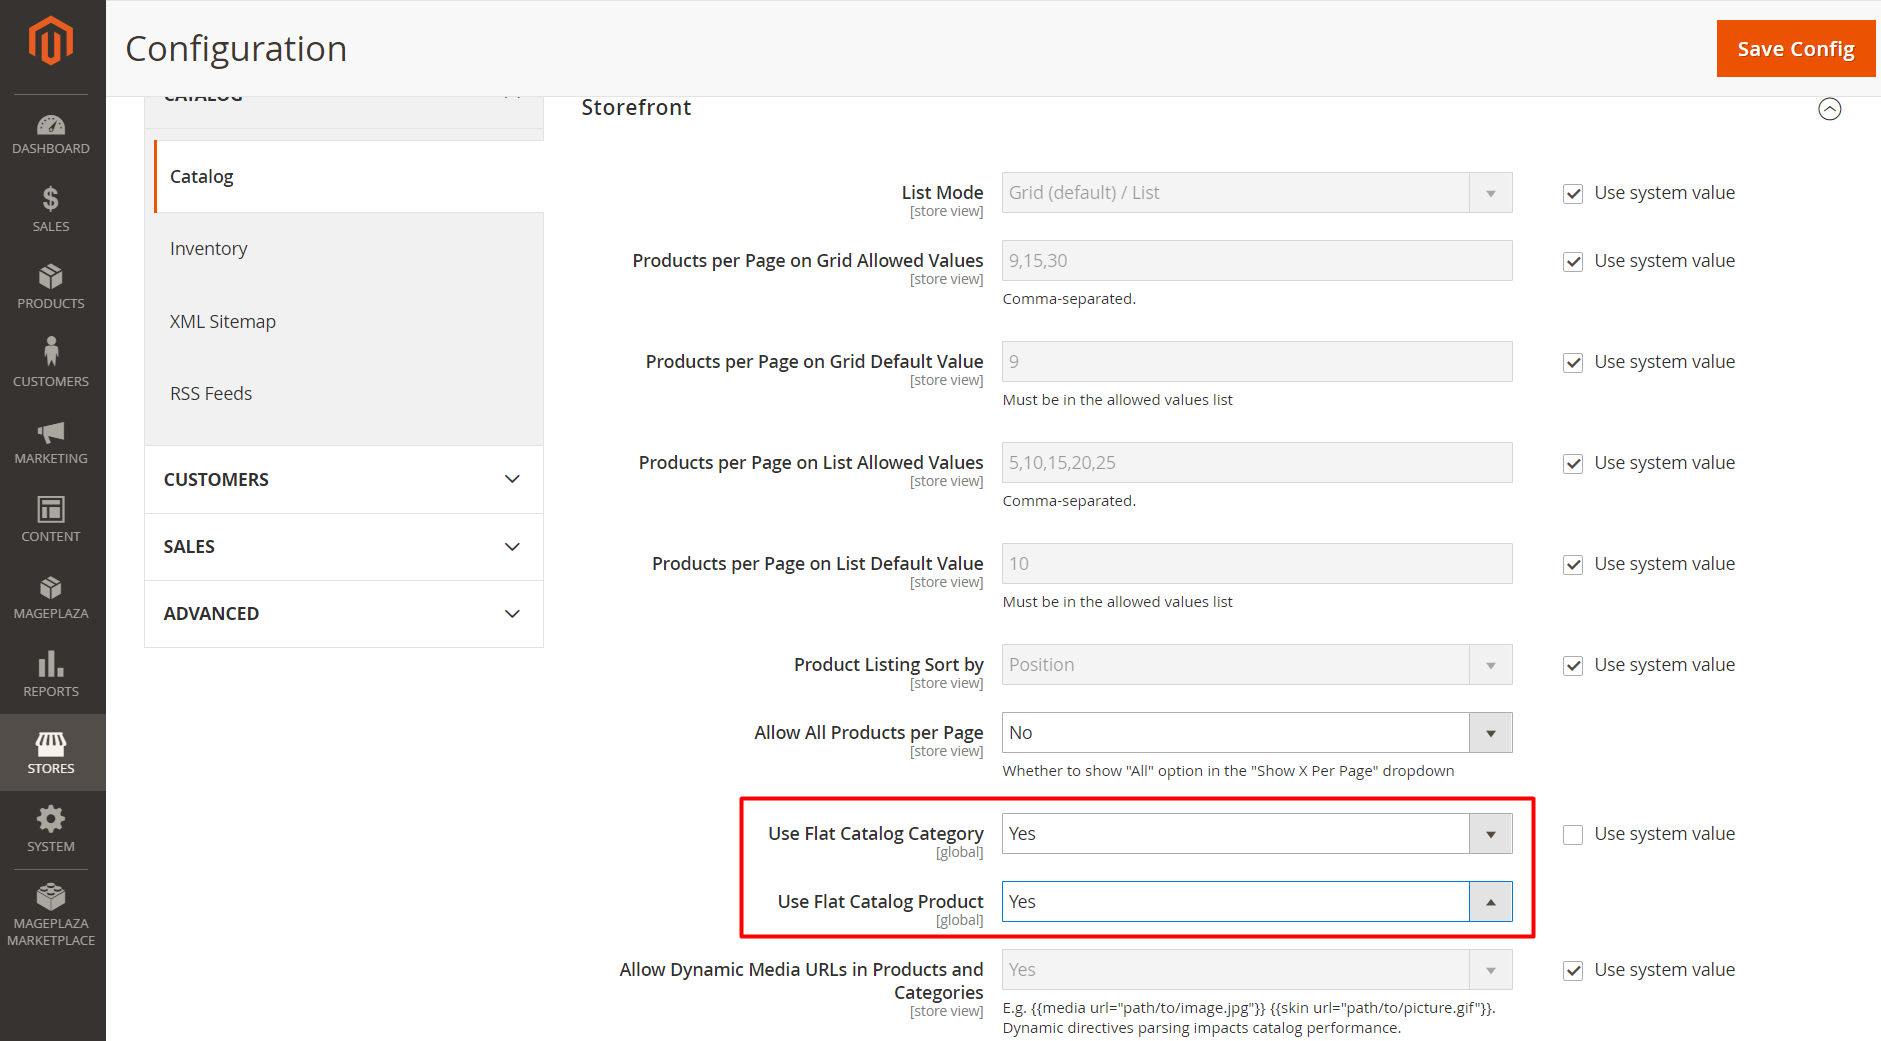
Step 5: Enable Flat Categories and Products
One of the most common reasons which make your Magento 2 site slowing down is the database’s read speed. To fix this issue, you can enable Flat Catalog.
Here is how you do it:
Firstly, go to your Magento store’s admin panel. Then follow this Store > Configuration > Catalog. Then click on Catalog which is under the Catalog tab. Here, you will see the Storefront section. When you have seen it, find two fields which are Use Flat Catalog Category and Use Flat Catalog Product, and change these fields to Yes.
Step 6: Optimize Javascript and CSS
Another reason which leads to the slow speed of Magento 2 is Javascript and CSS.
Following is the guide to minimize the Javascript and CSS in order to increase the speed of Magento 2:
From the Admin panel, go to Store > Configuration > Advanced. Under the Advanced tab, click Developer. In the Javascript Settings section, change the values in three fields Merge JavaScript Files, Enable JavaScript Bundling and Minify JavaScript Files to Yes. Then, change the fields Merge CSS Files and Minify CSS Files in the CSS Settings tab to Yes.
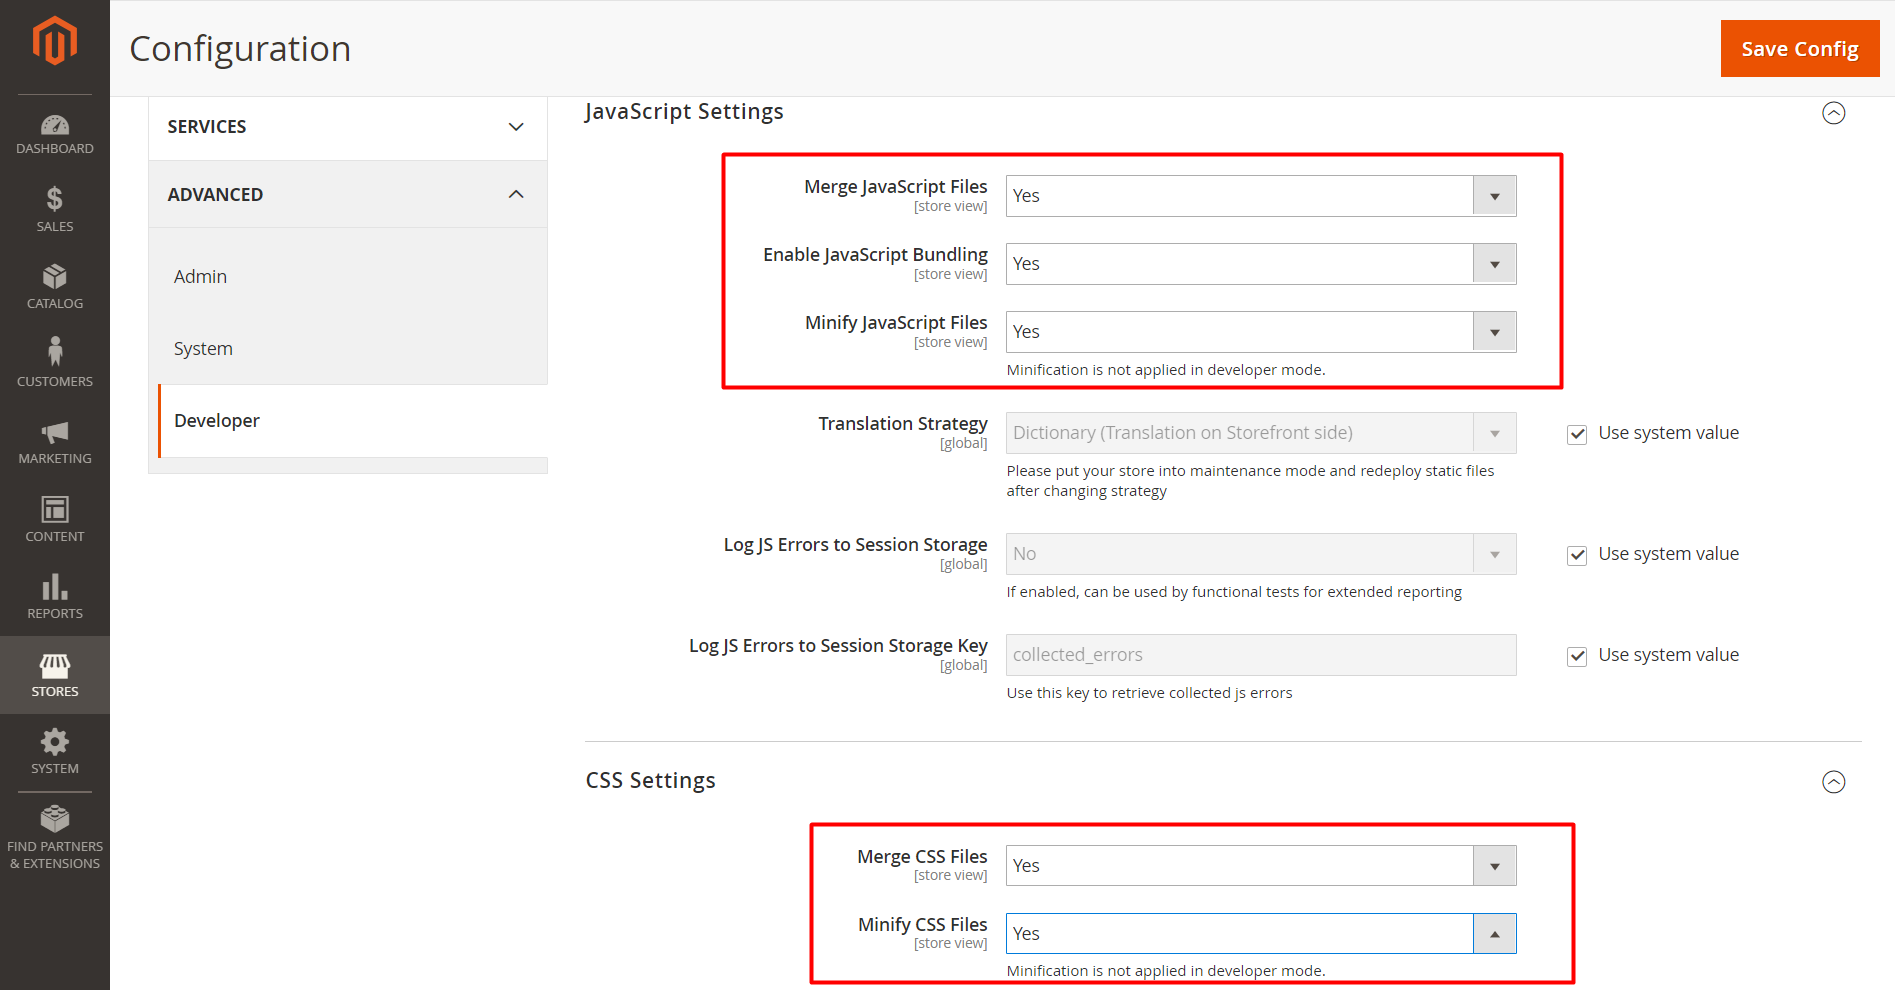
Additionally, you can use Mageplaza’s Magento 2 Google Tag Manager extension. This tool helps minimize redundant third-party scripts and also integrates with Google Analytics 4, enabling you to view performance reports for your Magento 2 store.
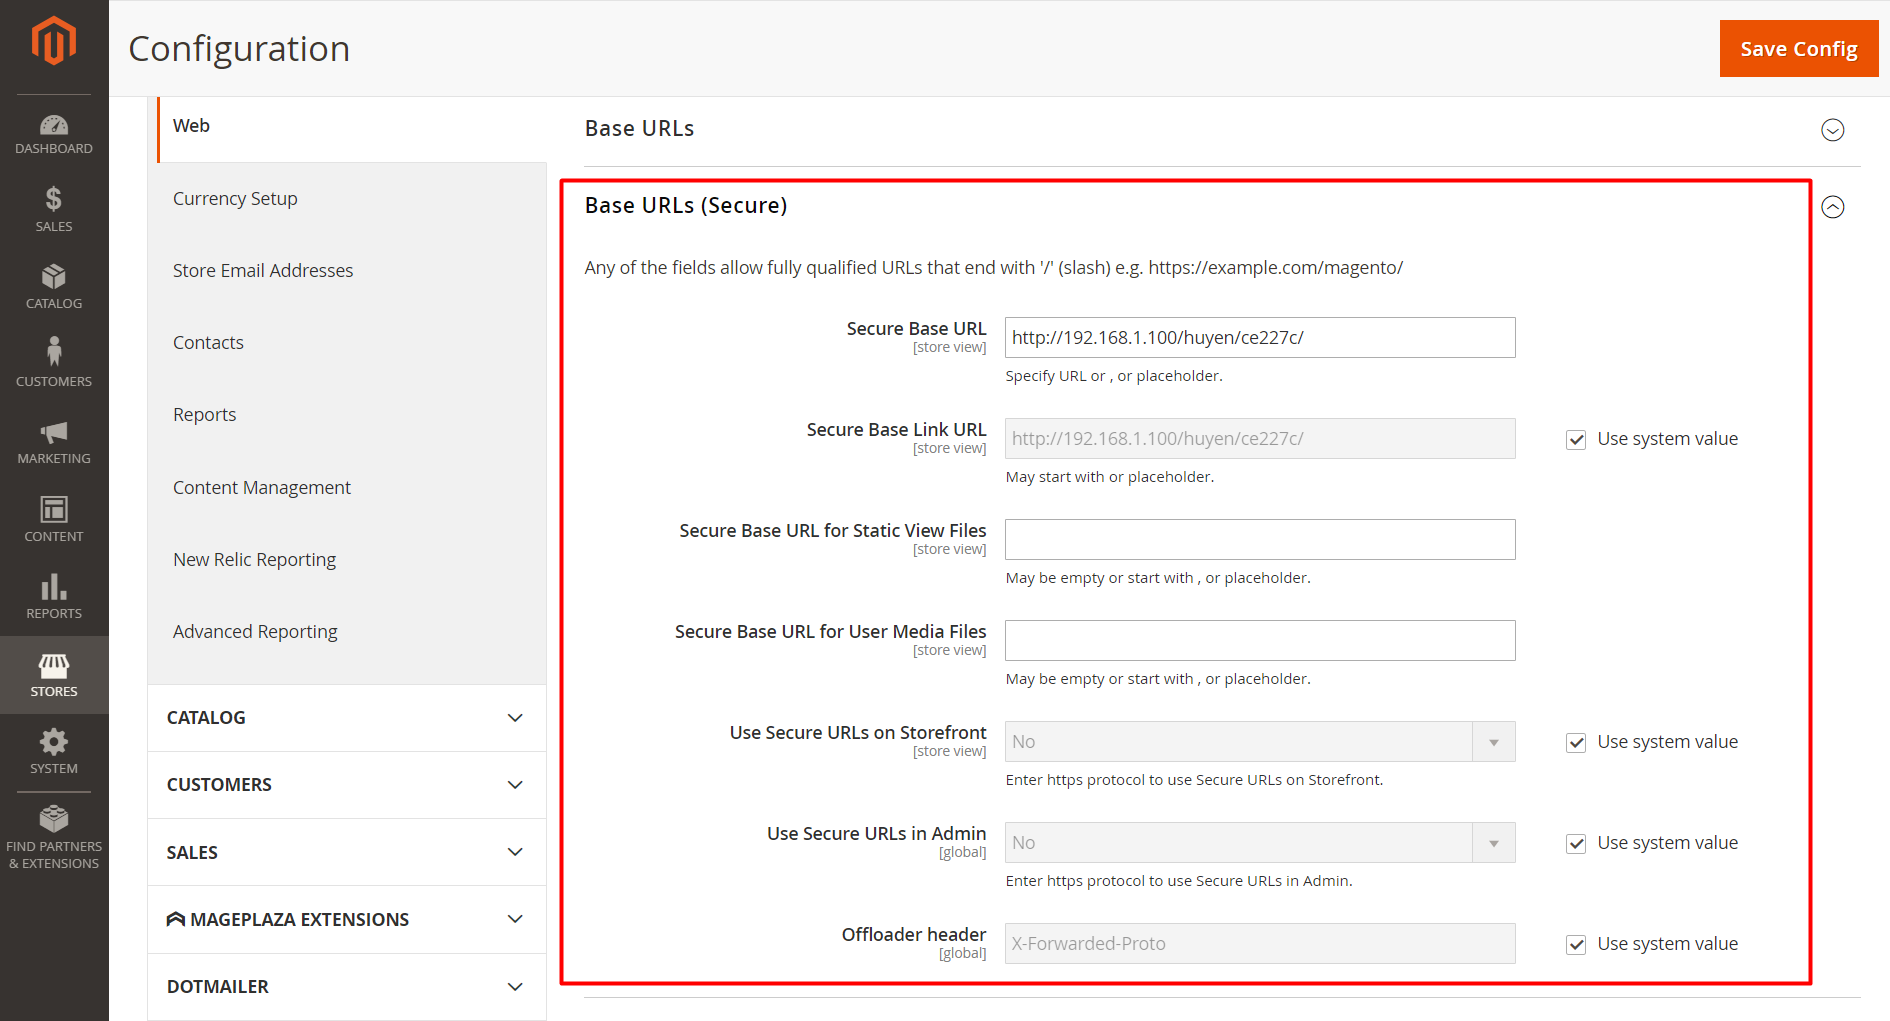
Step 7: Setup Content Delivery Network
You can also set up a Content Delivery Network to improve the speed of your Magento store.
From the Admin panel, go to Store > Configuration > General. Click Web which is under the General tab. Then, you can explore the Base URLS (Secure) section and add HTTPS URLs.
Related: How to Configure CDN in Magento 2
Step 8: Use a good theme
Enhancing Magento’s database performance is crucial due to issues like log space consumption. One common cause is the accumulation of logs, and removing them significantly improves database performance by reducing process execution delays. Important: Before implementing database changes, it’s advisable to create a recent backup.
Magento generates new log files automatically and regularly. Deleting old logs shouldn’t pose any issues. To configure log retention time:
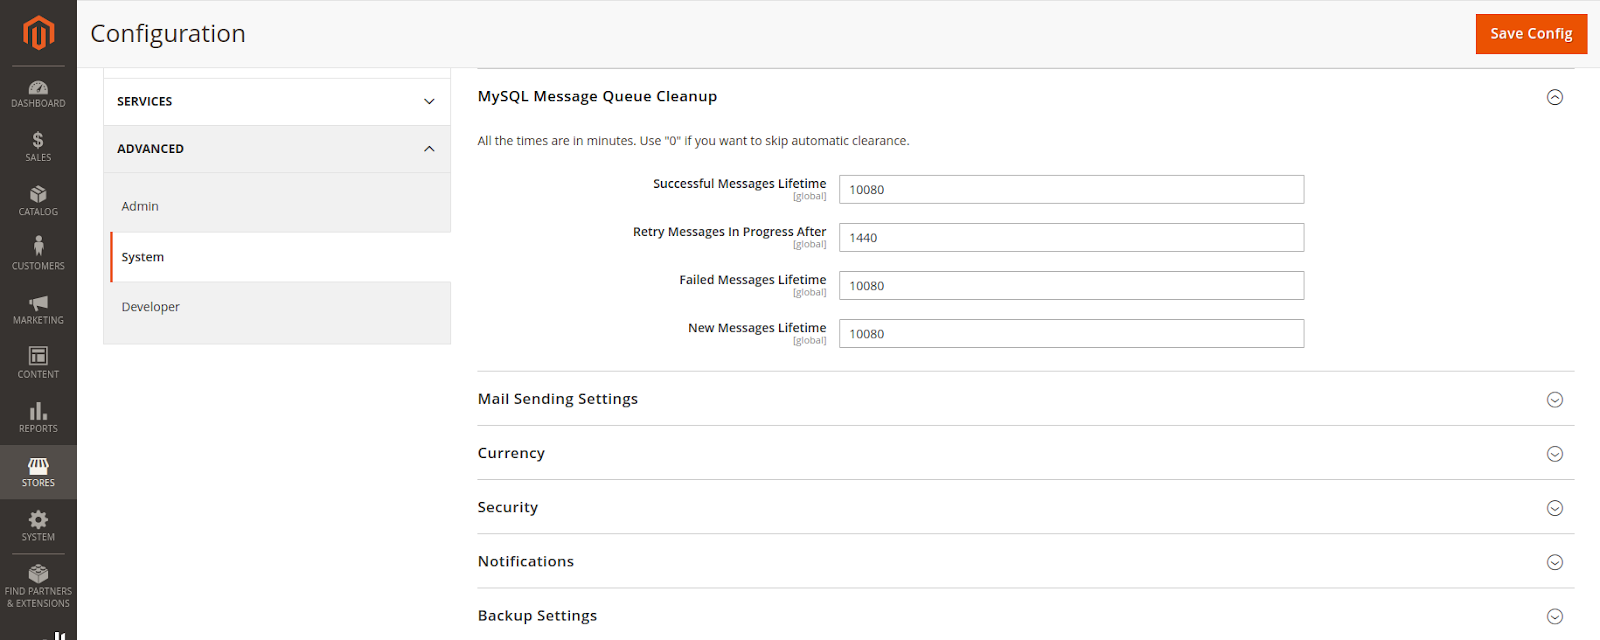
- Go to Stores → Configuration.
- Expand Advanced → System and access the MySQL Message Queue Cleanup section.
- Specify the desired time in New Messages Lifetime to automatically clean old log files.
- Save config after completion.
Step 9: Choose Extensions
Numerous users tend to use extensions without checking or confirming its safety. If it contains bugs, your Magento speed would definitely be affected. That is why you should always use a bug-free third-party extension for your Magento 2 store.
Related: The best extension collection for Magento 2
Step 10: Optimize Images
On your store site, there are tons of product images. This might slow down your Magento speed if these images are not optimized properly. Here are some key points in image optimization:
- Images need to be compressed.
- Using Image Otimizer module
- Your store’s logo should be in PNG or SVG format.
- The image of the product should be in JPEG format.
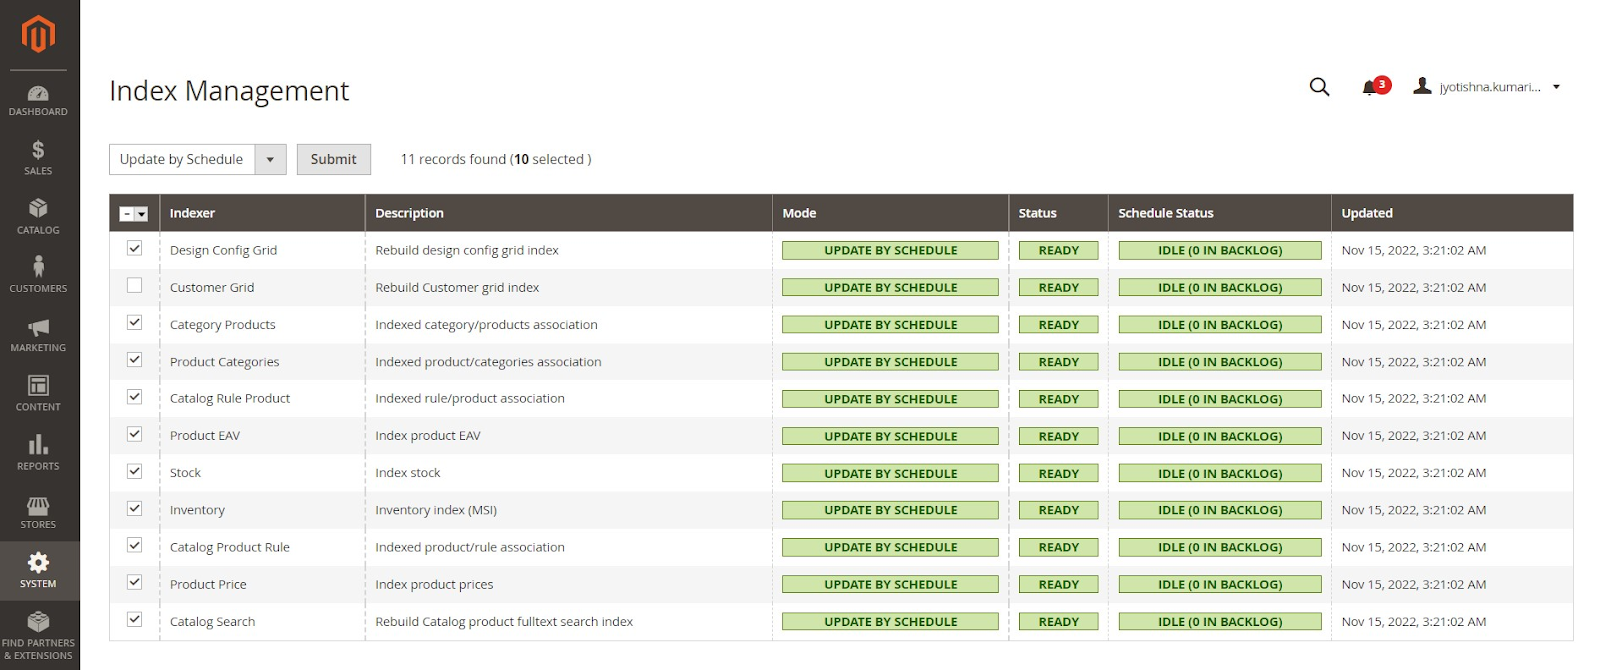
Step 11: Keep Indexers Updated
Magento enables the handling of large datasets, thereby decreasing loading times. To address this, Magento requires reindexing of its indexers since the core system automatically updates indexers for every stored object by default. Nevertheless, this process is not flawless, necessitating manual indexer updates.
Magento indexers offer two modes: “Update on Save” and “Update on Schedule.” Optimal configuration involves selecting the “Update on Schedule” mode, allowing for cron job execution at a user-defined time. It is advisable to schedule this process during periods of low website traffic.
You can do this in Magento Admin as follows:
Access the Magento Admin panel and go to System → Index Management. Choose all the indexers, and from the Actions dropdown, opt for Update by Schedule. Finally, click Submit to confirm and establish the schedule.
If you ever encounter an error where an indexer gets stuck or locked, you can follow this guide to unlock the reindex process in Magento 2 using the command line.
Step 12: Avoid Built-in Cache – Use Redis
In today’s context, optimizing Magento 2 speed and performance is a major concern. Various technologies, including Varnish, Redis, Nginx, and comprehensive full-page caching solutions, are integrated into Magento 2 speed optimization.
Use Memcached or Redis
To enhance performance, consider utilizing Memcached or Redis. These distributed memory caches effectively speed up large-scale web applications in Magento 2 with dynamic databases. They alleviate the server load by managing database requests and delivering cached data when external data requests permit.
Redis serves as an optional back-end cache solution, providing an alternative to the default Zend_Cache_Backend_File used in Magento 2. Both Memcached and Redis are suitable choices for PHP sessions, and Redis can be configured to handle over 60k session connections per second.
Opting for Redis brings the benefits of integrating a high-speed backend cache with full cache tag support, eliminating the need for additional low-level file system cache. This configuration results in excellent and stable performance, particularly beneficial for high-traffic Magento stores.
Configure Redis for Session Storage
Below is a configuration example to add to **
'session' =>


array (


 'save' => 'redis',


 'redis' =>


 array (


   'host' => '127.0.0.1',


   'port' => '6379',


   'password' => '',


   'timeout' => '2.5',


   'persistent_identifier' => '',


   'database' => '2',


   'compression_threshold' => '2048',


   'compression_library' => 'gzip',


   'log_level' => '1',


   'max_concurrency' => '6',


   'break_after_frontend' => '5',


   'break_after_adminhtml' => '30',


   'first_lifetime' => '600',


   'bot_first_lifetime' => '60',


   'bot_lifetime' => '7200',


   'disable_locking' => '0',


   'min_lifetime' => '60',


   'max_lifetime' => '2592000'


 )


),
Magento 2 also offers a command to establish and configure Redis. Execute the setup:config:set command and specify the following parameters.
bin/magento setup:config:set --session-save=redis --session-save-redis-<parameter_name>=<parameter_value>...
You can review all the details regarding the parameters and ensure that your Redis installation is functioning correctly with your Magento store.
Set up Redis for Default Cache
There are two methods to configure Redis for the page and default cache. You can manually edit the **
For configuring the default cache, execute the following command:
bin/magento setup:config:set --session-save=redis --session-save-redis-<parameter_name>=<parameter_value>...
Specify parameters that are specific to Redis default caching.
For the page cache, execute the following command:
php bin/magento setup:config:set --page-cache=redis --page-cache-redis-server=redis.example.com --page-cache-redis-db=1
Step 13: Upgrade Database and Package
When transitioning to the latest Magento version, users may encounter component dependency conflicts among various packages. Instead of addressing these conflicts manually, it is recommended to first upgrade the packages.
This situation commonly arises for advanced users with multiple PHP versions installed. Ensuring the fulfillment of the initial prerequisites for packages simplifies the upgrade process.
The minimum requirements for packages include:
| Requirements | Constraints |
|---|---|
| PHP version | >= 7.3 |
| Composer | None (composer 2 for Magento 2.4.X) |
| Node.js | Node.js (^12.22.0, ^14.17.0, or >=16.0.0) |
| Memory limitations | At least 2GB RAM |
Step 14: Switch to Production Mode
Numerous developers need to focus on transitioning their Magento 2 store to the live environment by activating Production Mode. Ensure that this step is prioritized on your Magento 2 speed optimization checklist.
Magento 2 operates in three modes: Default, Developer, and Production. Production Mode is specifically designed for optimized performance, guaranteeing an excellent user experience.
To check the current mode via CLI, use the command:
php bin/magento deploy:mode:show
Enabling Production mode can be done with a single command:
bin/magento deploy:mode:set production
To switch to Developer mode, use the CLI command:
php bin/magento deploy:mode:set developer
This process can also be divided into multiple steps if developers desire additional control over the transition:
php bin/magento setup:di:compile
php bin/magento setup:static-content:deploy -f
Step 15: Enable GZIP Compression
To enable gzip compression and activate the mod_deflate module in Apache, insert the following commands into the .htaccess file and uncomment the relevant lines, as demonstrated below.
<IfModule mod_deflate.c>


############################################


## enable apache served files compression


## http://developer.yahoo.com/performance/rules.html#gzip


   # Insert filter on all content


   SetOutputFilter DEFLATE


   # Insert filter on selected content types only


   AddOutputFilterByType DEFLATE text/html text/plain text/xml text/css text/JavaScript application/JavaScript application/x-JavaScript application/json image/svg+xml


   # Netscape 4.x has some problems...


   BrowserMatch ^Mozilla/4 gzip-only-text/html


   # Netscape 4.06-4.08 have some more problems


   BrowserMatch ^Mozilla/4\.0[678] no-gzip


   # MSIE masquerades as Netscape, but it is fine


   BrowserMatch \bMSIE !no-gzip !gzip-only-text/html


   # Don't compress images


   SetEnvIfNoCase Request_URI \.(?:gif|jpe?g|png)$ no-gzip dont-vary


   # Make sure proxies don't deliver the wrong content


   Header append Vary User-Agent env=!dont-vary


</IfModule>
Note that the mod_deflate module compresses static resources, reducing their size before sending them to the browser.
Step 16: Enable Advanced JS Bundling
JavaScript bundling aims to reduce the quantity and size of requested assets for loaded browser pages. To achieve this, organize bundles to ensure that each store page downloads a common bundle along with a page-specific bundle. Categorize pages into types such as Category, Product, CMS, Customer, Cart, and Checkout, each having unique RequireJS module dependencies. Bundling modules by page type results in a limited number of bundles covering dependencies for any store page.
Alternatively, create purpose-based bundles for common features, product-related features, shipping features, checkout features, taxes, and form validations. The effectiveness of the bundling strategy depends on your store’s structure, and experimentation can help determine the most suitable approach.
While a standard Commerce installation achieves satisfactory performance by dividing bundles based on page types, specific customizations may necessitate a more in-depth analysis and alternative distribution of assets.
Conclusion
As you can see, a slow website can decrease user experience and may lead to higher bounce rate. That is why maintaining your website speed is essential in retaining customers. In this post, we have guided you through reasons why your page is loaded slowly, and provided you with 10 steps to speed up your Magento 2. It’s up to you to choose the most suitable one for your store, you just need to remember that the more well-optimized and faster your personal development environment is, the faster your online store will be. I hope this post is helpful for you when optimizing Magento speed.
If you need more advice about boosting your Magento website speed and performance, don’t hesitate to contact us via this form. We’ll analyze your website and get back to you as soon as possible!
x

Jacker is the Chief Technology Officer (CTO) at Mageplaza, bringing over 10 years of experience in Magento, Shopify, and other eCommerce platforms. With deep technical expertise, he has led numerous successful projects, optimizing and scaling online stores for global brands. Beyond his work in eCommerce development, he is passionate about running and swimming.
Related Post

7 mins read
|
06-30-2026

How to Enable DebugView in GA4 for your Magento 2 store - Mageplaza
Step-by-step guide to enabling GA4 DebugView for Magento 2 merchants — verify your GA4 events are firing correctly before trusting your data.
9 mins read
|
06-09-2026

Table Rate Shipping in eCommerce: A Practical Guide
Master Magento 2 Table Rate Shipping. Learn how to configure an accurate, automated shipping matrix to optimize your checkout and boost sales.
11 mins read
|
06-02-2026
3 mins read
|
05-30-2026

Google Analytics Ecommerce Reports for Magento Merchants: What to track & Tips
A practical guide to GA4 ecommerce reports for Magento merchants, covering what to track, how to read each report, and specific tips to turn data into revenue decisions.
19 mins read
|
05-20-2026
5 mins read
|
07-30-2026
7 mins read
|
06-30-2026
How to Enable DebugView in GA4 for your Magento 2 store - Mageplaza
Step-by-step guide to enabling GA4 DebugView for Magento 2 merchants — verify your GA4 events are firing correctly before trusting your data.
9 mins read
|
06-09-2026
Table Rate Shipping in eCommerce: A Practical Guide
Master Magento 2 Table Rate Shipping. Learn how to configure an accurate, automated shipping matrix to optimize your checkout and boost sales.
11 mins read
|
06-02-2026
3 mins read
|
05-30-2026
Google Analytics Ecommerce Reports for Magento Merchants: What to track & Tips
A practical guide to GA4 ecommerce reports for Magento merchants, covering what to track, how to read each report, and specific tips to turn data into revenue decisions.
19 mins read
|
05-20-2026