


5 mins read
|
07-30-2026
How to Create Admin Grid in Magento 2
Vinh Jacker | 03-17-2025

In this tutorial, we’ll walk you through how to create an Admin Grid in the Magento 2 backend. As you may know, a grid in Magento 2 is a table that lists data from a database table and provides functionalities like sorting, filtering, deleting, updating, and more. Classic examples include the product grid or the customer grid.
Magento 2 provides two main approaches for creating an admin grid: using UI components and using layout XML. In this guide, we’ll explore both methods step-by-step. Before we dive in, make sure you have a simple module set up with an admin menu and router — we’ll build on that. In this article, we will use a sample module named Mageplaza_HelloWorld with some demo data.
How To Create Admin Grid
Step 1: Create database schema
First, create the database table that your grid will pull data from.
Database: We will use a simple database
app/code/Mageplaza/HelloWorld/Setup/InstallSchema.php
This file will execute only once time when installing the module. Let’s put this content in this file to create the above table:
<?php

namespace Mageplaza\HelloWorld\Setup;

class InstallSchema implements \Magento\Framework\Setup\InstallSchemaInterface
{

	public function install(\Magento\Framework\Setup\SchemaSetupInterface $setup, \Magento\Framework\Setup\ModuleContextInterface $context)
	{
		$installer = $setup;
		$installer->startSetup();
		if (!$installer->tableExists('mageplaza_helloworld_post')) {
			$table = $installer->getConnection()->newTable(
				$installer->getTable('mageplaza_helloworld_post')
			)
				->addColumn(
					'post_id',
					\Magento\Framework\DB\Ddl\Table::TYPE_INTEGER,
					null,
					[
						'identity' => true,
						'nullable' => false,
						'primary'  => true,
						'unsigned' => true,
					],
					'Post ID'
				)
				->addColumn(
					'name',
					\Magento\Framework\DB\Ddl\Table::TYPE_TEXT,
					255,
					['nullable => false'],
					'Post Name'
				)
				->addColumn(
					'url_key',
					\Magento\Framework\DB\Ddl\Table::TYPE_TEXT,
					255,
					[],
					'Post URL Key'
				)
				->addColumn(
					'post_content',
					\Magento\Framework\DB\Ddl\Table::TYPE_TEXT,
					'64k',
					[],
					'Post Post Content'
				)
				->addColumn(
					'tags',
					\Magento\Framework\DB\Ddl\Table::TYPE_TEXT,
					255,
					[],
					'Post Tags'
				)
				->addColumn(
					'status',
					\Magento\Framework\DB\Ddl\Table::TYPE_INTEGER,
					1,
					[],
					'Post Status'
				)
				->addColumn(
					'featured_image',
					\Magento\Framework\DB\Ddl\Table::TYPE_TEXT,
					255,
					[],
					'Post Featured Image'
				)
				->addColumn(
					'created_at',
					\Magento\Framework\DB\Ddl\Table::TYPE_TIMESTAMP,
					null,
					['nullable' => false, 'default' => \Magento\Framework\DB\Ddl\Table::TIMESTAMP_INIT],
					'Created At'
				)->addColumn(
					'updated_at',
					\Magento\Framework\DB\Ddl\Table::TYPE_TIMESTAMP,
					null,
					['nullable' => false, 'default' => \Magento\Framework\DB\Ddl\Table::TIMESTAMP_INIT_UPDATE],
					'Updated At')
				->setComment('Post Table');
			$installer->getConnection()->createTable($table);

			$installer->getConnection()->addIndex(
				$installer->getTable('mageplaza_helloworld_post'),
				$setup->getIdxName(
					$installer->getTable('mageplaza_helloworld_post'),
					['name', 'url_key', 'post_content', 'tags', 'featured_image'],
					\Magento\Framework\DB\Adapter\AdapterInterface::INDEX_TYPE_FULLTEXT
				),
				['name', 'url_key', 'post_content', 'tags', 'featured_image'],
				\Magento\Framework\DB\Adapter\AdapterInterface::INDEX_TYPE_FULLTEXT
			);
		}
		$installer->endSetup();
	}
}
We have done this in CRUD Models - Create Resource Model and Model Collection
Step 2: Create routes admin
File: app/code/Mageplaza/HelloWorld/etc/adminhtml/routes.xml
<?xml version="1.0"?>
<config xmlns:xsi="http://www.w3.org/2001/XMLSchema-instance" xsi:noNamespaceSchemaLocation="urn:magento:framework:App/etc/routes.xsd">
    <router id="admin">
        <route id="mageplaza_helloworld" frontName="mageplaza_helloworld">
            <module name="Mageplaza_HelloWorld"/>
        </route>
    </router>
</config>
Step 3: Create admin menu
Admin menu/Route: we will use the route mageplaza_helloworld for our admin page and the menu link to:
mageplaza_helloworld/post/index
Step 4: Create Controller
Create controller file: please read the Create Controller article for detail.
Create controller file called index.php
app/code/Mageplaza/HelloWorld/Controller/Adminhtml/Post/Index.php
With the following content:
<?php

namespace Mageplaza\HelloWorld\Controller\Adminhtml\Post;

class Index extends \Magento\Backend\App\Action
{
	protected $resultPageFactory = false;

	public function __construct(
		\Magento\Backend\App\Action\Context $context,
		\Magento\Framework\View\Result\PageFactory $resultPageFactory
	)
	{
		parent::__construct($context);
		$this->resultPageFactory = $resultPageFactory;
	}

	public function execute()
	{
		$resultPage = $this->resultPageFactory->create();
		$resultPage->getConfig()->getTitle()->prepend((__('Posts')));

		return $resultPage;
	}


}
There are 2 ways to create admin grid, in this post’s scope, we will talk about both of them.
Step 5: Method #1 - Create Admin Grid using Component
Step 5.1: Declare resource
Declare resource in dependency injection file
Now we will create di.xml file which will connect to the Model to get the data for our grid.
File: app/code/Mageplaza/HelloWorld/etc/di.xml
With the following content:
<config xmlns:xsi="http://www.w3.org/2001/XMLSchema-instance" xsi:noNamespaceSchemaLocation="../../../../../lib/internal/Magento/Framework/ObjectManager/etc/config.xsd">
    <type name="Magento\Framework\View\Element\UiComponent\DataProvider\CollectionFactory">
        <arguments>
            <argument name="collections" xsi:type="array">
                <item name="mageplaza_helloworld_post_listing_data_source" xsi:type="string">Mageplaza\HelloWorld\Model\ResourceModel\Post\Grid\Collection</item>
            </argument>
        </arguments>
    </type>
    <virtualType name="Mageplaza\HelloWorld\Model\ResourceModel\Post\Grid\Collection" type="Magento\Framework\View\Element\UiComponent\DataProvider\SearchResult">
        <arguments>
            <argument name="mainTable" xsi:type="string">mageplaza_helloworld_post</argument>
            <argument name="resourceModel" xsi:type="string">Mageplaza\HelloWorld\Model\ResourceModel\Post</argument>
        </arguments>
    </virtualType>
</config>
This file will declare the post collection class, table and resourceModel for the table. This source will be called in the layout file to get data for grid.
Step 5.2: Create layout file
For the action mageplaza_helloworld/post/index, we will create a layout file name mageplaza_helloworld_post_index.xml
File: app/code/Mageplaza/HelloWorld/view/adminhtml/layout/mageplaza_helloworld_post_index.xml
With the following content:
<page xmlns:xsi="http://www.w3.org/2001/XMLSchema-instance" xsi:noNamespaceSchemaLocation="../../../../../../../lib/internal/Magento/Framework/View/Layout/etc/page_configuration.xsd">
    <update handle="styles"/>
    <body>
        <referenceContainer name="content">
            <uiComponent name="mageplaza_helloworld_post_listing"/>
        </referenceContainer>
    </body>
</page>
In this layout file, we declare a uiComponent for the content of this page.
Step 5.3: Create component layout file
As declaration in layout file, we will create a component file mageplaza_helloworld_post_listing.xml
File: app/code/Mageplaza/HelloWorld/view/adminhtml/ui_component/mageplaza_helloworld_post_listing.xml
With the following content:
<listing xmlns:xsi="http://www.w3.org/2001/XMLSchema-instance" xsi:noNamespaceSchemaLocation="urn:magento:module:Magento_Ui:etc/ui_configuration.xsd">
    <argument name="data" xsi:type="array">
        <item name="js_config" xsi:type="array">
            <item name="provider" xsi:type="string">mageplaza_helloworld_post_listing.mageplaza_helloworld_post_listing_data_source</item>
            <item name="deps" xsi:type="string">mageplaza_helloworld_post_listing.mageplaza_helloworld_post_listing_data_source</item>
        </item>
        <item name="spinner" xsi:type="string">spinner_columns</item>
        <item name="buttons" xsi:type="array">
            <item name="add" xsi:type="array">
                <item name="name" xsi:type="string">add</item>
                <item name="label" xsi:type="string" translate="true">Add New Post</item>
                <item name="class" xsi:type="string">primary</item>
                <item name="url" xsi:type="string">*/*/new</item>
            </item>
        </item>
    </argument>
    <dataSource name="nameOfDataSource">
        <argument name="dataProvider" xsi:type="configurableObject">
            <argument name="class" xsi:type="string">Magento\Framework\View\Element\UiComponent\DataProvider\DataProvider</argument>
            <argument name="name" xsi:type="string">mageplaza_helloworld_post_listing_data_source</argument>
            <argument name="primaryFieldName" xsi:type="string">post_id</argument>
            <argument name="requestFieldName" xsi:type="string">id</argument>
            <argument name="data" xsi:type="array">
                <item name="config" xsi:type="array">
                    <item name="component" xsi:type="string">Magento_Ui/js/grid/provider</item>
                    <item name="update_url" xsi:type="url" path="mui/index/render"/>
                    <item name="storageConfig" xsi:type="array">
                        <item name="indexField" xsi:type="string">post_id</item>
                    </item>
                </item>
            </argument>
        </argument>
    </dataSource>
    <columns name="spinner_columns">
        <selectionsColumn name="ids">
            <argument name="data" xsi:type="array">
                <item name="config" xsi:type="array">
                    <item name="resizeEnabled" xsi:type="boolean">false</item>
                    <item name="resizeDefaultWidth" xsi:type="string">55</item>
                    <item name="indexField" xsi:type="string">post_id</item>
                </item>
            </argument>
        </selectionsColumn>
        <column name="post_id">
            <argument name="data" xsi:type="array">
                <item name="config" xsi:type="array">
                    <item name="filter" xsi:type="string">textRange</item>
                    <item name="sorting" xsi:type="string">asc</item>
                    <item name="label" xsi:type="string" translate="true">ID</item>
                </item>
            </argument>
        </column>
        <column name="name">
            <argument name="data" xsi:type="array">
                <item name="config" xsi:type="array">
                    <item name="filter" xsi:type="string">text</item>
                    <item name="editor" xsi:type="array">
                        <item name="editorType" xsi:type="string">text</item>
                        <item name="validation" xsi:type="array">
                            <item name="required-entry" xsi:type="boolean">true</item>
                        </item>
                    </item>
                    <item name="label" xsi:type="string" translate="true">Name</item>
                </item>
            </argument>
        </column>
        <column name="created_at" class="Magento\Ui\Component\Listing\Columns\Date">
            <argument name="data" xsi:type="array">
                <item name="config" xsi:type="array">
                    <item name="filter" xsi:type="string">dateRange</item>
                    <item name="component" xsi:type="string">Magento_Ui/js/grid/columns/date</item>
                    <item name="dataType" xsi:type="string">date</item>
                    <item name="label" xsi:type="string" translate="true">Created</item>
                </item>
            </argument>
        </column>
        <column name="updated_at" class="Magento\Ui\Component\Listing\Columns\Date">
            <argument name="data" xsi:type="array">
                <item name="config" xsi:type="array">
                    <item name="filter" xsi:type="string">dateRange</item>
                    <item name="component" xsi:type="string">Magento_Ui/js/grid/columns/date</item>
                    <item name="dataType" xsi:type="string">date</item>
                    <item name="label" xsi:type="string" translate="true">Modified</item>
                </item>
            </argument>
        </column>
    </columns>
</listing>
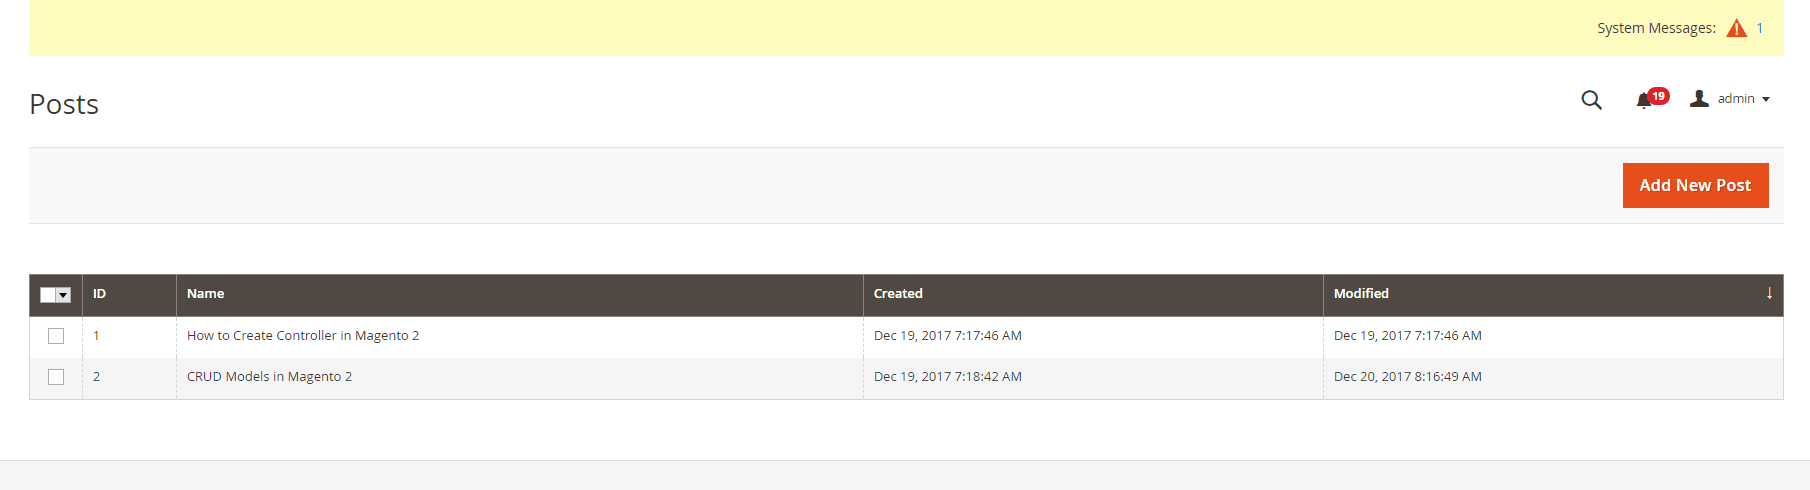
With this code, you will know how to declare Grid layout (button, columns), call data source. Please refresh the cache, and access this grid page, the admin grid will show up like this:
Step 5.4: Create a listing toolbar
As I said at the top of this page, the Magento 2 Grid will support some actions to interact with grid, like: sort, filter, action delete/update etc. The sort feature is a default action for the grid. You can click on the column header to sort the items. We will find out how to build the other features for our grid.
Prepare for this, we will create a listing toolbar element under the parent listing in the component layout file:
File: app/code/Mageplaza/HelloWorld/view/adminhtml/ui_component/mageplaza_helloworld_post_listing.xml
<?xml version="1.0" encoding="UTF-8"?>
<listing xmlns:xsi="http://www.w3.org/2001/XMLSchema-instance" xsi:noNamespaceSchemaLocation="urn:magento:module:Magento_Ui:etc/ui_configuration.xsd">
    <!-- ... other block of code -->
    <listingToolbar name="listing_top">
        <argument name="data" xsi:type="array">
            <item name="config" xsi:type="array">
                <item name="sticky" xsi:type="boolean">true</item>
            </item>
        </argument>
    </listingToolbar>
    <!-- ... other block of code -->
</listing>
Step 5.5: Create a Bookmark
This argument is used to define the template Magento/Ui/view/base/web/templates/grid/toolbar.html which will be loaded to define the knockout js for handling all ajax update actions in this grid. We will define above features inside this container. You can place this container element before or after the columns element to define the position of the toolbar (above or below the columns). Let’s see the details for each action: Bookmark
File: app/code/Mageplaza/HelloWorld/view/adminhtml/ui_component/mageplaza_helloworld_post_listing.xml
<?xml version="1.0" encoding="UTF-8"?>
<listing xmlns:xsi="http://www.w3.org/2001/XMLSchema-instance" xsi:noNamespaceSchemaLocation="urn:magento:module:Magento_Ui:etc/ui_configuration.xsd">
    <!-- ... other block of code -->
    <listingToolbar name="listing_top">
	<!-- ... other block of code -->
	<bookmark name="bookmarks"/>
    </listingToolbar>
    <!-- ... other block of code -->
</listing>
This will add the bookmark feature which allows admins set difference state of the grid. Each state may have a different column list. So, each admin user can choose to show the information that is relevant to them.
Step 5.6: Column controls
This node will add a column list box that allows the admin user to choose which columns can be shown on grid. After changing this list, admin can save that state as a bookmark which allows to access to this state quickly.
File: app/code/Mageplaza/HelloWorld/view/adminhtml/ui_component/mageplaza_helloworld_post_listing.xml
<?xml version="1.0" encoding="UTF-8"?>
<listing xmlns:xsi="http://www.w3.org/2001/XMLSchema-instance" xsi:noNamespaceSchemaLocation="urn:magento:module:Magento_Ui:etc/ui_configuration.xsd">
    <!-- ... other block of code -->
    <listingToolbar name="listing_top">
	<!-- ... other block of code -->
	<columnsControls name="columns_controls"/>
    </listingToolbar>
    <!-- ... other block of code -->
</listing>
Step 5.7: Full text search
This node will add a search box at the top of Grid. You can use this to search all the data in the table.
File: app/code/Mageplaza/HelloWorld/view/adminhtml/ui_component/mageplaza_helloworld_post_listing.xml
<?xml version="1.0" encoding="UTF-8"?>
<listing xmlns:xsi="http://www.w3.org/2001/XMLSchema-instance" xsi:noNamespaceSchemaLocation="urn:magento:module:Magento_Ui:etc/ui_configuration.xsd">
    <!-- ... other block of code -->
    <listingToolbar name="listing_top">
	<!-- ... other block of code -->
	<filterSearch name="fulltext"/>
    </listingToolbar>
    <!-- ... other block of code -->
</listing>
Step 5.8: Filter
This node defines the filter box for each column. You can see this by clicking to the Filter button at the top of the grid.
File: app/code/Mageplaza/HelloWorld/view/adminhtml/ui_component/mageplaza_helloworld_post_listing.xml
<?xml version="1.0" encoding="UTF-8"?>
<listing xmlns:xsi="http://www.w3.org/2001/XMLSchema-instance" xsi:noNamespaceSchemaLocation="urn:magento:module:Magento_Ui:etc/ui_configuration.xsd">
    <!-- ... other block of code -->
    <listingToolbar name="listing_top">
	<!-- ... other block of code -->
	<filters name="listing_filters" />
    </listingToolbar>
    <!-- ... other block of code -->
</listing>
Step 5.9: Mass actions
This node will add the mass action select to the grid. The admin can use this action to take action quickly on multiple items. Learn how to add mass actions easily with our Mass Actions in Magento 2 guide.
File: app/code/Mageplaza/HelloWorld/view/adminhtml/ui_component/mageplaza_helloworld_post_listing.xml
<?xml version="1.0" encoding="UTF-8"?>
<listing xmlns:xsi="http://www.w3.org/2001/XMLSchema-instance" xsi:noNamespaceSchemaLocation="urn:magento:module:Magento_Ui:etc/ui_configuration.xsd">
    <!-- ... other block of code -->
    <listingToolbar name="listing_top">
	<!-- ... other block of code -->
        <massaction name="listing_massaction">
            <argument name="data" xsi:type="array">
                <item name="config" xsi:type="array">
                    <item name="component" xsi:type="string">Magento_Ui/js/grid/tree-massactions</item>
                </item>
            </argument>
            <action name="delete">
                <argument name="data" xsi:type="array">
                    <item name="config" xsi:type="array">
                        <item name="type" xsi:type="string">delete</item>
                        <item name="label" xsi:type="string" translate="true">Delete</item>
                        <item name="url" xsi:type="url" path="mageplaza_helloworld/post/massDelete"/>
                        <item name="confirm" xsi:type="array">
                            <item name="title" xsi:type="string" translate="true">Delete Post</item>
                            <item name="message" xsi:type="string" translate="true">Are you sure you wan't to delete selected items?</item>
                        </item>
                    </item>
                </argument>
            </action>
        </massaction>
    </listingToolbar>
    <!-- ... other block of code -->
</listing>
Step 5.10: Paging
This node will add the pagination for the grid. This is useful if you have a large of data in the table.
File: app/code/Mageplaza/HelloWorld/view/adminhtml/ui_component/mageplaza_helloworld_post_listing.xml
<?xml version="1.0" encoding="UTF-8"?>
<listing xmlns:xsi="http://www.w3.org/2001/XMLSchema-instance" xsi:noNamespaceSchemaLocation="urn:magento:module:Magento_Ui:etc/ui_configuration.xsd">
    <!-- ... other block of code -->
    <listingToolbar name="listing_top">
	<!-- ... other block of code -->
	<paging name="listing_paging"/>
    </listingToolbar>
    <!-- ... other block of code -->
</listing>
Step 5.11: Export button
This node will add an export button, which you can use to export the data of the grid.
<?xml version="1.0" encoding="UTF-8"?>
<listing xmlns:xsi="http://www.w3.org/2001/XMLSchema-instance" xsi:noNamespaceSchemaLocation="urn:magento:module:Magento_Ui:etc/ui_configuration.xsd">
    <!-- ... other block of code -->
    <listingToolbar name="listing_top">
	<!-- ... other block of code -->
	<exportButton name="export_button"/>
    </listingToolbar>
    <!-- ... other block of code -->
</listing>
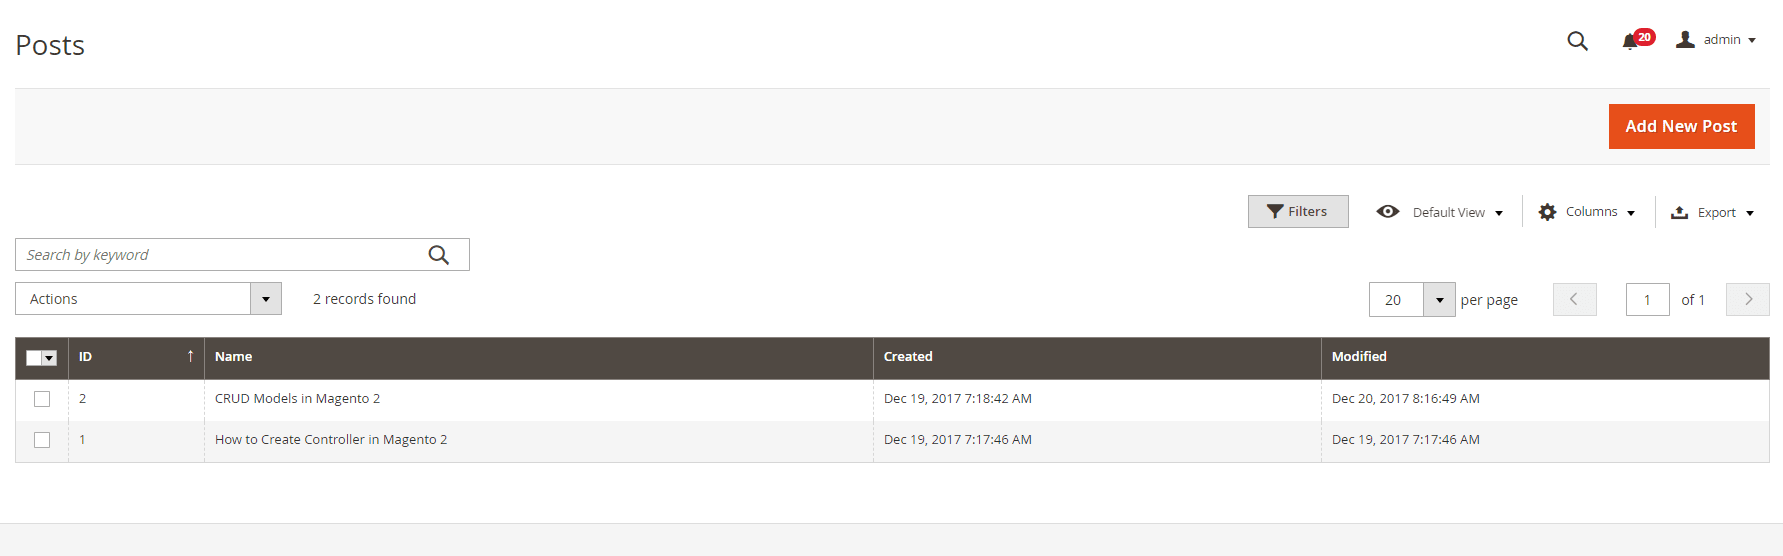
Try to clear the cache and go to the grid page, you will see a grid like this:
Step 6: Method #2 - Create Admin Grid using Layout
Important! Skip this step if you have already done Step 5
You have just found how to add a Magento 2 Grid by using Component. Now we will see how to do it by using normal layout/block file.
Step 6.1: Create block for this grid
File: app/code/Mageplaza/Mageplaza/Block/Adminhtml/Post.php
<?php
namespace Mageplaza\HelloWorld\Block\Adminhtml;

class Post extends \Magento\Backend\Block\Widget\Grid\Container
{

	protected function _construct()
	{
		$this->_controller = 'adminhtml_post';
		$this->_blockGroup = 'Mageplaza_HelloWorld';
		$this->_headerText = __('Posts');
		$this->_addButtonLabel = __('Create New Post');
		parent::_construct();
	}
}
The Grid block will extend \Magento\Backend\Block\Widget\Grid\Container and define some variables in the _construct() method.
_blockGroupis the name of our module with formatVendorName_ModuleName_controlleris the path to the Grid block inside the Block folder. In this helloWorld, I put the Grid.php file inside of theAdminhtml/Postfolder_headerTextis the Grid page title_addButtonLabelis the label of the Add new button.
Step 6.2: Create layout file
Now we will need a layout file to connect with Grid Block and render the grid. Let’s create this file:
File: app/code/Mageplaza/HelloWorld/view/adminhtml/layout/mageplaza_helloworld_post_index.xml
<?xml version="1.0"?>
<page xmlns:xsi="http://www.w3.org/2001/XMLSchema-instance" xsi:noNamespaceSchemaLocation="urn:magento:framework:View/Layout/etc/page_configuration.xsd">
    <update handle="styles"/>
    <body>
        <referenceContainer name="content">
            <block class="Mageplaza\HelloWorld\Block\Adminhtml\Post" name="mageplaza_post_grid">
                <block class="Magento\Backend\Block\Widget\Grid" name="mageplaza_post_grid.grid" as="grid">
                    <arguments>
                        <argument name="id" xsi:type="string">post_id</argument>
                        <argument name="dataSource" xsi:type="object">Mageplaza\HelloWorld\Model\ResourceModel\Post\Collection</argument>
                        <argument name="default_sort" xsi:type="string">id</argument>
                        <argument name="default_dir" xsi:type="string">ASC</argument>
                        <argument name="save_parameters_in_session" xsi:type="string">1</argument>
                    </arguments>
                    <block class="Magento\Backend\Block\Widget\Grid\ColumnSet" name="mageplaza_post_grid.grid.columnSet" as="grid.columnSet">
                        <arguments>
                            <argument name="rowUrl" xsi:type="array">
                                <item name="path" xsi:type="string">*/*/edit</item>
                            </argument>
                        </arguments>
                        <block class="Magento\Backend\Block\Widget\Grid\Column" as="post_id">
                            <arguments>
                                <argument name="header" xsi:type="string" translate="true">ID</argument>
                                <argument name="index" xsi:type="string">post_id</argument>
                                <argument name="type" xsi:type="string">text</argument>
                                <argument name="column_css_class" xsi:type="string">col-id</argument>
                                <argument name="header_css_class" xsi:type="string">col-id</argument>
                            </arguments>
                        </block>
                        <block class="Magento\Backend\Block\Widget\Grid\Column" as="name">
                            <arguments>
                                <argument name="header" xsi:type="string" translate="true">Name</argument>
                                <argument name="index" xsi:type="string">name</argument>
                                <argument name="type" xsi:type="string">text</argument>
                                <argument name="column_css_class" xsi:type="string">col-id</argument>
                                <argument name="header_css_class" xsi:type="string">col-id</argument>
                            </arguments>
                        </block>
                        <block class="Magento\Backend\Block\Widget\Grid\Column" as="created_at">
                            <arguments>
                                <argument name="header" xsi:type="string" translate="true">Created</argument>
                                <argument name="index" xsi:type="string">created_at</argument>
                                <argument name="type" xsi:type="string">date</argument>
                                <argument name="column_css_class" xsi:type="string">col-id</argument>
                                <argument name="header_css_class" xsi:type="string">col-id</argument>
                            </arguments>
                        </block>
                        <block class="Magento\Backend\Block\Widget\Grid\Column" as="updated_at">
                            <arguments>
                                <argument name="header" xsi:type="string" translate="true">Modified</argument>
                                <argument name="index" xsi:type="string">updated_at</argument>
                                <argument name="type" xsi:type="string">date</argument>
                                <argument name="column_css_class" xsi:type="string">col-id</argument>
                                <argument name="header_css_class" xsi:type="string">col-id</argument>
                            </arguments>
                        </block>
                    </block>
                </block>
            </block>
        </referenceContainer>
    </body>
</page>
In this layout file, we will define some arguments for the grid. The main argument is the dataSource. This argument will link with the dataSource which we declared in the di.xml file above to connect to the database and get data for this grid.
Step 6.4: Add Column
The Column set will define the columns that will be displayed in the grid. If you want to use massAction, you can add this block to the grid element:
<block class="Magento\Backend\Block\Widget\Grid\Massaction" name="mageplaza.helloWorld.massaction" as="grid.massaction">
    <arguments>
        <argument name="massaction_id_field" xsi:type="string">post_id</argument>
        <argument name="form_field_name" xsi:type="string">ids</argument>
        <argument name="use_select_all" xsi:type="string">1</argument>
        <argument name="options" xsi:type="array">
            <item name="disable" xsi:type="array">
                <item name="label" xsi:type="string" translate="true">Delete</item>
                <item name="url" xsi:type="string">*/*/massDelete</item>
            </item>
        </argument>
    </arguments>
</block>
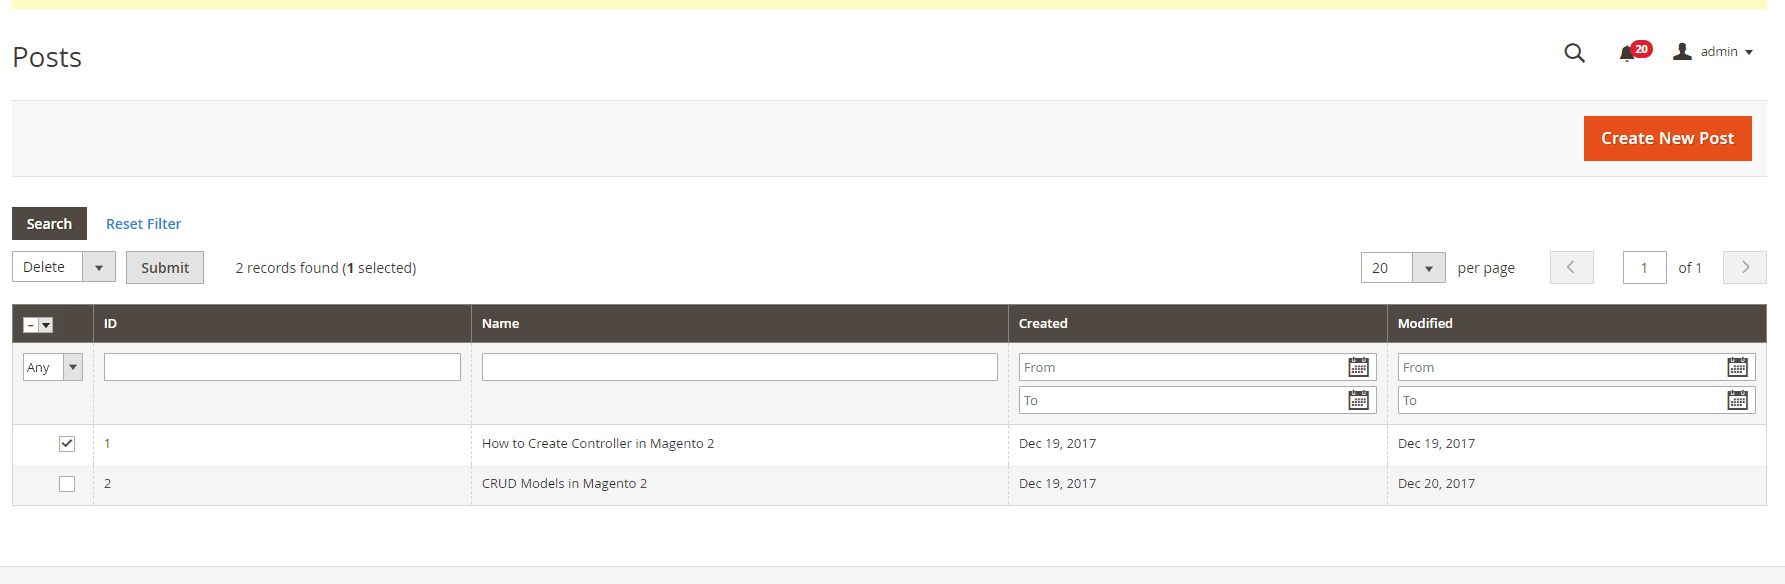
After this, please refresh the cache and go to grid page to see the result. It may display like this:
Conclusion
Creating an admin grid in Magento 2 can be handled either by using UI Components (the Magento 2 standard) or through traditional block and layout files. Each method has its use cases: UI components are more scalable and feature-rich, while layout-based grids are simpler and quicker for small custom modules.
No matter which method you choose, understanding both approaches gives you flexibility in future projects. After setting up your admin grid, you’ll be able to manage data in the backend much more efficiently — from adding filters, performing mass actions, exporting data, to customizing your admin views for better workflow.
Now it’s your turn: build your own grid and start managing your Magento 2 backend like a pro!
Related Post
x

Jacker is the Chief Technology Officer (CTO) at Mageplaza, bringing over 10 years of experience in Magento, Shopify, and other eCommerce platforms. With deep technical expertise, he has led numerous successful projects, optimizing and scaling online stores for global brands. Beyond his work in eCommerce development, he is passionate about running and swimming.
Related Post

7 mins read
|
06-30-2026

How to Enable DebugView in GA4 for your Magento 2 store - Mageplaza
Step-by-step guide to enabling GA4 DebugView for Magento 2 merchants — verify your GA4 events are firing correctly before trusting your data.
9 mins read
|
06-09-2026

Table Rate Shipping in eCommerce: A Practical Guide
Master Magento 2 Table Rate Shipping. Learn how to configure an accurate, automated shipping matrix to optimize your checkout and boost sales.
11 mins read
|
06-02-2026
3 mins read
|
05-30-2026

Google Analytics Ecommerce Reports for Magento Merchants: What to track & Tips
A practical guide to GA4 ecommerce reports for Magento merchants, covering what to track, how to read each report, and specific tips to turn data into revenue decisions.
19 mins read
|
05-20-2026
5 mins read
|
07-30-2026
7 mins read
|
06-30-2026
How to Enable DebugView in GA4 for your Magento 2 store - Mageplaza
Step-by-step guide to enabling GA4 DebugView for Magento 2 merchants — verify your GA4 events are firing correctly before trusting your data.
9 mins read
|
06-09-2026
Table Rate Shipping in eCommerce: A Practical Guide
Master Magento 2 Table Rate Shipping. Learn how to configure an accurate, automated shipping matrix to optimize your checkout and boost sales.
11 mins read
|
06-02-2026
3 mins read
|
05-30-2026
Google Analytics Ecommerce Reports for Magento Merchants: What to track & Tips
A practical guide to GA4 ecommerce reports for Magento merchants, covering what to track, how to read each report, and specific tips to turn data into revenue decisions.
19 mins read
|
05-20-2026