


5 mins read
|
07-30-2026
Magento 2 Add Category Attributes Programmatically
Vinh Jacker | 03-17-2025
Default Magento 2 category attributes are good but sometimes it’s necessary to add new ones. Today we’ll show you how to add category attributes to Magento 2 programmatically.
Magento 2 Category Attributes Programmatically is a timely topic so that you can work on custom Magento 2 extension, for example, in the right way. Welcome here, Mageplaza Tutorial! The exact steps are listed with the specific script in PHP to create the category attributes. By the availability of the setup scripts, there is no need to waste time learning or modifying anything while you don’t have experience in coding. The only thing you need to do is copying and pasting the following snippets to your module. Here are the snippets that you can achieve immediately.
How to Add Category Attribute Programmatically in Magento 2
In this article, we will use the Mageplaza HelloWorld module to learn how to add a category attribute.
Create file InstallData.php
We will start with the InstallData class which located in app/code/Mageplaza/HelloWorld/Setup/InstallData.php. The content for this file:
<?php
namespace Mageplaza\HelloWorld\Setup;

use Magento\Eav\Setup\EavSetupFactory;
use Magento\Framework\Setup\InstallDataInterface;
use Magento\Framework\Setup\ModuleContextInterface;
use Magento\Framework\Setup\ModuleDataSetupInterface;

class InstallData implements InstallDataInterface
{
	private $eavSetupFactory;

	public function __construct(EavSetupFactory $eavSetupFactory)
	{
		$this->eavSetupFactory = $eavSetupFactory;
	}

}
Define the install() method
<?php

public function install(ModuleDataSetupInterface $setup, ModuleContextInterface $context)
{

}
Create Category Attribute Programmatically
<?php
namespace Mageplaza\HelloWorld\Setup;

use Magento\Framework\Setup\InstallDataInterface;
use Magento\Framework\Setup\ModuleContextInterface;
use Magento\Framework\Setup\ModuleDataSetupInterface;
use Magento\Eav\Setup\EavSetupFactory;

class InstallData implements InstallDataInterface
{

	private $eavSetupFactory;

	public function __construct(EavSetupFactory $eavSetupFactory)
	{
		$this->eavSetupFactory = $eavSetupFactory;
	}

	public function install(
		ModuleDataSetupInterface $setup,
		ModuleContextInterface $context
	)
	{
		$eavSetup = $this->eavSetupFactory->create(['setup' => $setup]);

		$eavSetup->addAttribute(
			\Magento\Catalog\Model\Category::ENTITY,
			'mp_new_attribute',
			[
				'type'         => 'varchar',
				'label'        => 'Mageplaza Attribute',
				'input'        => 'text',
				'sort_order'   => 100,
				'source'       => '',
				'global'       => 1,
				'visible'      => true,
				'required'     => false,
				'user_defined' => false,
				'default'      => null,
				'group'        => '',
				'backend'      => ''
			]
		);
	}
}
Display the category attribute
The category UI Component is rendered with configuration from the category_form.xml file. All files with that name are merged together. As a result, We will add a field by creating a category_form.xml file in the app/code/Mageplaza/HelloWorld/view/adminhtml/ui_component/ directory.
Here is a full example of adding a field under the “general” group. It is important to note that mp_new_attribute should match the ID of the attribute that you created in the install script.
<?xml version="1.0" ?>
<form xmlns:xsi="http://www.w3.org/2001/XMLSchema-instance" xsi:noNamespaceSchemaLocation="urn:magento:module:Magento_Ui:etc/ui_configuration.xsd">
    <fieldset name="general">
        <field name="mp_new_attribute">
            <argument name="data" xsi:type="array">
                <item name="config" xsi:type="array">
                    <item name="required" xsi:type="boolean">false</item>
                    <item name="validation" xsi:type="array">
                        <item name="required-entry" xsi:type="boolean">false</item>
                    </item>
                    <item name="sortOrder" xsi:type="number">333</item>
                    <item name="dataType" xsi:type="string">string</item>
                    <item name="formElement" xsi:type="string">input</item>
                    <item name="label" translate="true" xsi:type="string">Mageplaza new attribute</item>
                </item>
            </argument>
        </field>
    </fieldset>
</form>
All done, please run the upgrade, flush cache, and check the result.
-
Flush Cache Run flush cache here
-
Run upgrade command line:
Then go to Product > Categories from the admin to check the result. It will show like this:
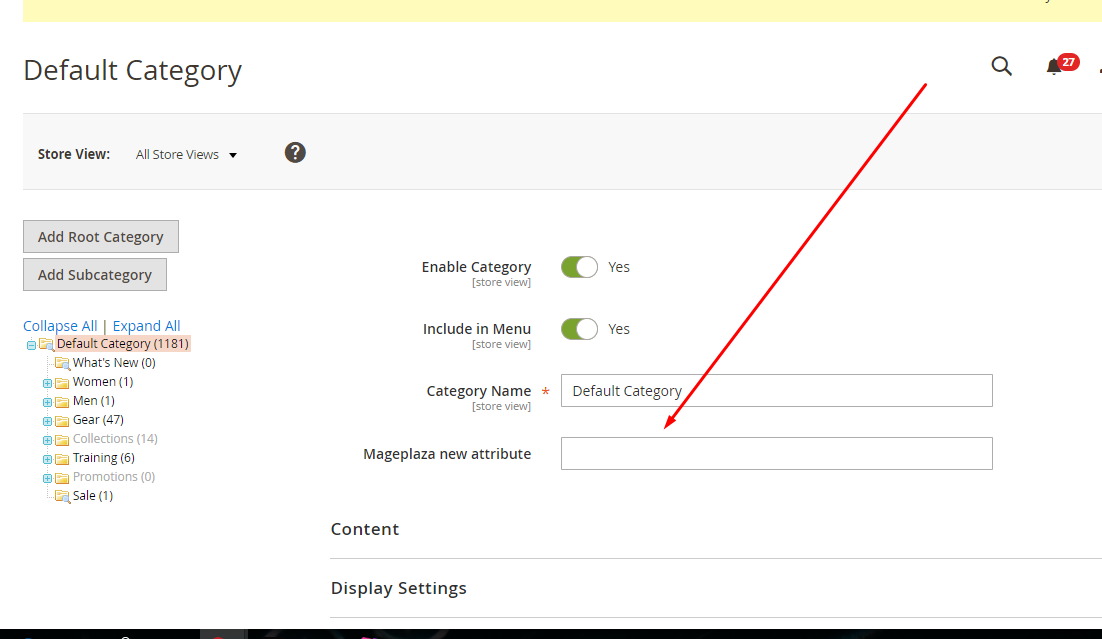
Check carefully if you can see and edit the new category attribute.
Conclusion
That’s how you can programmatically add category attributes to Magento 2. Hope you find this tutorial helpful. Happy reading.
Related Post
x

Jacker is the Chief Technology Officer (CTO) at Mageplaza, bringing over 10 years of experience in Magento, Shopify, and other eCommerce platforms. With deep technical expertise, he has led numerous successful projects, optimizing and scaling online stores for global brands. Beyond his work in eCommerce development, he is passionate about running and swimming.
Related Post

7 mins read
|
06-30-2026

How to Enable DebugView in GA4 for your Magento 2 store - Mageplaza
Step-by-step guide to enabling GA4 DebugView for Magento 2 merchants — verify your GA4 events are firing correctly before trusting your data.
9 mins read
|
06-09-2026

Table Rate Shipping in eCommerce: A Practical Guide
Master Magento 2 Table Rate Shipping. Learn how to configure an accurate, automated shipping matrix to optimize your checkout and boost sales.
11 mins read
|
06-02-2026
3 mins read
|
05-30-2026

Google Analytics Ecommerce Reports for Magento Merchants: What to track & Tips
A practical guide to GA4 ecommerce reports for Magento merchants, covering what to track, how to read each report, and specific tips to turn data into revenue decisions.
19 mins read
|
05-20-2026
5 mins read
|
07-30-2026
7 mins read
|
06-30-2026
How to Enable DebugView in GA4 for your Magento 2 store - Mageplaza
Step-by-step guide to enabling GA4 DebugView for Magento 2 merchants — verify your GA4 events are firing correctly before trusting your data.
9 mins read
|
06-09-2026
Table Rate Shipping in eCommerce: A Practical Guide
Master Magento 2 Table Rate Shipping. Learn how to configure an accurate, automated shipping matrix to optimize your checkout and boost sales.
11 mins read
|
06-02-2026
3 mins read
|
05-30-2026
Google Analytics Ecommerce Reports for Magento Merchants: What to track & Tips
A practical guide to GA4 ecommerce reports for Magento merchants, covering what to track, how to read each report, and specific tips to turn data into revenue decisions.
19 mins read
|
05-20-2026