


5 mins read
|
07-30-2026
How to resize product image in Magento 2?
Vinh Jacker | 03-17-2025
Product image size is a good attribute to make your goods closer to the consumer with the product details. Because in online shopping, the customer can’t have real touch on your items, they all feel through the descriptions you post and the product image you upload. The more beautiful the image, the more desire they have.
And the standard of the size is one of the main characters you need to learn. So how to change the product image size in order to fit with the size of your page. This topic on Magento 2 image resize will show you how to do that with detailed instructions.
Simple methods to change the product image size in Magento 2
- Method 1: Change product image size in HelloWorld block
- Method 2: Change product image size in template file
Method 1: Change product image in HelloWorld block
The first way to resize an image in Magento 2 is via HelloWorld block.
You will use a block class of the module Mageplaza_HelloWorld, then possibly inject objects of \Magento\Catalog\Model\ProductRepository and \Magento\Catalog\Helper\Image class in the constructor of the module’s block class.
app/code/Mageplaza/HelloWorld/Block/HelloWorld.php
<?php
namespace Mageplaza\HelloWorld\Block;
class HelloWorld extends \Magento\Framework\View\Element\Template
{
    protected $_productRepository;
    protected $_productImageHelper;

    public function __construct(
        \Magento\Backend\Block\Template\Context $context,
        \Magento\Catalog\Model\ProductRepository $productRepository,
        \Magento\Catalog\Helper\Image $productImageHelper,
        array $data = []
    )
    {
        $this->_productRepository = $productRepository;
        $this->_productImageHelper = $productImageHelper;
        parent::__construct($context, $data);
    }

    public function getProductById($id)
    {
        return $this->_productRepository->getById($id);
    }

    public function getProductBySku($sku)
    {
        return $this->_productRepository->get($sku);
    }

    /**
     * Schedule resize of the image
     * $width *or* $height can be null - in this case, lacking dimension will be calculated.
     *
     * @see \Magento\Catalog\Model\Product\Image
     * @param int $width
     * @param int $height
     * @return $this
     */
    public function resizeImage($product, $imageId, $width, $height = null)
    {
        $resizedImage = $this->_productImageHelper
                           ->init($product, $imageId)
                           ->constrainOnly(TRUE)
                           ->keepAspectRatio(TRUE)
                           ->keepTransparency(TRUE)
                           ->keepFrame(FALSE)
                           ->resize($width, $height);
        return $resizedImage;
    }
}
?>
When you resize the product base image to exact height and width, remember that the constraints, aspect ratio, and transparency need to be correct.
Now, you can do as the following example to load the product, then change the product’s image and show it. Here, the produt_base_image is used as the image ID.
Note that add the following code to the template you use.
<?php
//Get product object by ID
$id = 'PRODUCT_ID';
$_product = $block->getProductById($id);

//Get product object by SKU
// $sku = 'PRODUCT_SKU';
// $_product = $block->getProductBySku($sku);

$imageId = 'product_base_image';
$width = 200;
$height = 300;

$resizedImageUrl = $block->resizeImage($product, 'product_base_image', $width, $height)->getUrl();
?>
<img src="<?php echo $resizedImageUrl;?>" alt="<?php echo $_product->getTitle();?>" />
Method 2: Change product image in the template file
Apart from the custom HelloWorld block, you can change the product image in the template (.phtml) file. Use the code snippet below and run it in the template file.
<?php
//Get product object by ID
$id = 'PRODUCT_ID';
$_product = $block->getProductById($id);

//Get product object by SKU
// $sku = 'PRODUCT_SKU';
// $_product = $block->getProductBySku($sku);

$imageId = 'product_base_image';
$width = 200;
$height = 300;

$resizedImageUrl = $_imageHelper
                        ->init($product, $imageId)
                        ->constrainOnly(true)
                        ->keepAspectRatio(true)
                        ->keepTransparency(true)
                        ->keepFrame(false)
                        ->resize($width, $height)
                        ->getUrl();
?>
<img src="<?php echo $resizedImageUrl;?>" alt="<?php echo $_product->getTitle();?>" />
If you still have any trouble, please leave a comment on this topic, and we will assist you as soon as possible.
Method 3: Create a helper class
A helper class in PHP can contain reusable image resizing functions, which define specific rules and parameters for resizing images. When you create a helper class, you can specify dimensions, compression settings, and additional functionalities like watermarking or cropping.
By encapsulating these functionalities within a helper class, you can easily call the resize function from various parts of your application, such as template files or custom modules, whenever image resizing is needed. This approach simplifies the process of resizing images and helps maintain consistent product image sizes, which is particularly useful in e-commerce platforms like Magento stores.
Below is the code which helps you to create a helper class:
<?php
Namespace Mageplaza\Helloword\Helper;
use Magento\Framework\App\Filesystem\DirectoryList;
class Image extends \Magento\Framework\App\Helper\AbstractHelper
{
/**
* Custom directory relative to the "media" folder
*/
const DIRECTORY = 'Mageplaza_Helloword/posts';

/**
* @var \Magento\Framework\Filesystem\Directory\WriteInterface
*/
protected $_mediaDirectory;

/**
* @var \Magento\Framework\Image\Factory
*/
protected $_imageFactory;

/**
* Store manager
*
* @var \Magento\Store\Model\StoreManagerInterface
*/
protected $_storeManager;

/**
* @param \Magento\Framework\App\Helper\Context $context
* @param \Magento\Framework\Filesystem $filesystem
* @param \Magento\Framework\Image\Factory $imageFactory
* @param \Magento\Store\Model\StoreManagerInterface
*/
public function __construct(
\Magento\Framework\App\Helper\Context $context,
\Magento\Framework\Filesystem $filesystem,
\Magento\Framework\Image\AdapterFactory $imageFactory,
\Magento\Store\Model\StoreManagerInterface $storeManager
) {
$this->_mediaDirectory = $filesystem->getDirectoryWrite(DirectoryList::MEDIA);
$this->_imageFactory = $imageFactory;
$this->_storeManager = $storeManager;

parent::__construct($context);
}
/**
* First check this file on FS
*
* @param string $filename
* @return bool
*/
protected function _fileExists($filename)
{
if ($this->_mediaDirectory->isFile($filename)) {
return true;
}
return false;
}
/**
* Resize image
* @return string
*/
public function resize($image, $width = null, $height = null)
{
$mediaFolder = self::DIRECTORY;
$path = $mediaFolder . '/cache';
if ($width !== null) {
$path .= '/' . $width . 'x';
if ($height !== null) {
$path .= $height ;
}
}
$absolutePath = $this->_mediaDirectory->getAbsolutePath($mediaFolder) . $image;
$imageResized = $this->_mediaDirectory->getAbsolutePath($path) . $image;
if (!$this->_fileExists($path . $image)) {
$imageFactory = $this->_imageFactory->create();
$imageFactory->open($absolutePath);
$imageFactory->constrainOnly(true);
$imageFactory->keepTransparency(true);
$imageFactory->keepFrame(true);
$imageFactory->keepAspectRatio(true);
$imageFactory->resize($width, $height);
$imageFactory->save($imageResized);
}
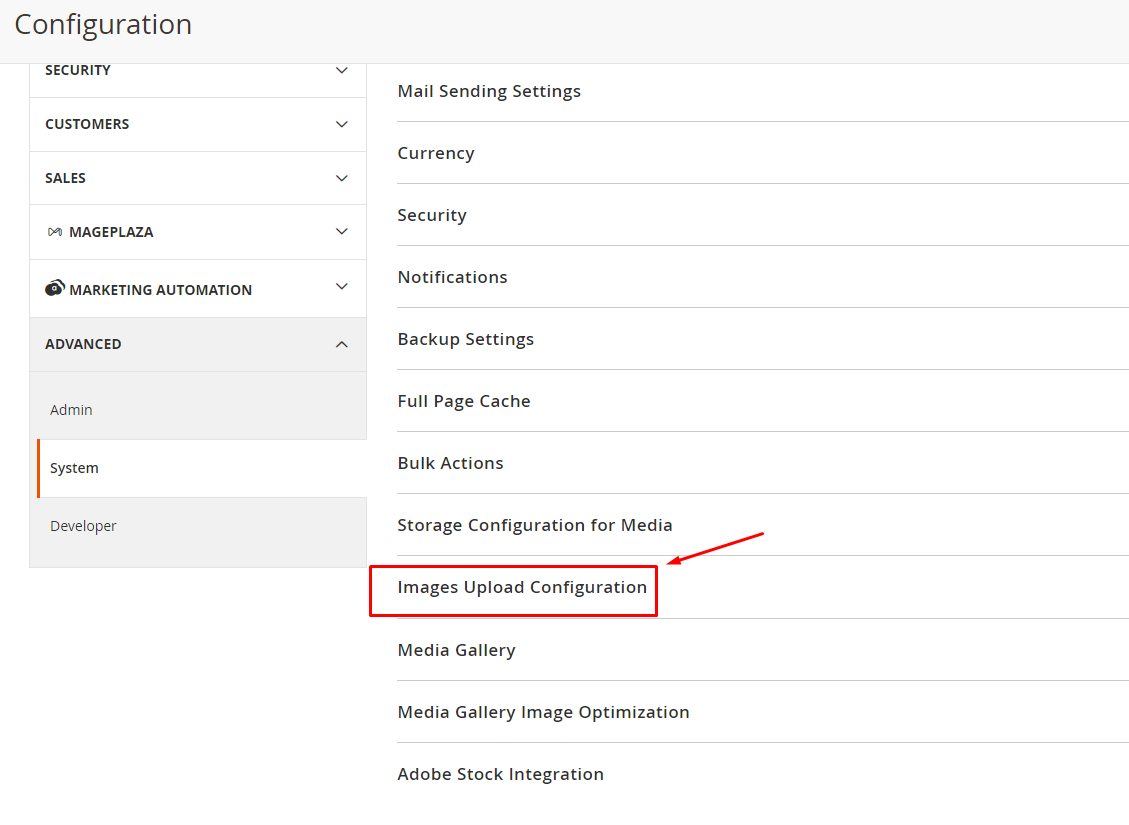
Enable Image Resizing in Magento 2
Enabling image resizing in Magento 2 can optimize your store’s performance and improve user experience. Here’s a specific guide on how to configure this feature, including field descriptions and setting up image placeholders:
Enabling Image Resizing in Magento 2
-
Log in to your Magento admin panel.
-
Navigate to
Stores > Settings > Configuration. -
Select
Systemunder theAdvancedsection, -
Find and expand the
Images Upload Configuration.
-
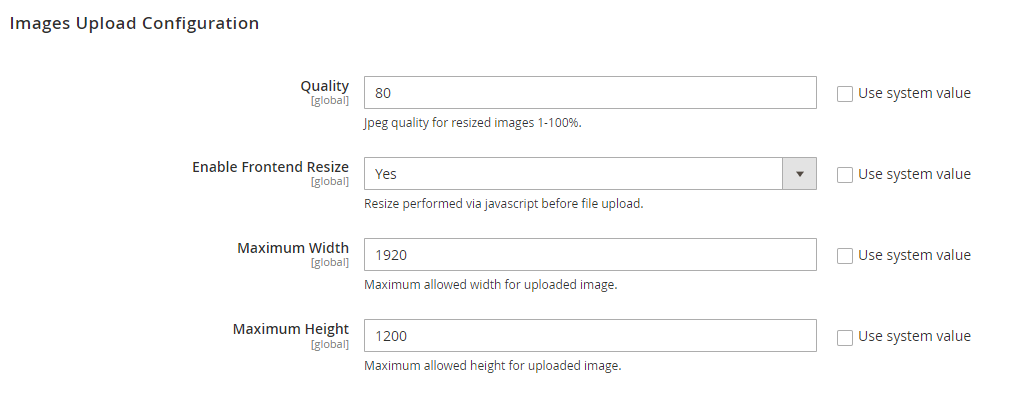
Uncheckthe ‘Use system value’ to enable editing. -
Set
Enable Frontend Resizeto ‘Yes’. -
Choose a
Qualitysetting between 1-100% (80-90% recommended). -
Set the
Maximum WidthandHeightin pixels for images.
- Click
Save Configto apply the changes.
Field descriptions
-
Quality: Determine the JPEG quality of resized images. A lower percentage reduces file size.
-
Enable Frontend Resize: Allow the resizing of images on the Product Details page, maintaining proportions according to the maximum width or height set.
-
Maximum Width: Specify the maximum pixel width for resized images, ensuring they do not exceed the set size.
-
Maximum Height: Determine the maximum pixel height for resized images, ensuring they do not exceed the defined height.
Image placeholders
Placeholders are temporary images displayed while the actual images load. They enhance the browsing experience and reduce page load times. Typically, the default placeholder image is set to the store’s logo.
In Magento stores, it’s possible to set unique placeholder images for various image roles. These placeholders operate as visual representations for the final product images, allowing customers to have an uninterrupted browsing experience without delay in image loading. As soon as the final images are ready, they automatically substitute the placeholders without any disruption.
To set up placeholders, follow the steps below:
-
Go to
Stores > Settings > Configurationin the Magento Admin sidebar. -
Under Catalog, select Catalog and then click on
Product Image Placeholders. -
For each image role, including Base, Small, Thumbnail, and Swatch, click
Choose Fileand upload an image.
Note: You may use the same image for all roles or different ones for each.
- Click
Save Configto save the placeholder settings.
By following these steps, you’ll ensure that your Magento 2 store displays images efficiently, with an appropriate balance between quality and performance. Remember to clear the cache after making changes to see the effects immediately.
Wrap up
The default image size that Magento 2 automatically assigns to your products might not be the best choice for your product’s appearance. With these two methods, you can easily change your product’s image size whenever you need it. A suitable size will make your products look good in your store or a marketing campaign.
Related Post
- Get parent products: Bundle, Grouped products
- Magento 2 Add Product Attribute Programmatically
- Get current product, category in Magento 2
- Get product collection in Magento 2
- Get product by id and sku in Magento 2
- Magento 2 create product programmatically
- Import Product Images in Magento 2
- Magento 2 Image Size Tutorial
- How to Optimize Images on Magento 2
x

Jacker is the Chief Technology Officer (CTO) at Mageplaza, bringing over 10 years of experience in Magento, Shopify, and other eCommerce platforms. With deep technical expertise, he has led numerous successful projects, optimizing and scaling online stores for global brands. Beyond his work in eCommerce development, he is passionate about running and swimming.
Related Post

7 mins read
|
06-30-2026

How to Enable DebugView in GA4 for your Magento 2 store - Mageplaza
Step-by-step guide to enabling GA4 DebugView for Magento 2 merchants — verify your GA4 events are firing correctly before trusting your data.
9 mins read
|
06-09-2026

Table Rate Shipping in eCommerce: A Practical Guide
Master Magento 2 Table Rate Shipping. Learn how to configure an accurate, automated shipping matrix to optimize your checkout and boost sales.
11 mins read
|
06-02-2026
3 mins read
|
05-30-2026

Google Analytics Ecommerce Reports for Magento Merchants: What to track & Tips
A practical guide to GA4 ecommerce reports for Magento merchants, covering what to track, how to read each report, and specific tips to turn data into revenue decisions.
19 mins read
|
05-20-2026
5 mins read
|
07-30-2026
7 mins read
|
06-30-2026
How to Enable DebugView in GA4 for your Magento 2 store - Mageplaza
Step-by-step guide to enabling GA4 DebugView for Magento 2 merchants — verify your GA4 events are firing correctly before trusting your data.
9 mins read
|
06-09-2026
Table Rate Shipping in eCommerce: A Practical Guide
Master Magento 2 Table Rate Shipping. Learn how to configure an accurate, automated shipping matrix to optimize your checkout and boost sales.
11 mins read
|
06-02-2026
3 mins read
|
05-30-2026
Google Analytics Ecommerce Reports for Magento Merchants: What to track & Tips
A practical guide to GA4 ecommerce reports for Magento merchants, covering what to track, how to read each report, and specific tips to turn data into revenue decisions.
19 mins read
|
05-20-2026