


5 mins read
|
07-30-2026
How to Add Customer Attribute Programmatically in Magento 2?
Vinh Jacker | 03-17-2025
This article will guide you on how to add customer attributes in Magento 2 programmatically. Please follow our previous article to create a simple module that we will use to demo coding for this lesson and how to create the setup script classes. In this article, we will use the sample module Mageplaza_HelloWorld and the InstallDataclass.
Recommend:
Use Magento 2 Customer Attributes to add extra attribute fields to collect valuable customer information on the registration or account page.
Overview of Adding Customer Attribute Programmatically
- Step 1: Create setup file InstallData.php
- Step 2: Define the install() method
- Step 3: Create custom attribute
Step 1: Create setup file InstallData.php
Firstly, we will create the InstallData.php file:
File: app/code/Mageplaza/HelloWorld/Setup/InstallData.php
<?php
namespace Mageplaza\HelloWorld\Setup;

use Magento\Eav\Setup\EavSetup;
use Magento\Eav\Setup\EavSetupFactory;
use Magento\Framework\Setup\InstallDataInterface;
use Magento\Framework\Setup\ModuleContextInterface;
use Magento\Framework\Setup\ModuleDataSetupInterface;

class InstallData implements InstallDataInterface
{
	private $eavSetupFactory;

	public function __construct(EavSetupFactory $eavSetupFactory)
	{
		$this->eavSetupFactory = $eavSetupFactory;
	}

}
In this class, we define the EAV setup model which will be used to interact with the Magento 2 attribute.
Step 2: Define the install() method
After that, we have to define the install() method and create eav setup model:
public function install(ModuleDataSetupInterface $setup, ModuleContextInterface $context)
	{
		$eavSetup = $this->eavSetupFactory->create(['setup' => $setup]);
	}
	Next, we will use eavSetup object to add attribute:
public function install(ModuleDataSetupInterface $setup, ModuleContextInterface $context)
	{
		$eavSetup = $this->eavSetupFactory->create(['setup' => $setup]);
		$eavSetup->addAttribute(
			\Magento\Customer\Model\Customer::ENTITY,
			'sample_attribute',
			[
				'type'         => 'varchar',
				'label'        => 'Sample Attribute',
				'input'        => 'text',
				'required'     => false,
				'visible'      => true,
				'user_defined' => true,
				'position'     => 999,
				'system'       => 0,
			]
		);
}
Step 3: Create custom attribute
Finally, we need to set the forms in which the attributes will be used. In this step, we need to define the eavConfig object which allows us to call the attribute back and set the data for it. And the full code to create customer attributes is:
File: app/code/Mageplaza/HelloWorld/Setup/InstallData.php
<?php

namespace Mageplaza\HelloWorld\Setup;

use Magento\Eav\Setup\EavSetup;
use Magento\Eav\Setup\EavSetupFactory;
use Magento\Framework\Setup\InstallDataInterface;
use Magento\Framework\Setup\ModuleContextInterface;
use Magento\Framework\Setup\ModuleDataSetupInterface;
use Magento\Eav\Model\Config;
use Magento\Customer\Model\Customer;

class InstallData implements InstallDataInterface
{
	private $eavSetupFactory;

	public function __construct(EavSetupFactory $eavSetupFactory, Config $eavConfig)
	{
		$this->eavSetupFactory = $eavSetupFactory;
		$this->eavConfig       = $eavConfig;
	}

	public function install(ModuleDataSetupInterface $setup, ModuleContextInterface $context)
	{
		$eavSetup = $this->eavSetupFactory->create(['setup' => $setup]);
		$eavSetup->addAttribute(
			\Magento\Customer\Model\Customer::ENTITY,
			'sample_attribute',
			[
				'type'         => 'varchar',
				'label'        => 'Sample Attribute',
				'input'        => 'text',
				'required'     => false,
				'visible'      => true,
				'user_defined' => true,
				'position'     => 999,
				'system'       => 0,
			]
		);
		$sampleAttribute = $this->eavConfig->getAttribute(Customer::ENTITY, 'sample_attribute');

		// more used_in_forms ['adminhtml_checkout','adminhtml_customer','adminhtml_customer_address','customer_account_edit','customer_address_edit','customer_register_address']
		$sampleAttribute->setData(
			'used_in_forms',
			['adminhtml_customer']

		);
		$sampleAttribute->save();
	}
}
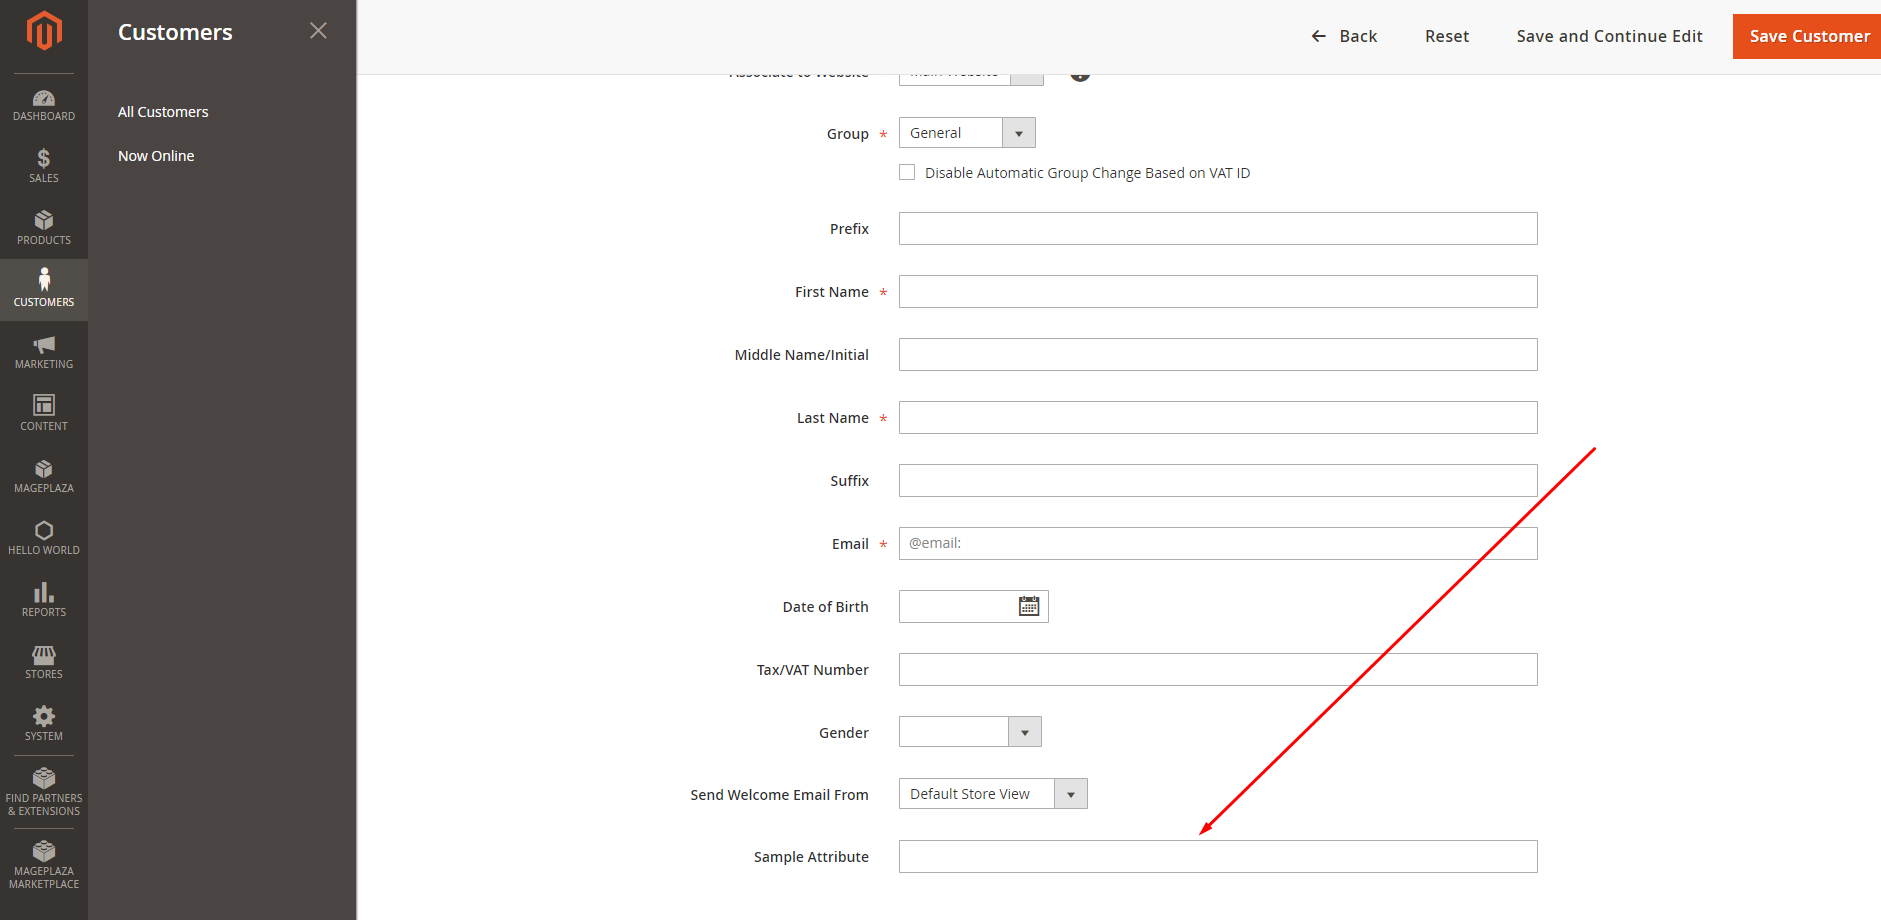
Now, let’s run a command line to install the module: php magento setup:upgrade and php bin/magento setup:static-content:deploy Then check the result. It will show like this:
Related Topics
x

Jacker is the Chief Technology Officer (CTO) at Mageplaza, bringing over 10 years of experience in Magento, Shopify, and other eCommerce platforms. With deep technical expertise, he has led numerous successful projects, optimizing and scaling online stores for global brands. Beyond his work in eCommerce development, he is passionate about running and swimming.
Related Post

7 mins read
|
06-30-2026

How to Enable DebugView in GA4 for your Magento 2 store - Mageplaza
Step-by-step guide to enabling GA4 DebugView for Magento 2 merchants — verify your GA4 events are firing correctly before trusting your data.
9 mins read
|
06-09-2026

Table Rate Shipping in eCommerce: A Practical Guide
Master Magento 2 Table Rate Shipping. Learn how to configure an accurate, automated shipping matrix to optimize your checkout and boost sales.
11 mins read
|
06-02-2026
3 mins read
|
05-30-2026

Google Analytics Ecommerce Reports for Magento Merchants: What to track & Tips
A practical guide to GA4 ecommerce reports for Magento merchants, covering what to track, how to read each report, and specific tips to turn data into revenue decisions.
19 mins read
|
05-20-2026
5 mins read
|
07-30-2026
7 mins read
|
06-30-2026
How to Enable DebugView in GA4 for your Magento 2 store - Mageplaza
Step-by-step guide to enabling GA4 DebugView for Magento 2 merchants — verify your GA4 events are firing correctly before trusting your data.
9 mins read
|
06-09-2026
Table Rate Shipping in eCommerce: A Practical Guide
Master Magento 2 Table Rate Shipping. Learn how to configure an accurate, automated shipping matrix to optimize your checkout and boost sales.
11 mins read
|
06-02-2026
3 mins read
|
05-30-2026
Google Analytics Ecommerce Reports for Magento Merchants: What to track & Tips
A practical guide to GA4 ecommerce reports for Magento merchants, covering what to track, how to read each report, and specific tips to turn data into revenue decisions.
19 mins read
|
05-20-2026