


5 mins read
|
06-30-2026
6 Steps to Install Magento 2 on CentOS [Latest] - Sample Data
Vinh Jacker | 03-17-2025
You are looking for Install Magento 2 latest version on CentOS from Magento repo or Github with Apache/Nginx, MySQL/MariaDB and PHP7.x, this guide is the best place for you. In this post, I will show you how to install Magento 2.3 on CentOS latest with Apache2, MariaDB. In previous posts, I talked about Install Magento 2 on MAC OS, Ubuntu/Debian or Windows.
Magento 2 Requirements
You should double-check 8 main requirements for Magento 2 here.
Step 1: Install Apache2 PHP and Required Extensions
I introduce the IUS Commyni repository for CentOS and Red Hat. It is a shell script to download and install necessary packages and PGP Keys.
curl 'https://setup.ius.io/' -o ius-installer.sh
chmod 755 ius-installer.sh
./ius-installer.sh
After run above command line, Apache2 and MySQL has been installed.
yum update
yum install httpd php72u php72u-pdo php72u-opcache php72u-xml php72u-mcrypt php72u-gd php72u-devel php72u-mysql php72u-intl php72u-mbstring php72u-json php72u-iconv php72u-mysqlnd php72u-fpm
Step 1.1 Install Apache2 Server
The Apache HTTP Server, called Apache, it is free and open-source cross-platform web server software. Apache is the most popular HTTP Server now. It runs on Linux, Windows, OpenVMS, NetWare and other operating systems.
To install Apache, you should update packages before running Apache install command:
sudo yum update
sudo yum install apache2
Step 1.2 Configure Apache2 Virtual Host
To declear Apache2 site configuration for Magento 2 store, you have to create a new configuration file httpd.conf:
nano /etc/httpd/conf/httpd.conf
Copy and paste the following content to the above file. Remember, you should change domain.com to your domain.
<VirtualHost *:80>
     ServerAdmin [email protected]
     DocumentRoot /var/www/magento2/
     ServerName domain.com
     ServerAlias www.domain.com

     <Directory /var/www/magento2/>
        Options Indexes FollowSymLinks MultiViews
        AllowOverride All
        Order allow,deny
        allow from all
     </Directory>

	ErrorLog /var/log/httpd/magento_error.log
    CustomLog /var/log/httpd/magento_access.log combined
</VirtualHost>
If you are installing Magento locally, you can change domain.com to localhost.com, dev.com or m2.com.
Then you have to update hosts file at /etc/hosts with
127.0.0.1 localhost.com
127.0.0.1 dev.com
127.0.0.1 m2.com
IMPORTANT:
In this tutorial, I use localhost.com.
To check Apache new configuration run this command line:
apachectl configtest
After passing configuration test, now reload the configuration:
systemctl reload httpd
To run apache automatically during startup, run the following command line:
systemctl enable httpd
Enable Rewrite mod
Make sure you enable rewrite mod to use site friendly URLs, open file httpd.conf:
nano /etc/httpd/conf/httpd.conf
Find this line:
# LoadModule foo_module modules/mod_foo.so
#
Include conf.modules.d/*.conf
Then add these following files:
LoadModule rewrite_module modules/mod_rewrite.so
Scroll down find this:
Options Indexes FollowSymLinks#
# AllowOverride controls what directives may be placed in .htaccess files.
# It can be "All", "None", or any combination of the keywords:
#
AllowOverride None
Then change AllowOverride None to:
AllowOverride All
After that, reload httpd service:
systemctl reload httpd
Step 1.4: Update php.ini file
Now time to increase values in php.ini file. Open php.ini file:
nano /etc/php.ini
Change the following data:
file_uploads = On
allow_url_fopen = On
short_open_tag = On
memory_limit = 512M
upload_max_filesize = 128M
max_execution_time = 3600
Then save this php.ini file.
After that, you should restart apache2. Run this command:
systemctl restart httpd
Step 2: Install Database Server
To install mySQL Server and Client, run this command line:
sudo yum install mysql-community-server
You’ve just installed MySQL server, now you have to initially setup this database server.
sudo mysql_secure_installation
It prompte and you choose the following option:
Enter current password for root (enter for none): Enter
Set root password? [Y/n]: Y
New password: Type your password
Re-enter new password: Type your password
Remove anonymous users? [Y/n]: Y
Disallow root login remotely? [Y/n]: Y
Remove test database and access to it? [Y/n]:  Y
Reload privilege tables now? [Y/n]:  Y
Step 3: Create MySQL User (Required)
From Magento 2.3.x, Magento requires a unique user for Magento installation, it cannot default user: root.
First of all, you have to login to MySQL:
sudo mysql -u root -p
Create a new database for Magento 2:
CREATE DATABASE magento2
Then create a new user name call: mageplaza
CREATE USER 'mageplaza'@'localhost' IDENTIFIED BY 'YOUR_PASSWORD';
Grant mageplaza user to magento2 database:
GRANT ALL ON magento2.* TO 'mageplaza'@'localhost' IDENTIFIED BY 'YOUR_PASSWORD' WITH GRANT OPTION;
Ok, time to flush privileges and exit.
FLUSH PRIVILEGES;
EXIT;
Step 4: Install Composer
Download Composer and install or you can use command line to install Composer
curl -sS https://getcomposer.org/installer | sudo php -- --install-dir=/usr/local/bin --filename=composer
Check Composer installed or not just type:
composer -v
Ouput:
   ______
  / ____/___  ____ ___  ____  ____  ________  _____
 / /   / __ \/ __ `__ \/ __ \/ __ \/ ___/ _ \/ ___/
/ /___/ /_/ / / / / / / /_/ / /_/ (__  )  __/ /
\____/\____/_/ /_/ /_/ .___/\____/____/\___/_/
                    /_/
Composer version 1.8.5 2019-04-09
Step 5: Download Magento 2 Pack
You can download from one of the folling resources:
After donwload, you should extract the pack to /var/www/html/. E.g you have a folder call: magento2 in /var/www/html/
Set permissions: Run this command
sudo chown -R www-data:www-data /var/www/html/magento2/
sudo chmod -R 755 /var/www/html/magento2/
Step 6: Install Magento 2
Access to this address http://localhost.com/magento2, you will get this Magento Setup Wizard as the following:
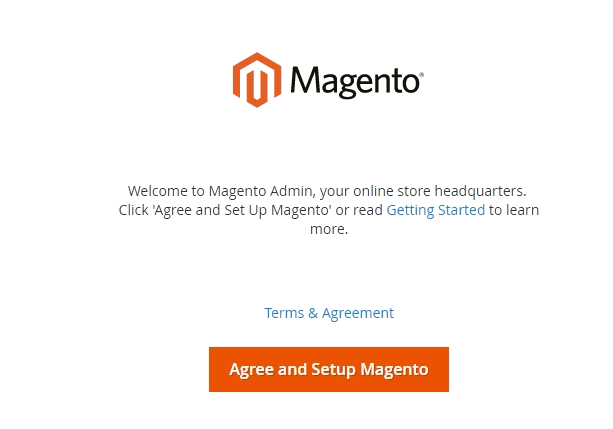
Step 6.3: Start Installing
- Click
Start Readiness Check. If any errors are displayed, you must resolve them before you continue. Click More detail if available to see more information about each check.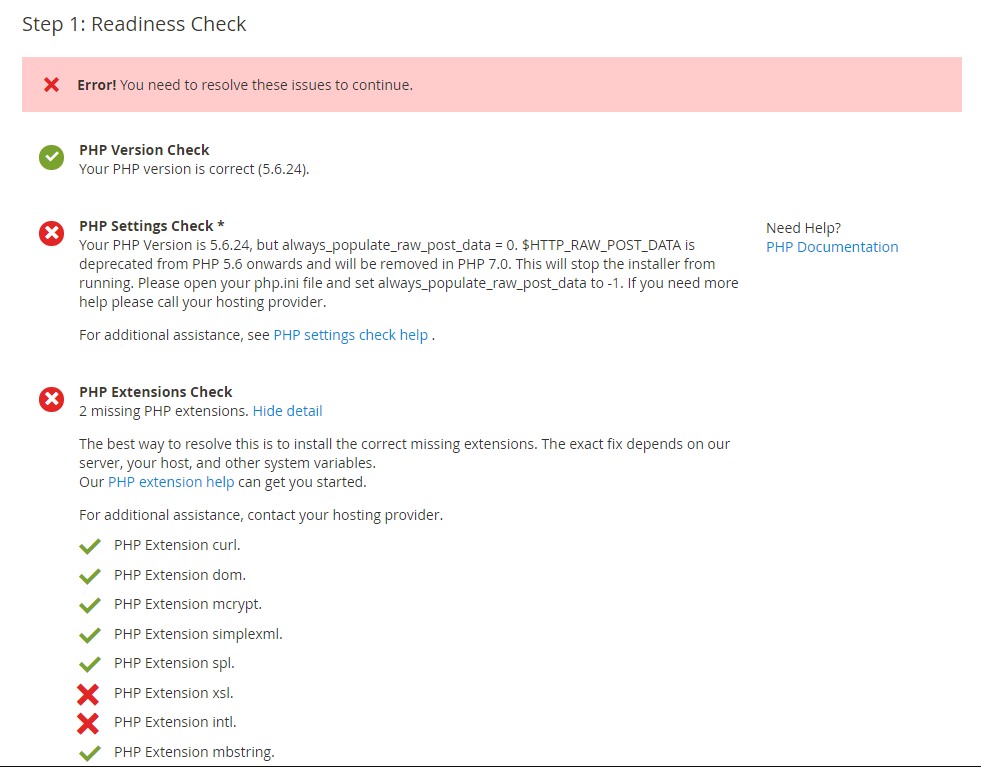
- Click
Next
Step 6.2 Add a Database
Fill database information then click Next
Step 6.3 Web Configuration
- Enter the following information:
- Your Store Address:
http://localhost.com - Magento Admin Address: Enter the relative URL by which to access the Magento Admin. e.g: secret, backend
- Your Store Address:
- Then click
Next
Step 6.4. Customize Your Store
- From the Store Default Time Zone list, click the name of your store’s time zone.
- From the Store Default Currency list, click the default currency to use in your store.
- From the Store Default Language list, click the default language to use in your store.
- Expand Advanced Modules Configuration to optionally enable or disable modules before you install the Magento software.

You can choose install Sample Data or not in this step.
Click Next
Important!: Use Skip dependency check for individual modules with caution. We recommend against it because a typical reason for this error is you manually edited the deployment configuration. Editing the deployment configuration is not recommended because future Magento software updates can undo your changes.
Step 6.5. Create Admin Account
Now enter admin information such as
- New Username
- New E-Mail
- New Password
- Confirm Password
- Then click Next
Step 6.6. Install

After completing all previous steps in the Setup Wizard, click Install Now.
Installation Success The message Success will be displayed to indicate a successful installation.
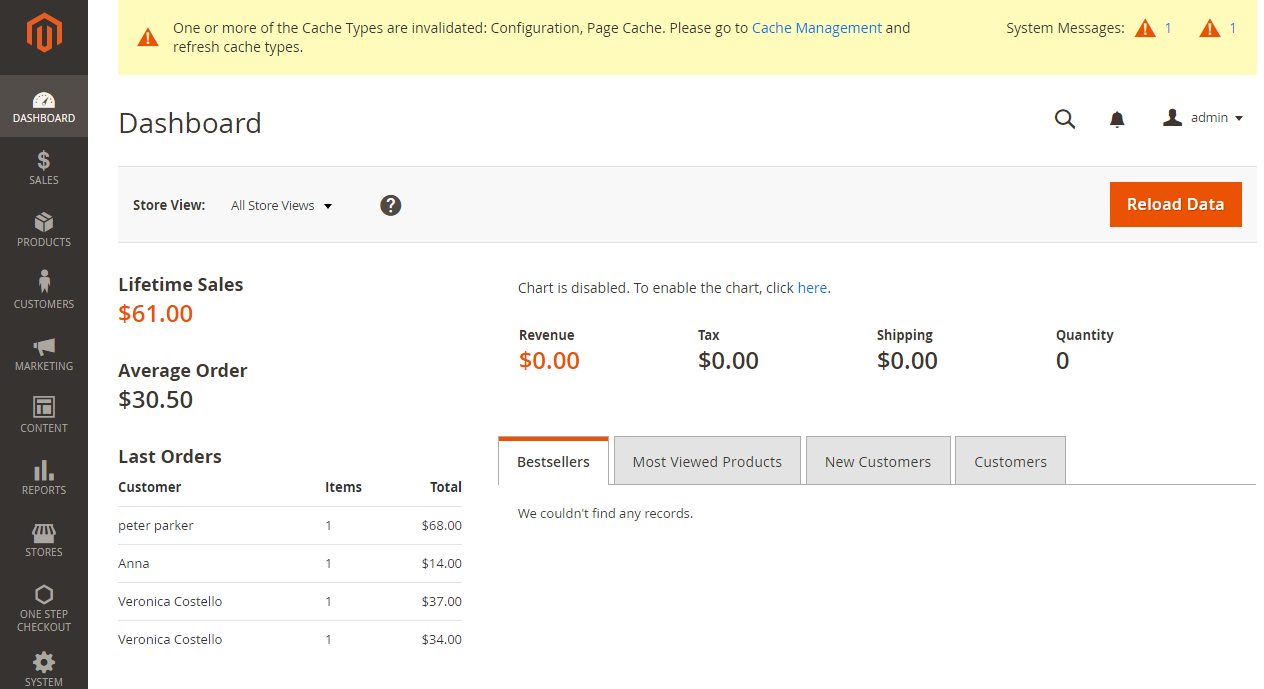
Step 6.7: Check the result
Now go to the frontend and backend to see the result
Frontend

Backend
x

Jacker is the Chief Technology Officer (CTO) at Mageplaza, bringing over 10 years of experience in Magento, Shopify, and other eCommerce platforms. With deep technical expertise, he has led numerous successful projects, optimizing and scaling online stores for global brands. Beyond his work in eCommerce development, he is passionate about running and swimming.
Related Post


How to Enable DebugView in GA4 for your Magento 2 store - Mageplaza
Step-by-step guide to enabling GA4 DebugView for Magento 2 merchants — verify your GA4 events are firing correctly before trusting your data.
9 mins read
|
06-09-2026

Table Rate Shipping in eCommerce: A Practical Guide
Master Magento 2 Table Rate Shipping. Learn how to configure an accurate, automated shipping matrix to optimize your checkout and boost sales.
11 mins read
|
06-02-2026
3 mins read
|
05-30-2026

Google Analytics Ecommerce Reports for Magento Merchants: What to track & Tips
A practical guide to GA4 ecommerce reports for Magento merchants, covering what to track, how to read each report, and specific tips to turn data into revenue decisions.
19 mins read
|
05-20-2026

5 Ways to Hide Products on Shopify (2026 Guide)
Explore the best 5 ways to hide products on Shopify. Learn how to manage visibility, protect pricing, and create a tailored shopping experience for buyers.
19 mins read
|
05-16-2026
5 mins read
|
06-30-2026
How to Enable DebugView in GA4 for your Magento 2 store - Mageplaza
Step-by-step guide to enabling GA4 DebugView for Magento 2 merchants — verify your GA4 events are firing correctly before trusting your data.
9 mins read
|
06-09-2026
Table Rate Shipping in eCommerce: A Practical Guide
Master Magento 2 Table Rate Shipping. Learn how to configure an accurate, automated shipping matrix to optimize your checkout and boost sales.
11 mins read
|
06-02-2026
3 mins read
|
05-30-2026
Google Analytics Ecommerce Reports for Magento Merchants: What to track & Tips
A practical guide to GA4 ecommerce reports for Magento merchants, covering what to track, how to read each report, and specific tips to turn data into revenue decisions.
19 mins read
|
05-20-2026
5 Ways to Hide Products on Shopify (2026 Guide)
Explore the best 5 ways to hide products on Shopify. Learn how to manage visibility, protect pricing, and create a tailored shopping experience for buyers.
19 mins read
|
05-16-2026