
Change Store Email Addresses - Mageplaza
3 mins read
|
04-02-2016

Vinh Jacker | 05-10-2016
Product Attribute is the characteristics of the products that your customers will consider to see if that item fits their needs or not, such as the size of a shirt or the color of a bag, etc. As a Magento 2 store owner, you should know how to add a Product Attribute in order to provide essential product information, classify items strategically, and speed up customers’ decision-making process. In this post, let’s find out what the product attribute is and how to add one. You can follow this post about how to add product attributes programmatically as well.
The attributes are the block of a product in a catalog, which enables customers to point to the existing characteristics of your product. You are allowed to create as many attributes as you need for a product in Magento 2 configuration. Each attribute will approve only one type of input that you will assign in the settings. Besides giving additional information about the product, the attributes are also used as search parameters and criteria to filter in layered navigation for Magento 2, product comparison reports, and promotions.
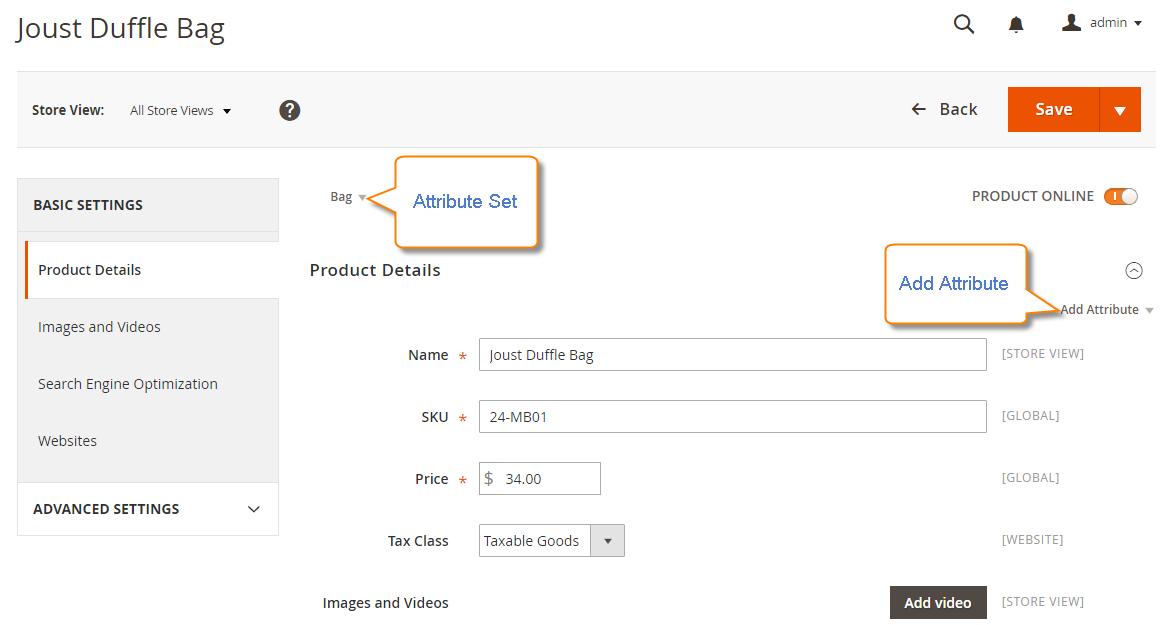
The product attributes can be created from the Stores menu or the Product Detail page where you are working with the product.
Magento offers the capability to generate and oversee various product attributes. Here are some prevalent examples:
Size: Specifies a product’s dimensions or size options, allowing customers to choose the suitable fit.
Color: Describes the color of a product, enabling customers to filter based on their preferred shades.
Weight: Provides the product’s weight, crucial for customers considering shipping costs and product handling.
Brand: Indicates the manufacturer or brand, facilitating customers in finding items from preferred companies.
Material: Defines the materials used in manufacturing a product, catering to customers with specific preferences.
Price: Displays the product cost, assisting customers in locating items within their desired price range.
SKU: Assigns a unique identifier to each product, simplifying inventory management and tracking.
Warranty: Indicates the warranty period or terms, providing customers with information about product quality and durability.
Ratings & Reviews: Showcases customer feedback, ratings, and reviews to aid potential buyers in making informed decisions.
Availability: Displays the stock status, informing customers whether an item is in stock, out of stock, or available for pre-order.
Promotion: Highlights special offers, discounts, or promotions, encouraging customers to take advantage of limited-time deals.
Custom Attributes: These can be tailored for specific products or industries, such as certifications, allergens, or environmental impact. This customization caters to the specific needs and preferences of your target audience.
Read how to update product attributes in bulk
In Magento 2, product attributes fall into two categories:
System attributes are inherent attributes provided by Magento 2, integral for the platform’s functionality, and cannot be removed. They play crucial roles in managing product information, catalog navigation, and sorting. Common examples include:
Name: The product’s name displayed on product pages and in search results.
SKU: A unique identifier used for specific product identification.
Price: The cost of the product, visible on product pages and utilized in cart total calculations.
Weight: The product’s weight, often used for shipping calculations.
Status: Indicates if the product is enabled or disabled in the store.
Visibility: Specifies where the product appears on the website, such as catalog pages, search results, or both.
Store owners have the flexibility to create custom attributes, offering specific product details beyond default system attributes. Custom attributes facilitate the provision of additional information about products, aiding customers in finding what they need.
These attributes serve various purposes, including showcasing unique features, enabling product comparisons (e.g., size, color), and enhancing search and navigation.
To create a custom attribute in the Magento 2 admin panel:
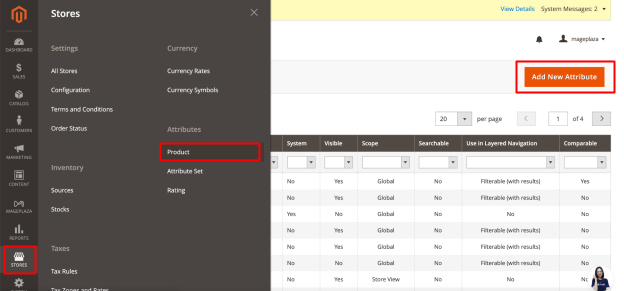
Stores > Attributes > Product.Add New Attribute button.Once created, custom attributes can be assigned to the appropriate attribute set and added to product pages as needed.
Please follow all these steps with detailed guides to create a Product Attribute:
Store > Attributes > Product, then click the Add New Attribute button.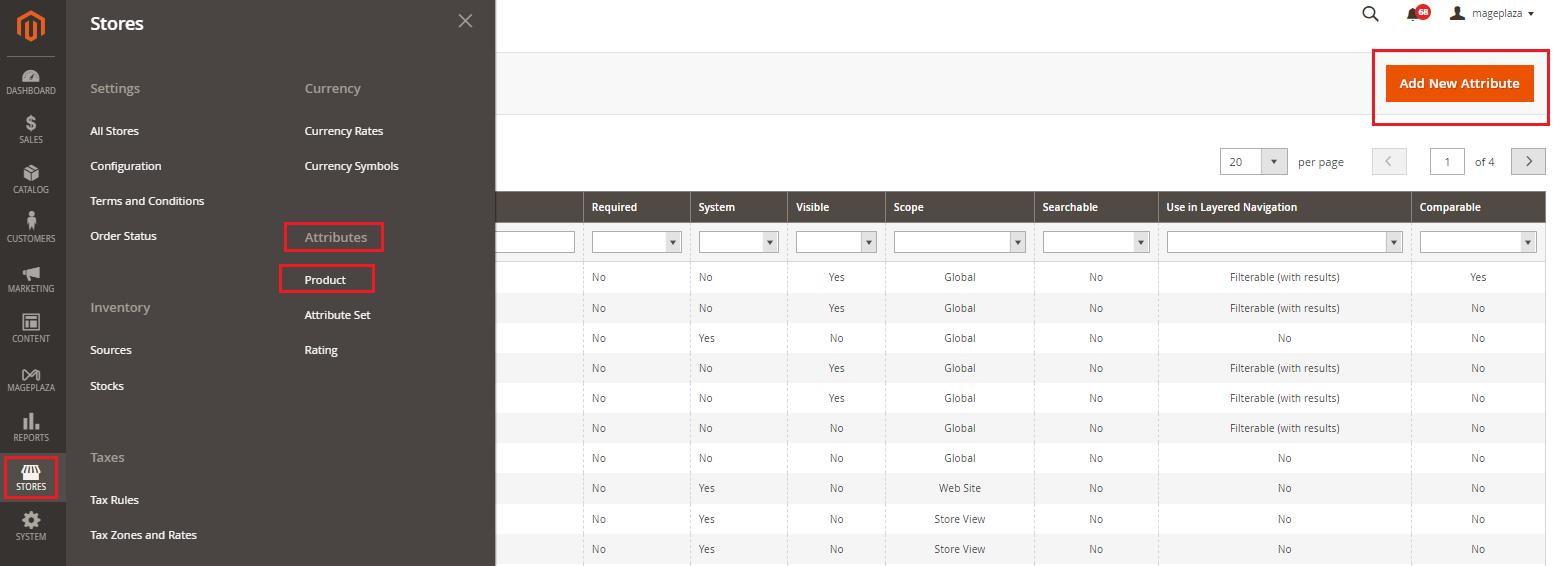
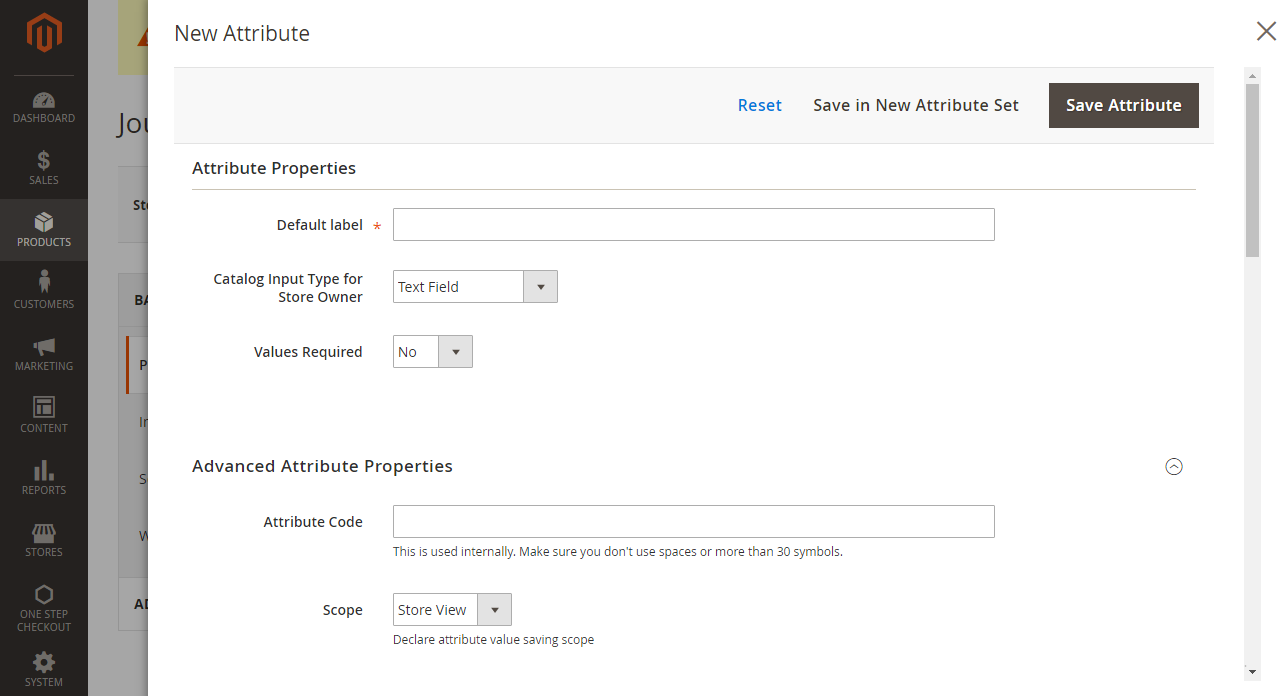
In this step, you are going to fill in the Basic Properties of a product attribute.

Default Label to describe the attribute.In the Catalog Input Type for Store Owner, choose the input type from the list.
Value Required to ask customers to select the options before purchasing.The Advanced Properties include extra details of the attribute, so this step is optional.
Attribute Code that is less than 30 characters and excludes spaces.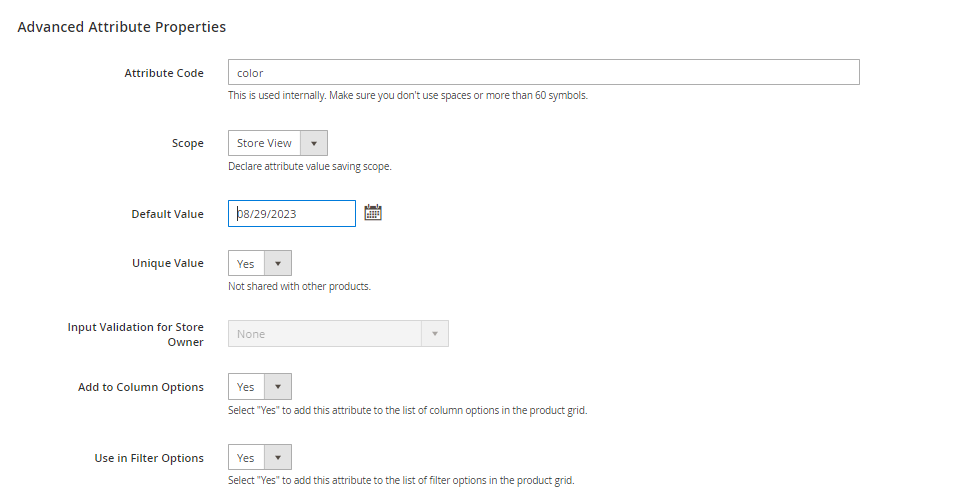
Scope includes Store View, Website, and Global.You will choose one of three places in your store system where the appearance of the attribute is approved.Default Value by clicking on the date you want.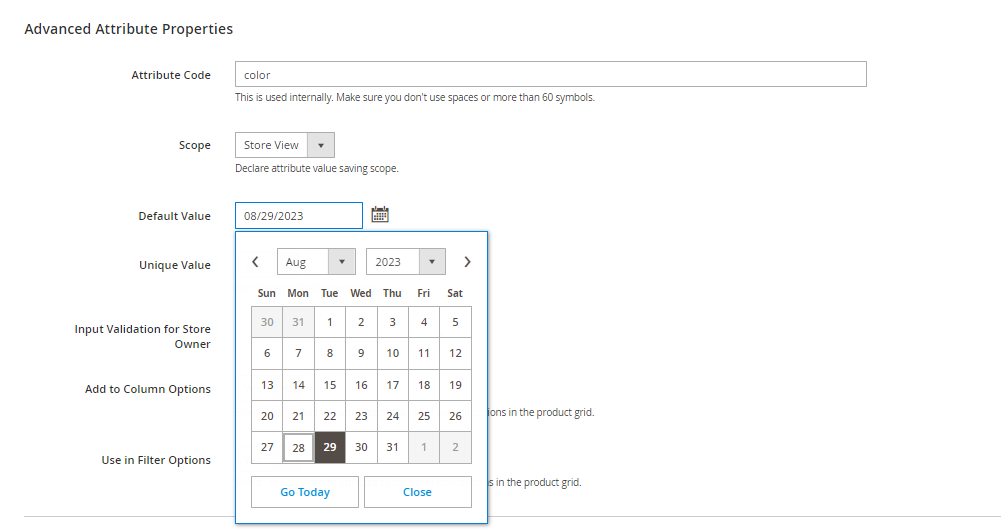
Unique Value if you do not want to share it with other products.Add to Column Options to add this attribute to the list of column options in the product grid.Use in Filter Options to add this attribute to the list of filter options in the product grid.Adding a Field Label will help you find and manage the attributes more easily:
Manage Labels section.Title that is shown for the field label. In case of multiple languages supported on your store, insert the translation of the title for each view.
Now, you need to set up the details in Storefront Properties to decide how the attribute is shown in the frontend:
Storefront Properties.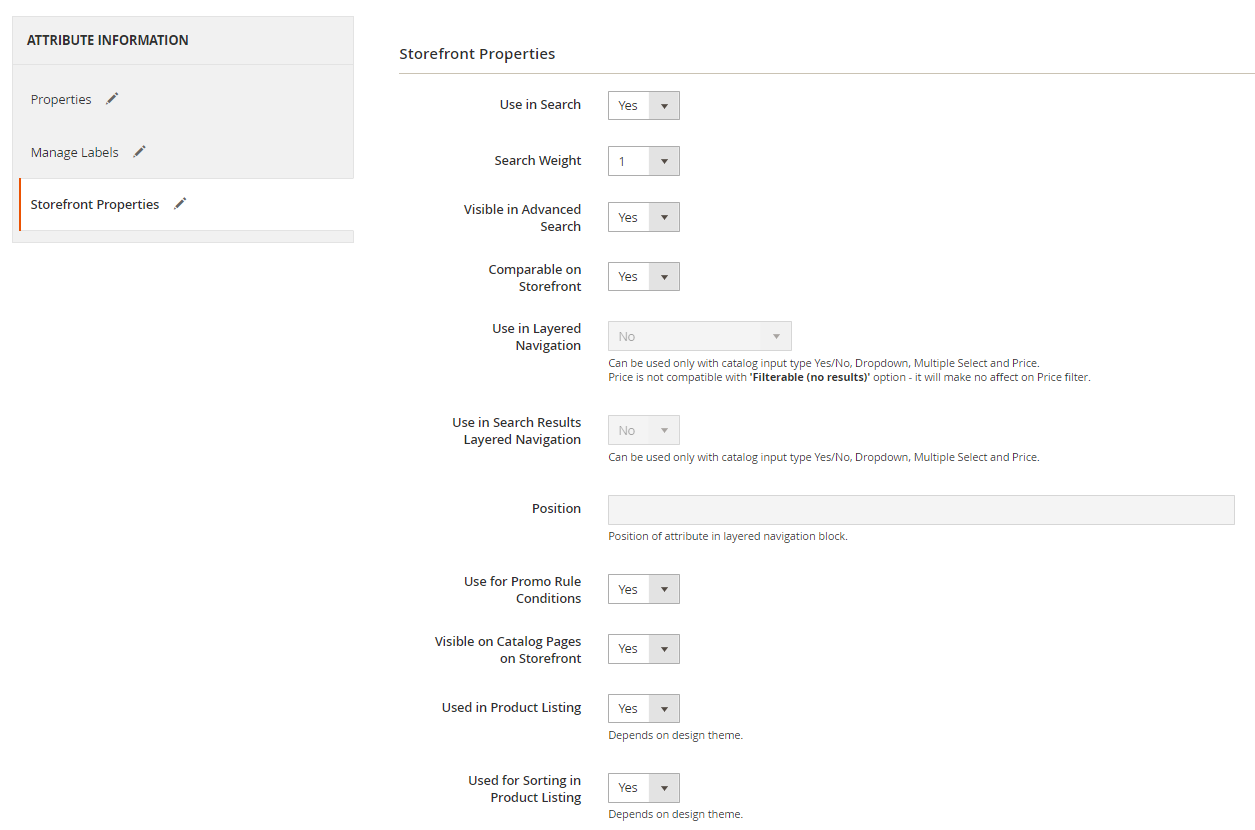
Use in Search to be ready for searching the attribute. Then, fill out the Search Weight and Visible in the Advanced Search fields.Comparable on Storefront field.Use in Layered Navigation.Use in Search Results Layered Navigation.Position of the attribute in the layered navigation block.Use for Promo Rule Conditions field to apply the product attribute for the price rules.Visible on Catalog Pages on Storefront field.Used in Product Listing and Used for Sorting in Product Listing field.Save Attribute to finish everything.In the settings process of creating the new product attribute, there are many input types you need to assign directly to the attribute fields, such as Text Field, Dropdown, or Yes/No. The input types will specify the type of data that is inserted into the fields, the format of the fields, and input control. All attribute fields take a responsibility to give more details about your products, and it is required for the customers to complete them before purchasing if needed.
Text Field: The field supports text type with only one line.Text Area: The text area is the text field with multiple lines in it. It allows a paragraph such as a product description. For the text area, the WYSIWYG Editor is available to format with HTML tags or insert tags directly into the text.Date: The Date value can be entered directly or selected from the dropdown list or clicked on the Calendar icon, depending on your purpose.Yes/No: The field includes 2 options: Yes and No in the dropdown.Dropdown: Dropdown allows listing all values for the field at the same time and accepts only one value.Multiple Select: Many values will be accepted at the same time in the field. All values appear in the dropdown.Price: Price value is set for the price field of the product. You can also use the Price value for the Special Price, Tier Price, or Cost field. The currency is based on your configuration.Media Image: The images of the attribute in the Media Image field will link to an additional image of the product with Base, Small, and Thumbnail, although the thumbnail gallery will not include the media image.Fixed Product Tax: Give the fixed number for the FPT rate.Visual Swatch: The visual swatches can describe the true color, texture, or pattern with a hexadecimal color value or an image.Text Swatch: A text swatch is like a button that is used for an attribute value as size.Think of attribute names like product labels—keeping them simple and descriptive makes managing your catalog much easier. Avoid abbreviations or overly technical terms that might confuse customers. A clear and consistent naming style helps both your team and your shoppers navigate your store effortlessly.
Before creating a new attribute, ask yourself:
By planning ahead, you avoid cluttering your store with unnecessary attributes, keeping everything organized and efficient.
If your store offers products in different colors, standardize color names (e.g., “Navy Blue” instead of “Dark Blue #2”) and, if possible, use color swatches. This helps customers quickly identify and select the colors they want, improving their shopping experience.
Instead of creating separate products for each size or color, use Magento’s configurable products to combine them into one listing. This makes product management easier and keeps your store clean while allowing customers to select their preferred options effortlessly.
Magento 2 lets you assign search importance to attributes, helping the most relevant results appear first. For example, if “Material” is crucial in your store, you can increase its search weight so that customers looking for “cotton shirts” get better results.
Over time, some attributes may become obsolete or redundant. Regularly review your product attributes and remove anything unnecessary to:
1. How to Import Magento 2 Product Attributes List?
If you’re not familiar with PHP code, you can utilize our Mageplaza Magento 2 extensions. These applications enable the effortless export of all or specific attribute sets via a CSV file in just a few clicks.
2. How to Integrate a Custom Attribute into the Customer Registration Form in Magento 2?
Magento 2 attributes define product characteristics. To add a custom attribute to the customer registration form, use the Customer Attribute for Magento 2 extension, as it surpasses the limitations of Magento Community’s default features.

3. How to Change the Attribute Scope?
If you wish to alter the scope of attributes, such as switching from Global to Websites, and find these Magento 2 product attributes unavailable in the Attribute grid, you’ll need to make changes in the database. Create an upgrade script with the following code:
$setup->updateAttribute('catalog_category', 'menutopdescription1', 'is_global', Mage_Catalog_Model_Resource_Eav_Attribute::SCOPE_WEBSITE);
4. How to Apply Promotion Rules to Items with a Specific Attribute Value?
Magento 2 attributes can serve to set specific conditions for catalog/shopping cart price rules, triggering actions when certain conditions are met. For instance:
Offer a discount on a particular product
Provide free shipping for orders above a certain amount
Schedule a promotion for a specific time span.
Navigate to Admin > Marketing > (Promotions) Catalog Price Rules > Add New Rule to utilize this functionality.

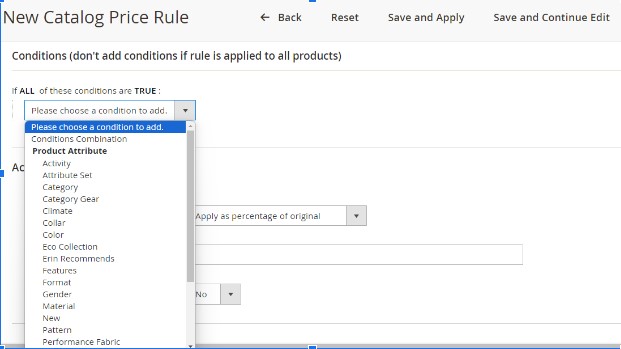
Remember to set “Use for Promo Rule Conditions” to “Yes” (under the Storefront Properties tab of the Magento 2 attribute’s configuration panel) to enable the use of attributes for promotion rule conditions.
In conclusion, adding a product attribute in Magento 2 offers a powerful way to categorize and manage your product information. By following the steps outlined, you can create custom attributes that best suit your specific needs. Remember to carefully consider the attribute type, label, and storefront properties to ensure a smooth customer experience. With these attributes in place, you can effectively organize your products and provide a more informative shopping experience for your customers. Additionally, for ongoing smooth operations, it’s essential to consider our Magento maintenance service to ensure your store’s stability and performance.
Related Post

Jacker is the Chief Technology Officer (CTO) at Mageplaza, bringing over 10 years of experience in Magento, Shopify, and other eCommerce platforms. With deep technical expertise, he has led numerous successful projects, optimizing and scaling online stores for global brands. Beyond his work in eCommerce development, he is passionate about running and swimming.
Related Post

Change Store Email Addresses - Mageplaza

Change Welcome Message - Mageplaza
Customize the welcome message on your store's homepage to provide a personalized touch for your customers. Improve the user experience with our step-by-step guide.

Configure Magento 2 Contact Form & Email: Detailed Guides - Mageplaza
Configure the email address for your Magento 2 store's contact form and ensure that your customers can easily get in touch with you with this informative guide

How to Install Magento 2 with Sample Data - Mageplaza
How to install Magento 2 with Sample Data. In this topic we will discuss about How to Install Magento 2 Step by Step in Manage Store topic

6 Steps To Stop Brute Force Attacks - Mageplaza
How To Stop Brute Force Attacks in Magento 1, 2. In this topic we will discuss about How To Stop Brute Force Attacks in Manage Store topic

How to set Locale, Language, and Country in Magento 2 - Mageplaza
Setup Locale State Country in Magento 2 provides setup your store information on Locale Options that determines the timezone, language, country and the days.
Change Store Email Addresses - Mageplaza
Change Welcome Message - Mageplaza
Customize the welcome message on your store's homepage to provide a personalized touch for your customers. Improve the user experience with our step-by-step guide.
Configure Magento 2 Contact Form & Email: Detailed Guides - Mageplaza
Configure the email address for your Magento 2 store's contact form and ensure that your customers can easily get in touch with you with this informative guide
How to Install Magento 2 with Sample Data - Mageplaza
How to install Magento 2 with Sample Data. In this topic we will discuss about How to Install Magento 2 Step by Step in Manage Store topic
6 Steps To Stop Brute Force Attacks - Mageplaza
How To Stop Brute Force Attacks in Magento 1, 2. In this topic we will discuss about How To Stop Brute Force Attacks in Manage Store topic
How to set Locale, Language, and Country in Magento 2 - Mageplaza
Setup Locale State Country in Magento 2 provides setup your store information on Locale Options that determines the timezone, language, country and the days.