

Change Store Email Addresses - Mageplaza
3 mins read
|
04-02-2016

Vinh Jacker | 04-04-2016

Magento is an ecommerce platform built on open source technology that provides online merchants with a flexible shopping cart system, as well as control over the look, content and functionality of their online store. Magento offers powerful marketing, search engine optimization, and catalog-management tools (Wikipedia).
Sample Data include sample products, sample orders, and other related data, based on the Luma theme, to serve as test data. While preparing to launch your store or testing new features and updates, online stores can use this data. Therefore, today let’s take a look at how to install Magento 2 with Sample data.
Note: Previously, we showed you how to install Magento 2.3.5 with Sample data. However, this version is now out of date, so the instructions below are only for reference. To catch up with the Magento 2.4.6 ver, please visit: Install Magento 2 on Ubuntu/Debian via Composer & Downloading Code.
This installation guide will show you how to install Magento 2 latest version on your own server or hosting for Magento 2
There are some solutions we can get started with.
In this guide, we will show how to install as the #1 solution. It is easy to get started.
Let’s download a zip file and now time to upload it to the server. You can use WinSCP, Filezilla to upload it to the server, then extract it to public_html directory (let’s call it: Magento root directory).
# File .tar.gz
tar zxf <filename>

# File .zip
unzip <filename>
Add write permission for the following folders: var, app/etc, pub by running below command line:
chmod 777 -R var
chmod 777 -R app/etc
chmod 777 -R pub
You may get this error if it does not have permission.
The Setup Wizard is a multi-page wizard that enables you to go back and forward one page at a time. You cannot skip pages, and you must enter all required information on every single page before you can proceed to the next page.
http://www.example.com/magento2. example.com is your domain name such as: localhost, localhost.com, 127.0.0.1 or your staging domain. magento2 is Magento 2 folder in htdocs Usually, it is http://localhost/magento2.Agree and Set Up Magento.
Continue with the following topics in the order presented to complete the installation.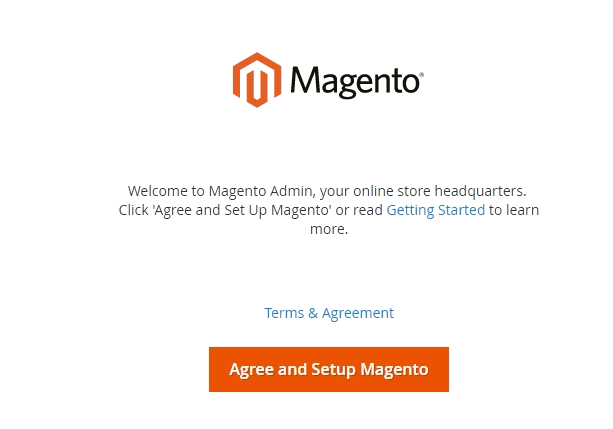
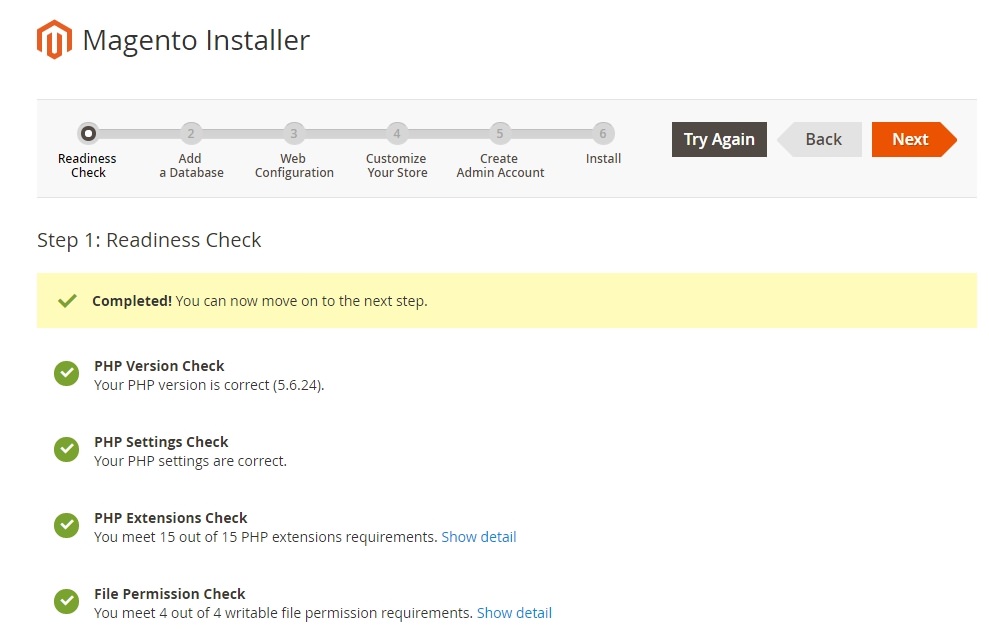
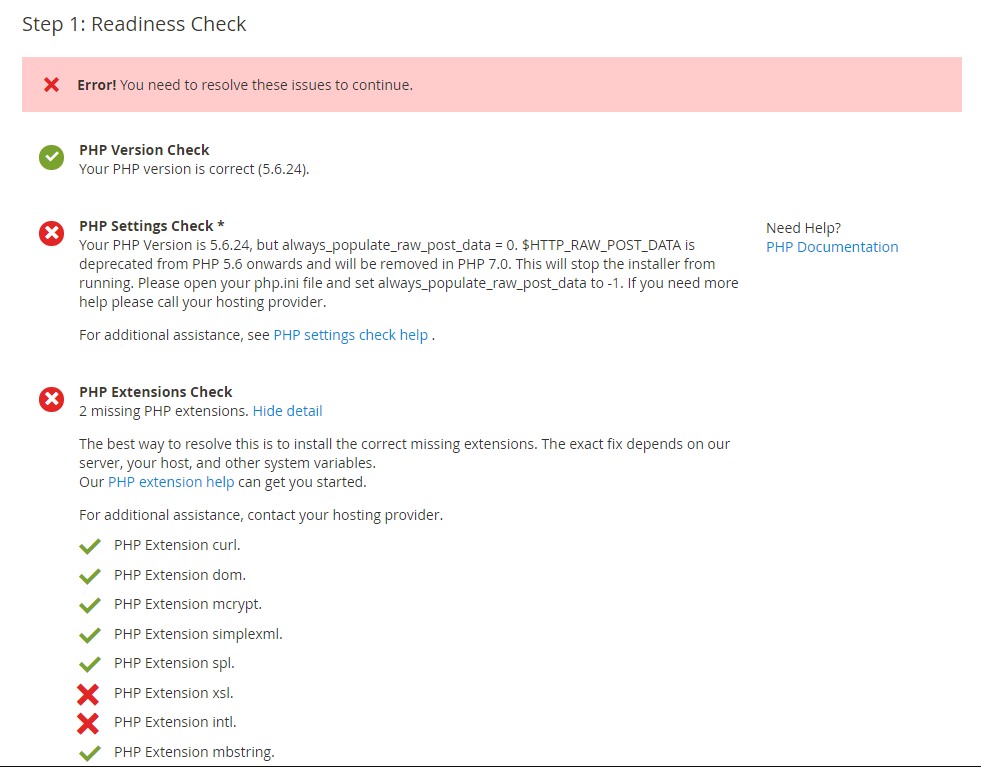
Start Readiness Check. If any errors are displayed, you must resolve them before you continue. Click More detail if available to see more information about each check.
NextFill database information then click Next
http://www.example.comNextLooking for a Trusted Magento Development Company?
137,000 clients can’t be wrong! Ready to become our next success story?
Our Magento experts are willing to help you with any tasks!
Get FREE 1:1 Consultation

Click Next
Important!: Use Skip dependency check for individual modules with caution. We recommend against it because a typical reason for this error is you manually edited the deployment configuration. Editing the deployment configuration is not recommended because future Magento software updates can undo your changes.
Now enter admin information such as

After completing all previous steps in the Setup Wizard, click Install Now.
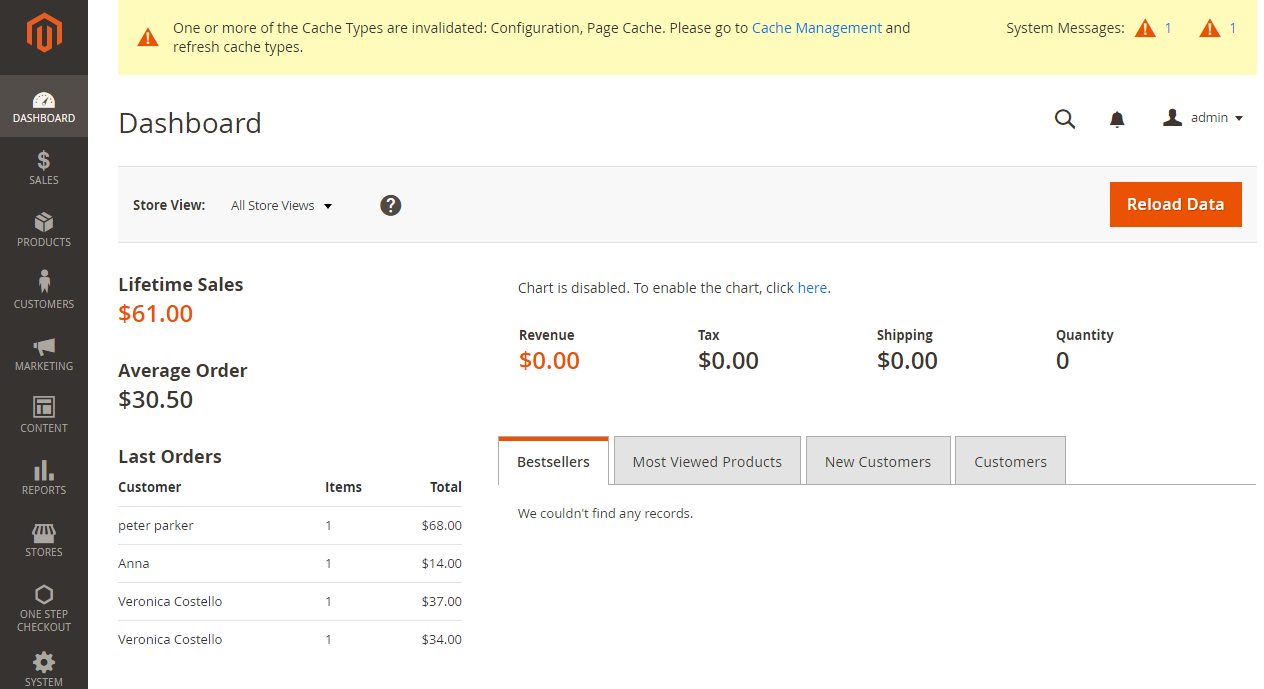
Installation Success: The message Success will be displayed to indicate a successful installation.
Now go to the frontend and backend to see the result
Frontend

Backend
To install Magento 2 by cloning the sample data repositories, you can select these two ways: Clone with the SSH protocol or with the HTTPS protocol.
/var/www/html for CentOS /var/www for Ubuntu
git clone and paste the value from the previous step into this fieldFor example:
git clone [email protected]:magento/magento2-sample-data.git
php -f <sample-data_clone_dir>/dev/tools/build-sample-data.php -- --ce-source="<path_to_your_magento_instance>"
After that, please wait to the command completing.
/var/www/html for CentOS /var/www for Ubuntugit clone https://github.com/magento/magento2-sample-data.git<magento_root>php -f <sample-data_clone_dir>/dev/tools/build-sample-data.php -- --ce-source="<path_to_your_magento_instance>"
For example:
php -f <sample-data_clone_dir>/dev/tools/build-sample-data.php -- --ce-source="/var/www/magento2"
After that, please wait to the command completing.That is everything you need to do to install Magento 2 with Sample data by cloning repositories.
There are some steps you can follow to install Magento 2 Sample data by composer.json:
{
"require": {
    "magento/module-bundle-sample-data": "100.4.*",
    "magento/module-catalog-rule-sample-data": "100.4.*",
    "magento/module-catalog-sample-data": "100.4.*",
    "magento/module-cms-sample-data": "100.4.*",
    "magento/module-configurable-sample-data": "100.4.*",
    "magento/module-customer-sample-data": "100.4.*",
    "magento/module-downloadable-sample-data": "100.4.*",
    "magento/module-grouped-product-sample-data": "100.4.*",
    "magento/module-msrp-sample-data": "100.4.*",
    "magento/module-offline-shipping-sample-data": "100.4.*",
    "magento/module-product-links-sample-data": "100.4.*",
    "magento/module-review-sample-data": "100.4.*",
    "magento/module-sales-rule-sample-data": "100.4.*",
    "magento/module-sales-sample-data": "100.4.*",
    "magento/module-swatches-sample-data": "100.4.*",
    "magento/module-tax-sample-data": "100.4.*",
    "magento/module-theme-sample-data": "100.4.*",
    "magento/module-widget-sample-data": "100.4.*",
    "magento/module-wishlist-sample-data": "100.4.*",
    "magento/sample-data-media": "100.4.*"
}
}
100.4 to 100.3 in the above code.For Magento 2.2.x: Change 100.3 to 100.2 in the above code.
After that, please pass this command:
composer update
That is everything you need to do to install Magento 2 with Sample data by composer.json file.
In this part, Mageplaza would like to give you three errors that usually happen during installing Magento 2 with Sample Date process and ways to fix them.
Error Description: This error occurs when Magento is not set to the correct mode during the installation process.
Solution:
To resolve this error, ensure that you set the correct mode before installing Magento. Open a command-line interface, navigate to the Magento root directory, and run the following command: ` php bin/magento deploy:mode:set developer `
Replace “develop” with “production” if you want to set the production mode. After setting the mode, proceed with the installation process.
Error Description: This error occurs when the PHP max_execution_time value is set too low, causing the installation process to timeout.
Solution:
To resolve this problem, increase the max_execution_time value in your PHP configuration. Locate the php.ini file and modify the following line: ` max_execution_time = 300 `
Increase the value to a higher value, such as 600 or 900, to give the installation process enough time to complete. Save the changes and restart your web server for the new configuration to take effect.
Error Description: This error occurs when the Magento installation script does not have the necessary file system permissions to write or modify files and directories.
Solution
To resolve, you should ensure that the correct file system permission are set for your Magento installation. Typically, directories should have permissions of 755 and files should have permissions of 644. You can set the permission using the following command from the Magento root directory. ` find . -type d -exec chmod 755 {} \; ` ` find . -type f -exec chmod 644 {} \; `
Additonally, make sure that the web server user has appropriate ownership of the Magento files and directories. You can set the ownership using the following command: ` chown -R web-server-user:web-server-group . `
Replace web-server-user and web-server-group with the actual user and group of your web server.
Installing your Magento 2 store using Sample data could be a great approach, as it allows you to test beforehand how the store looks and operates. It also helps to check the changes after installing new extensions or running an update. This guide has shown you how to install sample data for your Magento 2 store, and if you want to discover other Magento 2-related topics, check the below recommendations from us. And don’t forget to leave comments as you go!
Related Post

Jacker is the Chief Technology Officer (CTO) at Mageplaza, bringing over 10 years of experience in Magento, Shopify, and other eCommerce platforms. With deep technical expertise, he has led numerous successful projects, optimizing and scaling online stores for global brands. Beyond his work in eCommerce development, he is passionate about running and swimming.
Related Post

Change Store Email Addresses - Mageplaza

Change Welcome Message - Mageplaza
Customize the welcome message on your store's homepage to provide a personalized touch for your customers. Improve the user experience with our step-by-step guide.

Configure Magento 2 Contact Form & Email: Detailed Guides - Mageplaza
Configure the email address for your Magento 2 store's contact form and ensure that your customers can easily get in touch with you with this informative guide
How to Install Magento 2 with Sample Data - Mageplaza
How to install Magento 2 with Sample Data. In this topic we will discuss about How to Install Magento 2 Step by Step in Manage Store topic

6 Steps To Stop Brute Force Attacks - Mageplaza
How To Stop Brute Force Attacks in Magento 1, 2. In this topic we will discuss about How To Stop Brute Force Attacks in Manage Store topic

How to set Locale, Language, and Country in Magento 2 - Mageplaza
Setup Locale State Country in Magento 2 provides setup your store information on Locale Options that determines the timezone, language, country and the days.
Change Store Email Addresses - Mageplaza
Change Welcome Message - Mageplaza
Customize the welcome message on your store's homepage to provide a personalized touch for your customers. Improve the user experience with our step-by-step guide.
Configure Magento 2 Contact Form & Email: Detailed Guides - Mageplaza
Configure the email address for your Magento 2 store's contact form and ensure that your customers can easily get in touch with you with this informative guide
How to Install Magento 2 with Sample Data - Mageplaza
How to install Magento 2 with Sample Data. In this topic we will discuss about How to Install Magento 2 Step by Step in Manage Store topic
6 Steps To Stop Brute Force Attacks - Mageplaza
How To Stop Brute Force Attacks in Magento 1, 2. In this topic we will discuss about How To Stop Brute Force Attacks in Manage Store topic
How to set Locale, Language, and Country in Magento 2 - Mageplaza
Setup Locale State Country in Magento 2 provides setup your store information on Locale Options that determines the timezone, language, country and the days.