

Change Store Email Addresses - Mageplaza
3 mins read
|
04-02-2016

Vinh Jacker | 06-23-2016
Magento 2 provides an XML Widget file that allows you to manage the page layout as well as place CMS Blocks at any position on the page. Widget can vary from buttons, dialog box, to search box, clock, or visitor counter. Displaying a Widget in the sidebar on your site will help provide more information and increase conversion rates. In the tutorial today, I will instruct you how to insert a Widget into Sidebar with two elements: “Configure a Widget” and “Configure a Layout Update”.
Widget is the awesome functionality you can insert to the CMS page from Magento 2 Configuration because it can be considered as a predefined set of configuration options. In the widget, you can add links that navigate directly to any content page, category, or product as you need.
Content > Elements > Widgets.Add New Widget button.Type box.Design Theme.Continue button.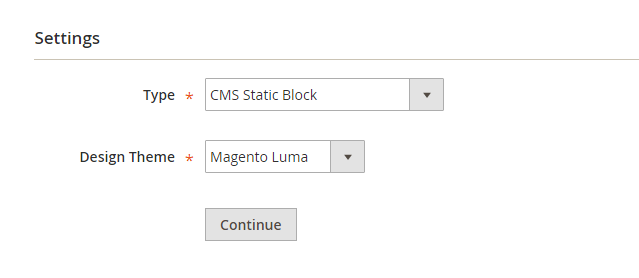
Widget Title for the internal reference.Assign to Store View field or to any store view you want to apply the block.Sort Order if many blocks are placed at the same container. The block is at the top if the inserted value is zero.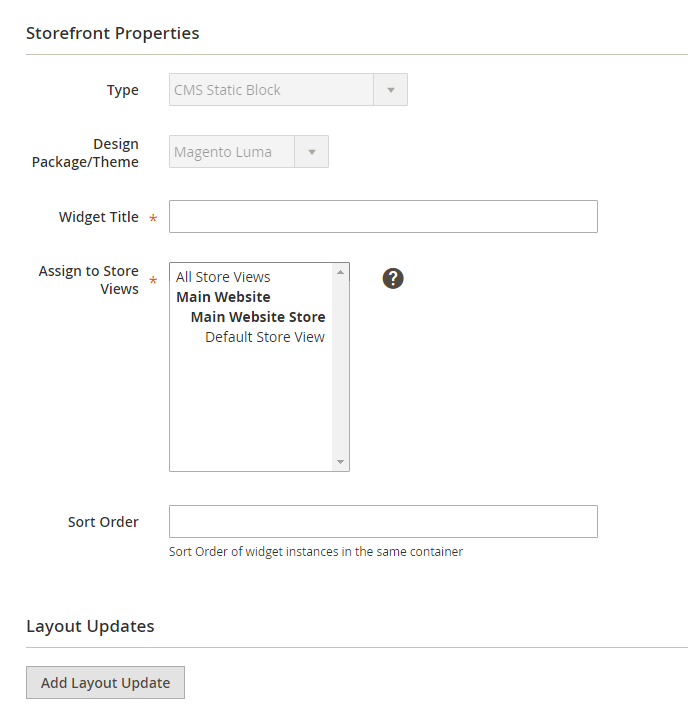
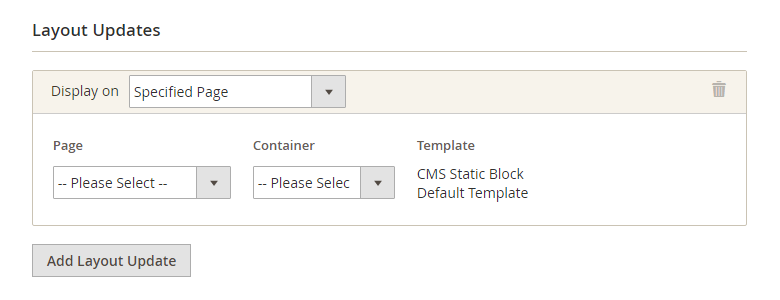
Layout Update to set the layout.
Widget Options tab on the left panel.Select Block to choose the block from the list you want to place.Save to complete.To insert the widget into the sidebar, you need to make a layout update to the XML code by changing lightly in the code. Due to that, it is simple to place the CMS Block Static on the right or left sidebar even or at different positions on the page.
Content > Elements > Blocks.Identifier.Content > Elements > Pages.On the left panel, select the Design tab, in the Layout Update XML box, insert the code for the right or left sidebar.
Code for CMS Block in Sidebar
<reference name="right">
<block type="cms/block" name="right.permanent.callout">
<action method="setBlockId"><block_id>your-block-id</block_
id></action>
</block>
</reference>
Save Page to complete.Now you’re done with the widget insert process in Magento 2. Start creating your own now to communicate with customers more effectively. In case you have any questions, feel free to write in the comment box. There are also other widget posts for you to check out below.
Related Post

Jacker is the Chief Technology Officer (CTO) at Mageplaza, bringing over 10 years of experience in Magento, Shopify, and other eCommerce platforms. With deep technical expertise, he has led numerous successful projects, optimizing and scaling online stores for global brands. Beyond his work in eCommerce development, he is passionate about running and swimming.
Related Post

Change Store Email Addresses - Mageplaza

Change Welcome Message - Mageplaza
Customize the welcome message on your store's homepage to provide a personalized touch for your customers. Improve the user experience with our step-by-step guide.

Configure Magento 2 Contact Form & Email: Detailed Guides - Mageplaza
Configure the email address for your Magento 2 store's contact form and ensure that your customers can easily get in touch with you with this informative guide

How to Install Magento 2 with Sample Data - Mageplaza
How to install Magento 2 with Sample Data. In this topic we will discuss about How to Install Magento 2 Step by Step in Manage Store topic

6 Steps To Stop Brute Force Attacks - Mageplaza
How To Stop Brute Force Attacks in Magento 1, 2. In this topic we will discuss about How To Stop Brute Force Attacks in Manage Store topic

How to set Locale, Language, and Country in Magento 2 - Mageplaza
Setup Locale State Country in Magento 2 provides setup your store information on Locale Options that determines the timezone, language, country and the days.
Change Store Email Addresses - Mageplaza
Change Welcome Message - Mageplaza
Customize the welcome message on your store's homepage to provide a personalized touch for your customers. Improve the user experience with our step-by-step guide.
Configure Magento 2 Contact Form & Email: Detailed Guides - Mageplaza
Configure the email address for your Magento 2 store's contact form and ensure that your customers can easily get in touch with you with this informative guide
How to Install Magento 2 with Sample Data - Mageplaza
How to install Magento 2 with Sample Data. In this topic we will discuss about How to Install Magento 2 Step by Step in Manage Store topic
6 Steps To Stop Brute Force Attacks - Mageplaza
How To Stop Brute Force Attacks in Magento 1, 2. In this topic we will discuss about How To Stop Brute Force Attacks in Manage Store topic
How to set Locale, Language, and Country in Magento 2 - Mageplaza
Setup Locale State Country in Magento 2 provides setup your store information on Locale Options that determines the timezone, language, country and the days.