

Change Store Email Addresses - Mageplaza
3 mins read
|
04-02-2016

Vinh Jacker | 05-11-2016
Learn how to configure the Wishlist in Magento 2 with our step-by-step guide. Enhance your eCommerce store by enabling customers to save their favorite products for later. Our comprehensive tutorial covers everything from initial setup to advanced customization, ensuring a seamless shopping experience. Start optimizing your Magento 2 store today and boost customer engagement with an efficient Wishlist feature.
Key takeaways from this post:
Magento 2 Wishlist provides a virtual shopping cart for your customers, specifically for items they still need to buy. It’s like a “maybe later” pile, allowing them to save products for future reference or purchases. This can be for various reasons, like waiting for a sale, doing more research, or even sharing product ideas with others.
Here’s how Wishlists benefit both customers and store owners:
Customer Benefits:
Save for Later: Customers can easily stash products they like for future reference, ensuring they remember them.
Gift-Giving Helper: Wishlists can be shared with friends and family, making gift-giving occasions a breeze. Recipients can see precisely what the customer desires, eliminating the guesswork.
Track Price Changes: With some configuration, customers can be notified if a wishlist item goes on sale, potentially prompting them to snag it at a discounted price.
Store Owner Benefits:
Increased Sales: Wishlists can keep desired products on customers’ radars, nudge them towards future purchases, and potentially convert them from browsers to buyers.
Customer Insights: Analyzing wishlist data can be a goldmine of information. You can see trends in what products customers save, helping you tailor your product offerings and marketing strategies to align with customer desires.
The wish list can be regarded as a helpful solution for customer shopping because it not only stores favorite products but also allows easy sharing of products with friends.
When enabling the Advanced wishlists, the Add to Wish List link will appear on each product’s category or product detail page. Depending on your current theme, you can set it as a text link or a graphic image. The wish list can also be managed well on the customer account’s dashboard.
Each product in the WishList is allowed to share with the customer’s friends by sending the email from a store email address. Meanwhile, the content of the email is flexible to customize by the clients and the email template and the email sender are configured in the Magento configuration.
For a product with many options, when the customers add it to the wish list, they will appear as the individual items in the list. For other situations, if the same product is added many times to the wish list, instead of creating a new space for a new addition, the quantity of the product is updated automatically.
Configuring the wish list means you will set the template and sender of the email that are used for sharing the list.
Stores > Settings > Configuration.Customer, click Wish List tab.General Option section, choose Yes to enable the list.
Share Options section,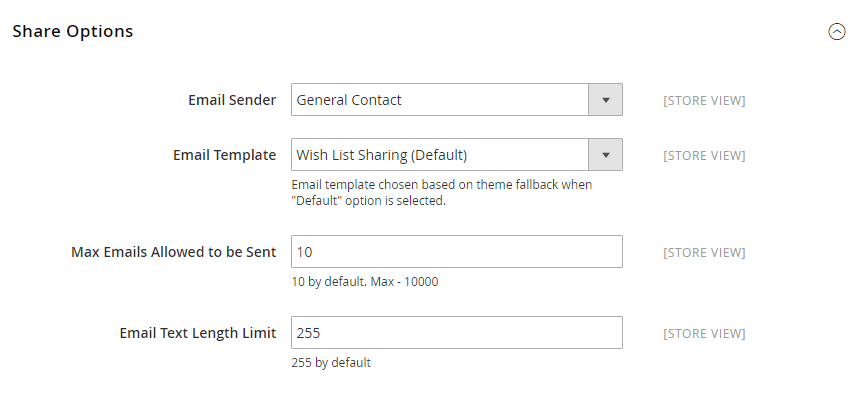
Email Sender, the name contact will appear in the email.Max Emails Allowed to be Sent to limit the maximum number of sent email from 10 to 10,0000.Email Text Length Limit to limit the size of the message. 255 is the default number.My Wish List Link section and allow displaying the number of items in the wish list or item quantities in the Display Wish List Summary field.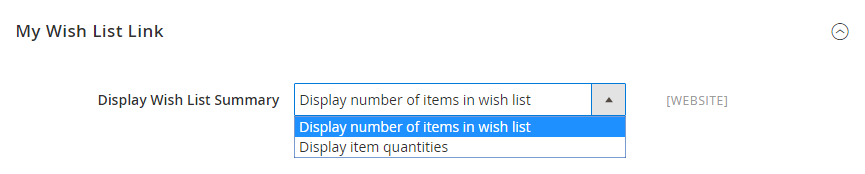
Save Config to finish.This setting enables customers to share the wish list with their friends by email. In addition, both the clients and store admin can manage the wish list from the account dashboard and Magento Admin
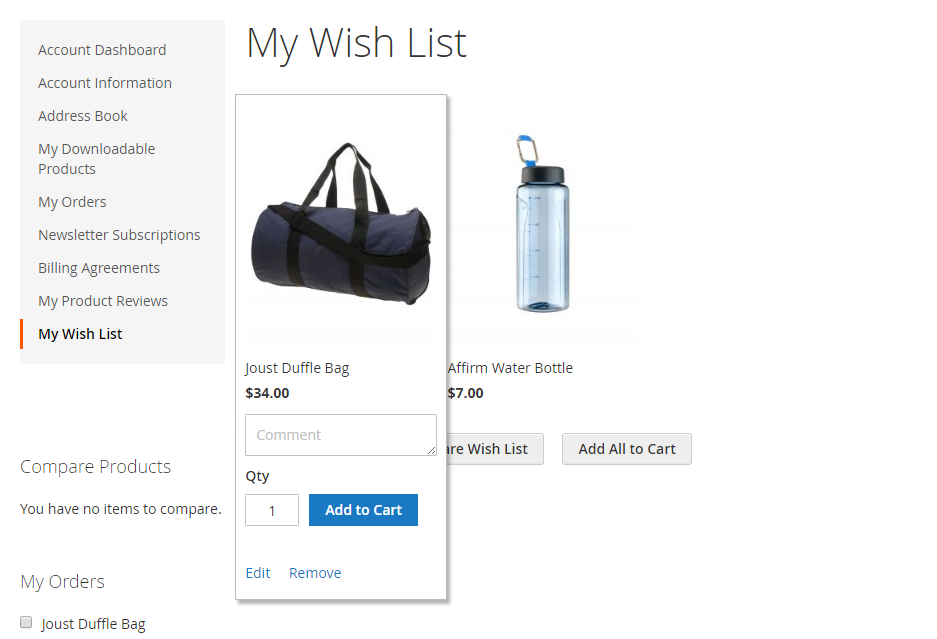
Account Dashboard, select My Wish List.Comment box of each product.Share Wish List button.Message for the sharing.Share WishList when you are ready.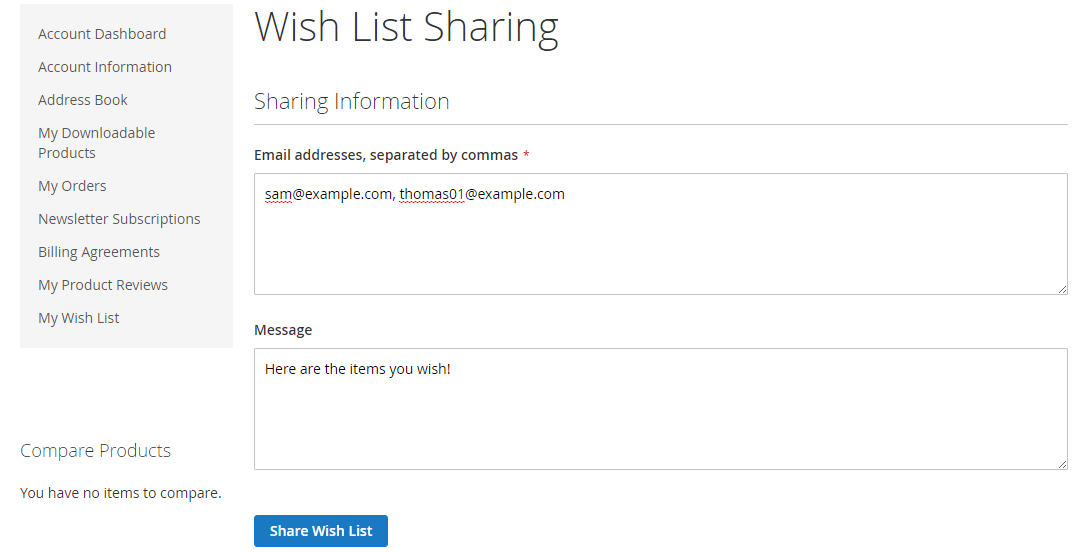
My Wish List page.Add to Cart.Add All to Cart.You can create a wishlist by following the above tutorial, or take advantage of these amazing features by using our Better Wishlist module:
There are also other extensions to create a better experience for customers such as Quick View & AJAX Cart, Social Share, Save cart & Better Wishlist.
Through this post, hopefully you gain knowledge on how important the Wishlist is and the way to configure Wishlist in Magento 2. If you are in need of a completed solution, consider our Better Wishlist module. We are happy to help you with any concerns, so please contact us if you need further guidance.
Is it possible for customers to create multiple wishlists in Magento 2?
Certainly, customers are able to create multiple wishlists in Magento 2. Each wishlist can be given a distinct name, and customers can freely add or remove products based on their preferences.
Can customers manage privacy settings for wishlist items in Magento?
Absolutely, customers have full control over the privacy settings for their wishlist items in Magento 2. They can decide whether to set their wishlist as public or private, giving them the flexibility to determine who has access to view it.
How does a customer share wishlists with others in Magento 2?
To share wishlists with others in Magento 2, customers can navigate to their account dashboard and click on the Share Wishlist button. Subsequently, they can share the wishlist link through email or various social media platforms.
Where can I see and manage the wish list link section in Magento?
In Magento, you can typically find the wish list link section within the customer account dashboard, specifically under the My Wish List tab. This section allows users to efficiently manage all items within their wish list, facilitating tasks such as moving items between wish lists, adding items directly to the cart, and sharing wish lists via email.
Related topics

Jacker is the Chief Technology Officer (CTO) at Mageplaza, bringing over 10 years of experience in Magento, Shopify, and other eCommerce platforms. With deep technical expertise, he has led numerous successful projects, optimizing and scaling online stores for global brands. Beyond his work in eCommerce development, he is passionate about running and swimming.
Related Post

Change Store Email Addresses - Mageplaza

Change Welcome Message - Mageplaza
Customize the welcome message on your store's homepage to provide a personalized touch for your customers. Improve the user experience with our step-by-step guide.

Configure Magento 2 Contact Form & Email: Detailed Guides - Mageplaza
Configure the email address for your Magento 2 store's contact form and ensure that your customers can easily get in touch with you with this informative guide

How to Install Magento 2 with Sample Data - Mageplaza
How to install Magento 2 with Sample Data. In this topic we will discuss about How to Install Magento 2 Step by Step in Manage Store topic

6 Steps To Stop Brute Force Attacks - Mageplaza
How To Stop Brute Force Attacks in Magento 1, 2. In this topic we will discuss about How To Stop Brute Force Attacks in Manage Store topic

How to set Locale, Language, and Country in Magento 2 - Mageplaza
Setup Locale State Country in Magento 2 provides setup your store information on Locale Options that determines the timezone, language, country and the days.
Change Store Email Addresses - Mageplaza
Change Welcome Message - Mageplaza
Customize the welcome message on your store's homepage to provide a personalized touch for your customers. Improve the user experience with our step-by-step guide.
Configure Magento 2 Contact Form & Email: Detailed Guides - Mageplaza
Configure the email address for your Magento 2 store's contact form and ensure that your customers can easily get in touch with you with this informative guide
How to Install Magento 2 with Sample Data - Mageplaza
How to install Magento 2 with Sample Data. In this topic we will discuss about How to Install Magento 2 Step by Step in Manage Store topic
6 Steps To Stop Brute Force Attacks - Mageplaza
How To Stop Brute Force Attacks in Magento 1, 2. In this topic we will discuss about How To Stop Brute Force Attacks in Manage Store topic
How to set Locale, Language, and Country in Magento 2 - Mageplaza
Setup Locale State Country in Magento 2 provides setup your store information on Locale Options that determines the timezone, language, country and the days.