


Change Store Email Addresses - Mageplaza
3 mins read
|
04-02-2016

Vinh Jacker | 08-01-2021

When starting on Magento, developers may jump into various problems that are easy to handle if they know the right processes. Some are quite complex to address; nevertheless, if you have solutions documented, you can timely solve the most common issues.
This post will illustrate some of the most popular Magento 2 issues and how you can solve them effectively.
Are you ready to start?
Make sure your store is not only in good shape but also thriving with a professional team yet at an affordable price.
Get Started
Encountering issues within Magento 2 is commonplace, regardless of whether you’re an experienced Magento developer or new to the platform. It is advisable to begin by comprehensively understanding the problem and applying generic troubleshooting methods.
Navigate to the ./var/log directory in your Magento 2 installation.
Look for any errors or exceptions in the log and system.log files.
If you receive a “There has been an error processing your request” message while trying to open the page, check the corresponding report ID in the ./var/report directory. A file with the same name will be there.
If you encounter a file permissions issue, check the ownership of files in the Magento 2 store directory and their permissions by using the UNIX commands chown (change owner) and chmod (change mode).
For Apache, check /var/log/apache2 or /var/log/httpd (folder location depends on your system).
If cache is enabled, clear the following cache directories:
./var/cache
./var/page_cache
./var/generation
Access the .htaccess file in the Magento root directory.
Enable developer mode by adding SetEnv MAGE_MODE “developer” or use the CLI command: php bin/magento deploy:mode:set developer.
Developer mode provides more detailed error information.
In the PHP ini file, set the following:
ini_set('display_startup_errors', 1);
ini_set('display_errors', 1);
error_reporting(-1);
Note: For front-end issues, check the browser console (in Chrome: Developer tools / Console). Besides, enable template path hints in the admin panel: Stores / Settings / Configuration / Advanced / Developer / Debug / ‘Enabled Template Path Hints for Storefront’.
If you’re not a developer, you should find assistance from Magento 2 experts or community forums that can answer any question, such as:
Magento Stack Exchange
Quora
Magento community
Suppose that your Magento is configured with www.yourdomain.com and you desire to edit the domain to www.anotherdomain.com.
Solution
Firstly, navigate to MySQL Manager, choose your database, find the core_config_data table called core_config_data and click on it.
In the core_config_data table, you can find web/secure/base_url and web/unsecure/base_url entries. Then replace your old domain name with a new one and click on the Go button to save the changes.

Many problems in the Magento store are due to the poor performance of the site. To clarify, you can improve the performance of the site to tide over these problems.
Solution
This is one of the simplest ways to speed up Magento 2 yet drives good results. Whenever Magento launches a new version, the performance and other tweaks (like security patches and bug fixes) will be enhanced dramatically.
Varnish Cache or Full Page Cache is an incredible built-in feature of Magento 2 that lets you simplify the process of sending requests to the server from your website. Therefore, activating Varnish Cache will help decrease your website’s response time, contributing to a quicker loading time.
You can decrease the number of separate CSS and Javascript files by merging them into a single and condensed file. This function will help to generate a constant stream of text, with line breaks removed.
Normally, you sometimes forget your admin password. However, don’t worry; you can reset your admin password anytime you want.
Solution
As a Magento developer, if you want to have a quick and simple way to reset or change your Magento admin password, go to your phpMyAdmin or MySQL Manager, then pick your Magento database and go to the admin_user table. Replace your old password with a new one. Remember that you enter the password in the MD5 function.
Magento “Access Denied” problem occurs as you don’t get permission to access the web pages or applications. Some common explanations for these problems are:
It’s important for you to log out, log in to your Magento account, and reset the admin privileges. If you still cannot get it, try these solutions.
Solution
When including a new user from the admin panel, it’s possible to forget to assign a role. In this case, you need to navigate to System > Permissions > User > Click on User> User roles and correct the access right.
The most popular reason for “Access Denied” is incorrect information when logging in to the admin panel. If you attempt to sign out and log in again but still cannot access it, apply the command below to reset the password:
UPDATE admin_user SET password = MD5(‘PASSWORD’) WHERE username = ‘USERNAME’;
It happens that when store admins include a new Magento extension via the downloader and go to the configuration settings of this extension, they will likely meet the “Access Denied” problem. As Magento doesn’t automatically update the privileges of new extensions, you had better reset your admin privileges.
From the Magento dashboard, navigate to System > Permissions > Roles > Click Administrator Role > Role Resources > Set it to All > Save Role.
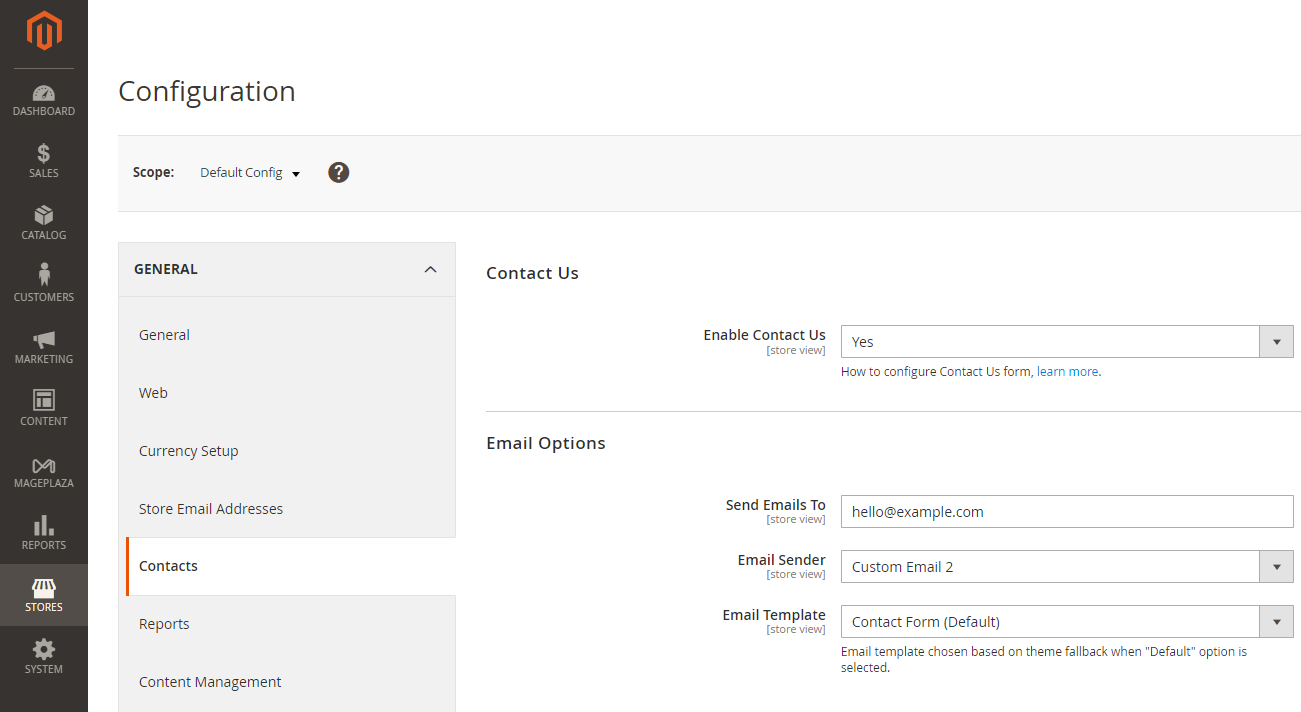
The built-in Magento contact form is a convenient feature for customers to reach out to your store, often found at the bottom of your website, and beneficial for managing multiple stores on Magento. You can easily add this form by following these steps:

Another common problem in today’s list of Magento 2 issues is lacking a Website maintenance mode.
When managing your Magento store, it’s essential to periodically enhance, maintain, or add new features to keep your website up-to-date. During these activities, you should change your Magento 2 store to Developer Mode or enable Magento 2 maintenance mode to prevent disruptions and inform your customers. To set Developer Mode, utilize the following command:
CLI bin / magento deploy: mode: set developer
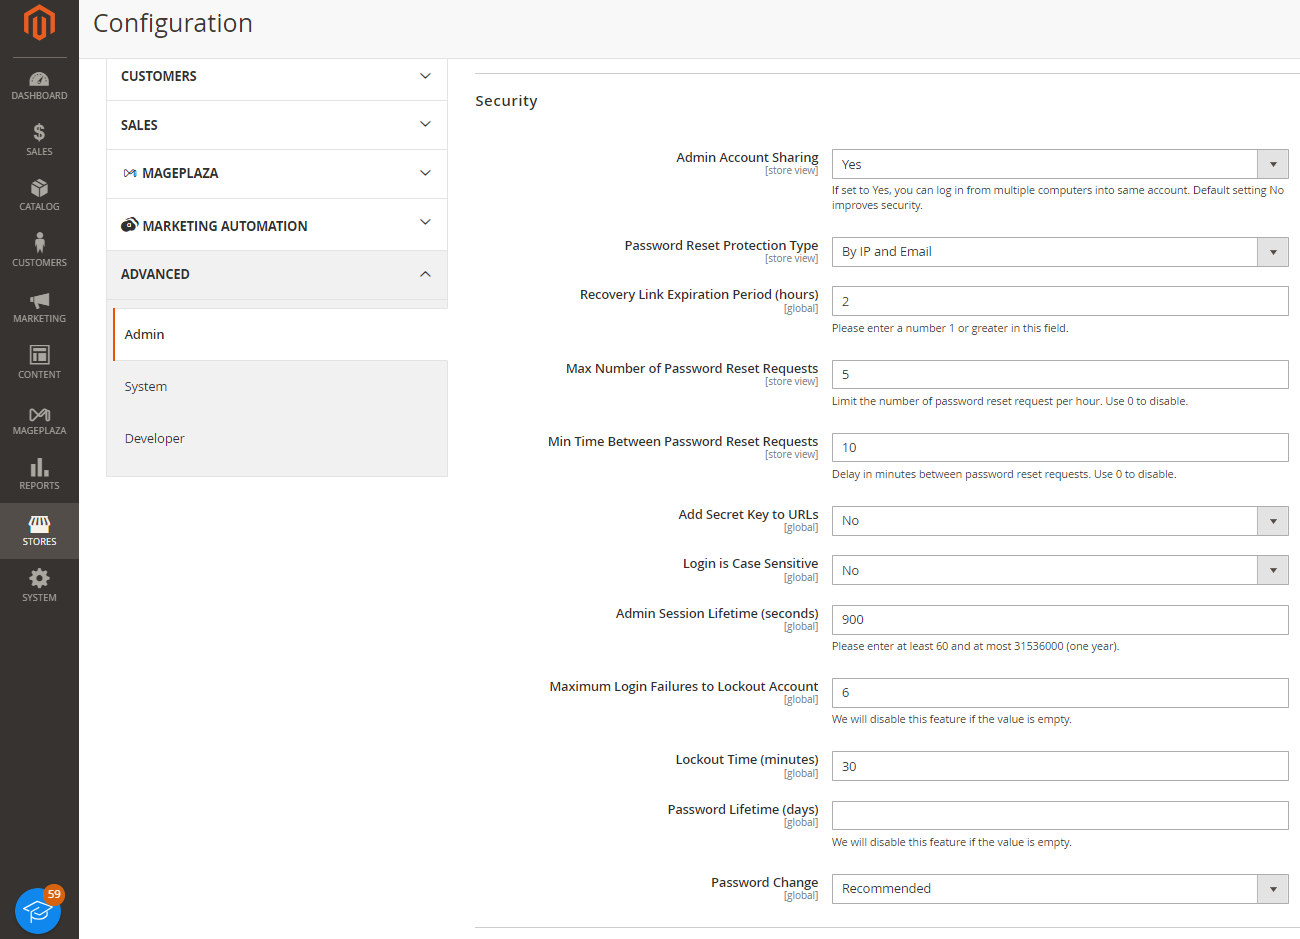
Magento 2 limits a period of time logging in 1 Admin session, which can potentially disrupt your workflow and lead to frustration. To modify this time interval, please follow these steps:
Using Magento 2, you have the ability to enable the URL rewrites and Web Server Apache Rewrites that let you remove the file name “index.php” in your URL.
For example:
http://www.yourdomain.com/magento/index.php/http://www.yourdomain.com/magento/storeview/url-dentifierAs you see, this excellent built-in feature eliminates words that impart nothing of value to search engines or customers. Consequently, all URLs will become more friendly to both search engines and users.
Solution
Step 1: Within the Admin sidebar, navigate to Stores > Settings > Configuration.
Step 2: In the left panel where General is expanded, select Web.
Step 3: Set Use Web Server Rewrites, and click on Save Config.

When addressing SEO-friendly concerns in Magento, enhancing speed, as mentioned in point 2, is a critical step to enhance user experience and elevate your search engine rankings. Notably, significant SEO improvements have been incorporated into the latest iterations of Magento 2, encompassing:
You should prioritize indexing the preferred version, while the alternate version of the same URL should redirect to the HTTPS version using relative standards. For instance, designating HTTPS as the preferred version, and ensuring HTTP points to HTTPS in HTML encoding, and vice versa. It’s essential to avoid indexing both HTTP and HTTPS versions, as this may lead to the perception of duplicate content.
Generally, layered navigation isn’t conducive to optimal SEO outcomes for your site. Consequently, it’s advisable to abstain from indexing sorted and navigated subclasses. Alternatively, you can utilize a layered navigation extension to transform sorted and filtered pages into well-optimized landing pages. Before proceeding, it’s crucial to ensure compatibility between the chosen extension, your Magento 2 version, and any necessary fixes after that.
It’s a good idea to create a blog for your Magento 2 as it helps a lot in connecting with customers more personally. You’ll get to express more about your brand, like backstory, achievement, unique selling point, etc. Moreover, having a blog will enhance your SEO ranks by naturally driving traffic to your site.
Unfortunately, the default Magento 2 does not have this practical feature, so you’ll have to install a third-party extension. If you’re looking for a free module, why don’t you try the Mageplaza Magento 2 Blog extension?
One of the common challenges developers struggle with when installing or upgrading additional features in Magento is file and folder permissions. Upon installing Magento or any third-party extensions, the default permissions undergo a reset, thereby increasing the security vulnerabilities for critical data.
If this issue is bothering you, follow our guidelines below:
For Magento, it’s essential that all files have permissions set to 660. This permission configuration allows only the owner and the group to read and write, while other users are restricted from any permission.
Execute the following command to apply the new file permissions:
find . -type f -exec chmod 644 {} \
In Magento, it’s recommended that all directories maintain permissions of 770. This permission setup grants read, write, and execute permissions solely to the owner and their group. On occasions where 770 is not applicable, you can opt for 755 as an alternative.
Execute the following command to apply the new permissions for folders:
find . -type d -exec chmod 755 {} \
To reset permissions for Magento 2, run the following commands in the terminal after navigating to your Magento root directory:
**cd
find . -type f -exec chmod 644 {} \;  # 644 permission for files
find . -type d -exec chmod 755 {} \;  # 755 permission for folders
chmod 644 ./app/etc/*.xml
chown -R :<web server group>
chmod u+x bin/magento
These permissions must also be run if you encounter any Magento migration issues.
After setting up your Magento 2 store, it’s crucial to install sample data to test the site features. To do so, run the commands in each step below to make use of the mock data:
sudo php bin/magento
Sampledata:deploy
sudo php bin/magento setup:upgrade

Whenever you modify settings or add new extensions, it’s essential to clear the static cache initially. This guarantees that the user interface reflects the recent changes and isn’t utilizing outdated CSS files. You can conveniently achieve this by navigating to System > Tools > Cache Management > Flush Static Files Cache.
Alternatively, you can execute the subsequent commands:
sudo php bin / magento cache: flush
sudo php bin / magento cache: clean
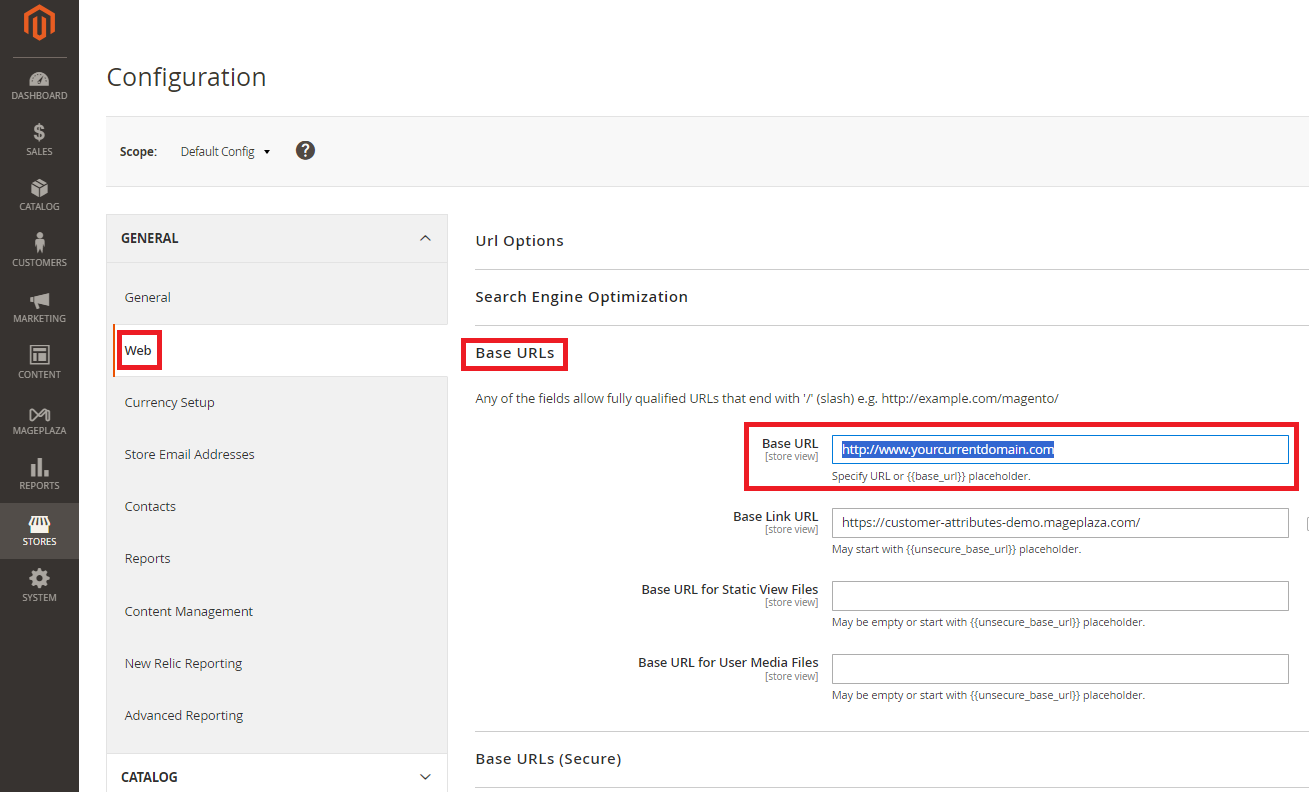
Ensure customers arrive at your Magento website through the “www” prefix, for instance, http://www.yourcurrentdomain.com, as it enhances both SEO and user-friendliness. This can be seamlessly accomplished using Magento.
Follow these steps:
Step 1: Open the .htaccess file in your Magento root directory. Inside this file, find the RewriteEngine, and then add the following code:
RewriteCond %{HTTP_HOST} ^yourcurrentdomain.com$ [NC]
RewriteRule ^(.*)$ http://www.yourcurrentdomain.com/$1 [R=301,L]
Step 2: Save the .htaccess file, then log in to Magento Admin. Navigate to Store > Configuration > General > Web
Step 3: Click the Base URLs tab and modify the Base URL section from http://yourcurrentdomain.com to http://www.yourcurrentdomain.com
Step 4: Click Save Config to ensure your store operates with the “www” prefix.
301 Redirect means permanently leading the IP to the new address. Besides, this function also allows you to rewrite the URL. Consequently, it makes your web store more web-structured and SEO-optimized.
Solution
There are often two ways to generate a 301 redirect for your website.
Generate 301 redirects using .htacess: Search for the code in your .htaccess.
Then add:
Then check the old URL to see the result.
Step 1: Within the sidebar, navigate to Marketing > SEO & Search > URL Rewrites
Step 2: Choose Add URL Rewrites. Here, you can generate URLs for your products, categories, CMS pages, or even custom URLs.
Step 3: Enter the required information and click on Save.
The 503 Error on Magento is of the most common Magento 2 issues, which means an online service is temporarily unavailable to users. This is particularly common whenever you try to install Magento 2 extensions. There are two common reasons why you might have this error:
Solution: If you’re having problems with your server, then reach out to your hosting company.
If that doesn’t work, remove your sessions and cache before doing the above steps.
Magento allows you to categorize customers into a group and manage store behavior based on which group a customer belongs to. Specifically, you can assign tax or status (General, Not Logged In, and Wholesale) for a group to achieve better control of your customers.
Solution
Step 1: From the Admin sidebar, navigate to Customers > Customer Groups
Step 2: Choose Filters > Enter criteria for your groups like ranges of IDs, groups, or tax classes.
Step 1: On the main menu, go to Customers > Customer Groups > Add New Customer Group.
Step 2: Enter your group name.
Step 3: Choose the Tax Class that applies to the group.
Step 4: Choose the site you want to exclude.
Step 5: Then click on Save Customer Group.
A common concern with Magento stores arises when customers seek support for their orders or account details, necessitating assistance from the store’s admin. In such cases, the ability for admins to log in to customer accounts and support them will save the day. With customers who are not familiar with online shopping, assistance from admins is really necessary.
Therefore, Magento offers a feature known as “Login as a Customer” in Magento 2, available in both open-source and enterprise editions.
Steps to enable “Login as a Customer”:
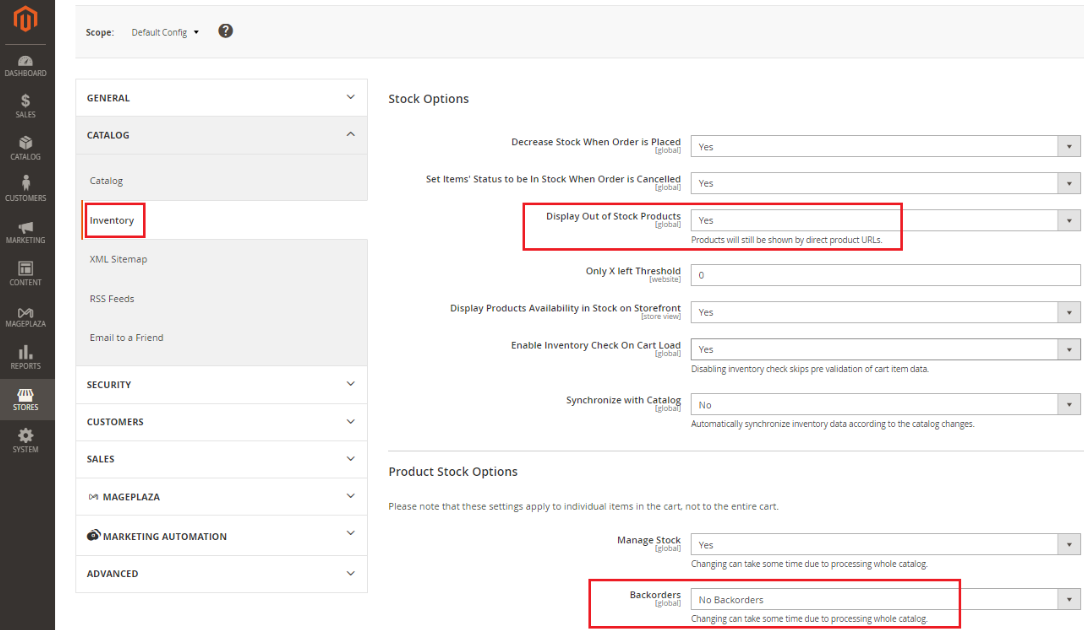
It’s crucial to display the item’s stock status for an online store to enhance user interaction. Often, Magento 2 administrators encounter challenges in managing products with zero available stock. In such cases, displaying an “Out Of Stock” message is essential.
To enable the “Display Out of Stock” feature on your Magento store, follow these steps:
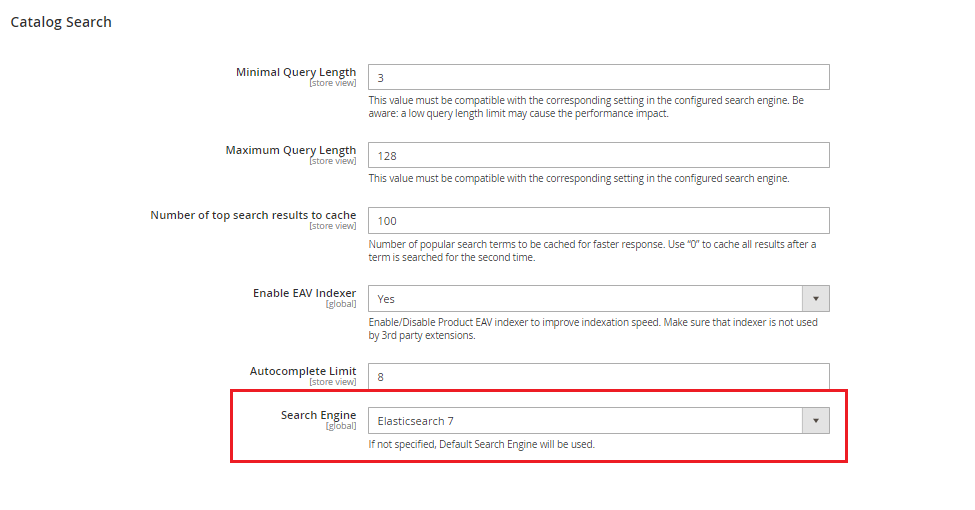
An additional method to address security concerns in Magento involves implementing Elasticsearch for both catalog pages and search results. Elasticsearch significantly enhances search speed, thereby leading to improved website performance.
Magento provides Elasticsearch pre-enabled with default settings starting from version 2.4.x and later. However, for earlier versions, you can set it up by following these steps:
Magento is a quick way to build online stores, but how well your store works depends on your hosting. So, choose the fastest hosting for Magento.
When picking a hosting for Magento 2, think about what you need. Choose a service that is easy, fast, safe, and not too expensive. Most importantly, it should make your store work better. So, go for a provider that gives you everything you need without costing too much.
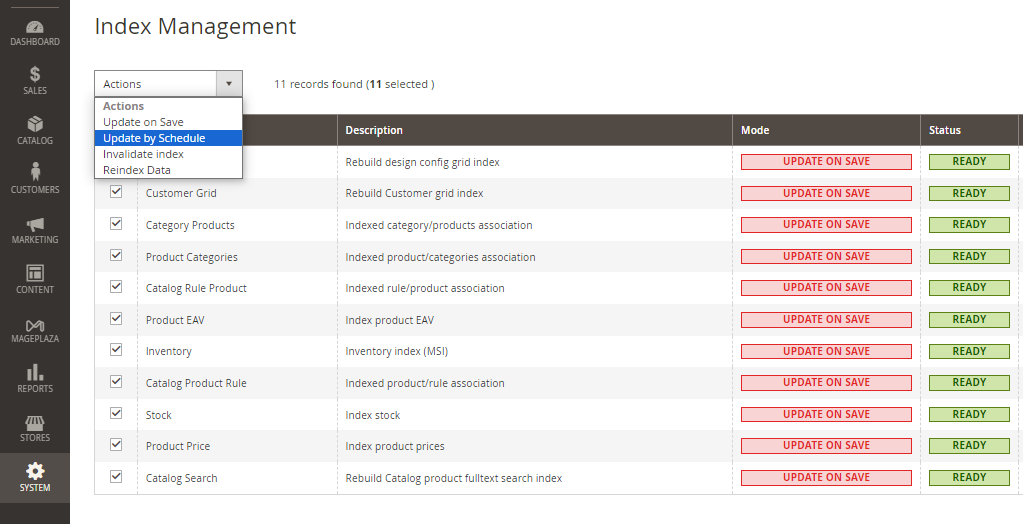
When store owners deal with low product stock issues, they often update price lists and save changes in Magento. However, frequent caching and rebuilding indexes can slow down your site’s performance.
To solve this, you can set Magento’s indexing to “Update by Schedule.”
Magento offers two indexing modes:
Update on Save: This mode triggers specific indexing each time you save a product, attribute, or category. However, indexers can consume resources and slow down your server.
Update by Schedule: In this mode, tasks are executed by a cron job at your chosen time, which is ideal for low-traffic periods.
To check the indexing mode, use this command:
php bin/magento indexer:show-mode
You can change the indexer’s mode to “Update by Schedule” by running the command below:
php bin/magento indexer:set-mode schedule
And set the indexer’s mode to “Update on Save” by running the below command:
php bin/magento indexer:set-mode realtime
You can run indexing from the admin panel by
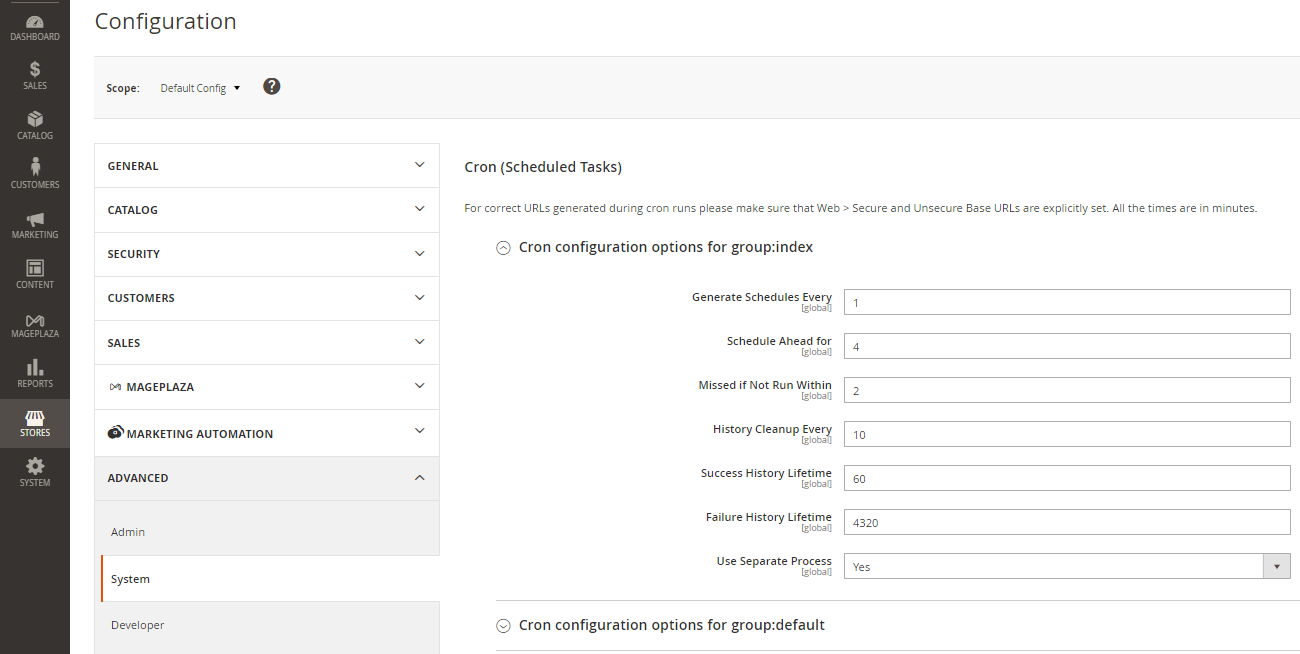
Setting your Magento indexer mode to “Update by Schedule” allows you to set tasks based on the schedule. Besides the method mentioned above, there’s another way to schedule tasks via the admin dashboard in the backend. Let’s see how to do so!
Having an adaptable design matters because more and more people are viewing internet shops on their phones. However, Magento 2 styles might not always look right on all devices.
To fix this issue, you should test your store often on several different platforms and screen sizes. You might want to use browser testing tools to make this process easier. If you find problems, they might be caused by your theme. Contact the theme’s provider to either get changes or the fastest fix.
When performing specific operations, such as importing products, users may encounter obstacles in the form of errors related to PHP memory limits. To mitigate this problem, you should increase the PHP memory limit in your server’s php.ini file. Configure it appropriately, especially when dealing with a large store or with a lot of extensions, ensuring compatibility with Magento requirements. By addressing these memory limitations, users can optimize the performance of the Magento platform and streamline operations seamlessly.
Magento 2 relies a lot on JavaScript, which can sometimes cause problems like buttons that don’t work or front-end features that fail to function.
First, you must clear the caches in your browser and Magento. If the problem keeps happening, check for output failures and make sure that no JavaScript files are at odds with each other.
Cron jobs are used by Magento 2 to do many things, such as reindexing and changing currency rates. Still, these cron jobs might fail or go off track from when they are supposed to run.
Start by checking your server’s cron settings to ensure it’s set up correctly. Keep an eye on your cron jobs regularly and think about adding third-party apps that offer more advanced cron control tools
It’s undeniable that nothing is perfect. Every application has its share of glitches and issues that can be addressed when the right procedures are applied. Before you decide to make any changes in the core code, please ensure that you’re familiar with the coding environment in Magento. If you’re not confident in your technology capabilities or want to spend time focusing on your business, you can hire a Magento support and maintenance service provider.
Mageplaza experts will help you with the following tasks:
Don’t hesitate to contact them for free consultations today!
We hope that this article will somehow help you run your Magento store more seamlessly and efficiently. Thank you for reading!

Jacker is the Chief Technology Officer (CTO) at Mageplaza, bringing over 10 years of experience in Magento, Shopify, and other eCommerce platforms. With deep technical expertise, he has led numerous successful projects, optimizing and scaling online stores for global brands. Beyond his work in eCommerce development, he is passionate about running and swimming.
Related Post

Change Store Email Addresses - Mageplaza

Change Welcome Message - Mageplaza
Customize the welcome message on your store's homepage to provide a personalized touch for your customers. Improve the user experience with our step-by-step guide.

Configure Magento 2 Contact Form & Email: Detailed Guides - Mageplaza
Configure the email address for your Magento 2 store's contact form and ensure that your customers can easily get in touch with you with this informative guide

How to Install Magento 2 with Sample Data - Mageplaza
How to install Magento 2 with Sample Data. In this topic we will discuss about How to Install Magento 2 Step by Step in Manage Store topic

6 Steps To Stop Brute Force Attacks - Mageplaza
How To Stop Brute Force Attacks in Magento 1, 2. In this topic we will discuss about How To Stop Brute Force Attacks in Manage Store topic

How to set Locale, Language, and Country in Magento 2 - Mageplaza
Setup Locale State Country in Magento 2 provides setup your store information on Locale Options that determines the timezone, language, country and the days.
Change Store Email Addresses - Mageplaza
Change Welcome Message - Mageplaza
Customize the welcome message on your store's homepage to provide a personalized touch for your customers. Improve the user experience with our step-by-step guide.
Configure Magento 2 Contact Form & Email: Detailed Guides - Mageplaza
Configure the email address for your Magento 2 store's contact form and ensure that your customers can easily get in touch with you with this informative guide
How to Install Magento 2 with Sample Data - Mageplaza
How to install Magento 2 with Sample Data. In this topic we will discuss about How to Install Magento 2 Step by Step in Manage Store topic
6 Steps To Stop Brute Force Attacks - Mageplaza
How To Stop Brute Force Attacks in Magento 1, 2. In this topic we will discuss about How To Stop Brute Force Attacks in Manage Store topic
How to set Locale, Language, and Country in Magento 2 - Mageplaza
Setup Locale State Country in Magento 2 provides setup your store information on Locale Options that determines the timezone, language, country and the days.