
Change Store Email Addresses - Mageplaza
3 mins read
|
04-02-2016

Vinh Jacker | 04-14-2016
![How to Change Logo in Magento 2 [2024 Updated] - Mageplaza](https://cdn.mageplaza.com/media/general/wLZAivY.jpg)
As soon as applying the Magento 2 platform for your online store, one of the first things you may want to do is to change the Magento 2 default logo in the header, and upload a favicon for the browser. Uploading your own logo will make the store more professional and more reliable in the customer’s mind. Especially, the business logo will help you increase the awareness of your brand significantly by differentiating your website from the others.
In the previous tutorial, I discussed changing the Email logo to help you with customizing your emails. So what about the logo of the brand on the website, you may ask? That is why today’s topic is about how to change the logo in Magento 2 via 3 steps.
The size and location of the logo in the header are determined by the store’s theme. Your logo can be saved as either a GIF, PNG, JPG, or SVG file type, and uploaded from the Admin of your store. The default Magento logo in the sample data is an SVG file, which is a scalable XML-based vector graphic format.
![]()
The logo image resides in the following location on the server. Any image file by that name and at that location is used as the theme logo.
Path: app/design/frontend/[vendor]/[theme]/web/images/logo.svg
Or app/design/vendor/magento/theme-frontend-luma/web/images/ then replaced it with a png named logo.svg
If you don’t know the size of the logo, or any other image that is used in your theme, open the page in a browser, right-click the image, and inspect the element.
In addition to the logo in the header, your logo also appears on email templates and on PDF invoices and other sales documents. The logos used for email templates and invoices have different size requirements, and must be uploaded separately.
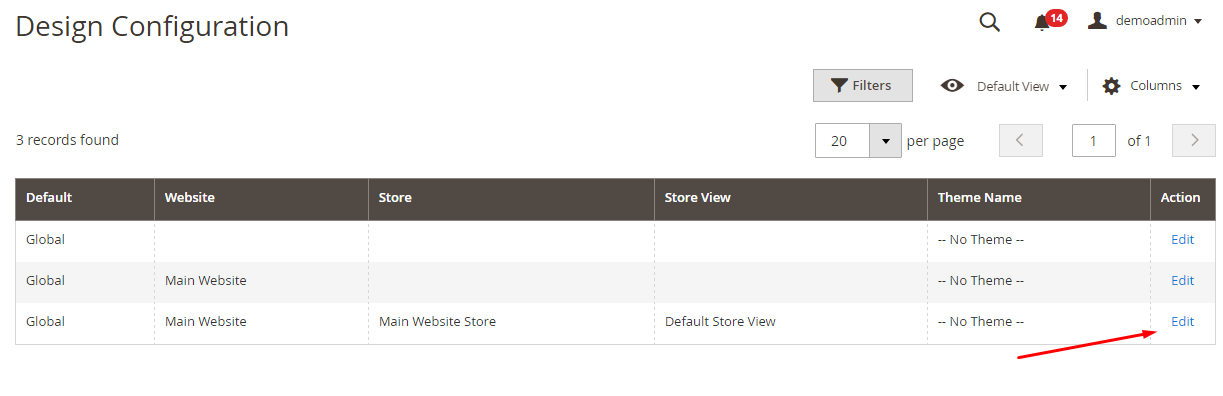
Stores. Then under Settings, choose Configuration.General choose Design.Store View in the upper-left corner to the view where
the configuration applies. Then, clear the checkbox after each field so new values can be
entered.Header section. Then, do the following:From Magento 2.1, this path was changed. It is located at Content > Configuration > Select your current theme > Header
You can see Header section like this.
![]()
Logo Image Width and Logo Image Height.Logo Image Alt field, enter the text that you want to appear when someone hovers
over the image.When complete, click Save Config
Now your logo is ready.
Besides your website header, there are plenty of places you can place your brand logo for a more professional image, build trust, and make use of it as a marketing tool:
In addition, you may also want to update the copyright notice in the footer. These are a few simple design tasks that you can take care of right away. While your store is in development, you can turn on the store demo notice, and then remove it when you’re ready to launch.
If you want to professionalize your online store, start by changing your logo. The above easy-to-follow steps will get you to complete this in no time. Other guidelines for editing actions can be found below. In case you have any problems, reach out to us here and Mageplaza will try our best to help.
Related Topics:

Jacker is the Chief Technology Officer (CTO) at Mageplaza, bringing over 10 years of experience in Magento, Shopify, and other eCommerce platforms. With deep technical expertise, he has led numerous successful projects, optimizing and scaling online stores for global brands. Beyond his work in eCommerce development, he is passionate about running and swimming.
Related Post

Change Store Email Addresses - Mageplaza

Change Welcome Message - Mageplaza
Customize the welcome message on your store's homepage to provide a personalized touch for your customers. Improve the user experience with our step-by-step guide.

Configure Magento 2 Contact Form & Email: Detailed Guides - Mageplaza
Configure the email address for your Magento 2 store's contact form and ensure that your customers can easily get in touch with you with this informative guide

How to Install Magento 2 with Sample Data - Mageplaza
How to install Magento 2 with Sample Data. In this topic we will discuss about How to Install Magento 2 Step by Step in Manage Store topic

6 Steps To Stop Brute Force Attacks - Mageplaza
How To Stop Brute Force Attacks in Magento 1, 2. In this topic we will discuss about How To Stop Brute Force Attacks in Manage Store topic

How to set Locale, Language, and Country in Magento 2 - Mageplaza
Setup Locale State Country in Magento 2 provides setup your store information on Locale Options that determines the timezone, language, country and the days.
Change Store Email Addresses - Mageplaza
Change Welcome Message - Mageplaza
Customize the welcome message on your store's homepage to provide a personalized touch for your customers. Improve the user experience with our step-by-step guide.
Configure Magento 2 Contact Form & Email: Detailed Guides - Mageplaza
Configure the email address for your Magento 2 store's contact form and ensure that your customers can easily get in touch with you with this informative guide
How to Install Magento 2 with Sample Data - Mageplaza
How to install Magento 2 with Sample Data. In this topic we will discuss about How to Install Magento 2 Step by Step in Manage Store topic
6 Steps To Stop Brute Force Attacks - Mageplaza
How To Stop Brute Force Attacks in Magento 1, 2. In this topic we will discuss about How To Stop Brute Force Attacks in Manage Store topic
How to set Locale, Language, and Country in Magento 2 - Mageplaza
Setup Locale State Country in Magento 2 provides setup your store information on Locale Options that determines the timezone, language, country and the days.