

Change Store Email Addresses - Mageplaza
3 mins read
|
04-02-2016

Vinh Jacker | 08-24-2016
Managing tax rates is an essential part of running an e-commerce store. If you’re operating in multiple regions, configuring tax rates manually can be time-consuming and prone to errors. Thankfully, Magento 2 provides built-in functionality to import and export tax rates easily, saving you hours of manual work and ensuring tax compliance across locations.
In this guide, we’ll walk you through everything you need to know about Magento 2 tax rates and show you step-by-step how to import and export tax rates efficiently.
Magento 2 tax rates are predefined rules that determine how much tax is applied to products based on specific conditions such as the customer’s location, product type, or tax class. They are a fundamental part of Magento’s flexible tax configuration system.
Each tax rate in Magento 2 is associated with:
These tax rates ensure that the correct amount of tax is applied at checkout based on customer location and legal tax requirements.
For store owners who sell to multiple countries or states, managing tax rates manually can be complex and time-consuming. This is why Magento 2 offers a tax rate import and export feature that simplifies the process.
Using the Magento 2 import tax rates and Magento 2 export tax rates feature brings significant advantages:
Manually configuring dozens or hundreds of tax rates in the admin panel is not practical. Importing and exporting allows you to manage them in bulk.
Handling tax rates in a CSV file reduces the chance of manual entry mistakes and misconfigurations.
You can easily transfer tax rates between different Magento installations or simply back them up before making major changes.
If local tax rates change, you can quickly update your store’s tax rates using the import feature without editing each rate manually.
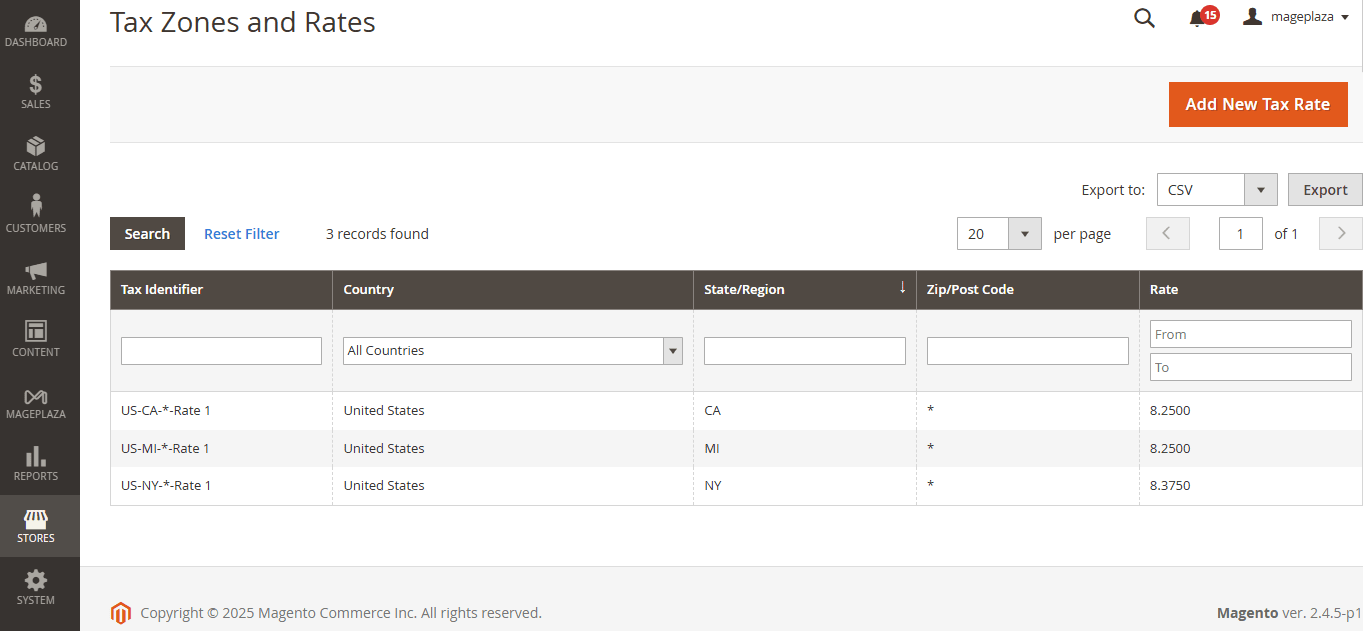
Magento 2 provides built-in options to import and export tax rates directly from the admin panel. Below is a detailed step-by-step guide:
You can use the file exported earlier as a template. The CSV file should contain the following columns:
Ensure that:
Magento 2 will automatically upload the tax rates and apply them across your store.
If you want to backup your existing tax rates or move them to another Magento store, follow these steps:

Pro tip: Always keep a copy of your exported tax rates before making bulk changes to avoid accidental data loss.
To ensure a smooth import process, avoid these common mistakes:
To effectively manage tax rates in Magento 2, follow these best practices:
Properly managing tax rates is vital for any eCommerce store’s compliance and customer trust. Magento 2 makes it easy to import and export tax rates so you can manage them in bulk without hassle.
By following the steps in this guide, you can streamline your tax rate management process, avoid manual errors, and ensure tax regulations are correctly applied across all your store locations.
If you need further assistance with Magento 2 tax rate setup or other store configurations, feel free to reach out to our team.
Related Post

Jacker is the Chief Technology Officer (CTO) at Mageplaza, bringing over 10 years of experience in Magento, Shopify, and other eCommerce platforms. With deep technical expertise, he has led numerous successful projects, optimizing and scaling online stores for global brands. Beyond his work in eCommerce development, he is passionate about running and swimming.
Related Post

Change Store Email Addresses - Mageplaza

Change Welcome Message - Mageplaza
Customize the welcome message on your store's homepage to provide a personalized touch for your customers. Improve the user experience with our step-by-step guide.

Configure Magento 2 Contact Form & Email: Detailed Guides - Mageplaza
Configure the email address for your Magento 2 store's contact form and ensure that your customers can easily get in touch with you with this informative guide

How to Install Magento 2 with Sample Data - Mageplaza
How to install Magento 2 with Sample Data. In this topic we will discuss about How to Install Magento 2 Step by Step in Manage Store topic

6 Steps To Stop Brute Force Attacks - Mageplaza
How To Stop Brute Force Attacks in Magento 1, 2. In this topic we will discuss about How To Stop Brute Force Attacks in Manage Store topic

How to set Locale, Language, and Country in Magento 2 - Mageplaza
Setup Locale State Country in Magento 2 provides setup your store information on Locale Options that determines the timezone, language, country and the days.
Change Store Email Addresses - Mageplaza
Change Welcome Message - Mageplaza
Customize the welcome message on your store's homepage to provide a personalized touch for your customers. Improve the user experience with our step-by-step guide.
Configure Magento 2 Contact Form & Email: Detailed Guides - Mageplaza
Configure the email address for your Magento 2 store's contact form and ensure that your customers can easily get in touch with you with this informative guide
How to Install Magento 2 with Sample Data - Mageplaza
How to install Magento 2 with Sample Data. In this topic we will discuss about How to Install Magento 2 Step by Step in Manage Store topic
6 Steps To Stop Brute Force Attacks - Mageplaza
How To Stop Brute Force Attacks in Magento 1, 2. In this topic we will discuss about How To Stop Brute Force Attacks in Manage Store topic
How to set Locale, Language, and Country in Magento 2 - Mageplaza
Setup Locale State Country in Magento 2 provides setup your store information on Locale Options that determines the timezone, language, country and the days.