

Change Store Email Addresses - Mageplaza
3 mins read
|
04-02-2016

Vinh Jacker | 06-30-2016
Tax is an important factor to be considered by online stores when they want to operate in several countries. The EU is a prominent region with a large customer base and potential growth, hence becoming a popular choice for merchants to expand their store to. In today’s EU Tax Configurations from Magento 2, you will follow the steps to set up the tax rules and rates on two store views: France and Germany. The guides are shown clearly to make sure that the tax rules and rates are correct to apply for your EU Tax in the allowed jurisdiction.
In addition to EU Tax, you also have a certain example about US Tax and Canadian Tax. Follow these links to get a deeper understanding about the tax rules and rates configuration on Magento 2 stores.
For this example, suppose that multiple VAT-Reduced product tax classes are not needed.
Complete the requirement of creating a new tax rate. Remember to select the correct countries in EU as you need.
Complete the requirement of creating a new tax rule. For example, you create the tax for Retail Customers.
Now you will create store views for each country:
Stores > Settings > All Stores.Stores > Settings > Configuration.Default Config to the France store.General, choose General, then open the Countries Options section, and set the default country to France.Stores > Settings > All Stores.Stores > Settings > Configuration.Default Config to the Germany store.General, choose General, then open the Countries Options section, and set the default country to Germany”.Next, fill out details to set up tax for each country:
Stores > Settings > Configuration.Sales, choose Tax.Tax Class for Shipping to “Shipping”.Calculation Settings workplace,
Tax Calculation Method Based On field, allow calculating the tax on “Total” value of the order.Catalog Prices and Shipping Prices.Apply Customer Tax field.Apply Discount on Prices field.Apply Tax On field, choose “Custom Price” (if available).Default Tax Destination Calculation section, you need to:
Include Tax in Grand Total to “Yes”Enable FPT.Apply Tax to FPT to “Yes”.Stores > Settings > Configuration.Sales, select Tax. Then, do the following:
Store View to Germany.Use Website checkbox that is in the right of the Default Country field, then enter Germany into the field.Use Website checkbox that is in the right of the Default State field, then leave “*” symbol into the field.Use Website checkbox that is in the right of the Default Post Code field, then leave “*” symbol into the field.Save Config to complete.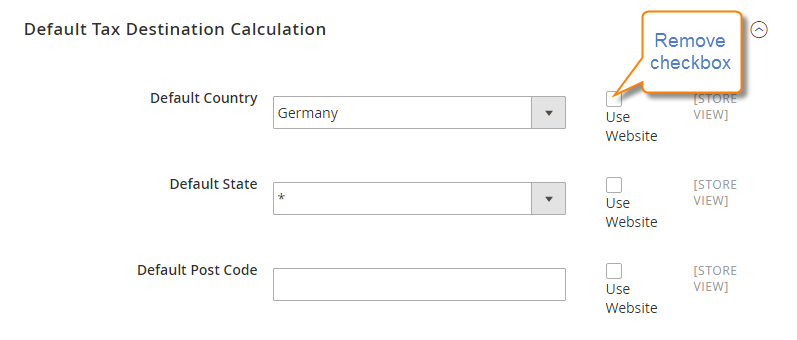
How to Configure EU Tax in Magento 2 tutorial hopefully gives stores like you timely support if EU countries are your target markets. We have shown you via the example of setting up tax for a store running in two countries: France and Germany, by creating two store views. You can follow that to apply to your own store, and if you need help, please leave comments below or ask us. Good luck!
Related Topics

Jacker is the Chief Technology Officer (CTO) at Mageplaza, bringing over 10 years of experience in Magento, Shopify, and other eCommerce platforms. With deep technical expertise, he has led numerous successful projects, optimizing and scaling online stores for global brands. Beyond his work in eCommerce development, he is passionate about running and swimming.
Related Post

Change Store Email Addresses - Mageplaza

Change Welcome Message - Mageplaza
Customize the welcome message on your store's homepage to provide a personalized touch for your customers. Improve the user experience with our step-by-step guide.

Configure Magento 2 Contact Form & Email: Detailed Guides - Mageplaza
Configure the email address for your Magento 2 store's contact form and ensure that your customers can easily get in touch with you with this informative guide

How to Install Magento 2 with Sample Data - Mageplaza
How to install Magento 2 with Sample Data. In this topic we will discuss about How to Install Magento 2 Step by Step in Manage Store topic

6 Steps To Stop Brute Force Attacks - Mageplaza
How To Stop Brute Force Attacks in Magento 1, 2. In this topic we will discuss about How To Stop Brute Force Attacks in Manage Store topic

How to set Locale, Language, and Country in Magento 2 - Mageplaza
Setup Locale State Country in Magento 2 provides setup your store information on Locale Options that determines the timezone, language, country and the days.
Change Store Email Addresses - Mageplaza
Change Welcome Message - Mageplaza
Customize the welcome message on your store's homepage to provide a personalized touch for your customers. Improve the user experience with our step-by-step guide.
Configure Magento 2 Contact Form & Email: Detailed Guides - Mageplaza
Configure the email address for your Magento 2 store's contact form and ensure that your customers can easily get in touch with you with this informative guide
How to Install Magento 2 with Sample Data - Mageplaza
How to install Magento 2 with Sample Data. In this topic we will discuss about How to Install Magento 2 Step by Step in Manage Store topic
6 Steps To Stop Brute Force Attacks - Mageplaza
How To Stop Brute Force Attacks in Magento 1, 2. In this topic we will discuss about How To Stop Brute Force Attacks in Manage Store topic
How to set Locale, Language, and Country in Magento 2 - Mageplaza
Setup Locale State Country in Magento 2 provides setup your store information on Locale Options that determines the timezone, language, country and the days.