

Change Store Email Addresses - Mageplaza
3 mins read
|
04-02-2016

Vinh Jacker | 03-17-2025
Configure Currency Magento 2 to determine what currency customers are allowed to use when checking out of your store. The currency symbol will appear in product prices and sales documents such as orders and invoices. Most interestingly, store admins are able to customize its appearance if needed.
Moreover, with Magento 2 configuration, you can set more than 200 currency units of the corresponding countries in the world. If your store accepts multiple currencies, Currency Chooser is available in the header of the storefront. This helps your store easily reach the global market, as well as enhance customers’ experience. Once they are satisfied with the experience on your site, they tend to make faster purchase decisions and become a loyal customer. So today, let’s discover how to set up currency on the Magento 2 platform, modify the symbol of currency, and update the currency rates.
Recommend post
Creating multiple currencies is a great competitive advantage for online businesses, including the following benefits:
Global Reach:
Customer Experience: Since it’s a great way to save customers time converting prices, multiple currencies improve the overall shopping experience. Additionally, positive exp will improve customer engagement and loyalty.
Transparent Pricing: Currency rates can change, but showing prices in different currencies provides clarity. Customers know exactly how much they’ll pay in their own currency, which avoids confusion or surprises at checkout and helps them make better decisions.
Localization and Trust: When shoppers see prices in their local currency, it creates a familiar sense and makes them trust you a bit more. It shows that the store understands their needs and has made an effort to fit their region, which helps build credibility and makes them more likely to buy.
Improved Conversions: All the benefits above, including more customers, great shopping exp, transparent price, and trust, are perfect ingredients to boost sales.
Before heading to setting Magento 2 currency, let’s quickly view the basic types we have.
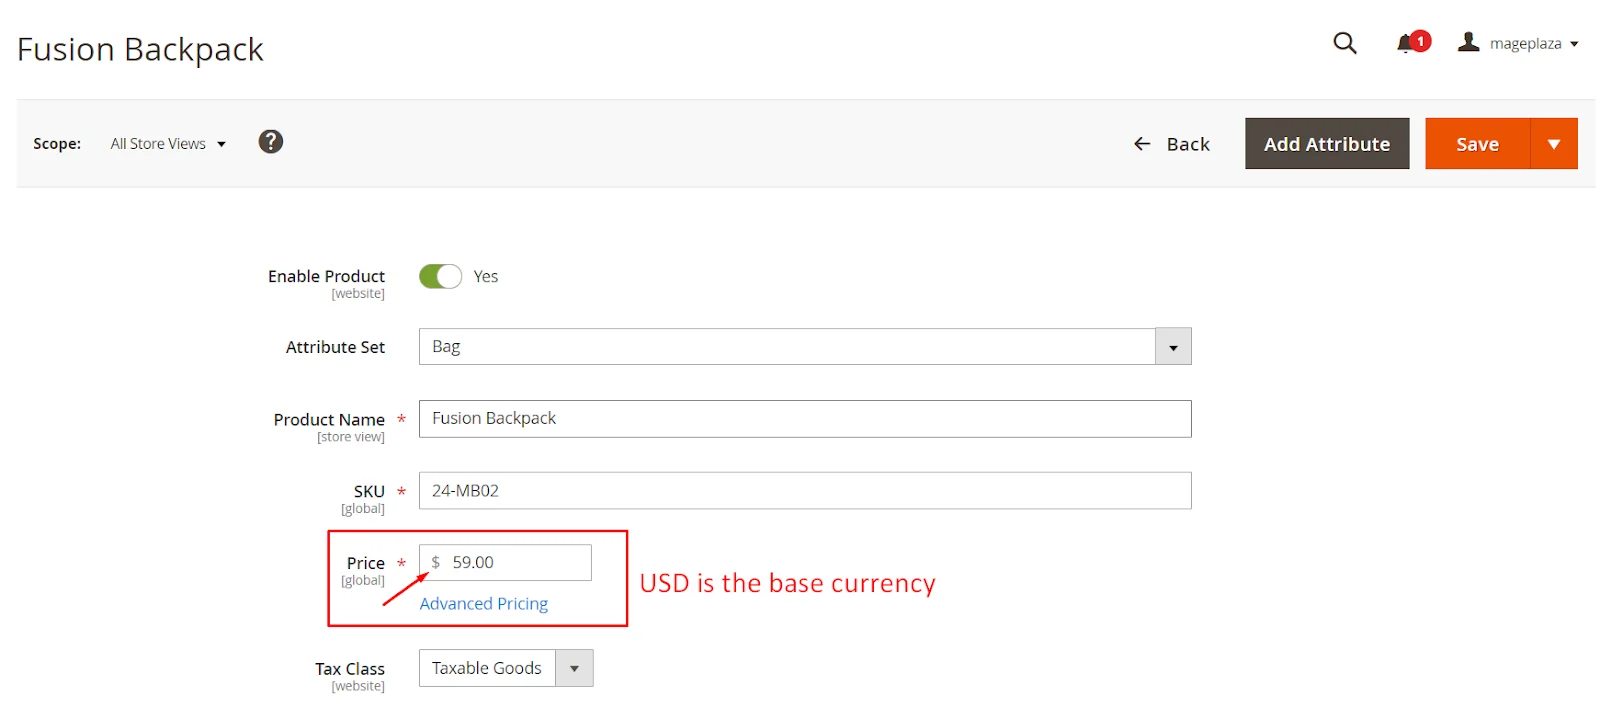
The first type is Magento 2 Base currency. It’s the default currency set in the backend and used for product pricing. It can only be configured at the global or website level and applies to all stores and store views under that website. This means admins cannot set a different base currency for each store view. For instance, if the base currency for website X is USD, and the Fusion Backpack is priced at 59, then all stores and store views under website X will have this product priced at $59.
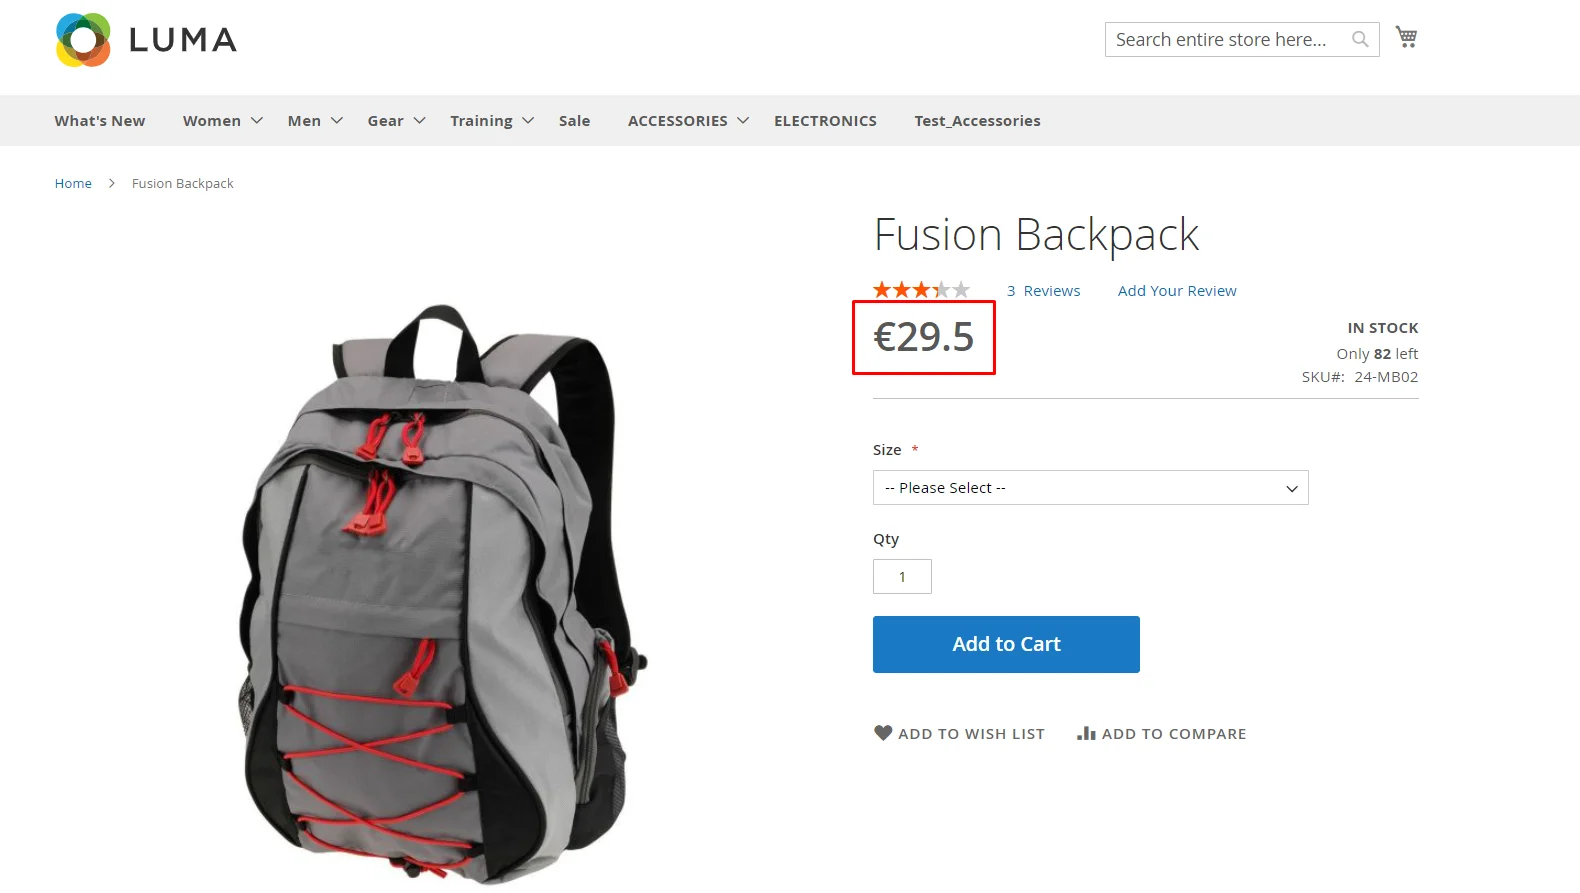
The Default Display Currency in Magento 2 is used to show product prices on the frontend and operates independently from the base currency. Admins can set a unique default display currency for each store view, allowing prices to appear in different currencies for each store view on the frontend.
If the default display currency matches the base currency of the website, the price shown on the frontend will be identical to the one set in the backend. However, if the default display currency differs from the base currency, the frontend price will be calculated using Magento’s currency conversion rate with the following formula:
Display price = Base Price x Currency Rate
Example:
– The base currency of your website is $. The base price of the product Fusion Backpack is 59. – Store view “French” on your website has € as its default display currency. – Currency rate is 0.5 ( $1= €0.5).
=> The display price on the French store view of this product will be 59 x 0.5= €29.5.
Keep in mind that currency rates in Magento can only be configured at the global level. These rates can be set manually or imported from third-party providers like Yahoo Finance Exchange or Webservice.
When customers make payments, the base price in the Magento 2 base currency will be applied, not the displayed price.
Allowed currency is allowed to be used in global/website/store/store views depending on scope configuration. This kind of Magento currency is the same as the base currency in the global/ website scope or as the default display currency.
If currency rates are set for each allowed currency, the corresponding currency will be displayed on the frontend using the default display currency. Users can switch between these allowed currencies, and the prices will update according to the Magento 2 currency conversion rates.
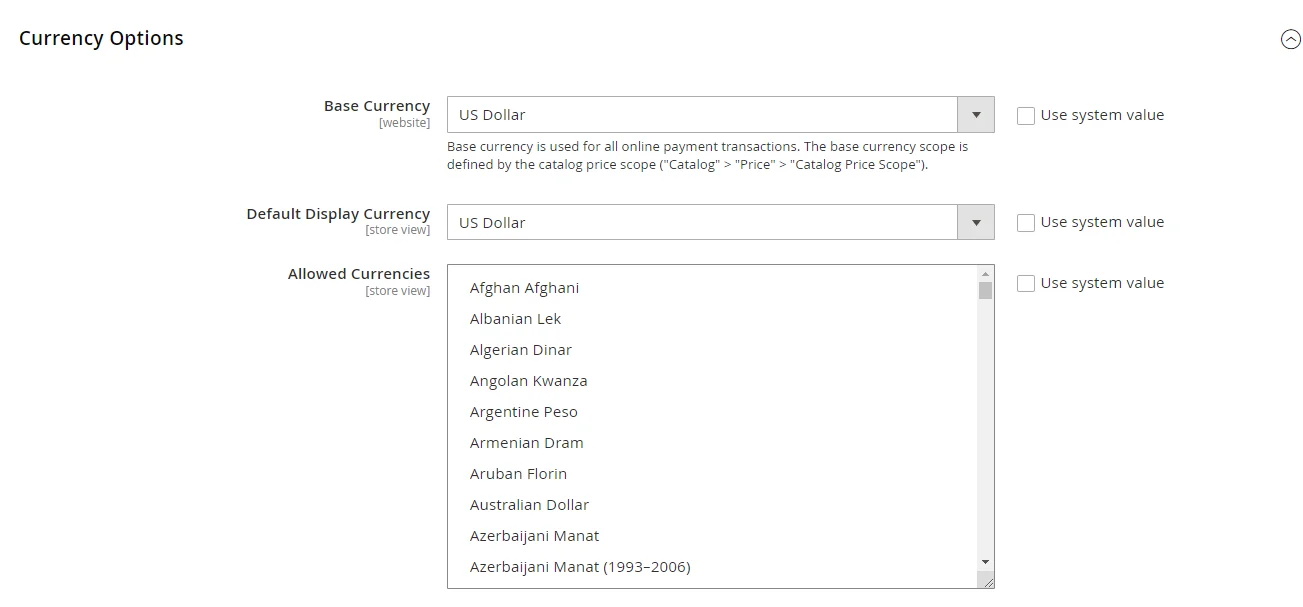
Firstly, you need to define which currencies are accepted to appear along with the price on your store.
Stores > Settings > Configuration.General, select Currency Setup.Currency Options section,
Base Currency in the online transaction.Default Display Currency to the currency that you use to display pricing in your store.Allowed Currencies list, collect any currencies you need for the payment in your store. If you want to support multiple currencies, hold down the Ctrl key and select each option.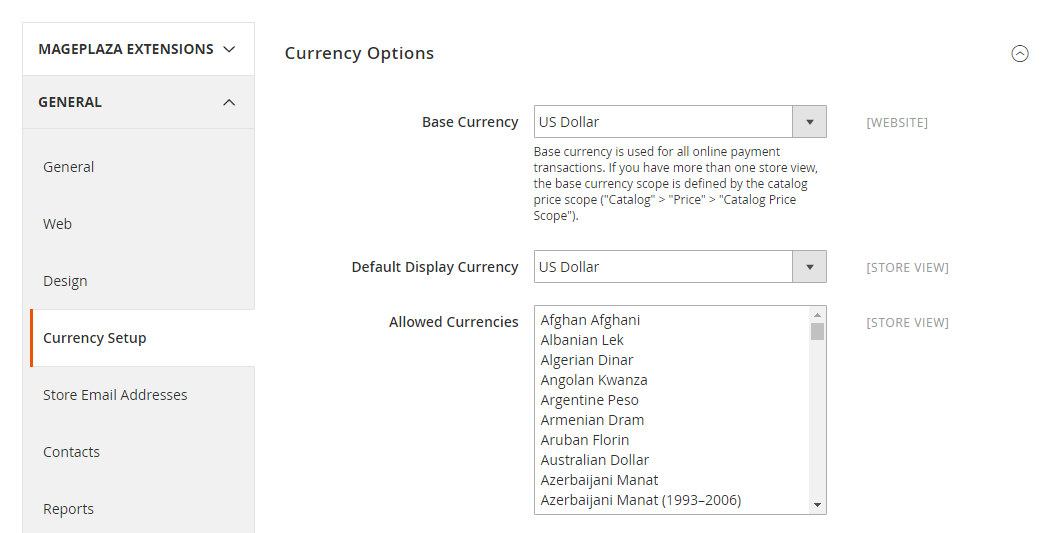
Close it and refresh it later.Catalog, select Catalog, and open the Price section.Catalog Price Scope to either “Global” or “Website”.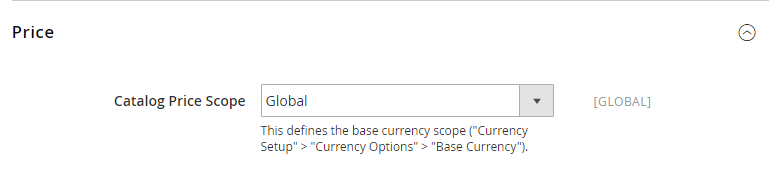
Next, you have to set up a timeout for inactivity:
General, select Currency Setup.Set up your currency service connection by choosing from three available options: Fixer.io (legacy), Fixer API (APILayer), and Currency Converter API. To connect to these options:
Expand Fixer.io (legacy)/Fixer API (APILayer)/Currency Converter API section, then enter your API key.

NOTE: Beginning with the 2.4.6 release, the Fixer.io service has been deprecated and is now replaced by the Fixer API (APILayer) service. It is strongly recommended to utilize an APILayer account instead of continuing with an outdated Fixer.io account.
Scheduled Import Settings enable the currency rate to be automatically updated:
Currency Setup tab, open the Scheduled Import Settings section.Enabled field. Then do the following:
Service by selecting the existing list and the default value is “Webservicex”.Start Time (hours, minutes, seconds) to auto-update the rate.Frequency for the rate updating: Daily, Weekly, or Monthly.Error Email Recipient field, you will insert an email address which receives the email notification when there is any error in the import process. If you enter many emails, the comma is used to separate them.Error Email Sender who will appear on the email notificationError Email Template to the email template used for the error notification.Save Config to complete.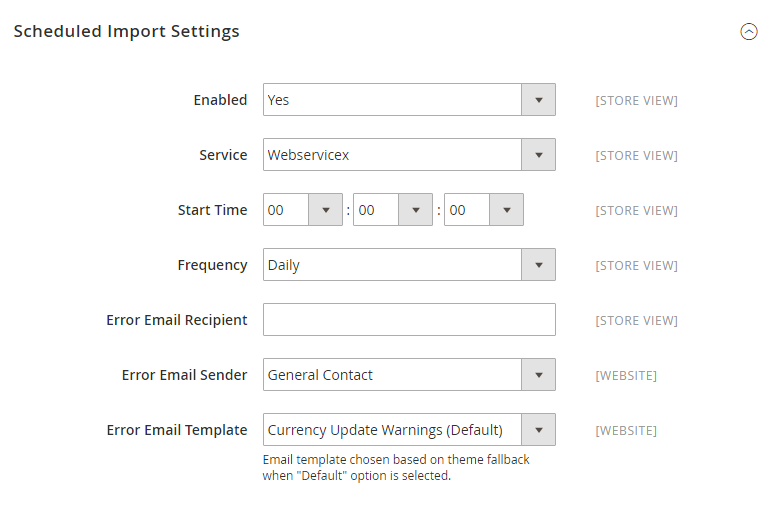
Make sure that the currency rates have been already updated with the current values before they go into effect. Scroll down this post and get the guide to update the rates manually even or to import the rates automatically.
As mentioned above, you can modify the currency symbols comfortably.

Stores > Currency > Currency Symbols.Use Standard checkbox and insert a custom symbol as you want.Save Currency Symbols to enable the new symbol.Before updating the currency rates, ensure that the current rate configuration is ready to use. The currency rates can be set manually, or imported into the store. In particular, you can configure the currency rates to be auto-updated on schedule and these rates are always latest.
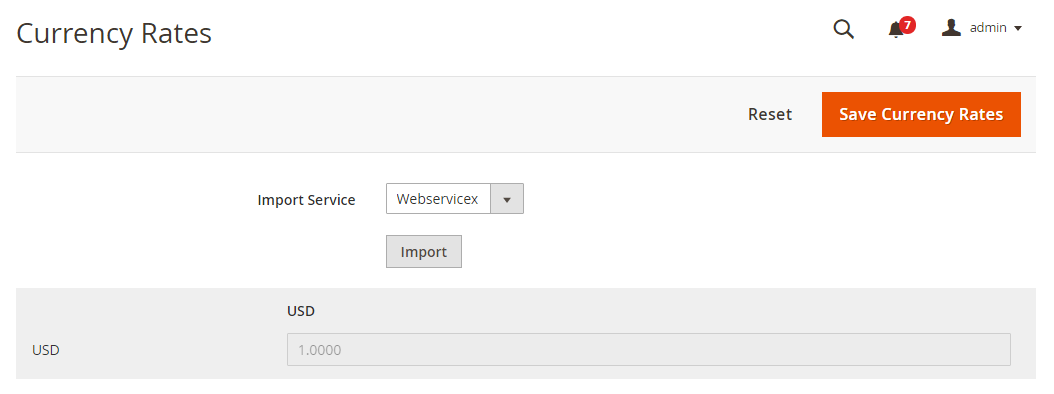
Stores > Currency > Currency Rates.Save Currency Rates to enable it.Stores > Currency > Currency Rates.Import Service while “WebserviceX” is the default service.Import button.The updated rates appear in the Currency Rates list. If the rates have changed since the last update, the old rate appears below for reference.
Save Currency Rates to enable it.The default Magento 2 only gives simple configuration when it comes to setting up currency, while we understand that your needs are beyond. That is why we bring you our Magento 2 Currency Formatter extension. Let’s find out what features it offers:
Allowing customers to view products and make payment in their preferred currency by configuring currency for your Magento 2 store is a great tactic. Not only does it increase conversion rates and boost sales, but it also provides personalized experience and retains customers in the long term. You can either do this on the default Magento 2, or take it to the next level by using our module with more flexible options, easier settings, and other exclusive features. Go ahead and come chat with us if you have anything to share!
Related Post

Jacker is the Chief Technology Officer (CTO) at Mageplaza, bringing over 10 years of experience in Magento, Shopify, and other eCommerce platforms. With deep technical expertise, he has led numerous successful projects, optimizing and scaling online stores for global brands. Beyond his work in eCommerce development, he is passionate about running and swimming.
Related Post

Change Store Email Addresses - Mageplaza

Change Welcome Message - Mageplaza
Customize the welcome message on your store's homepage to provide a personalized touch for your customers. Improve the user experience with our step-by-step guide.

Configure Magento 2 Contact Form & Email: Detailed Guides - Mageplaza
Configure the email address for your Magento 2 store's contact form and ensure that your customers can easily get in touch with you with this informative guide

How to Install Magento 2 with Sample Data - Mageplaza
How to install Magento 2 with Sample Data. In this topic we will discuss about How to Install Magento 2 Step by Step in Manage Store topic

6 Steps To Stop Brute Force Attacks - Mageplaza
How To Stop Brute Force Attacks in Magento 1, 2. In this topic we will discuss about How To Stop Brute Force Attacks in Manage Store topic

How to set Locale, Language, and Country in Magento 2 - Mageplaza
Setup Locale State Country in Magento 2 provides setup your store information on Locale Options that determines the timezone, language, country and the days.
Change Store Email Addresses - Mageplaza
Change Welcome Message - Mageplaza
Customize the welcome message on your store's homepage to provide a personalized touch for your customers. Improve the user experience with our step-by-step guide.
Configure Magento 2 Contact Form & Email: Detailed Guides - Mageplaza
Configure the email address for your Magento 2 store's contact form and ensure that your customers can easily get in touch with you with this informative guide
How to Install Magento 2 with Sample Data - Mageplaza
How to install Magento 2 with Sample Data. In this topic we will discuss about How to Install Magento 2 Step by Step in Manage Store topic
6 Steps To Stop Brute Force Attacks - Mageplaza
How To Stop Brute Force Attacks in Magento 1, 2. In this topic we will discuss about How To Stop Brute Force Attacks in Manage Store topic
How to set Locale, Language, and Country in Magento 2 - Mageplaza
Setup Locale State Country in Magento 2 provides setup your store information on Locale Options that determines the timezone, language, country and the days.