

Change Store Email Addresses - Mageplaza
3 mins read
|
04-02-2016

Vinh Jacker | 06-30-2016
Configure Full Page Cache Magento 2 - The cache management system that will help you improve the performance of your site better and better. In addition, the Magento system will auto-show a notice at the top of the workplace if it is time to refresh the cache. Just follow the Cache Management link and flush the invalid caches.
By default, Magento 2 provides the full page cache on the server to optimize the display of various pages such as category pages, product pages, and CMS pages. If you enable the Magento 2 full-page cache, you can make response time on your store faster as well as reduce the customer’s waiting time to reload the server; otherwise, a fully-generated page can be read directly from the cache. Customers’ experience will be improved, and you can increase conversion rates at once.
Please follow this tutorial to configure the full-page cache from Magento 2 configuration.
Before exploring the detailed guideline for Magento 2 Full Page Cache/ Varnish Cache configuration, we would like to give you some basic information about this innovative feature.
Magento 2 Full Page Cache (or Full Page Cache Magento 2) is a powerful performance optimization feature in the Magento 2 e-commerce platform. It significantly enhances website speed and responsiveness by caching the entire HTML content of web pages, including dynamic elements. This results in faster response times and a smoother browsing experience for customers. The Full Page Cache employs various caching techniques, such as full-page caching, block caching, and hole punching, to ensure that dynamic and personalized content is correctly handled
Magento 2 Full Page Cache captures and stores the complete HTML content of web pages. When a visitor requests a page, Magento will check if a cached version of the page exists. If it does, the cached HTML is served directly to the visitor, bypassing the need for time-consuming database queries and rendering processes. This significantly reduces the server load and improves page load times. The Full Page Cache employs block caching to selectively cache specific elements within a page and hole punching to exclude dynamic content from the cached version. By intelligently managing the cache, Magento 2 ensures that personalized content, such as customer-specific information or shopping cart details, remains up to date.
The Magento 2 Full Page Cache Settings relies on the caching application being utilized, which can be either in the built-in application or Varnish Caching. Nevertheless, Varnish is the recommended solution for Magento users. When opting for Varnish, you need to fill in some specific information, such as the Access list, Backend port, Backend host, and Grace period in order to properly configure the cache settings.
Stores. In the Settings section, select Configuration.System under Advanced in the panel on the leftFull Page Cache section, and continue with following:
In the Caching Application field, select one of the following
In the TTL for public content field, set the time-out for the page cache. The default value is 86400
Varnish option in the Caching Application field, complete the Varnish Configuration section as following instruction: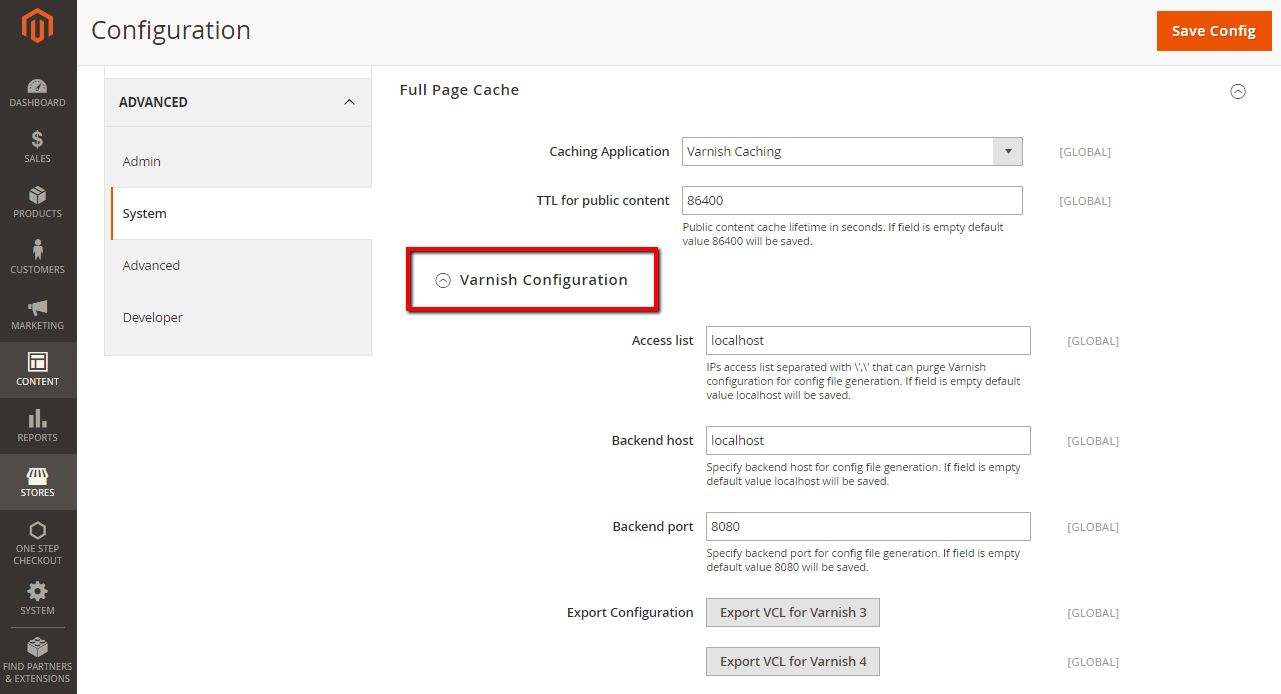
Access list field, enter the IP addresses, IPs access list separated with ',' that can purge Varnish configuration for config file generation. If the field is empty default value localhost will be saved.Backend host field, enter the IP address of the backend host that generates config files. The default value is localhostBackend port field, identify the backend port that is used to generate config files. The default value is: 8080In the Export Configuration field, click the button for the version of Varnish that you use.
Save ConfigRead more: Install & Configure Magento 2 Varnish
In case you need to clear the cache programmatically in Magento 2, please implement these lines of codes in Helper:
<?php
use Magento\Framework\App\PageCache\Version;
use Magento\Framework\App\Cache\TypeListInterface;
use Magento\Framework\App\Cache\Frontend\Pool;
protected $cacheTypeList;
protected $cacheFrontendPool;

public function __construct(
    TypeListInterface $cacheTypeList,
    Pool $cacheFrontendPool
){

    $this->cacheTypeList = $cacheTypeList;
    $this->cacheFrontendPool = $cacheFrontendPool;

}

public function flushCache(Version $subject)
{
  $_types = [
            'config',
            'layout',
            'block_html',
            'collections',
            'reflection',
            'db_ddl',
            'eav',
            'config_integration',
            'config_integration_api',
            'full_page',
            'translate',
            'config_webservice'
            ];

    foreach ($_types as $type) {
        $this->cacheTypeList->cleanType($type);
    }
    foreach ($this->cacheFrontendPool as $cacheFrontend) {
        $cacheFrontend->getBackend()->clean();
    }
}
Full Cache page allows pages to be rendered faster, which improves the load speed and response time of your website, enhancing customers’ experience considerably. After following these instructions, you can easily configure Magento 2 Full Page Cache/ Varnish Cache. If you still have doubts, please write your concerns in the comment box or contact us. Mageplaza is always here to listen and solve your problem.

Jacker is the Chief Technology Officer (CTO) at Mageplaza, bringing over 10 years of experience in Magento, Shopify, and other eCommerce platforms. With deep technical expertise, he has led numerous successful projects, optimizing and scaling online stores for global brands. Beyond his work in eCommerce development, he is passionate about running and swimming.
Related Post

Change Store Email Addresses - Mageplaza

Change Welcome Message - Mageplaza
Customize the welcome message on your store's homepage to provide a personalized touch for your customers. Improve the user experience with our step-by-step guide.

Configure Magento 2 Contact Form & Email: Detailed Guides - Mageplaza
Configure the email address for your Magento 2 store's contact form and ensure that your customers can easily get in touch with you with this informative guide

How to Install Magento 2 with Sample Data - Mageplaza
How to install Magento 2 with Sample Data. In this topic we will discuss about How to Install Magento 2 Step by Step in Manage Store topic

6 Steps To Stop Brute Force Attacks - Mageplaza
How To Stop Brute Force Attacks in Magento 1, 2. In this topic we will discuss about How To Stop Brute Force Attacks in Manage Store topic

How to set Locale, Language, and Country in Magento 2 - Mageplaza
Setup Locale State Country in Magento 2 provides setup your store information on Locale Options that determines the timezone, language, country and the days.
Change Store Email Addresses - Mageplaza
Change Welcome Message - Mageplaza
Customize the welcome message on your store's homepage to provide a personalized touch for your customers. Improve the user experience with our step-by-step guide.
Configure Magento 2 Contact Form & Email: Detailed Guides - Mageplaza
Configure the email address for your Magento 2 store's contact form and ensure that your customers can easily get in touch with you with this informative guide
How to Install Magento 2 with Sample Data - Mageplaza
How to install Magento 2 with Sample Data. In this topic we will discuss about How to Install Magento 2 Step by Step in Manage Store topic
6 Steps To Stop Brute Force Attacks - Mageplaza
How To Stop Brute Force Attacks in Magento 1, 2. In this topic we will discuss about How To Stop Brute Force Attacks in Manage Store topic
How to set Locale, Language, and Country in Magento 2 - Mageplaza
Setup Locale State Country in Magento 2 provides setup your store information on Locale Options that determines the timezone, language, country and the days.