
Change Store Email Addresses - Mageplaza
3 mins read
|
04-02-2016

Vinh Jacker | 04-14-2016
High-quality images are the strength to make your website more beautiful and have a professional look for your shoppers. Thanks to those images, customers can make purchase decisions more quickly, and have fewer questions related to how the products look, which can reduce the support team’s workload significantly. However, if each of your products has a collection of images in the catalog, it is quite difficult to manage hundreds or thousands of images. Thus, you should establish a naming convention for your image files right now, that will help you track more easily even if you want to find the originals.
In this topic, we will show you how to upload images of products in Magento 2 step by step. You can also find guidance on how to move, edit, or delete those images below.
Related Post
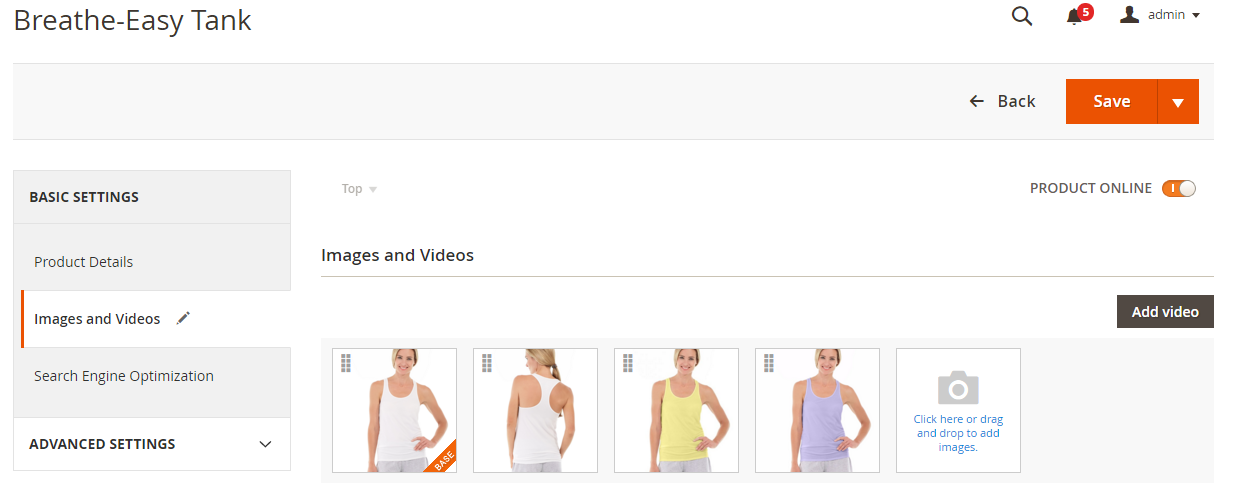
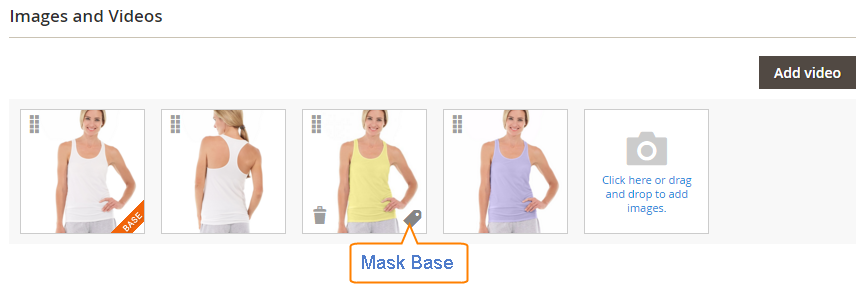
In the Product Detail, you can upload as many images as you need for a product, simultaneously, link to video, rearrange their order, and determine how each is used. For each product, three roles are available for you to assign to any image. You can set the main image or the base image that must be large enough to produce the magnification that is needed for zoom. Apart from the base image, a small image of that image will appear in the product listing, and a thumbnail image will be in the shopping cart. The assign is flexible for you; however, by default, these roles are auto-assigned to the first uploaded image.
How to upload Images Product in Magento 2 as following options
Catalog > Manage ProductsEdit link, and then do the following:To upload a new image, you can apply one of these two ways:
Camera title in the Images and Videos box, browse to the Image file and click on Open to select any image you need.
If you want to assign to the Base Image, only need to click on the tag icon that is in the lower-corner of the image. As soon as your tap, a small orange banner will appear, that means your assign is successful.
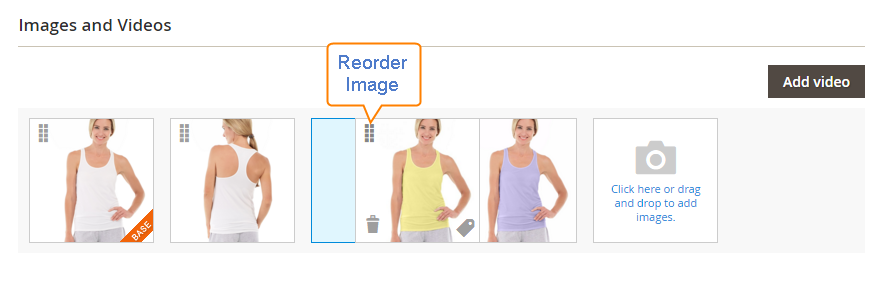
To change the showing position of images in the catalog, click on the Sort icon on the top right-corner of the image, and drop it to the new position.
To delete any image, click on the Delete icon in the lowe-left corner.

Click on Save to save the changes.
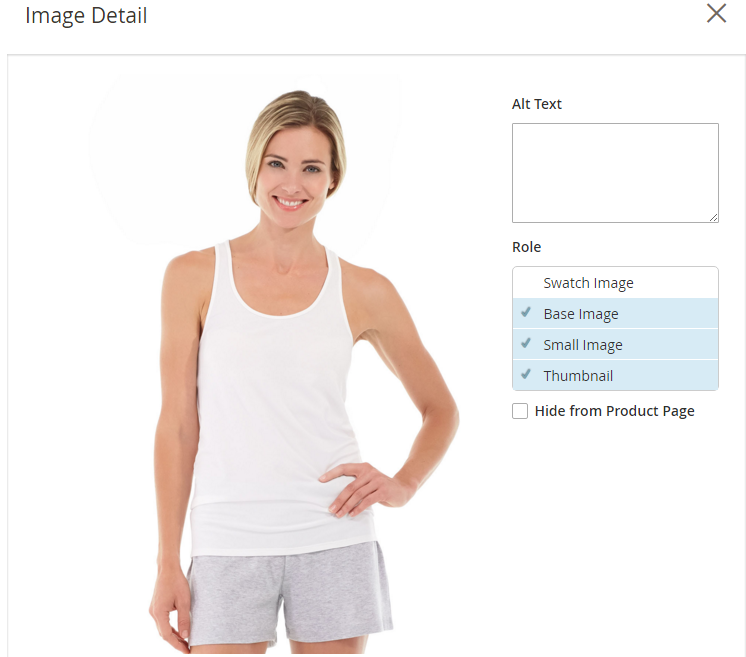
Images and Videos beneath the image title or under the Basic Settings in the panel.In the Alt Text box, write some description of your image.
Image Alt text is referenced by screen readers to improve web accessibility, and by search engines when indexing the site. Some browsers display the Alt text on mouseover. Thus, you should be careful to select the key words for the image.
By default, three roles (Base Image, Small Image, and Thumbnail) are auto-assigned to the first image of the prouct. If you want to reassign, do the following:
Role section, choose the role you want to assign to that image.The assigned role appears with a checkmark in selected mode, and the previous image is no longer assigned to the role.
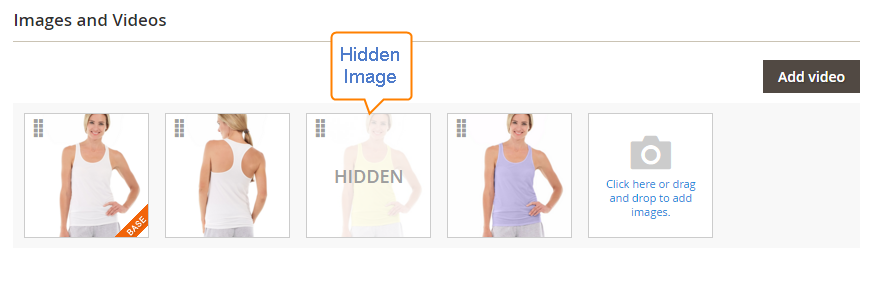
To exclude any image, mark the Hide from Product Page checkbox in the Image Detail page, then click on Save.
Close box in the upper-right corner.Save to complete.These are possible actions you can take to upload, edit, delete, and hide your Images Product in Magento 2. Mageplaza also provides various Magento 2 Extensions so that you can manage and optimize your images with ease. Feel free to comment below or contact us if you want to have more guidance.
Related Post

Jacker is the Chief Technology Officer (CTO) at Mageplaza, bringing over 10 years of experience in Magento, Shopify, and other eCommerce platforms. With deep technical expertise, he has led numerous successful projects, optimizing and scaling online stores for global brands. Beyond his work in eCommerce development, he is passionate about running and swimming.
Related Post

Change Store Email Addresses - Mageplaza

Change Welcome Message - Mageplaza
Customize the welcome message on your store's homepage to provide a personalized touch for your customers. Improve the user experience with our step-by-step guide.

Configure Magento 2 Contact Form & Email: Detailed Guides - Mageplaza
Configure the email address for your Magento 2 store's contact form and ensure that your customers can easily get in touch with you with this informative guide

How to Install Magento 2 with Sample Data - Mageplaza
How to install Magento 2 with Sample Data. In this topic we will discuss about How to Install Magento 2 Step by Step in Manage Store topic

6 Steps To Stop Brute Force Attacks - Mageplaza
How To Stop Brute Force Attacks in Magento 1, 2. In this topic we will discuss about How To Stop Brute Force Attacks in Manage Store topic

How to set Locale, Language, and Country in Magento 2 - Mageplaza
Setup Locale State Country in Magento 2 provides setup your store information on Locale Options that determines the timezone, language, country and the days.
Change Store Email Addresses - Mageplaza
Change Welcome Message - Mageplaza
Customize the welcome message on your store's homepage to provide a personalized touch for your customers. Improve the user experience with our step-by-step guide.
Configure Magento 2 Contact Form & Email: Detailed Guides - Mageplaza
Configure the email address for your Magento 2 store's contact form and ensure that your customers can easily get in touch with you with this informative guide
How to Install Magento 2 with Sample Data - Mageplaza
How to install Magento 2 with Sample Data. In this topic we will discuss about How to Install Magento 2 Step by Step in Manage Store topic
6 Steps To Stop Brute Force Attacks - Mageplaza
How To Stop Brute Force Attacks in Magento 1, 2. In this topic we will discuss about How To Stop Brute Force Attacks in Manage Store topic
How to set Locale, Language, and Country in Magento 2 - Mageplaza
Setup Locale State Country in Magento 2 provides setup your store information on Locale Options that determines the timezone, language, country and the days.