

5 mins read
|
06-30-2026
Magento 2 Email Settings: Configure SMTP in 3 Easy Steps
Vinh Jacker
|
03-17-2025

Configuring Magento 2 email settings correctly is essential to ensure your store can send order confirmations, invoices, and newsletters without issues. In this guide, we’ll walk you through everything from the default SMTP option in Magento to customizing your Magento 2 SMTP settings for better reliability and deliverability. Whether you’re a beginner struggling with the built-in email system or looking to fine-tune SMTP for smoother communication, this tutorial will help you set up and manage emails with confidence.
Key Takeaways
- Magento 2.4.6 and later versions already include a built-in basic SMTP option.
- Learning how to set up Magento 2 SMTP settings ensures your order confirmations, invoices, and newsletters are delivered on time and don’t land in spam.
- With the default SMTP you can handle basic needs, while the Mageplaza Magento 2 SMTP extension gives you advanced controls like authentication, testing, logging, and third-party service integration.
- By mastering both the default SMTP and enhanced features from Mageplaza’s extension, you can optimize email deliverability and customer engagement across your store.
Magento 2 Email Settings Overview
General Settings
In the general settings of Magento 2 Email Settings, you have the ability to customize your email setup effectively:
-
Set Sender Information: Define the from address for outgoing emails.
-
Access Logs for Troubleshooting: Review email logs to resolve any issues that arise.
-
Configure SPF Records: Set up SPF records to authenticate your emails and improve security.
-
Handle Email-Related Cron Tasks: Schedule and manage cron jobs related to email sending and receiving.
These settings not only offer the flexibility to adjust your email interactions but also ensure the smooth functioning of your Magento store’s email system.
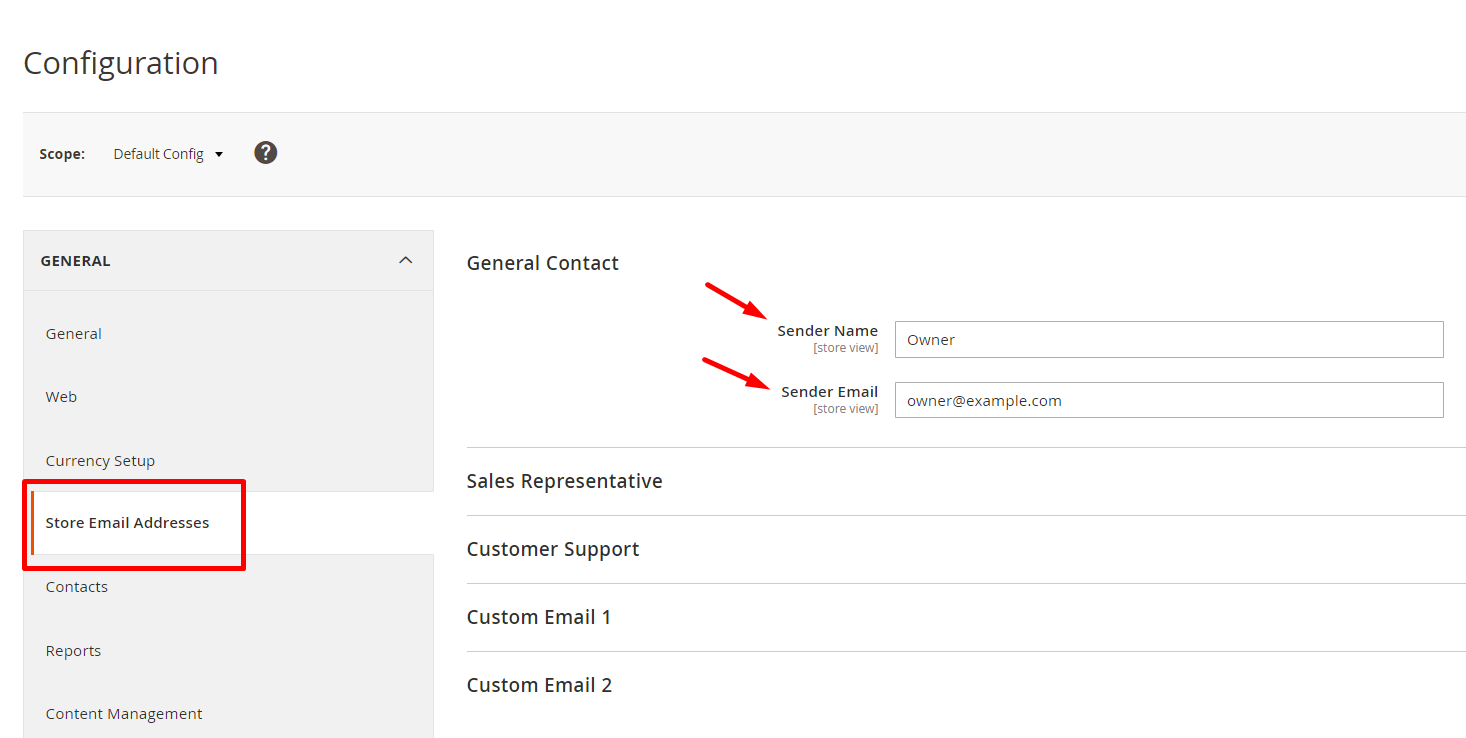
Sender Email Update
To update the sender’s email, follow these steps:
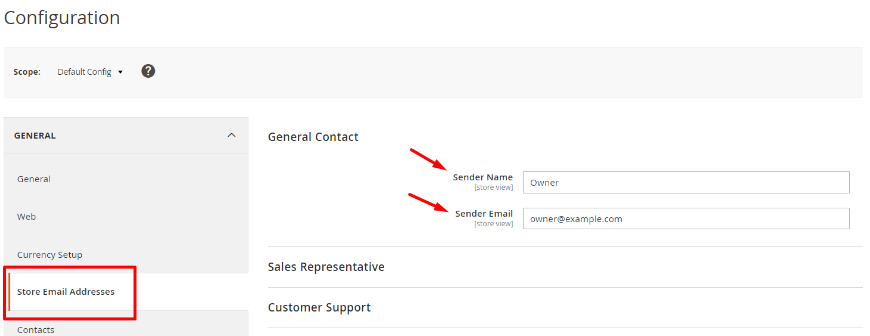
-
Navigate to the backend of your website and log in to your Magento admin panel.
-
Proceed to Stores > Settings > Configuration.
-
Click on Store Email Addresses under the General tab
-
Locate the General Contact section, which is used for customer inquiries, product information, and partnership offers, and then update the following fields:
Sender Name: Enter the name of the sender who will be responsible for all outgoing emails from this specific General Contact email address.
Sender Email: Provide the email address that will be used to send emails from this General Contact. Save configuration
Note: For consistency, use an email address matching your store’s domain.
Furthermore, maintaining up-to-date information can enhance email acceptance rates and build customers’ trust.
SPF Record Configuration
Configuring an SPF (Sender Policy Framework) record is vital for the integrity of your email delivery system. It helps in authenticating your sent emails and safeguards your domain’s reputation by preventing emails from being marked as spam.
To set up your SPF record, follow these steps:
-
Navigate to your domain’s DNS settings.
-
Insert a TXT record that records the IPs or domains authorized to send emails on your domain’s behalf.
For accurate SPF record setup, it’s advisable to consult with your e-commerce hosting provider or IT team. They will guide you on the specific required format and values needed for the TXT record. After obtaining the correct information, promptly update your DNS settings to ensure consistent and reliable email delivery.
Cron Tasks List
In Magento 2, cron tasks automate processes that handle essential operations, including sitemap generation, currency rate updates, and email dispatching.
To check the list of Magento 2 cron jobs, you can use the command line to execute bin/magento cron:install. This command will show all the tasks scheduled on your site, helping you ensure that your website runs efficiently and without errors. Quickly resolving any problems is crucial to maintaining the optimal performance and functionality of your Magento 2 website.
Configure SMTP in Magento 2.4.6 and above
Starting with Magento 2.4.6, the platform comes with a built-in SMTP option, making it easier for store owners to send emails directly without installing extra modules. To start using it, follow the steps below:
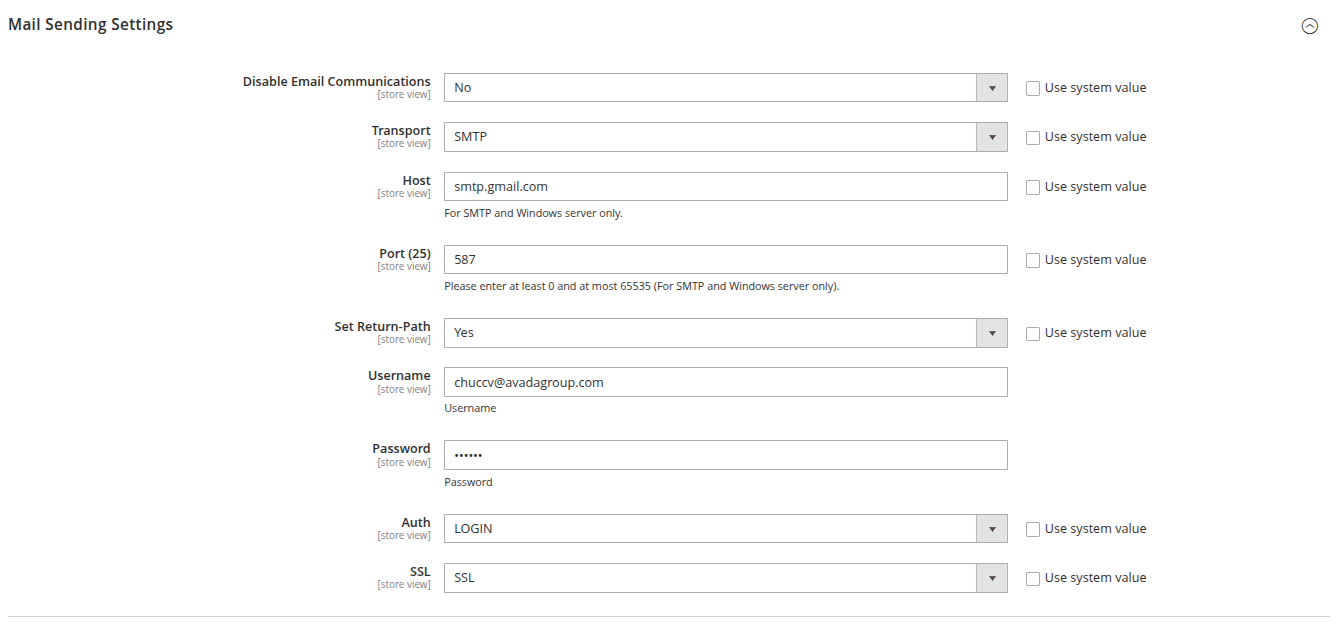
Go to: Stores > Configuration > Advanced > System > Mail Sending Settings
Example for Gmail SMTP Settings for Magento
- Disable Email Communications: Select No
- Transport: Select SMTP
- Host: smtp.gmail.com
- Port: 587 (if using TLS) or 465 (if using SSL)
- Set Return-Path Yes (optional, but recommended)
- Username: Your Gmail address (example: [email protected])
- Password: Your App Password (not your normal Gmail password)
- You must enable 2-Step Verification on your Google account.
- Then generate an App Password here: Google App Passwords
- Choose “Mail” as app, and “Other (Custom)” if asked.
- Auth: LOGIN
- SSL: Choose TLS if using port 587, Choose SSL if using port 465
Magento 2 Email Settings: Steps to Configure SMTP
Step 1: Create an email address for your domain
This is the first step in our guide on Magento 2 email settings. Before a store admin can start configuring SMTP email for the Magento store, the store admin needs to obtain a valid email address for his domain. Admins can set up email addresses by following guidelines from the server administrator or email hosting provider. Therefore, this very first step is also called the SMTP email setting for Magento 2.
-
Access your Hosting Control Panel
-
Navigate to Email Accounts section
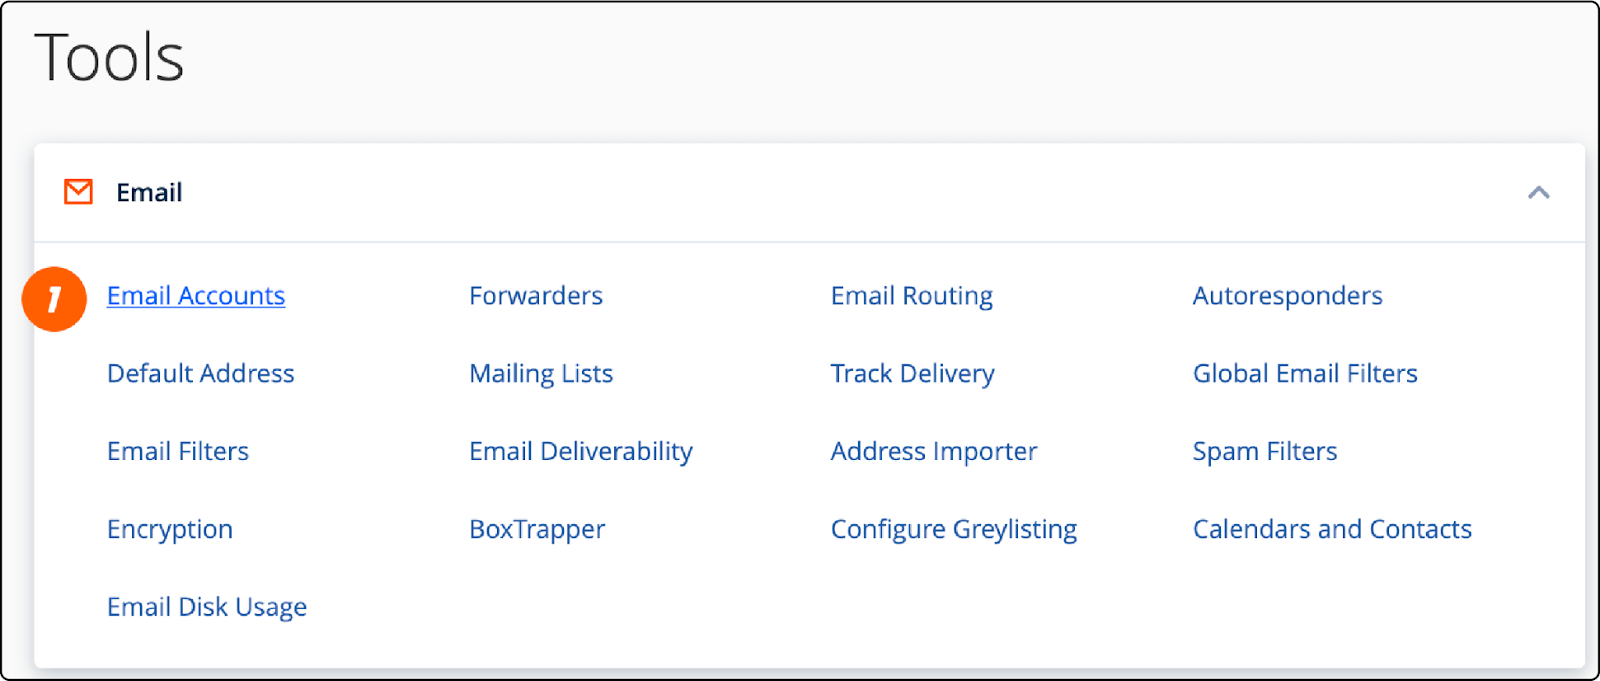
- Create a New Email Address
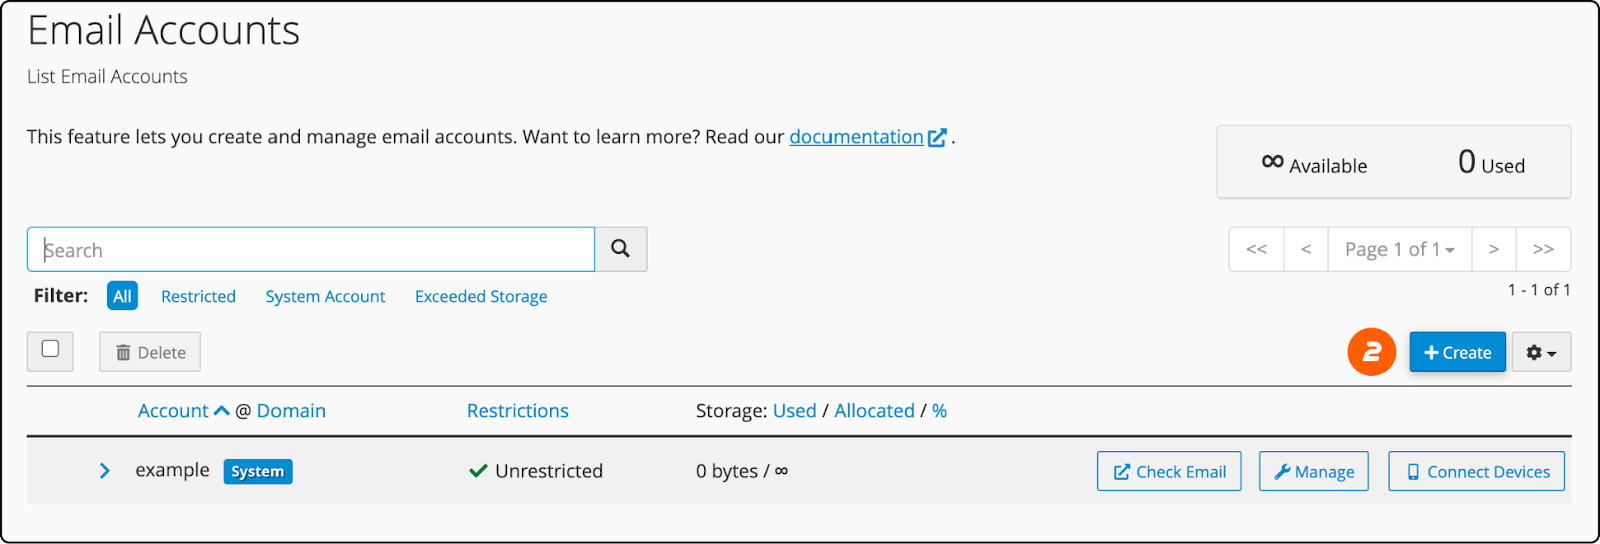
-
Enter the desired username for your email address
-
Set a password for this email address
 Save and verify your mail
Step 2: Setup the Email sending system for Magento stores
To set up the email transmission system for Magento stores, which includes configuring SMTP, adhere to these steps within your Magento 2 admin panel:
-
Log in to your
Magento admin panellocated in the backend of your website. -
Go to
Stores > Settings > Configuration. -
On the left-hand side, under the
Generalsection, chooseStore Email Addresses. -
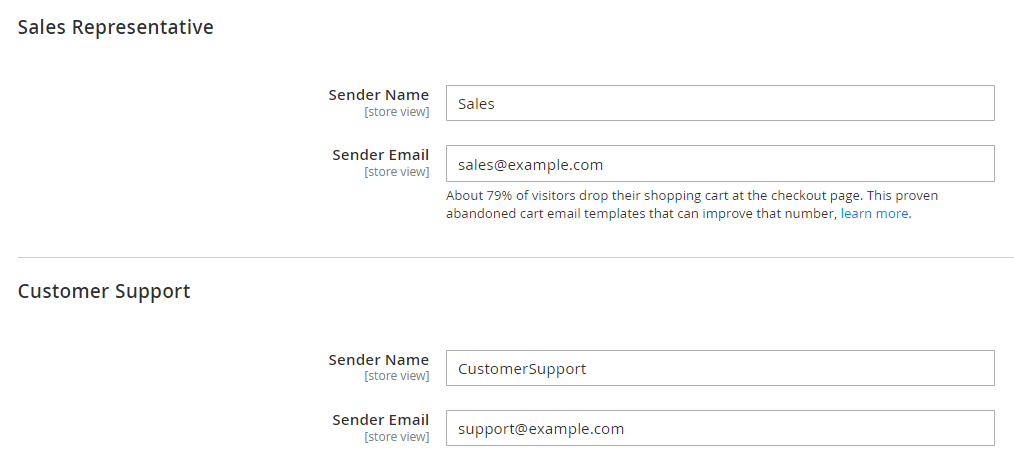
In the General Contact area (utilized for inquiries, product details, and collaboration proposals), make the following modifications:
-
Under
General Contact > Sender Name, input the name of the sender responsible for all messages sent from this particular General Contact email. -
Under
General Contact > Sender Email, provide the associated email addr
Repeat these adjustments for the Sales Representative and Customer Support sections.
Please note: If you are using Custom Email, ensure that the content reflects the correct sender’s identity.
Step 3: Keep your Sales Email Configuration up-to-date
The last step for Magento 2 email settings is updating the Sale Email configuration. No one appreciates receiving delayed sales-related emails, particularly those related to order confirmations or tracking details. In this guide, we’ll explain how to ensure your Magento store maintains an up-to-date sales email setup.
- Log in to
Magento Admin Panel > Stores > Configuration > Sales > Sales Email
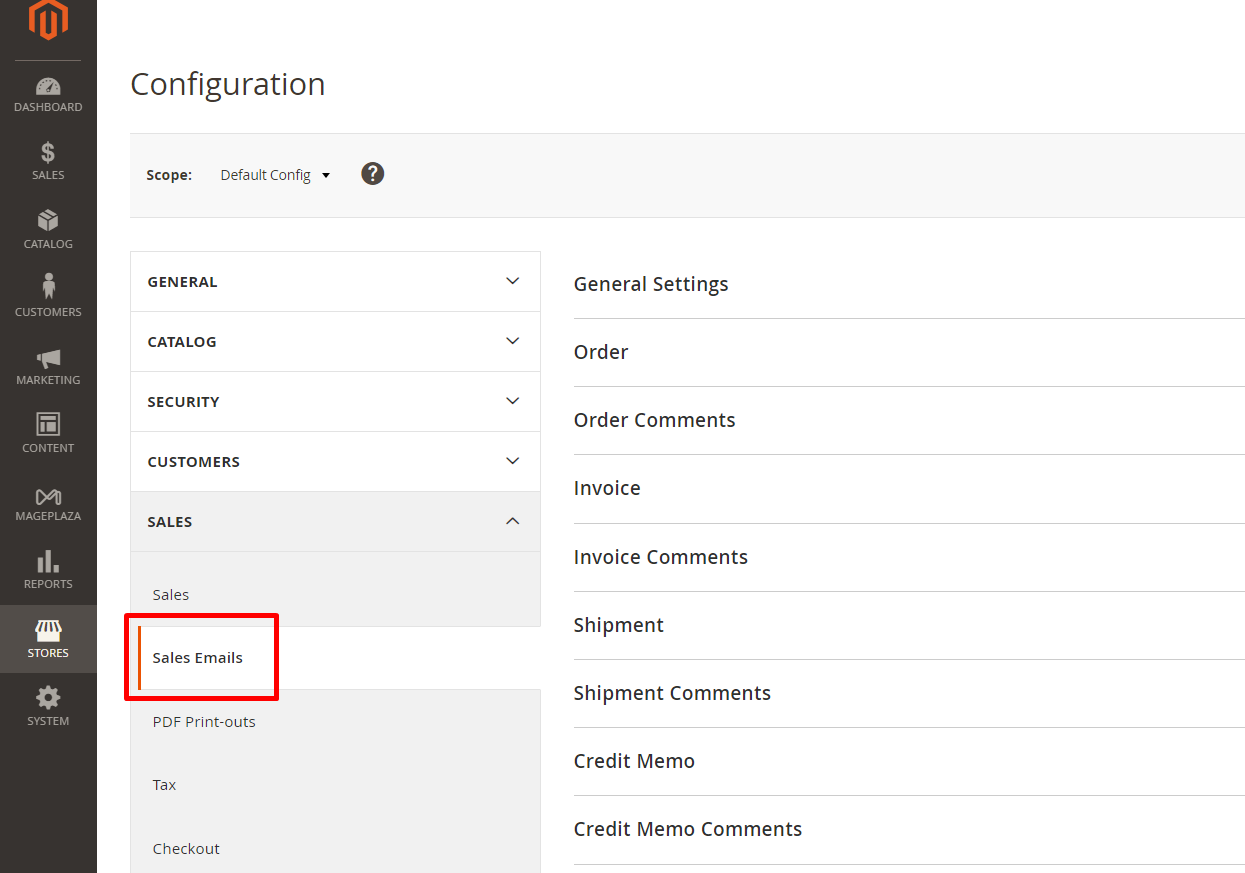
-
Choose
Ordercarefully and thoroughly inspect all sender details for accuracy -
Click the
Save Configto apply the changes
How to Set Up Magento 2 Email SMTP Setup
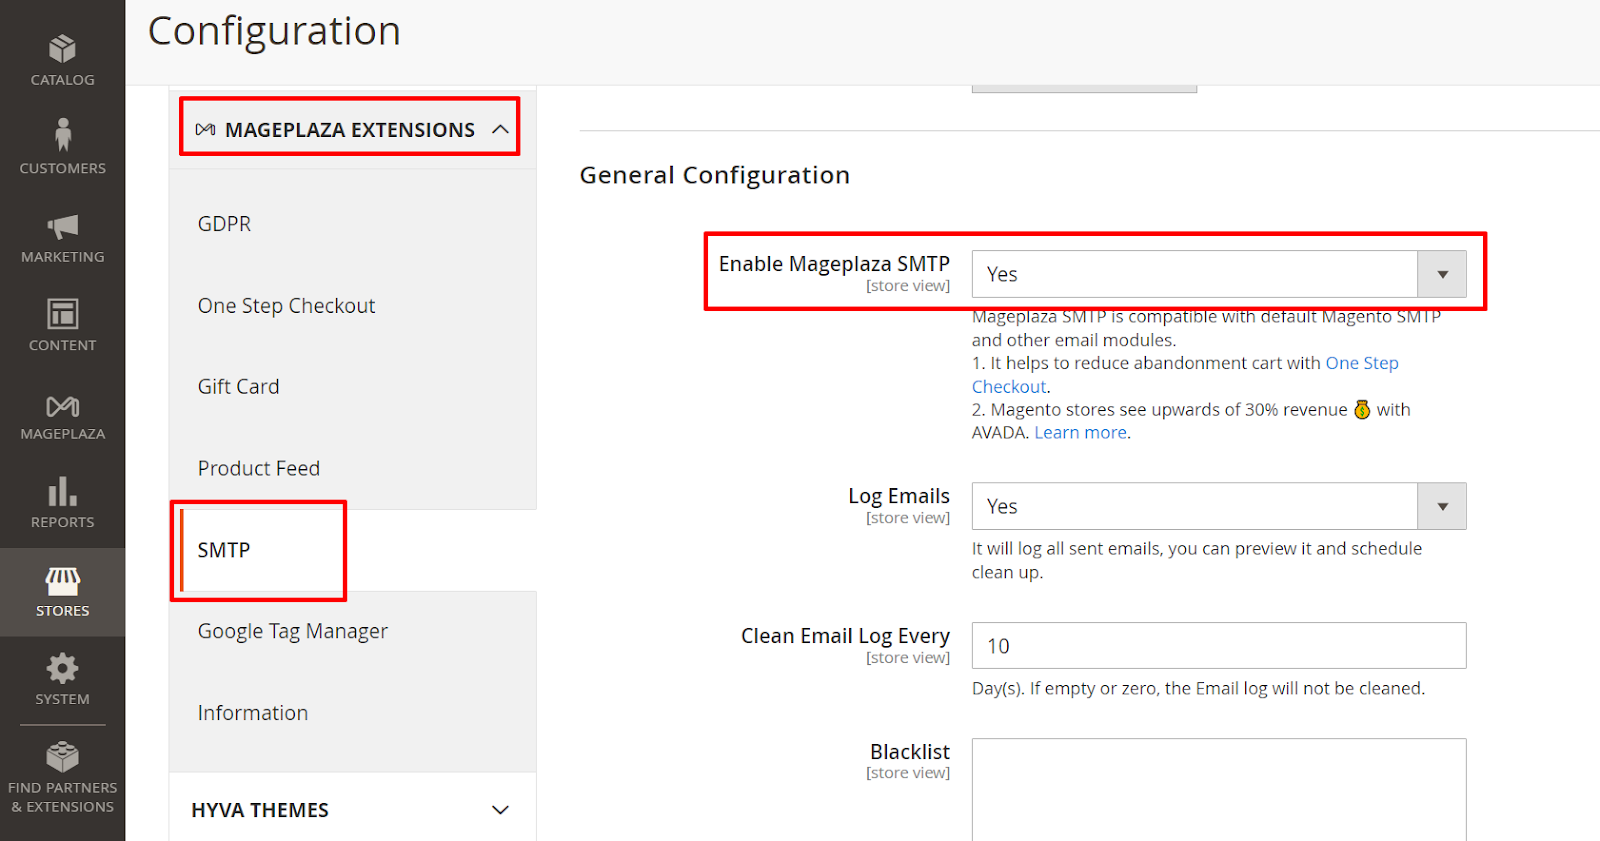
Step 1: Enable the SMTP extension
-
Go to the admin panel
> Stores > STMP > Configuration > Mageplaza extensions > SMTP -
Choose
Yesin the Enable field to turn on the extension
Step 2: Set up SMTP configuration options
- Begin by choosing a reliable SMTP provider for Magento. Click on the
Load Settings buttonnext to the Host field, then a popup about SMTP Providers will be displayed.
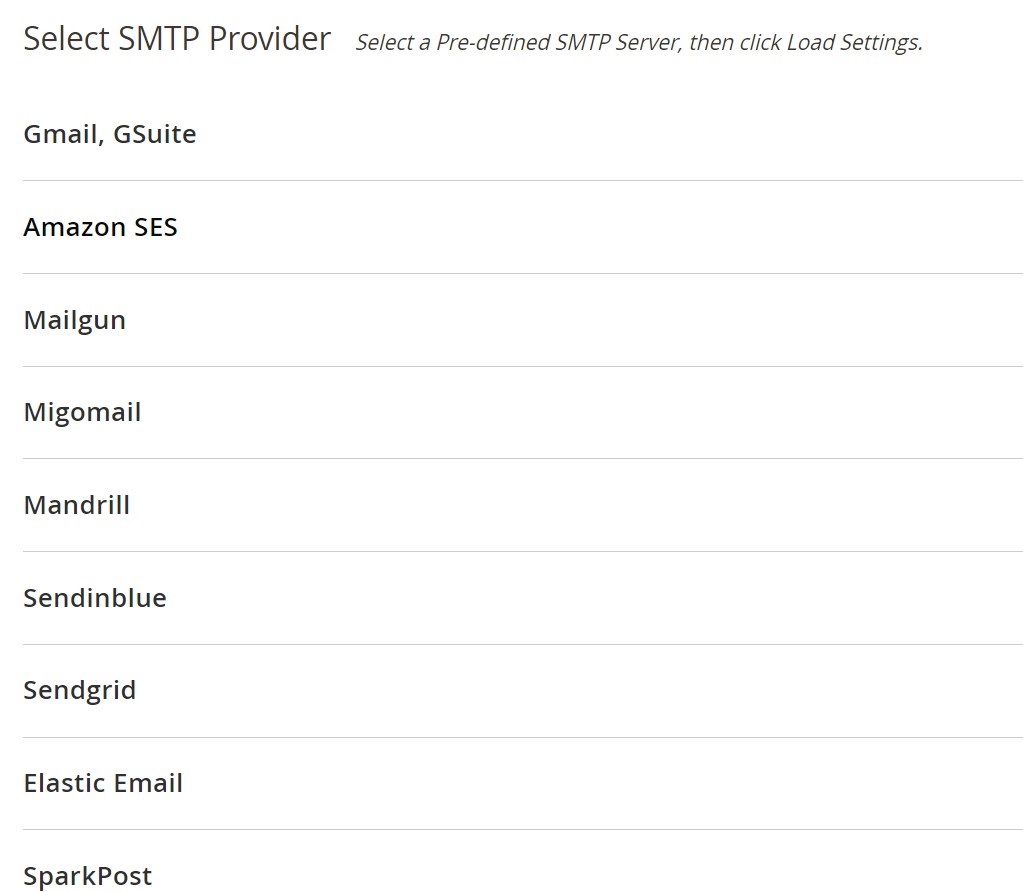
-
Pick your preferred provider
-
Enter the
username and passwordprovided by your selected email service provider
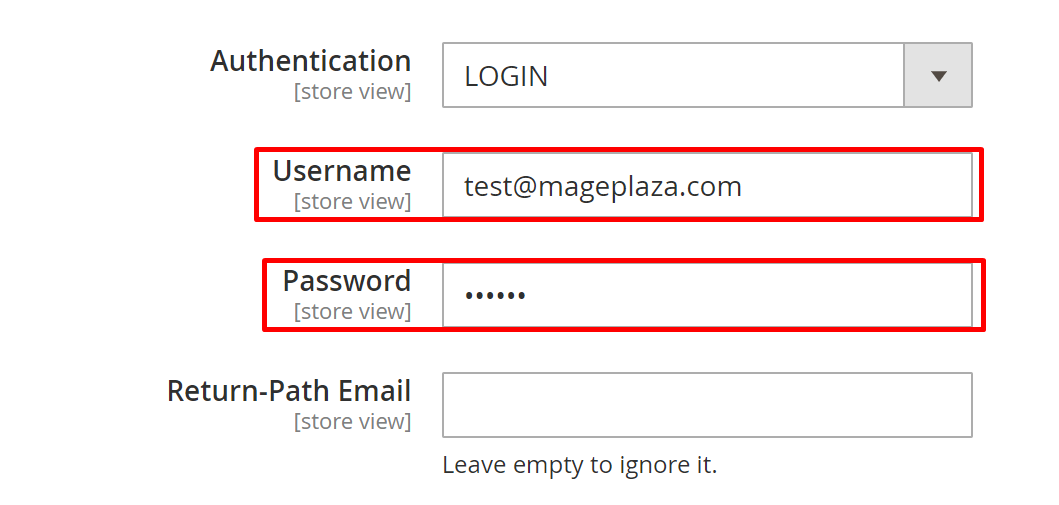
-
Click the
Save Configbutton -
You will receive a confirmation message:
You saved the configuration.
Step 3: Verify SMTP Settings
To verify the functionality of your SMTP settings within Magento 2, move to the Send Test Email section and follow these steps:
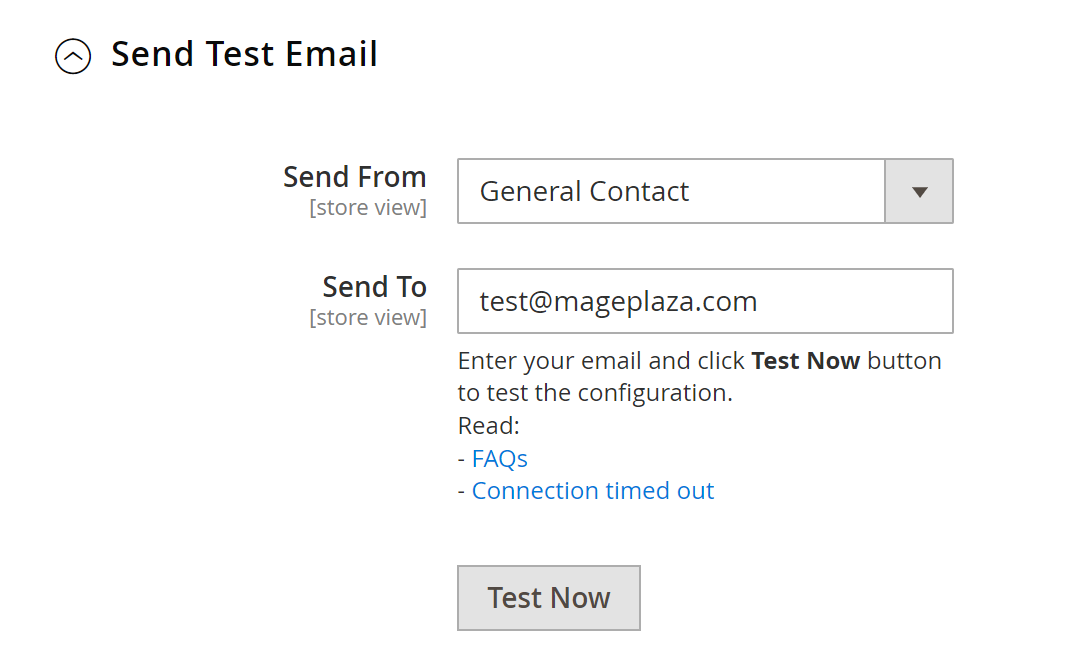
-
Choose the sender group
-
Enter the
recipient's email address -
Click
Test Nowto send a test email -
Check your inbox for the
test email confirmation
Blacklist Email
Magento 2 email settings include the blacklist feature. It is a helpful feature designed to enhance the security and integrity of your store’s email communication system. By allowing you to blacklist specific email addresses, Magento 2 ensures that emails from these sources are automatically filtered out and not processed. This is particularly useful for preventing spam and unauthorized access, as it allows store owners to manage and control the flow of incoming emails proactively.
How to Implement the Blacklist Feature:
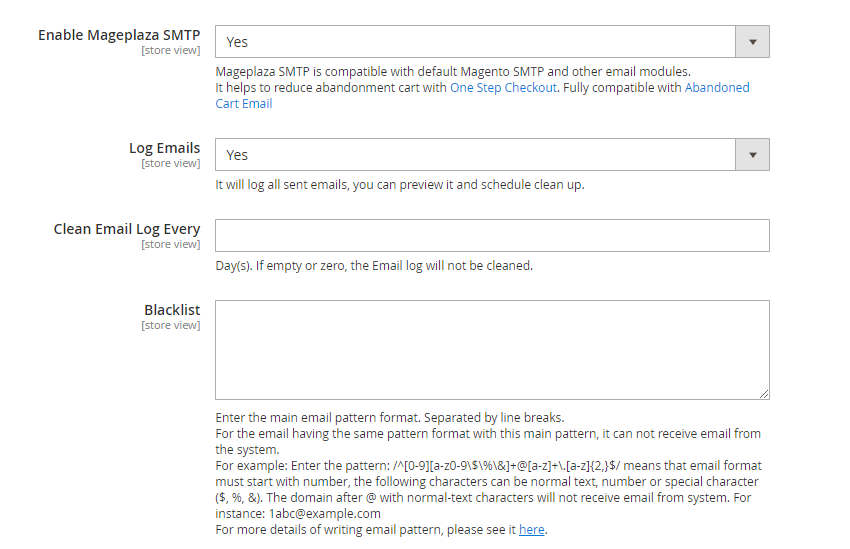
-
Log into your Magento 2 admin panel.
-
Navigate to Stores > Settings > Configuration > Mageplaza > SMTP
-
Click General Configuration sections
-
Identify the customer whose email address or IP you wish to block.
-
Add an email address or IP to the blacklist; you prevent any emails from these sources from reaching your store or your customers.
-
Save configuration. This action will activate the blacklist and start protecting your store from the specified addresses.
Automatic Clear Log
The Automatic Log Clearing function within Magento 2 Email Settings helps you autonomously delete outdated log files so you can save time. It not only ensures that your email logs remain current but also conserves storage space by eliminating unnecessary data. Therefore, it’s an efficient tool that simplifies maintenance and contributes to the seamless operation of your Magento 2 email configurations.
Debug Log
The Magento 2 debug log records errors that occur while sending emails. It offers detailed error information to help with efficient problem-solving.
By examining the debug log, you can identify problems with your email configurations, SMTP settings, and other related aspects. This review process is crucial for maintaining uninterrupted and effective email communication with customers. Additionally, it keeps you informed about any potential issues, allowing for fast action to maintain email operations.
Conclusion
Magento 2 Default SMTP is introduced with the aim of supporting store owners in accessing more customers and increasing sales. However, many shop admins do not know that most of their emails were left silently in spam or outbox instead of customers’ inboxes. That is the biggest limitation of default SMTP making it become ineffective for any e-commerce. If you have any questions about the guide above for Magento 2 email settings, don’t hesitate to contact us.
FAQs
1. What are Magento 2 SMTP settings?
An SMTP server is vital for sending and receiving emails. It manages outgoing mail, communicating with email clients and servers to ensure messages are delivered correctly. Think of it as the post office for emails, ensuring they reach the right destination efficiently. The SMTP server’s role is crucial in making sure email communication is reliable and smooth.
2. Can I use a third-party extension for my Magento 2 SMTP service?
Certainly! You can enhance your email-sending capabilities by utilizing a third-party extension, such as the Magento 2 SMTP extension.
3. Do I need technical expertise to configure SMTP in Magento 2?
While basic technical knowledge may be helpful, most SMTP configuration processes in Magento 2 are designed to be user-friendly and intuitive. Additionally, you can refer to documentation or seek assistance from your hosting provider or Magento support if needed.
4. What benefits does configuring SMTP in Magento 2 offer?
Configuring SMTP in Magento 2 offers several benefits, including:
- Improved email deliverability and reliability
- Better control over email sending processes
- Enhanced security for email transmissions
- Ability to track email delivery and performance metrics
5. Why is SMTP configuration important?
SMTP configuration ensures smooth communication between your email client or server and the SMTP server, enabling reliable and secure email sending.
Related Posts
- How to configure Elastic Email SMTP in Magento 2
- How to configure Mandrill / Mailchimp SMTP in Magento 2
- How to configure MailJet SMTP in Magento 2
- How to configure Outlook Office365 SMTP in Magento 2
- How to configure Mailgun SMTP in Magento 2
- How to configure Amazon SES SMTP in Magento 2
- How to Configure Gmail SMTP in Magento 2
- How to configure Mail.com SMTP in Magento 2
- How to configure SendinBlue SMTP in Magento 2
- How to configure GMX Mail SMTP in Magento 2
- How to configure SendGrid SMTP in Magento 2
Table of content

Jacker is the Chief Technology Officer (CTO) at Mageplaza, bringing over 10 years of experience in Magento, Shopify, and other eCommerce platforms. With deep technical expertise, he has led numerous successful projects, optimizing and scaling online stores for global brands. Beyond his work in eCommerce development, he is passionate about running and swimming.
Related Post


How to Enable DebugView in GA4 for your Magento 2 store - Mageplaza
Step-by-step guide to enabling GA4 DebugView for Magento 2 merchants — verify your GA4 events are firing correctly before trusting your data.
8 mins read
|
06-09-2026

Table Rate Shipping in eCommerce: A Practical Guide
Master Magento 2 Table Rate Shipping. Learn how to configure an accurate, automated shipping matrix to optimize your checkout and boost sales.
10 mins read
|
06-02-2026
3 mins read
|
05-30-2026

Google Analytics Ecommerce Reports for Magento Merchants: What to track & Tips
A practical guide to GA4 ecommerce reports for Magento merchants, covering what to track, how to read each report, and specific tips to turn data into revenue decisions.
18 mins read
|
05-20-2026

5 Ways to Hide Products on Shopify (2026 Guide)
Explore the best 5 ways to hide products on Shopify. Learn how to manage visibility, protect pricing, and create a tailored shopping experience for buyers.
18 mins read
|
05-16-2026
5 mins read
|
06-30-2026
How to Enable DebugView in GA4 for your Magento 2 store - Mageplaza
Step-by-step guide to enabling GA4 DebugView for Magento 2 merchants — verify your GA4 events are firing correctly before trusting your data.
8 mins read
|
06-09-2026
Table Rate Shipping in eCommerce: A Practical Guide
Master Magento 2 Table Rate Shipping. Learn how to configure an accurate, automated shipping matrix to optimize your checkout and boost sales.
10 mins read
|
06-02-2026
3 mins read
|
05-30-2026
Google Analytics Ecommerce Reports for Magento Merchants: What to track & Tips
A practical guide to GA4 ecommerce reports for Magento merchants, covering what to track, how to read each report, and specific tips to turn data into revenue decisions.
18 mins read
|
05-20-2026
5 Ways to Hide Products on Shopify (2026 Guide)
Explore the best 5 ways to hide products on Shopify. Learn how to manage visibility, protect pricing, and create a tailored shopping experience for buyers.
18 mins read
|
05-16-2026