


5 mins read
|
07-30-2026
How to configure Mailgun SMTP in Magento 2
Vinh Jacker
|
03-17-2025


This is How to configure Mailgun SMTP in Magento 2 will show What you need is, make sure customers won’t miss any precious mails from your brand. It’s a well-known fact that most of consumers tend to be favoured of attention. Human beings love being noticed particularly, a personal email for distance relationships would be appropriate in this case. But the email system constantly marks your send-in-bulk emails as spam letters. How long will you let this worst scenario has your eyes roll back?
Mailgun has always gained a certain of loyalty customer groups thanks to their magnificent skill in developing technicalities. Especially to developers, experiencing Mailgun is quite a good chance ever to practice and learn through new knowledge behind the walls unexpectedly.
In this article, I’ll show you how to connect the dot between Magento 2 and Mailgun server, to implement the SMTP takes action on sending email more stable.
How to configure Mailgun SMTP in Magento 2
- Step 1: Create a new and setup the Mailgun account.
- Step 2: Download and install Magento 2 SMTP extension.
- Step 3: Configure Mailgun SMTP for Magento 2.
Step 1: Create a new and setup the Mailgun account
- To use Mailgun SMTP, create an account in Mailgun website.
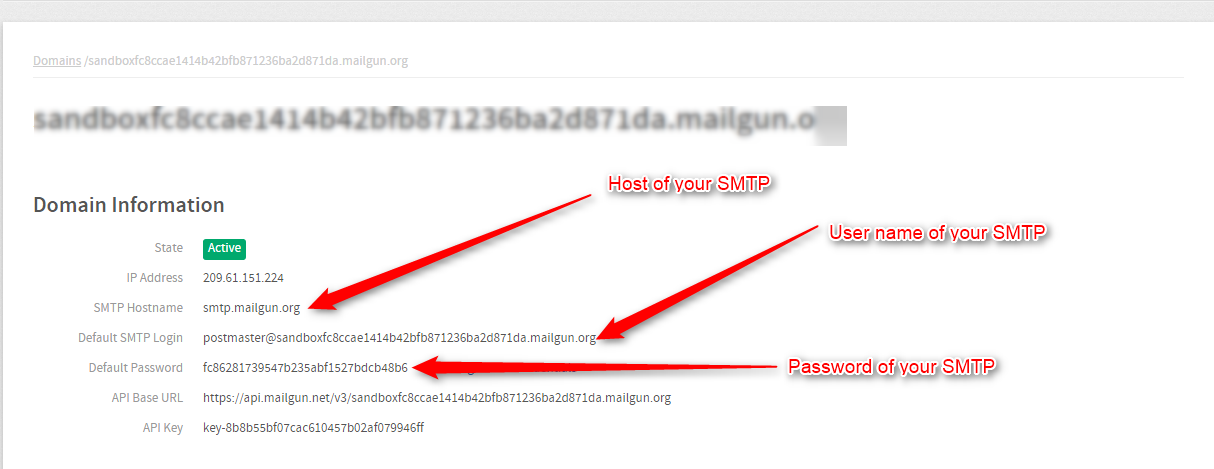
- After creating an account in Mailgun click on any domain( custom domain or sandbox domain) to get credentials of that domain for configuration.
- Here we clicked on Sandbox domain and get the below page. From this page you will get all required credentials to configure it with Magento 2.
Step 2. Download and install Magento 2 SMTP extension.
This guide will use Mageplaza SMTP extension to configure this setup. It’s a free extension so there’s no risk to try out this new advanced modules. You can download it in Github and the installation guide can be found at this Documentation: Install extension in magento 2.
Step 3. Configure the SMTP extension for Magento 2.
Back to Magento Admin, make your way from Mageplaza > SMTP > Configuration. Expand General Configuration, choose Yes to turn Mageplaza SMTP on

Expand SMTP Configuration Option, complete these following steps
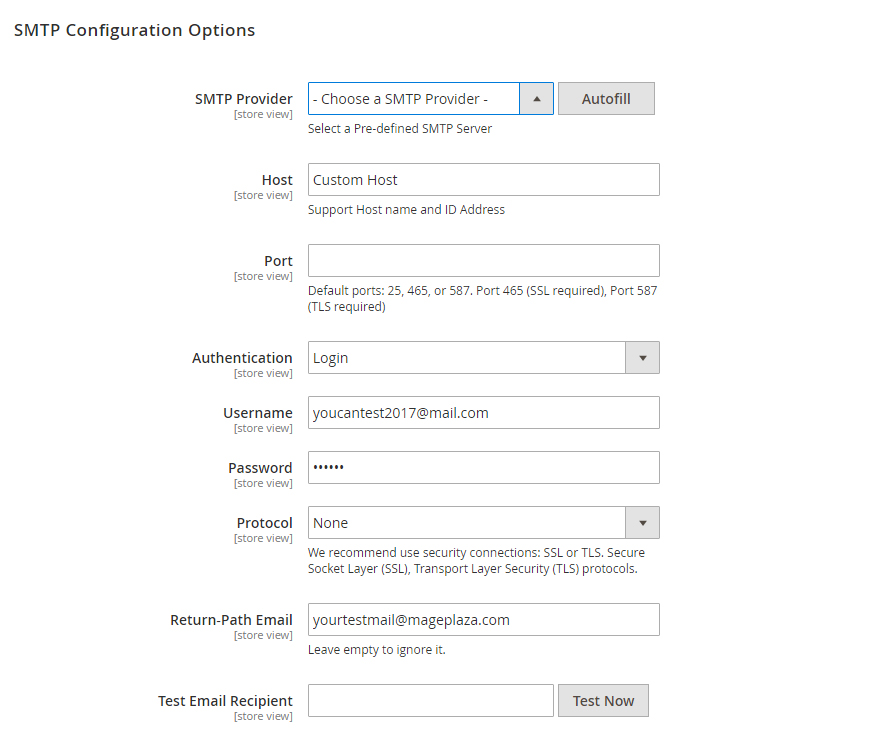
- In the SMTP Provider field, choose Mailgun.
- Click Auto Fill button to fill Host, Port, Authentication and Protocol will be automatically filled up to match Mailgun provider you had chosen.
- In the Username and Password field, fill the Mailgun account information you just have set up in Step 1.
- In Test Email Recipient, enter the email you want to sent to. A successful report will show up if thing worked properly.
You might be interested in:
- [How to set up SMTP Email](https://www.mageplaza.com/blog/how-to-set-up-smtp-email-for-magento-2.html
- Configure Gmail SMTP in Magento 2
- How to configure Zoho Mail SMTP in Magento 2
Table of content

Jacker is the Chief Technology Officer (CTO) at Mageplaza, bringing over 10 years of experience in Magento, Shopify, and other eCommerce platforms. With deep technical expertise, he has led numerous successful projects, optimizing and scaling online stores for global brands. Beyond his work in eCommerce development, he is passionate about running and swimming.
Related Post

7 mins read
|
06-30-2026

How to Enable DebugView in GA4 for your Magento 2 store - Mageplaza
Step-by-step guide to enabling GA4 DebugView for Magento 2 merchants — verify your GA4 events are firing correctly before trusting your data.
8 mins read
|
06-09-2026

Table Rate Shipping in eCommerce: A Practical Guide
Master Magento 2 Table Rate Shipping. Learn how to configure an accurate, automated shipping matrix to optimize your checkout and boost sales.
10 mins read
|
06-02-2026
3 mins read
|
05-30-2026

Google Analytics Ecommerce Reports for Magento Merchants: What to track & Tips
A practical guide to GA4 ecommerce reports for Magento merchants, covering what to track, how to read each report, and specific tips to turn data into revenue decisions.
18 mins read
|
05-20-2026
5 mins read
|
07-30-2026
7 mins read
|
06-30-2026
How to Enable DebugView in GA4 for your Magento 2 store - Mageplaza
Step-by-step guide to enabling GA4 DebugView for Magento 2 merchants — verify your GA4 events are firing correctly before trusting your data.
8 mins read
|
06-09-2026
Table Rate Shipping in eCommerce: A Practical Guide
Master Magento 2 Table Rate Shipping. Learn how to configure an accurate, automated shipping matrix to optimize your checkout and boost sales.
10 mins read
|
06-02-2026
3 mins read
|
05-30-2026
Google Analytics Ecommerce Reports for Magento Merchants: What to track & Tips
A practical guide to GA4 ecommerce reports for Magento merchants, covering what to track, how to read each report, and specific tips to turn data into revenue decisions.
18 mins read
|
05-20-2026