


4 mins read
|
07-30-2026
How to configure Mailchimp SMTP in Magento 2
Vinh Jacker
|
03-17-2025

According to Statista, the daily exchange of emails is projected to rise from 333.2 billion in 2022 to 347.3 billion in 2023. If you haven’t done so already, now is the opportune moment to broaden your ecommerce marketing strategy and harness the potential of this expanding channel.
While Magento provides fundamental email features, including responsive and customizable templates, fully realizing the power of email requires a specialized tool like Mailchimp. To optimize your email marketing efforts, consider integrating Mailchimp into your strategy.
Basically, Mailchimp (formerly known as Mandrill) allows people to send their marketing emails through a compatible SMTP server. But to activate the integrated SMTP is quite complicated and needs more steps to accomplish, and the initial steps require you to generate an API key first, then integrate it with the SMTP extension and done!
Here we go.
Reasons To Use Mailchimp for Magento Email Marketing
Offer flexible pricing plans
Offer flexible pricing plans
 Source: Mailchimp
Mailchimp provides four flexible pricing plans, including a free option, allowing you to initiate your marketing efforts even with a limited budget. The cost of Mailchimp’s paid plans is determined by the number of contacts you import into your account.
This ensures that you only pay for the services you actively use, offering a cost-effective approach to accommodate varying needs and budgets.
Diverse email marketing features
Datanyze reports that Mailchimp holds the largest market share of 68.02% as the most widely used email marketing service globally. This is attributed to Mailchimp offering top-tier email marketing features:
- Client surveys
- Pre-made email templates
- Behavioral targeting
- Automation builder
Intuitive user interface
Mailchimp provides an easy-to-use interface featuring a drag-and-drop email builder, enabling the creation of visually appealing marketing emails without the need for coding. Users can leverage this interface to effortlessly design intricate automation through the customer journey builder, allowing targeted marketing to customers at various stages of their buying journey.
Multiple options for support
Mailchimp provides a variety of support options for both premium and free subscriptions. During the first thirty days of its free plan, you can access a vast knowledge source of instructions and receive free email help. Live chat, email assistance, and thea knowledge base are available to paid subscribers.
Integrations with more than 200 tools and apps
More than 200 third-party programs and applications, such as Zapier, Quickbooks, and social media sites like Facebook and Instagram, are integrated with Mailchimp. For your email marketing efforts, Mailchimp will therefore integrate with whatever apps you want.
How to configure Mailchimp SMTP in Magento 2
-
Step 1: Download and install the Magento 2 SMTP extension
-
Step 2: Configure the SMTP extension for Magento 2
Step 1. Download and install Magento 2 SMTP extension.
This guide will use Mageplaza SMTP extension to configure this setup. It’s a free extension so there’s no risk to try out these new advanced modules. You can download it in Github and the installation guide can be found at this Documentation: Install extension in magento 2.
Step 2. Configure SMTP extension for Magento 2.
Back to Magento Admin, make your way from Store > Settings > Configuration > Mageplaza > SMTP. Expand General Configuration, and choose Yes to turn Mageplaza SMTP on

Expand SMTP Configuration Option, complete these following steps
Scroll down and move to the SMTP Configuration Options section.
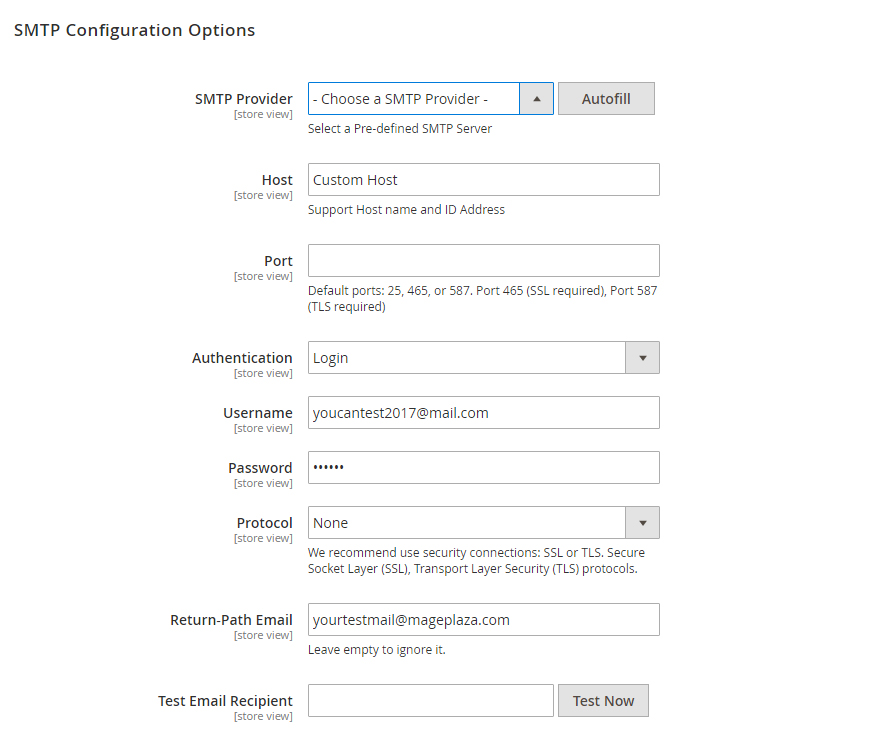
In the Host field, you can input the Support Hostname and IP address. Clicking the Load Settings button triggers a popup about SMTP Providers, allowing admins to choose their desired provider. In this case, choose Mandrill (Mailchimp’s former name). The system automatically fills in certain fields such as Host, Port, and Protocol based on the selected SMTP Provider.
-
For the Port field, it represents the specific gateway for outgoing emails. This step can be skipped if Load Settings was chosen initially. Typically, there are three Default Ports:
-
Port 25: Used for emails sent via protocols other than SSL or TLS.
-
Port 465: Designated for emails sent via the SSL protocol.
-
Port 587: Reserved for emails sent via the TLS protocol.
-
-
Moving to the Protocol field, it lets you choose the protocol for sending emails. If Autofill was selected, you can disregard this field. Options include:
-
None: Implies acceptance of all risks associated with sent emails.
-
SSL (Secure Socket Layer): Ensures secure data exchange between the web server and the browser.
-
TLS (Transport Layer Security): Secures data/messages and validates message integrity through authentication codes.
-
-
In the Authentication field, you can select from three methods:
-Login: Authentication via login to the account using a Username and Password (to be filled in the next field). This method is commonly required by most providers.
-
Plain
-
CRAM-MD5
-
-
The Username field allows you to input the Account name following the format specified by the chosen SMTP Provider.
-
For the Password field, you can enter the password corresponding to the Username. Upon saving, the Password is encrypted for security, appearing as **
The bottom line
In conclusion, configuring Mailchimp SMTP in Magento 2 is a strategic move to optimize email deliverability, enhance customer communication, and drive business growth. By following the steps in this guide, you can easily integrate Mailchimp’s reliable SMTP servers with your Magento 2 store. This ensures that your emails reach the right audience at the right time.
Table of content

Jacker is the Chief Technology Officer (CTO) at Mageplaza, bringing over 10 years of experience in Magento, Shopify, and other eCommerce platforms. With deep technical expertise, he has led numerous successful projects, optimizing and scaling online stores for global brands. Beyond his work in eCommerce development, he is passionate about running and swimming.
Related Post

7 mins read
|
06-30-2026

How to Enable DebugView in GA4 for your Magento 2 store - Mageplaza
Step-by-step guide to enabling GA4 DebugView for Magento 2 merchants — verify your GA4 events are firing correctly before trusting your data.
8 mins read
|
06-09-2026

Table Rate Shipping in eCommerce: A Practical Guide
Master Magento 2 Table Rate Shipping. Learn how to configure an accurate, automated shipping matrix to optimize your checkout and boost sales.
10 mins read
|
06-02-2026
3 mins read
|
05-30-2026

Google Analytics Ecommerce Reports for Magento Merchants: What to track & Tips
A practical guide to GA4 ecommerce reports for Magento merchants, covering what to track, how to read each report, and specific tips to turn data into revenue decisions.
18 mins read
|
05-20-2026
4 mins read
|
07-30-2026
7 mins read
|
06-30-2026
How to Enable DebugView in GA4 for your Magento 2 store - Mageplaza
Step-by-step guide to enabling GA4 DebugView for Magento 2 merchants — verify your GA4 events are firing correctly before trusting your data.
8 mins read
|
06-09-2026
Table Rate Shipping in eCommerce: A Practical Guide
Master Magento 2 Table Rate Shipping. Learn how to configure an accurate, automated shipping matrix to optimize your checkout and boost sales.
10 mins read
|
06-02-2026
3 mins read
|
05-30-2026
Google Analytics Ecommerce Reports for Magento Merchants: What to track & Tips
A practical guide to GA4 ecommerce reports for Magento merchants, covering what to track, how to read each report, and specific tips to turn data into revenue decisions.
18 mins read
|
05-20-2026