


5 mins read
|
07-30-2026
How to configure and design Product Labels in Magento 2?
Vinh Jacker
|
05-27-2026


Getting to a new store can make shoppers confused with too many options, which makes the product search process become longer. Moreover, how easy to read the website will affect how customers perceive the product (CXL).
With Mageplaza Product Labels, it is easy to attract customers to certain products and let them navigate through the store conveniently. Save your time by using available templates as well as configuring display rules and variables. In this post, let’s discover how to configure and design Product Labels for your Magento 2 store.
Related posts:
- Create New Feed on Product Labels
- How to make Daily Deals work
- 4 Steps to create engaging Promo Banners
- 3 Free Shipping Bar applications
- How to show lively notifications with Promo Bar
How to configure Product Labels in Magento 2?
To access the configuration panel, go to:
Mageplaza > Product Labels > Configuration
From here, you can enable the module, choose where labels appear, control how sale labels work, and decide how labels behave when products are out of stock.
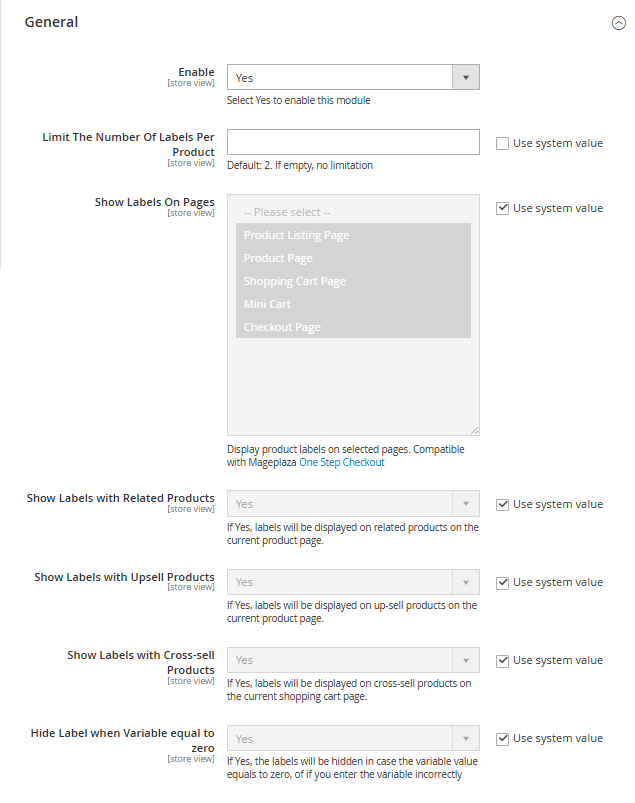
General Configuration
-
Enable the module to activate product labels across your store.
-
Limit labels per product or leave blank to show all.
-
Choose display pages: listing, product, cart, mini cart, and checkout.
-
Show labels on related, upsell, and cross-sell products for broader visibility.
-
Auto-hide labels when variable values are zero or invalid.
💡 Tip: Limit labels to 1–2 per product to keep the product image clean. If too many labels appear at once, shoppers may ignore them or feel the page is visually crowded. Start with Product Listing Page and Product Page first — only expand to Cart, Mini Cart, and Checkout after confirming labels display correctly and do not affect the layout.
New Product Setting

- Method 1 – New from Date & New to Date: Manually enter the start and end dates.
- Method 2 – Create Date + Number of Days: Automatically assign the “New” label within X days from the product creation date.
💡 Tip: Use Method 2 to save manual data entry time.
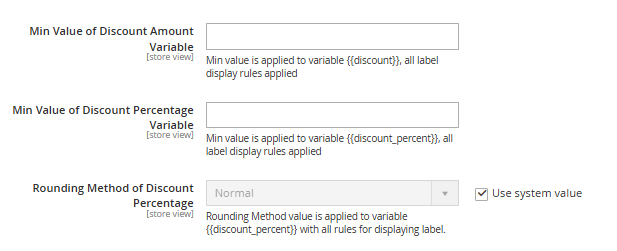
On Sale Product Settings
-
Min Value of Discount Percentage: Set a minimum value (e.g., 10) to prevent weak labels like “3% OFF” from appearing, ensuring sale labels remain attractive and meaningful to shoppers.
-
Rounding Method: Select Rounding Down to avoid displaying a percentage higher than the actual discount (e.g., 10.8% will display as 10%).
💡 Tip: Use the {{discount_percent}}% OFF syntax for campaigns featuring multiple different discount levels.
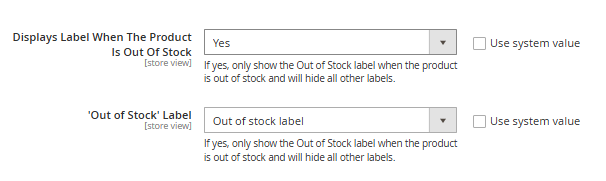
Stock Status Label Setting
-
Displays Label When Out Of Stock = Yes → Only shows the “Out of Stock” label.
-
Hides all other labels (Sale, New) when the product cannot be purchased.
-
Choose a clear label: “Out of Stock” / “Back Soon”.
💡 Tip: Combine with a “Notify me when back in stock” feature to retain potential sales.
Learn more: 10+ Magento 2 Product Labels Use Cases with Configuration Guide
How to Design a Product Label in Magento 2
After finishing the global configuration, you can create and design individual labels. A product label setup follows this flow:
General Info → Where to Show → Label Design
Step 1: Complete General Info
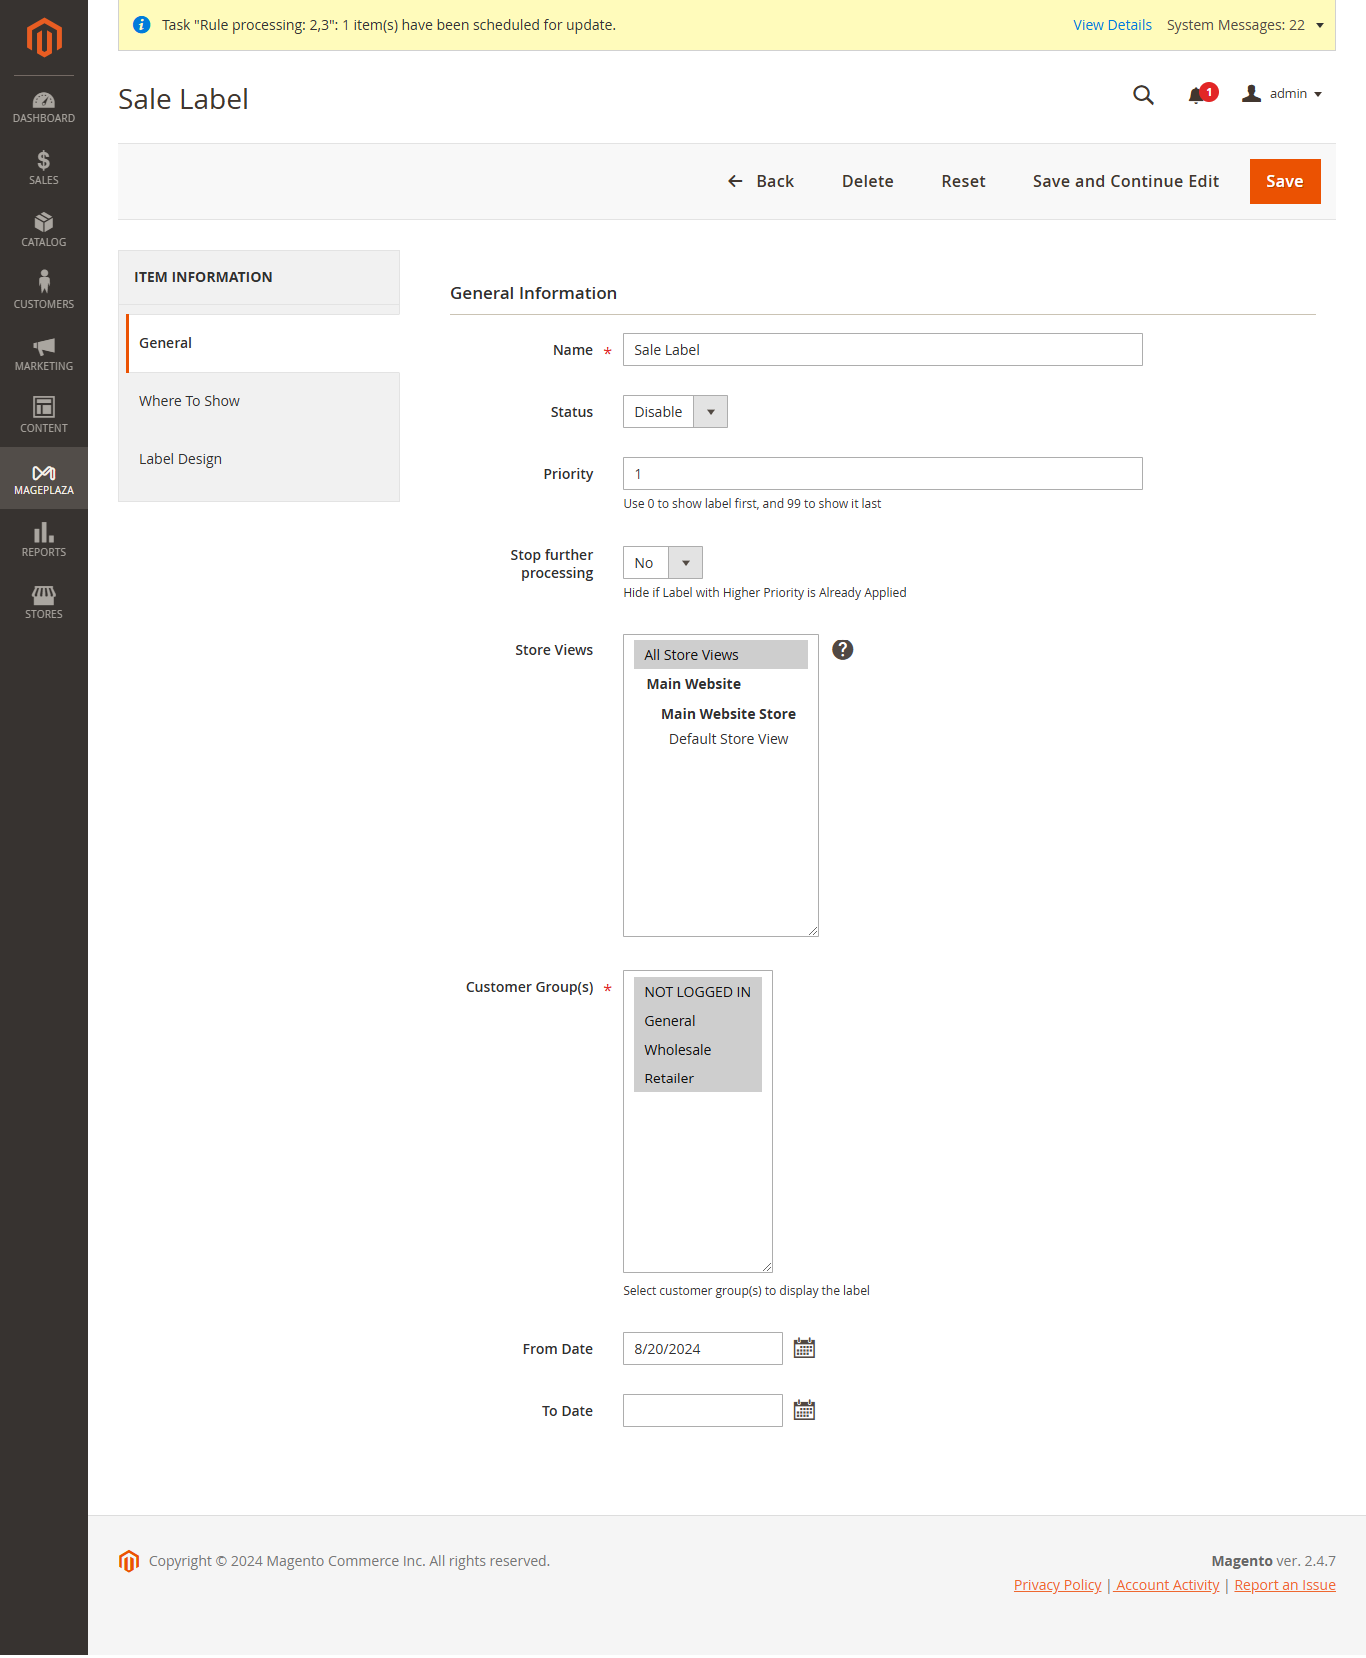
The General Info section controls the basic information, timing, visibility, and priority of each label.
Config options:
-
Set the label name, status, store view, and customer group visibility.
-
Define the display period and priority (lower number = higher priority; lower ID wins on ties).
-
Enable Stop further processing to skip lower-priority rules once this label is applied. For example, set the Out of Stock label with the highest priority and enable Stop further processing to ensure out-of-stock products only show that label and ignore all other lower-priority rules.
Step 2: Choose Where to Show the Label
The Where to Show section controls which products should receive the label.
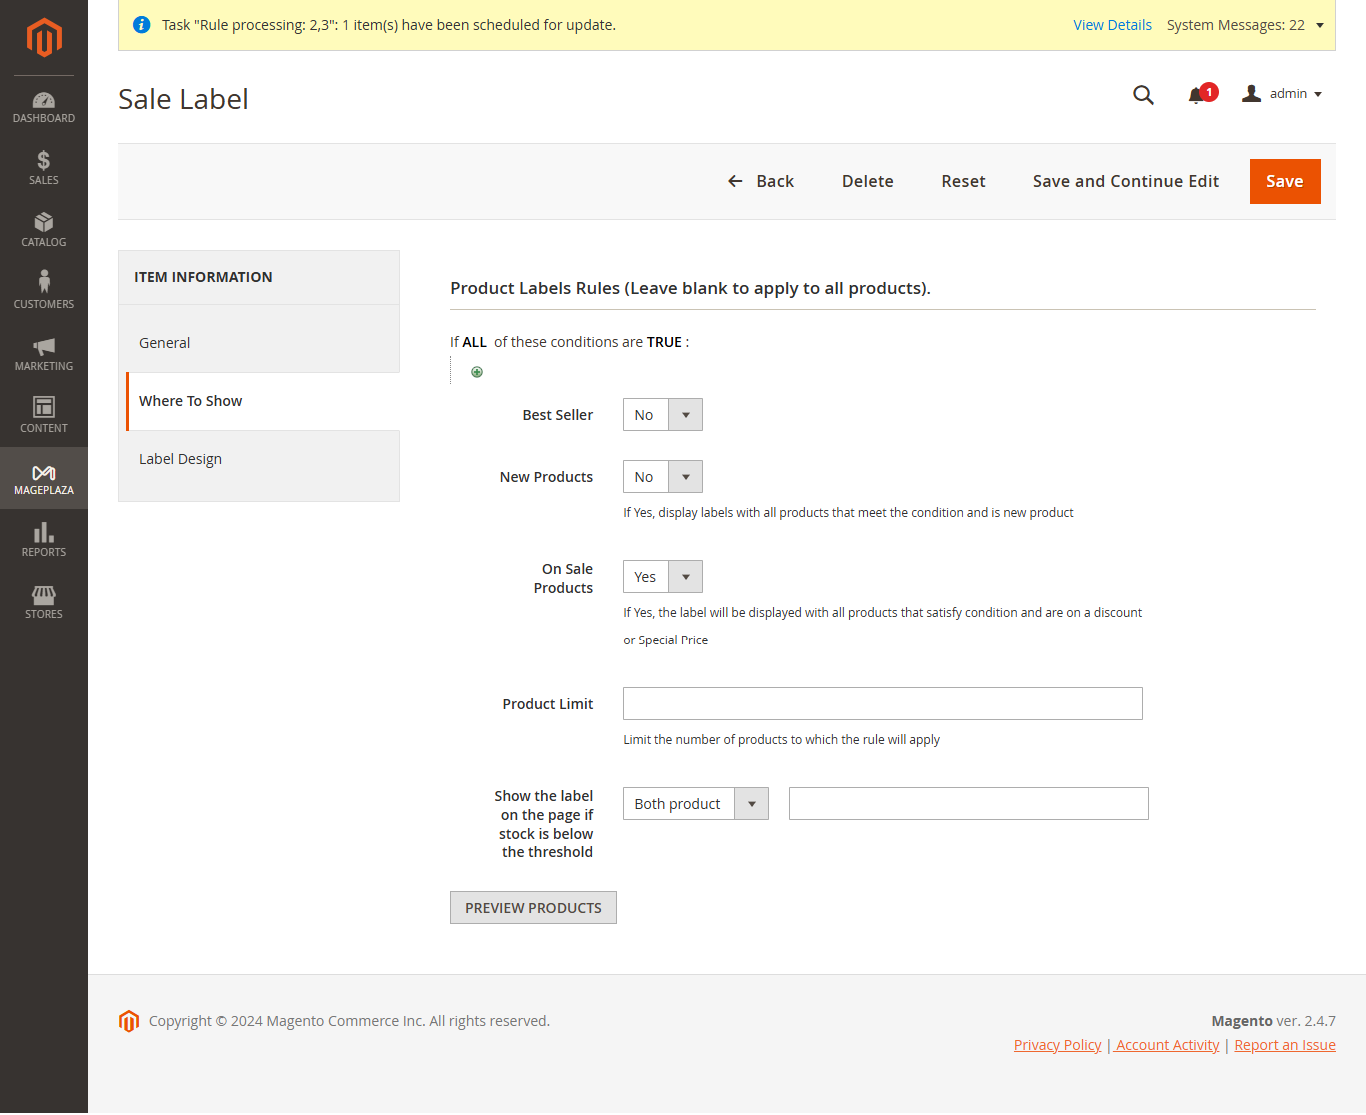
Config options:
-
Set the label type: Best Seller, New Product, or On Sale Product.
-
Define product limit: Limit the number of products that can receive the label (e.g., Top 5 Best Sellers)
-
Set stock threshold: Display the label when stock drops below a threshold (both Product List and Product Detail pages, or custom per page).
-
Preview matching products: Preview which products meet the label conditions before saving.
💡 Tip: Use Custom for each page to set different thresholds: a higher threshold on the Product List Page (for example, below 10) to surface urgency early while customers are browsing, and a lower threshold on the Product Detail Page (for example, below 3) to create a stronger scarcity signal when the customer is closer to a purchase decision. If you need low stock alerts to admins, see full guide here.
Step 3: Design the Label and Image
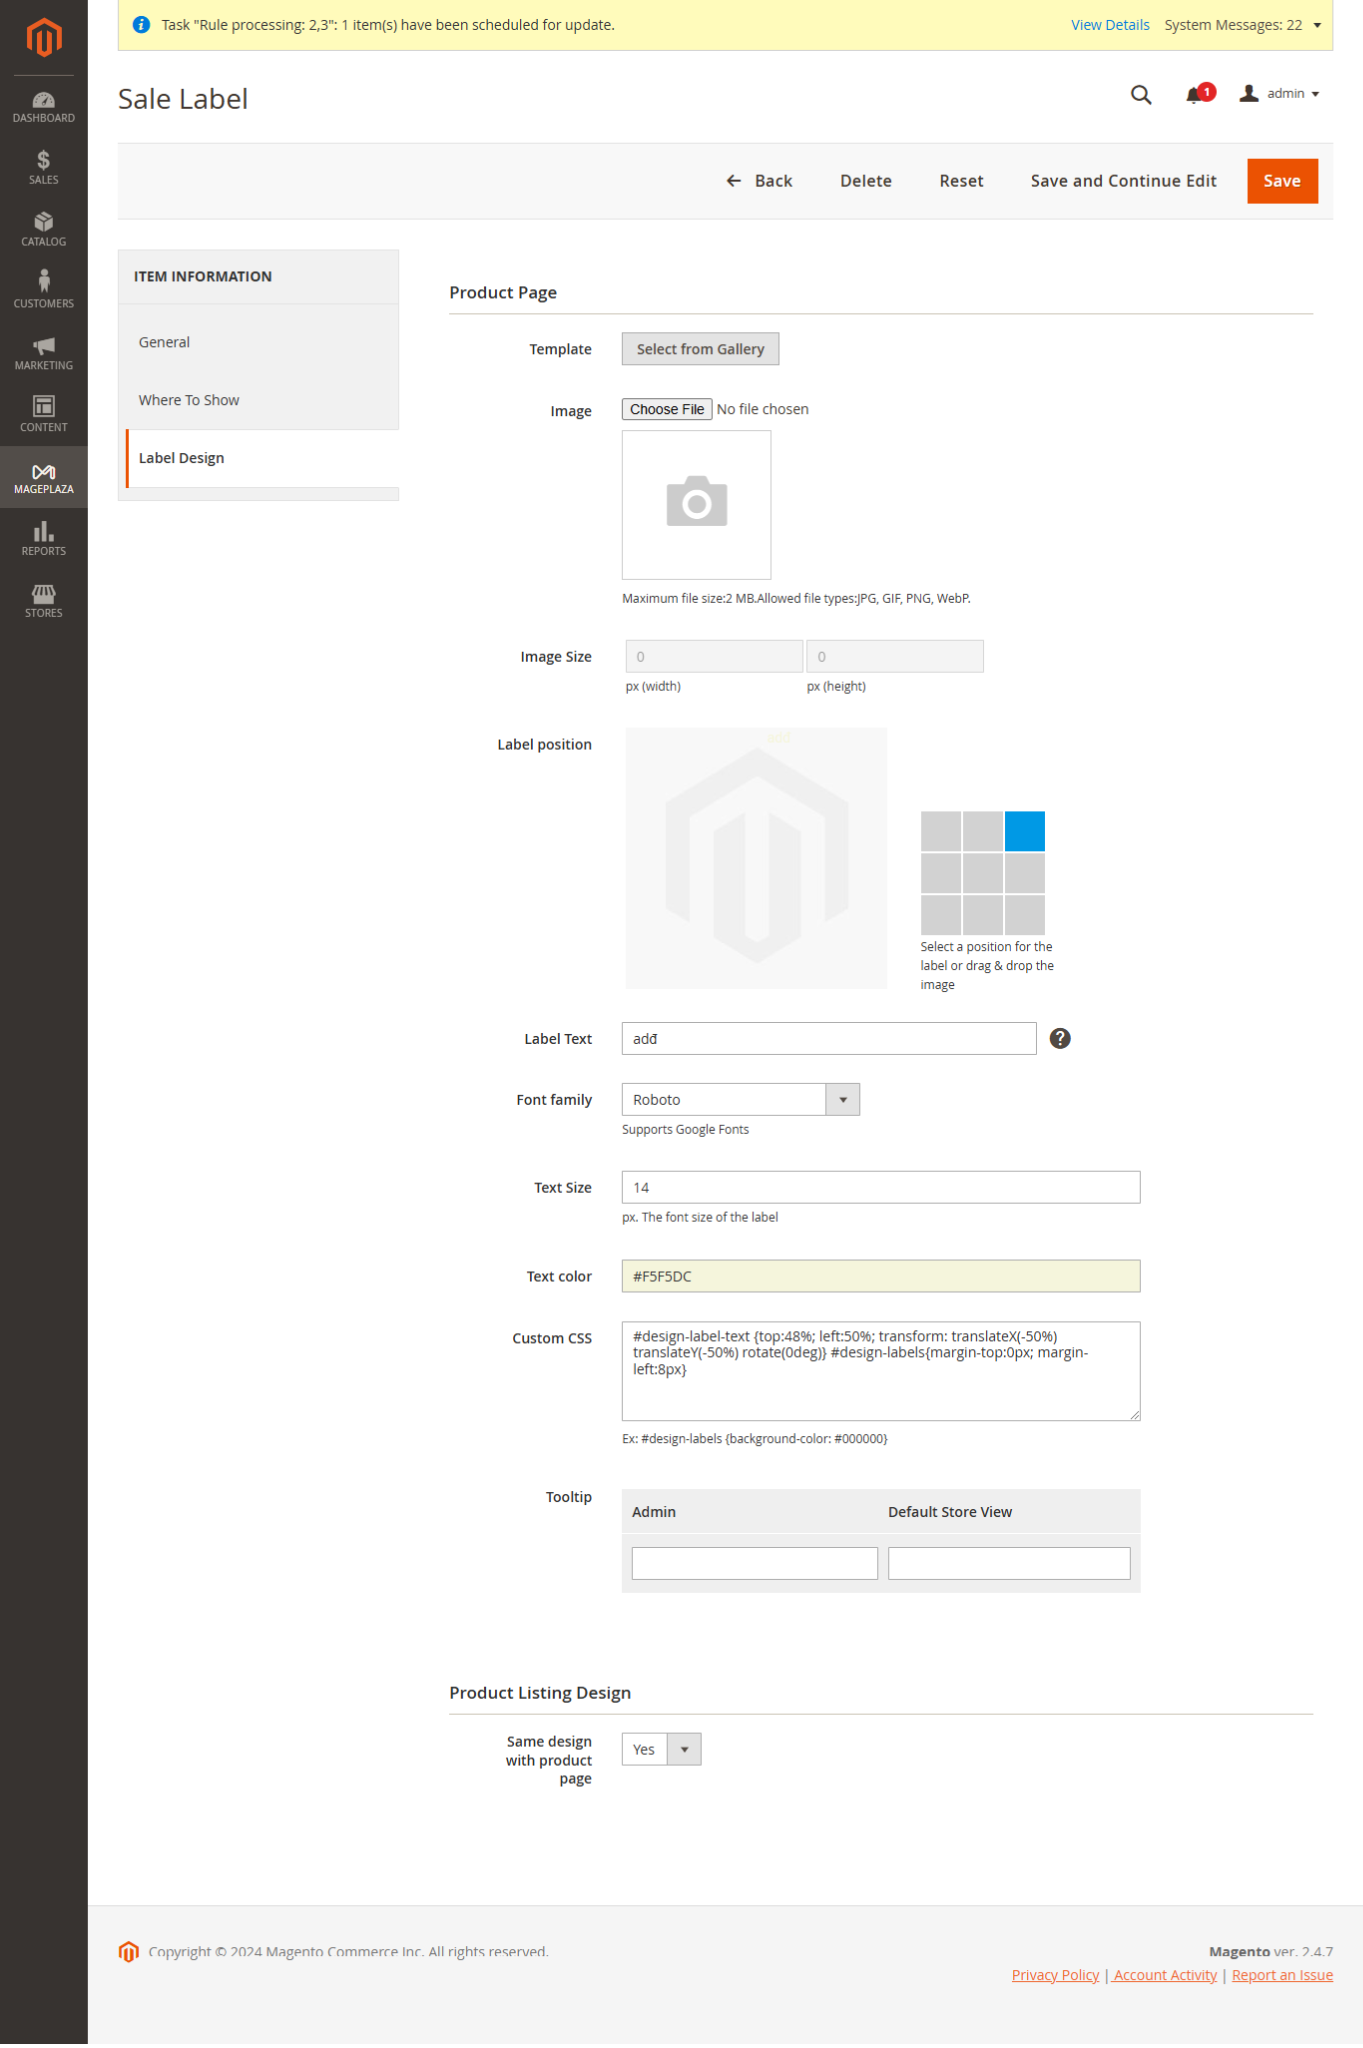
Template & Image
-
Template: Choose from the system library; use the search bar to filter quickly.
-
Label Image: Upload a custom image (JPG, GIF, PNG, WebP, max 2MB).
-
Image Size: Adjust width and height.
💡 Tip: Use templates for quick setup. Upload a custom image to match brand colors, fonts, or shapes (ribbon, hexagon, etc.).
Label Text & Variables
-
Label Text: Enter static text or use variables:
{{discount}}– discount amount{{discount_percent}}– discount percentage{{original_price}}– original price{{attribute_code}}– product attribute value
-
Font, Size, Color: Adjust to store needs; default is Roboto.
💡 Tip: Keep text short and readable, e.g., “20% OFF”, “New”, “Best Seller”, “Only 3 left”.
Position, Tooltip & Page Design
- Position: Drag or select position on the product image.
- Tooltip: Shows on hover; also appears on Search, Category, and Layered Navigation pages if you are using Magento 2 Layered Navigation extension.
- Same design on pages:
- Yes: Use same design on Product Listing and Detail pages.
- No: Configure a separate design for Product Listing.
💡 Tip: Tooltips are only needed for labels requiring extra context (e.g., “Online Exclusive”). Simple labels like “Sale” or “New” do not need a tooltip.
Custom CSS
- Custom CSS: Add custom CSS to control label styling beyond the built-in design options — background color, border radius, shadow, padding, and more.
Use case: If your store uses both promotional labels and informational labels such as “For iPhone 15” or “Fits Model X”, both will share the same visual style by default. Use Custom CSS to give informational labels a distinct background-color and border-radius — customers can tell the two label types apart at a glance without reading every word.
A quick Pre-Launch Product Labels Checklist
Before launching product labels across your Magento 2 store, review these essentials:
-
Keep label text short and instantly readable (for example: “New,” “20% OFF,” or “Only 3 left”)
-
Limit products to 1–2 labels to avoid visual clutter
-
Confirm label priority rules prevent conflicting labels
-
Match label style to purpose (sale, urgency, informational)
-
Test labels on Product Listing Page and Product Detail Page first
-
Review campaign dates and active labels before promotions go live
-
Verify out-of-stock labels replace promotional labels correctly
Conclusion
Configuring product labels in Magento 2 is not just about enabling every available option. The goal is to show the right message on the right product, in the right place.
Start with the global configuration, choose where labels should appear, and keep each label clear and purposeful. Then design each label with short text, a suitable position, and the correct priority. When used well, product labels make your catalog easier to scan, support promotions, communicate product availability, and help shoppers make faster purchase decisions.
Table of content

Jacker is the Chief Technology Officer (CTO) at Mageplaza, bringing over 10 years of experience in Magento, Shopify, and other eCommerce platforms. With deep technical expertise, he has led numerous successful projects, optimizing and scaling online stores for global brands. Beyond his work in eCommerce development, he is passionate about running and swimming.
Related Post

7 mins read
|
06-30-2026

How to Enable DebugView in GA4 for your Magento 2 store - Mageplaza
Step-by-step guide to enabling GA4 DebugView for Magento 2 merchants — verify your GA4 events are firing correctly before trusting your data.
8 mins read
|
06-09-2026

Table Rate Shipping in eCommerce: A Practical Guide
Master Magento 2 Table Rate Shipping. Learn how to configure an accurate, automated shipping matrix to optimize your checkout and boost sales.
10 mins read
|
06-02-2026
3 mins read
|
05-30-2026

Google Analytics Ecommerce Reports for Magento Merchants: What to track & Tips
A practical guide to GA4 ecommerce reports for Magento merchants, covering what to track, how to read each report, and specific tips to turn data into revenue decisions.
18 mins read
|
05-20-2026
5 mins read
|
07-30-2026
7 mins read
|
06-30-2026
How to Enable DebugView in GA4 for your Magento 2 store - Mageplaza
Step-by-step guide to enabling GA4 DebugView for Magento 2 merchants — verify your GA4 events are firing correctly before trusting your data.
8 mins read
|
06-09-2026
Table Rate Shipping in eCommerce: A Practical Guide
Master Magento 2 Table Rate Shipping. Learn how to configure an accurate, automated shipping matrix to optimize your checkout and boost sales.
10 mins read
|
06-02-2026
3 mins read
|
05-30-2026
Google Analytics Ecommerce Reports for Magento Merchants: What to track & Tips
A practical guide to GA4 ecommerce reports for Magento merchants, covering what to track, how to read each report, and specific tips to turn data into revenue decisions.
18 mins read
|
05-20-2026