

Change Store Email Addresses - Mageplaza
3 mins read
|
04-02-2016

Vinh Jacker | 06-30-2016
Today, my topic will point out the steps you need to follow to Create new API Integration both manually and programmatically, which means integrating your Magento store with a third-party API.
Please follow the instructions below to understand specifically what you should do to create a Magento 2 Integration for your e-commerce store.
System. In the Extensions section, select Integrations.Add New Integration button and complete all information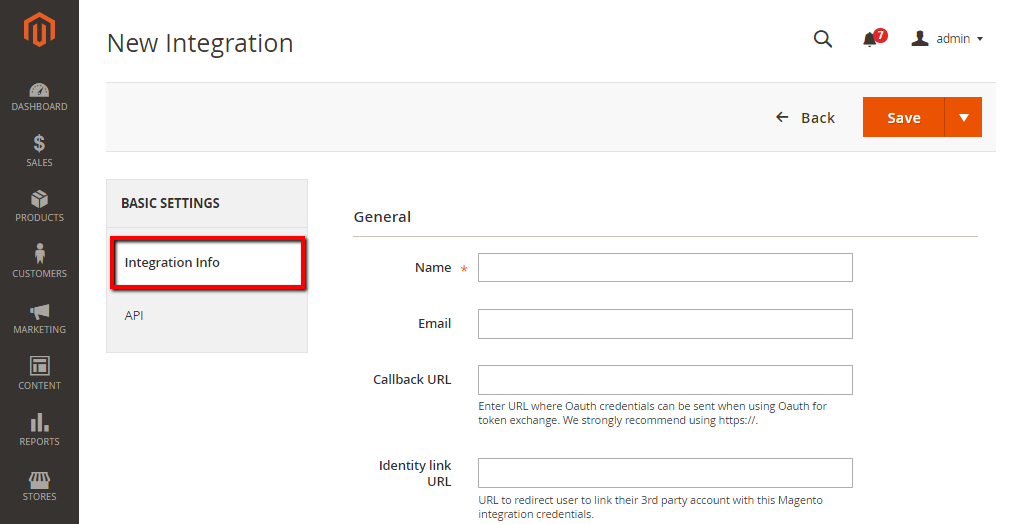
Name field, enter the name of the integrationEmail field, enter the contact email addressCallback URL field, enter the Callback URL where OAuth credentials can be sent when using OAuth for token exchange. We strongly recommend using https://.Identity Link URL field, enter the Identity Link URL to redirect the users to a third-party account with these Magento integration credentials.API, and do the following: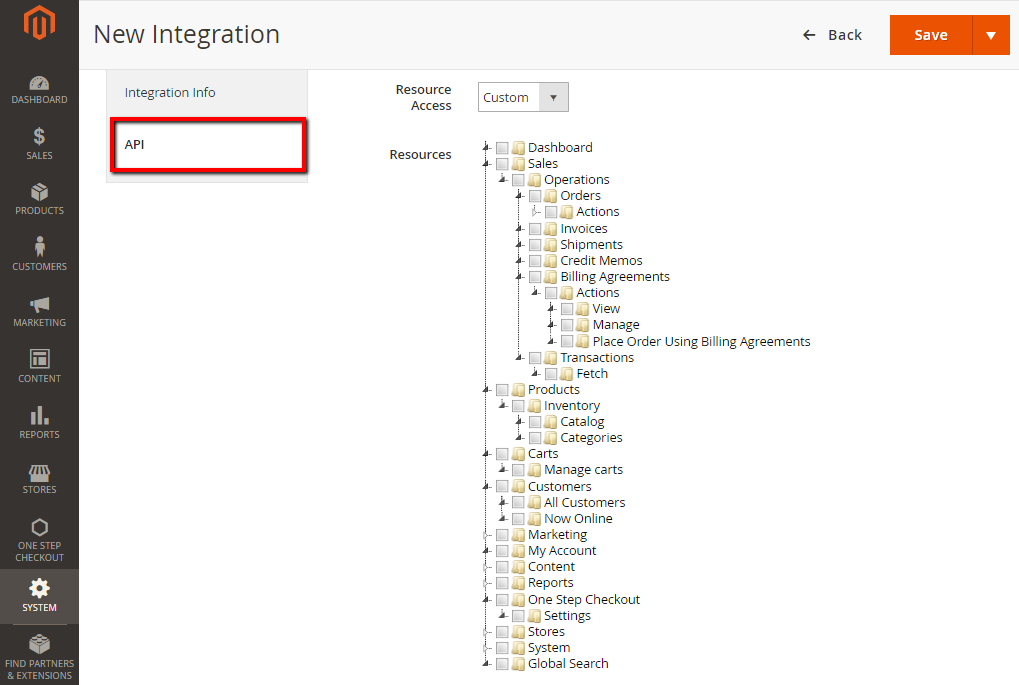
Resource Access field, choose one of the following
Custom, mark the checkbox of each resource that is neededSave button.You can enable anonymous guest access in the backend:
Stores. In the Settings section, select Configuration.Magento Web API under Services in the panel on the leftWeb API Security Setting section, and continue with the following: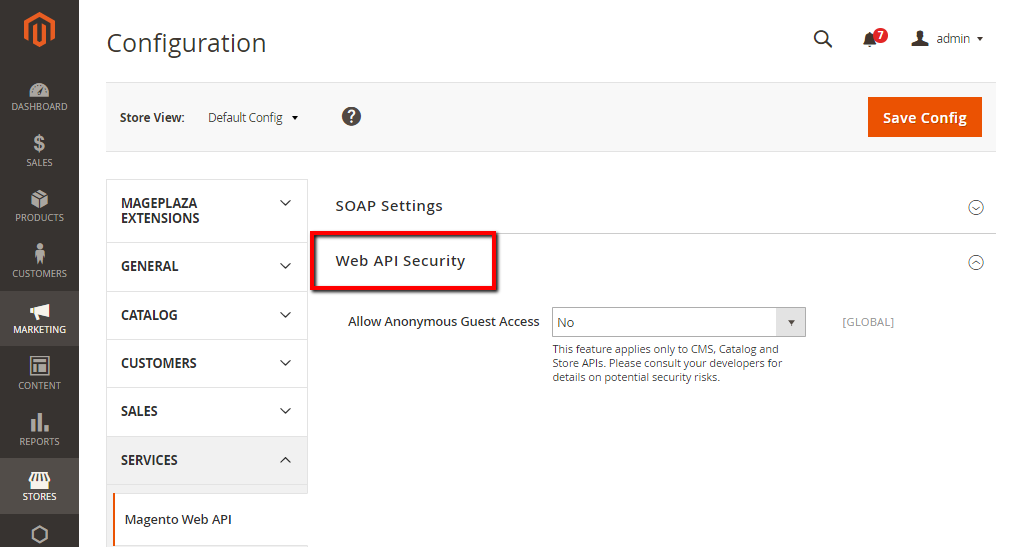
Allow Anonymous Guest Access field, select YesSave Config.Read more: How to Create Integration Module in Magento 2
Magento 2 handles integrations within the Magento_Integration module. To create a Magento 2 Integration using XML configuration files, please follow these three key steps.
Create the module file structure Similar to other custom modules in Magento 2, the integration module should be placed under /app/code// or under the /vendor/ folder. For instance, we will store the source code under. To keep things simple, let’s run the following commands at /app/code//.
cd
mkdir -p app/code////etc/integration
mkdir -p app/code////Setup
Specify the configuration file for your module as etc/module.xml The etc/module.xml file contains essential details about the module. Navigate to the etc directory and create the module.xml file, where you need to provide the following information:
Since we will be using the MagentoIntegrationModelConfigBasedIntegrationManager class in the installation script, we need to add Magento_Integration as a dependency for our custom integration creator.
Add your composer.json file Composer is a PHP dependency management. To ensure that the libraries required by your module can be installed and updated by Composer, you need to create a composer.json file. Simply place this file in the root directory of your module.
{
    "name": "Mageplaza/integrationmanager",
    "description": "",
    "type": "magento2-module",
    "version": "1.0.1",
    "license": [
      "MIT"
    ],
    "autoload": {
      "psr-4": {
        "Mageplaza\IntegrationManager\": ""
      },
      "files": [
        "registration.php"
      ]
    }
  }
Create a registration.php file The registration.php file is responsible for registering your module with the Magento system. Make sure to place this file in the root directory of your module.
MagentoFrameworkComponentComponentRegistrar::register(
    MagentoFrameworkComponentComponentRegistrar::MODULE,
    'Mageplaza_IntegrationManager',
    __DIR__
);
Create an installation class that will generate an integration during the module installation process. Navigate to the Setup directory and generate a file named InstallData.php, which will handle the installation of integration configuration data into the Magento integration table.
namespace MageplazaIntegrationManagerSetup;
use MagentoFrameworkSetupModuleContextInterface;
use MagentoFrameworkSetupModuleDataSetupInterface;
use MagentoIntegrationModelConfigBasedIntegrationManager;
use MagentoFrameworkSetupInstallDataInterface;
class InstallData implements InstallDataInterface
{
    /**
     * @var ConfigBasedIntegrationManager
     */
    private $integrationManager;
    /**
     * @param ConfigBasedIntegrationManager $integrationManager
     */
    public function __construct(ConfigBasedIntegrationManager $integrationManager)
    {
        $this->integrationManager = $integrationManager;
    }
    /**
     * {@inheritdoc}
     */
    public function install(ModuleDataSetupInterface $setup, ModuleContextInterface $context)
    {
        $this->integrationManager->processIntegrationConfig(['mp_Integration']);
    }
}
The InstallData script will extract data from different XML configuration files before integrating it into Magento.
The Magento Integration module simplifies the process of defining an integration. This module is in charge of managing third-party accounts, OAuth authorizations and user data, and security tokens and requests.
To configure integrations programmatically, you can utilize two files:
The file etc/integration/api.xml indicates which API resources the integration can access. Evaluate the permissions defined in each module’s etc/acl.xml file to identify which resources an integration needs access to. The test integration in the below example needs access to the essential resources in the Catalog and Sales modules:
<integration name="mp_Integration">
	<resources>
		<!-- To grant permission to Magento_Log::online, its parent Magento_Customer::customer needs to be declared as well--><resource name="Magento_Customer::customer" ?-->
		<!-- To grant permission to Magento_Sales::reorder, all its parent resources need to be declared-->
		<!-- to grant permission to Magento_Catalog::products, all its parent resources need to be declared -->
In order to automatically pre-configure the integration with default values, your module has the option to include values in the configuration file. To enable this functionality, make the necessary updates to the config.xml file located in the etc/integration directory. [email protected]
Once you have completed the previous steps, run the familiar commands for installing the module. This will trigger the setup script to create an integration.
bin/magento setup:upgrade
bin/magento setup:di:compile
bin/magento cache:clean
Now, go to Systems -> Extensions -> Integrations Click on the integration you need to see the result.
And that’s how you can create Magento 2 Integration. You are welcome to write down any concerns you have, and we will respond to support you soon.
And don’t forget that our experienced and dedicated API specialists are always here to help you! Our Magento API/GraphQL integration helps connect your store with any third-party software, uncover new business opportunities, and boost customer experience.
All you need to do is tell us your specific requirements, and we’ll handle the rest for you. Contact us for free consultations now!
EXPLORE OUR API INTEGRATION SERVICE
Related Post

Jacker is the Chief Technology Officer (CTO) at Mageplaza, bringing over 10 years of experience in Magento, Shopify, and other eCommerce platforms. With deep technical expertise, he has led numerous successful projects, optimizing and scaling online stores for global brands. Beyond his work in eCommerce development, he is passionate about running and swimming.
Related Post

Change Store Email Addresses - Mageplaza

Change Welcome Message - Mageplaza
Customize the welcome message on your store's homepage to provide a personalized touch for your customers. Improve the user experience with our step-by-step guide.

Configure Magento 2 Contact Form & Email: Detailed Guides - Mageplaza
Configure the email address for your Magento 2 store's contact form and ensure that your customers can easily get in touch with you with this informative guide

How to Install Magento 2 with Sample Data - Mageplaza
How to install Magento 2 with Sample Data. In this topic we will discuss about How to Install Magento 2 Step by Step in Manage Store topic

6 Steps To Stop Brute Force Attacks - Mageplaza
How To Stop Brute Force Attacks in Magento 1, 2. In this topic we will discuss about How To Stop Brute Force Attacks in Manage Store topic

How to set Locale, Language, and Country in Magento 2 - Mageplaza
Setup Locale State Country in Magento 2 provides setup your store information on Locale Options that determines the timezone, language, country and the days.
Change Store Email Addresses - Mageplaza
Change Welcome Message - Mageplaza
Customize the welcome message on your store's homepage to provide a personalized touch for your customers. Improve the user experience with our step-by-step guide.
Configure Magento 2 Contact Form & Email: Detailed Guides - Mageplaza
Configure the email address for your Magento 2 store's contact form and ensure that your customers can easily get in touch with you with this informative guide
How to Install Magento 2 with Sample Data - Mageplaza
How to install Magento 2 with Sample Data. In this topic we will discuss about How to Install Magento 2 Step by Step in Manage Store topic
6 Steps To Stop Brute Force Attacks - Mageplaza
How To Stop Brute Force Attacks in Magento 1, 2. In this topic we will discuss about How To Stop Brute Force Attacks in Manage Store topic
How to set Locale, Language, and Country in Magento 2 - Mageplaza
Setup Locale State Country in Magento 2 provides setup your store information on Locale Options that determines the timezone, language, country and the days.