37 Points You Need to Have in Magento 2 Go-Live Checklist
Managing a Magento 2 store is a challenging journey, demanding significant time and effort. To mitigate post-launch problems, a comprehensive checklist of potential mistakes is crucial. In this blog, we will present 37 points that need to be reviewed before your store’s launch.
Let’s start our Magento 2 Go-Live Checklist!
Magento 2 Go-Live Checklist
Before launching a Magento 2 store, owners need to carefully follow the Magento 2 go-live checklist below, including 37 points.
1. System Version
First and foremost, don’t forget to check whether you are using the latest Magento 2 version. If you don’t know for sure your current version, just apply one of the following methods that help check the Magento version:
- Check Admin Dashboard
- Check Composer.json file
- Check Composer.lock file
- Check via Command Line
- Using a Chrome Extension
- Check from the URL
- Check PHP Code
- Using Online Tools
Additionally, you can also contact us for Magento 2 Upgrade Service.
2. System Requirements
Today’s second point in our Magento 2 go-live checklist is ensuring the following system requirements are met.
2.1. Operating System
Magento 2 requires Linux distributors like Debian, CentOS, Ubuntu, or RedHat Enterprise Linux. Remember: Magento does not support macOS and Microsoft Windows.
2.2. Memory Requirement
Updating Magento requires a minimum of 2GB RAM
2.3. Composer Requirement
Store admin needs the most recent stable composer version.
2.4. Web Service
- Apache 2.2 or 2.4
- Nginx 1.8
2.5. PHP extensions
- curl;
- gd, ImageMagick > 6.3.7;
- intl;
- mbstring;
- mcrypt;
- mhash;
- openssl;
- PDO/MySQL;
- SimpleXML;
- soap;
- xml;
- xsl;
- zip;
- JSON (PHP 7 only); iconv (PHP 7 only)
2.6. Mail server
- Mail Transfer Agent (MTA)
- SMTP server
2.7. SSL
- An HTTPS security certificate
- Self-signed SSL certificates are rejected
- Both PayPal and repo.magento.com mandate TLS 1.2 or later for secure connections
3. SSL Setting
As a Magento 2 store owner, it’s essential to install a reliable security certificate and secure the frontend URL using HTTPS in the configuration.
Ensuring security is crucial not only for SEO rankings, as Google considers HTTPS a ranking signal, but also for other vital reasons stated by Kayce Basques - a well-known technical writer at Google.
To set up SSL in your Magento 2 store, follow these steps:
- Navigate to Stores > Configuration > General > Web > Base URLs (Secure)
- Choose the URL with HTTPS for a secure and trustworthy website
4. Store URLs
Please review the following points:
- Ensure the frontend URLs function works correctly
- Make sure that store URLs are friendly to users
- Remove “index.php” from the URLs
- Check for 200 OK status.
- Verify “www” and “http/https” status
5. Favicon
Having a small image in the browser’s address bar is crucial for brand recognition, especially with Google’s update emphasizing a website’s name and favicon.
To add your favicon, go to Content > Design > Configuration, edit your store, and upload the image under HTML Head settings. Then press the save button.
![]()
6. 301 Redirects
Double-check all the redirects in your store and fix broken ones immediately.
7. 404 Error Page
Ensure your website has a 404 error page. In case you’re wondering if it’s harmful to the store, don’t worry. Check out Google’s confirmation that 404 error pages do not harm your site.
A 404 page is necessary when your site breaks down as it helps calm your customers that the issue is only temporary and is fixed at the moment or simply for maintenance. To configure your 404 error page in Magento 2, follow these steps:
- Go to Stores > Configurations > Web > Default Pages
- Review all the settings and customize the Magento 2 404 page to create a user-friendly experience
8. SEO Setting
All the efforts on building your store, improving products, organizing events, and more will mean nothing if customers can’t reach you. One of the most effective to spread brand awareness is SEO. Therefore, check out the below aspects of SEO to raise your online store rank.
- Ensure your Meta Title and Meta Descriptions are optimized
- Verify if your Magento store has a proper Robots.txt file; generate one if you don’t have it
- Configure your Magento XML Sitemap at Stores > Configuration > Catalog to automate sitemap regeneration. Consider using the Magento 2 Google Sitemap extension for generating XML and HTML sitemaps
- Implement page-level and FAQ schema markup for improved Search Result Pages performance
- Find and fix broken links. For more optimization tips, feel free to contact our Magento SEO Services
9. Marketing
A welcoming and confirmation email for customers when signing up or making a purchase is a great idea in marketing for online stores. It helps remind customers to return for their next purchase and delivers a grateful attitude from store owners. Businesses can take advantage of email by attaching a coupon or discount code that motivates shoppers to buy more. Additionally, consider sending newsletters at least once a month, adjusting the frequency as needed. Create eye-catching and clear promotional materials to showcase specific products or sales events, including a usable coupon or discount code on your website.
Also, try to promote as much as possible, not just via mail but also social media, especially famous ones that shoppers usually use to surf the internet like Facebook, Twitter, Instagram, etc.
10. Google Tools Integration
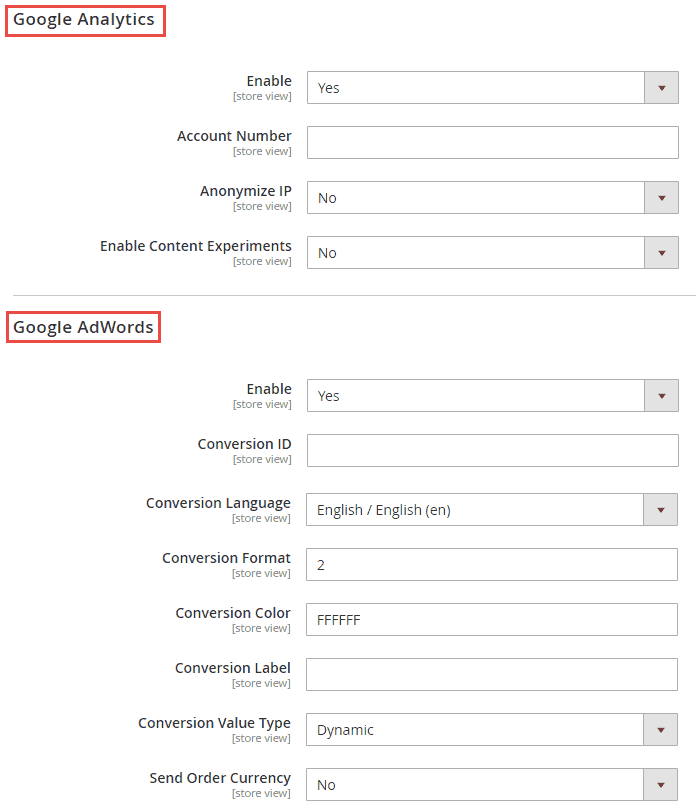
From the very beginning, it’s crucial to track growth and analyze data by integrating Google Analytics with Magento 2. If you plan to use Adwords, Magento 2 provides API integration as well. Configure both settings at Stores > Settings > Configuration > Sales > Google API.
11. Store Information
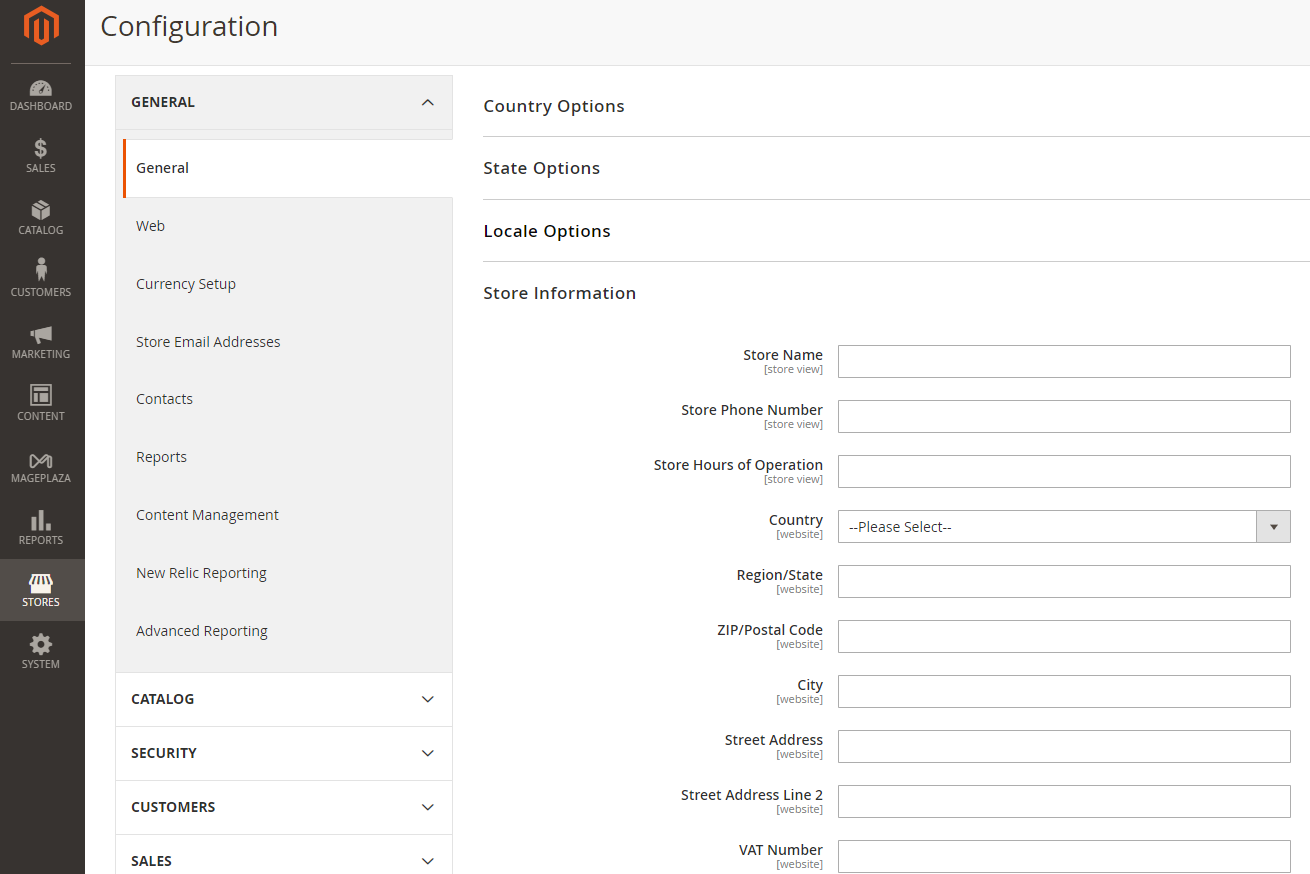
Double-check your essential store information for accuracy. Access Stores > Settings > Configuration > General > General > Store Information and verify the details.
12. Content Delivery Network (CDN)
To ensure optimal website performance for customers worldwide, configure your CDN to deliver website content with minimal latency to users in different regions. Well-known CDN providers include CloudFlare, AWS CloudFront, Fastly, and others.
13. Email Setups
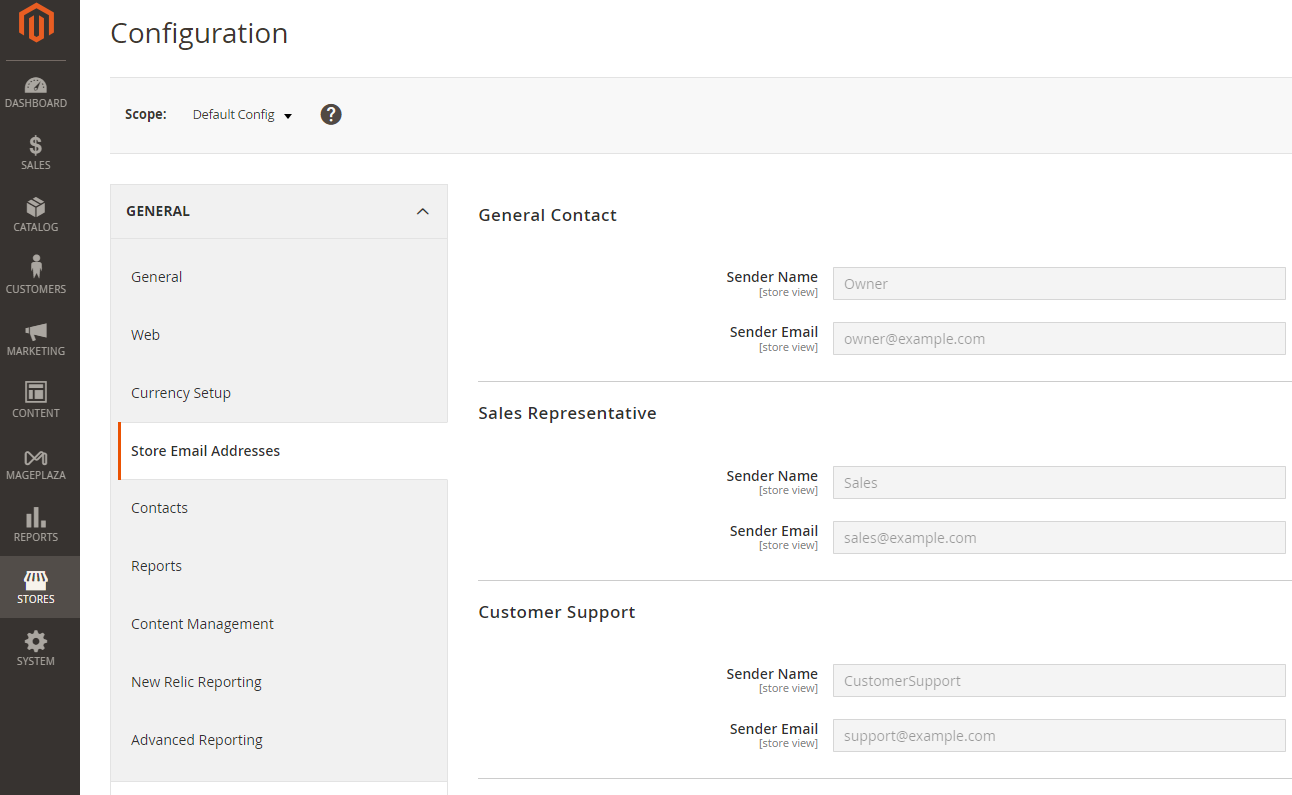
The next essential part of our Magento 2 checklist before launching is Email Setups. Remember to update the test Email IDs used in the staging environment with the actual business Email addresses for your Magento 2 store. You can easily do this at Stores > Settings > Configuration > General > Store Email Addresses.
To change the contact Email address, navigate to Stores > Settings > Configuration > General > Contacts.
Additionally, ensure to address transactional Emails. These Emails utilize a distinct logo from the default image. Confirm if the desired picture is stored in your theme directory as logo_email.gif.
14. Cart Options
In the next Magento 2 go-live checklist section, we’d like to remind you to ensure that the cart features are operational and the calculations are accurate. Verify the add, edit, and remove product functions within the cart.
15. Shipping Methods
Ensure you verify the setup and performance of the selected shipping methods from the backend. For more detailed instructions, please check our guide on How to Configure Shipping Methods in Magento 2.
16. Checkout Process
Check out process is one of the most critical customer experience priorities on the list of things to check before launching Magento 2 stores. In your Magento store, there are two options: one-page checkout or guest checkout.
The one-page checkout is a straightforward process where customers enter their information on a single page and complete the transaction in one step. It is the preferred option for most stores due to its simplicity and speed compared to guest checkout.
On the other hand, guest checkout involves multiple steps where customers provide their name, address, and payment information. This option is suitable for stores selling to customers who are not familiar with the website.
A satisfied checkout experience will surely give your customers a good impression, so choose wisely. Don’t forget to double-check its setups, as the checkout page can be beneficial in collecting shoppers’ insights.
17. Payment Methods
As an E-commerce store owner, ensuring a flawless online payment system is crucial. This might be one of the most important keys that decide whether the customer makes an order. To avoid errors, check the configuration settings before launching your store by going to Stores > Settings > Configuration > Sales > Payment Methods.

18. Tax Settings
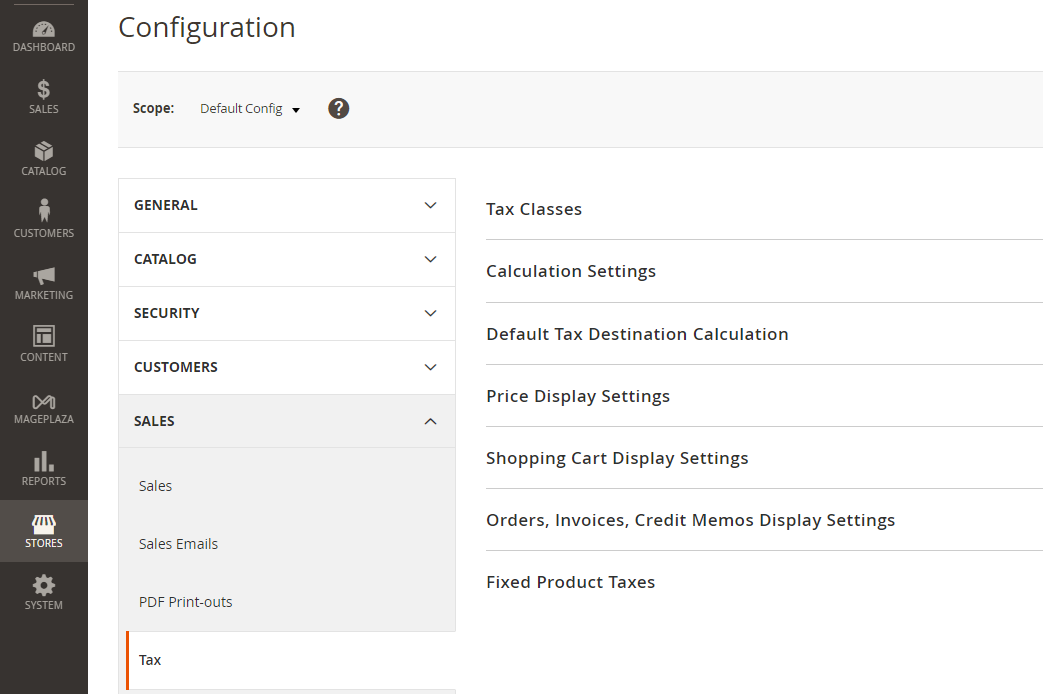
At this stage, go to Stores > Settings > Configuration > Sales > Tax and make sure the tax settings are correct.
19. Admin URL
I’m sure you won’t want to miss Admin URL in the list of things to check before launching Magento 2 stores. Ensure maximum security for your admin panel. Avoid default /admin URL, which is easily guessable. Follow this guide below to change the admin URL in Magento 2 and set a robust and unique password for added protection!
There are three options to customize your Magento 2 admin URL:
- Using SSH:
php bin/magento setup:config:set --backend-frontname="admin_path"
Then, replace “admin_path” with your desired URL
- Manual method:
- Navigate to app/etc/env.php
- Change ‘frontName’ => ‘admin’
- Clear cache
- Via Admin panel:
- Log in to the Admin panel
- Go to Stores > Configuration
- Choose Admin under the Advanced section
- Expand the Admin Base URL part
- Set Yes in Use Custom Admin URL
- Insert the custom admin URL
- Then the system will log you out and redirect you to the new Admin URL.
20. Inventory
You have two choices for stock management:
- Inventory management without stock management.
- Inventory management with stock management. Make sure to double-check this section!
21. Extensions License
When installing a module, you may need to enter a license key. Ensure the key you used in the test store is still valid for your new domain. If not, it’s time to obtain a new key!
22. Test Data Removement
Before the store is launched, ensure to remove all test data, including test orders, products, and customer information.
23. System Compilation
Execute the following command to initiate system compilation:
php bin/magento setup:di:compile
System compilation handles code generation and collection, effectively reducing load time.
24. Cron Status
Cron Status is also crucial in the Magento 2 checklist before launching. Ensure that you have configured cron in Magento 2 to handle essential repetitive tasks such as generating Google sitemaps and reindexing. If needed, you can also create a Magento cron job.
25. Placeholder Images
Make sure you’ve created default settings for the store and positioned them at catalog/products/placeholder/image.jpg, catalog/products/placeholder/small_image.jpg, and catalog/products/placeholder/thumbnail.jpg.
Alternatively, upload them through the admin panel at Stores > Configuration > Catalog > Catalog > Product Image Placeholders.
26. Caching & Indexing
Caching is enabled by default, but developers often turn it off during store development. Make sure to turn it back on and refresh it. You can find methods to clear Magento 2 cache here. To check indexing readiness, navigate to System > Index Management.
27. Varnish Cache Activation
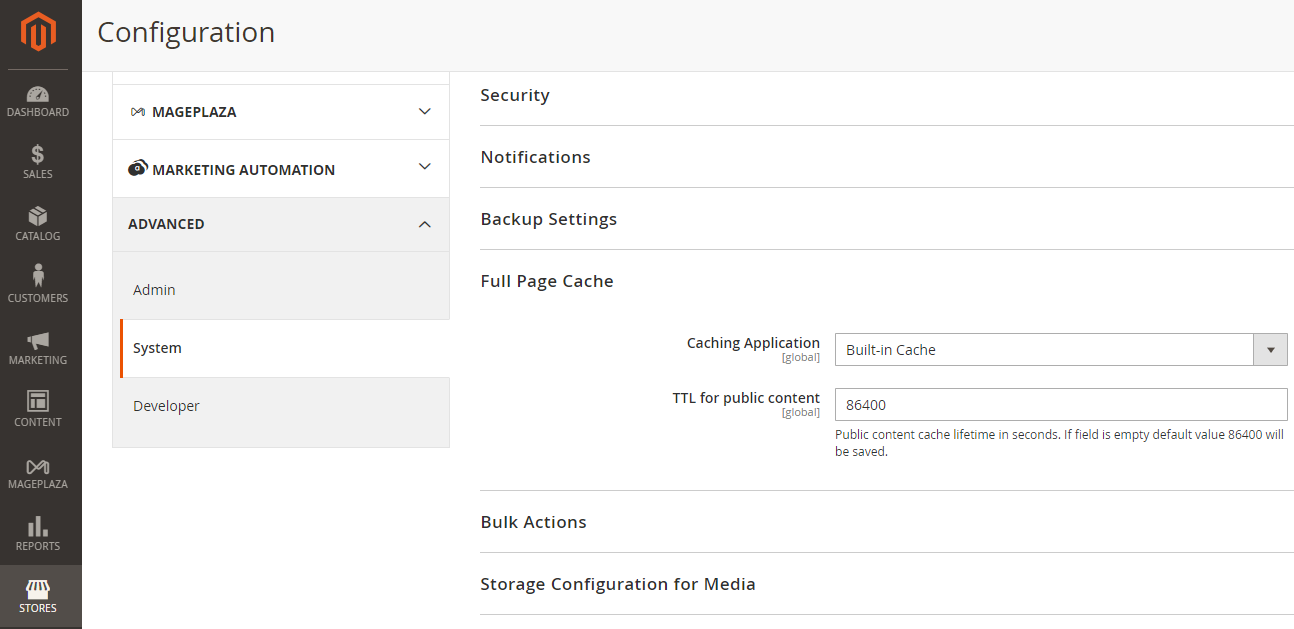
Activate the varnish cache section to enhance your store’s speed. Verify if you’ve selected Varnish Cache as the Caching Application under Stores > Configuration > Advanced > System > Full Page Cache.
28. CSS
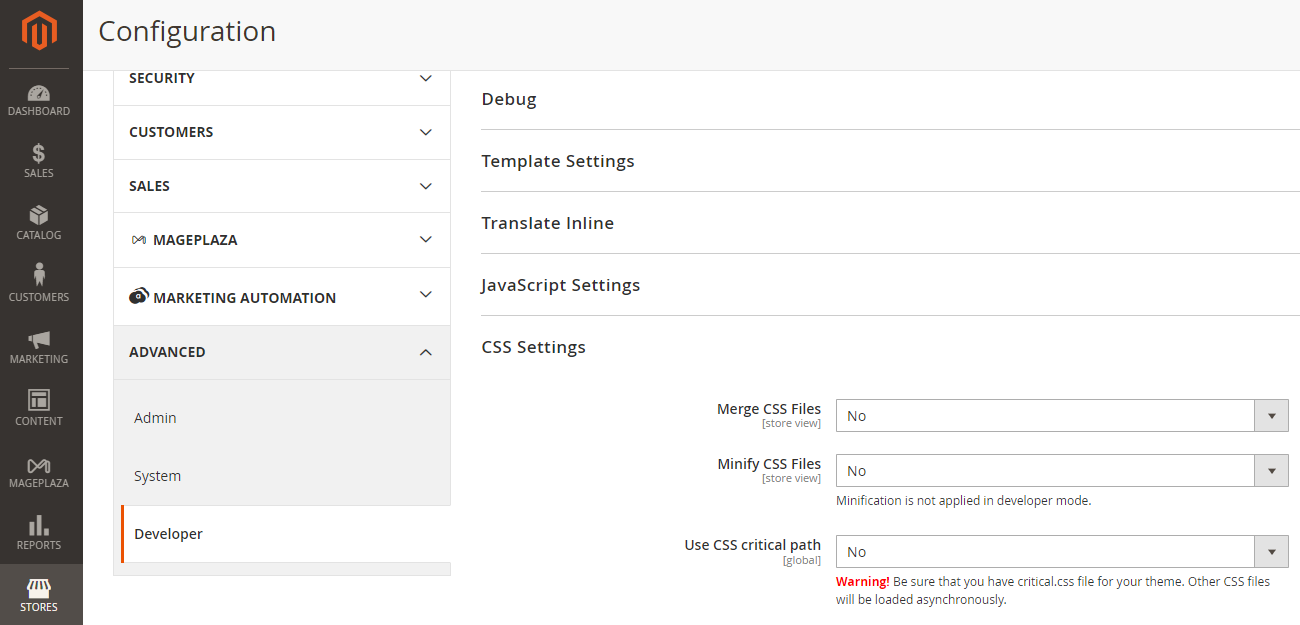
Optimize site load time by employing a CSS compressor. Maintain two CSS versions: one in readable form and a minified version (styles.css).
To make changes, access Stores > Configuration > Advanced > Developer > CSS Settings.
29. Javascript
Another essential task in our Magento 2 go-live checklist is enhancing load time by minifying and consolidating HTTP requests via Stores > Configuration > Advanced > Developer > Javascript Settings. You can also enable CSS and JS merging in Magento 2 to improve performance further.

30. Image Optimization
Perform a rapid assessment of image optimization using tools like TinyPNG, ShortPixel, and others.
31. Email Templates
Don’t forget to check whether you have customized the default email template to align with your brand.
32. Website Loading Time
In addition to the points I’ve highlighted earlier, assess your website’s loading time using tools like WebPageTest, GTMetrix, and Google PageSpeed Insights. If there’s any room for improvement, which is always possible, make the necessary adjustments before launching your Magento 2 store. Make sure to refer to tips for speeding up your Magento 2 store to optimize its performance.
33. CMS Pages
Check again to make sure you’ve provided personalized CMS pages, such as privacy policies and Terms & Conditions.
34. Crawling Activation
Indeed, you’d want Google to index your store. Confirm that you have enabled the configuration that permits Google to crawl and index, as it might be disabled in the staging environment. Allow Googlebot to visit your store regularly, and to verify the configuration, please visit our blog here.
35. Newsletter Subscriptions
To prevent any awkward situations with actual customers, review your newsletter subscription system to ensure customers can easily subscribe or unsubscribe.
36. Database Backup
Incorporate methods for regular and timely backups, eliminating concerns about data loss when your store goes live. Consider leveraging the Magento 2 Cloud Backup extension, which allows you to schedule backups to Google Drive or Dropbox at specific intervals and times.
37. Production Mode
Finally, switch to production mode once all development and admin panel tasks are completed!
Magento 2 Go Live Checklist
With the arrival of launch day, the holding page has been taken down, and IP restrictions have been lifted, making the site globally accessible. It’s time you should verify the following aspects immediately after going live. Additionally, consider re-examining the pre-launch checklist, excluding SEO-related tasks, for thorough quality assurance.
Test Orders
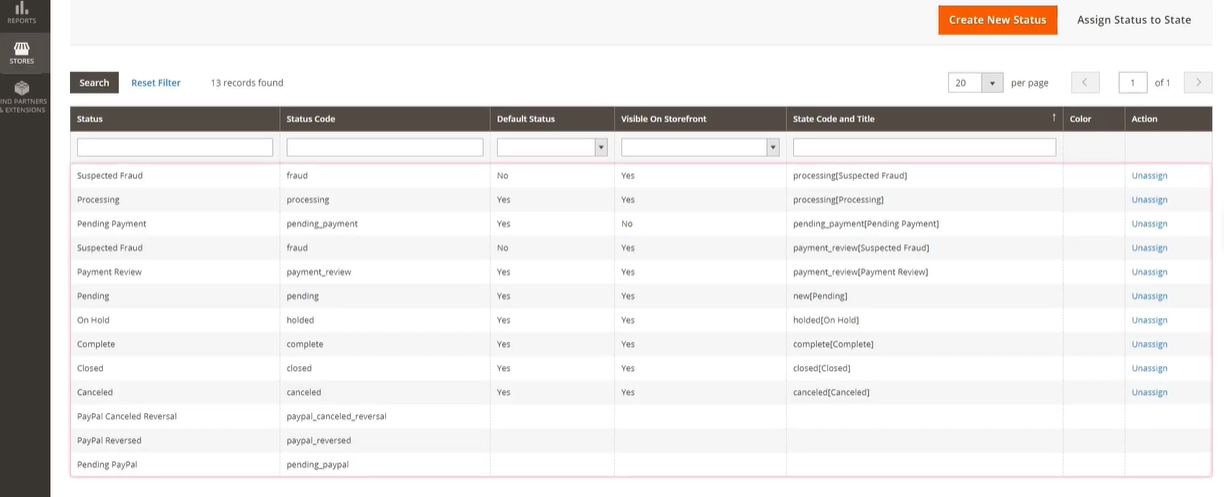
Place Multiple Test Orders:
- Logged-in users: Test the order process while logged in as a registered user. Ensure that the checkout flow, payment options, and order confirmation work as expected.
- Guest users: Repeat the same process for guest users who don’t have an account. Verify that guest checkout functions smoothly.
- Billing and Shipping Addresses:
Place test orders with both the same billing and shipping addresses and different billing and shipping addresses. Confirm that the system correctly processes these situations.
Payment Options:
-
Test various payment methods available on your store. These may include credit/debit cards, PayPal, or other gateways.
-
Verify that payments are captured successfully and reflected accurately in the order details.
Integration Testing:
Check if orders are correctly transmitted to Magento itself. Ensure that order data is accurately recorded in the system.
Additionally, test the integration with any ERP or order management software you’re using. Confirm that orders flow seamlessly between systems.
Tax Amounts:
Validate that tax calculations are accurate. Test orders with different products and shipping locations to ensure correct tax amounts are applied.
Payment Gateway:
Confirm that payments are captured as expected by the chosen payment gateway (e.g., Stripe, PayPal, etc.).
If there are any issues, investigate and resolve them promptly.
Website Address:
-
Confirm that your website’s domain (URL) is correctly set up and accessible.
-
Resolve to HTTPS (secure connection)
-
Redirect non-HTTPS requests to HTTPS.
-
Handle non-www and www versions consistently (e.g., non-www resolves to www or vice versa).
Transactional Emails
-
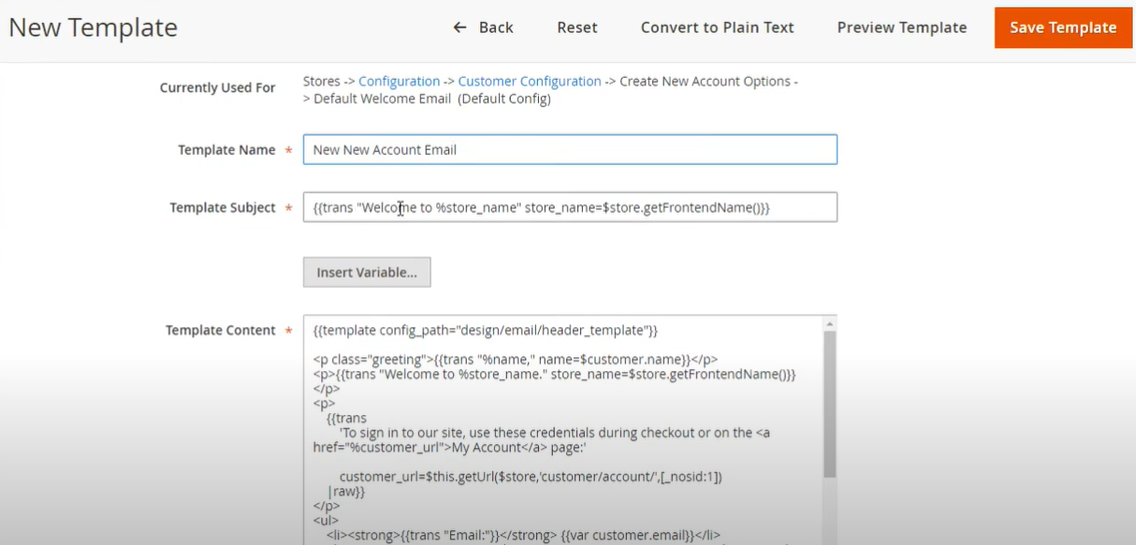
Sales Order Email: Verify that sales order confirmation emails are sent correctly and display as expected on all devices.
-
Guest Order Email: Confirm that guest order confirmation emails work properly.
-
Logged-In User Emails: Test emails related to logged-in user actions (e.g., account updates, order status changes).
-
New Account Sign-Up Email: Ensure that new account sign-up emails are delivered promptly.
-
Forgotten Password Email: Test the password reset functionality and verify that users receive the reset link.
-
Back-in-Stock Notifications: Check if back-in-stock notification emails are functioning as intended.
Performance
-
Optimize website speed by compressing images, enabling caching, and minimizing HTTP requests.
-
Test page load times on desktop and mobile devices.
-
Compare the new Google Lighthouse audit with the old one and discuss any issues with your technical team.
SEO
-
Conduct checks for 301 redirects throughout the site.
-
Generate precise XML sitemaps in Magento.
-
Set your site to INDEX/FOLLOW status.
-
View page source across multiple front-end instances to confirm text presence.
-
Enable search engine access in robots.txt.
-
Create or update a webmaster tools account.
-
Add new sitemaps for enhanced tracking.
-
Use SEO software to locate and correct broken links.
-
Test product pages with the schema markup tool.
-
Confirm proper canonical URL settings.
-
Validate href-lang execution.
Google Analytic (GA)
-
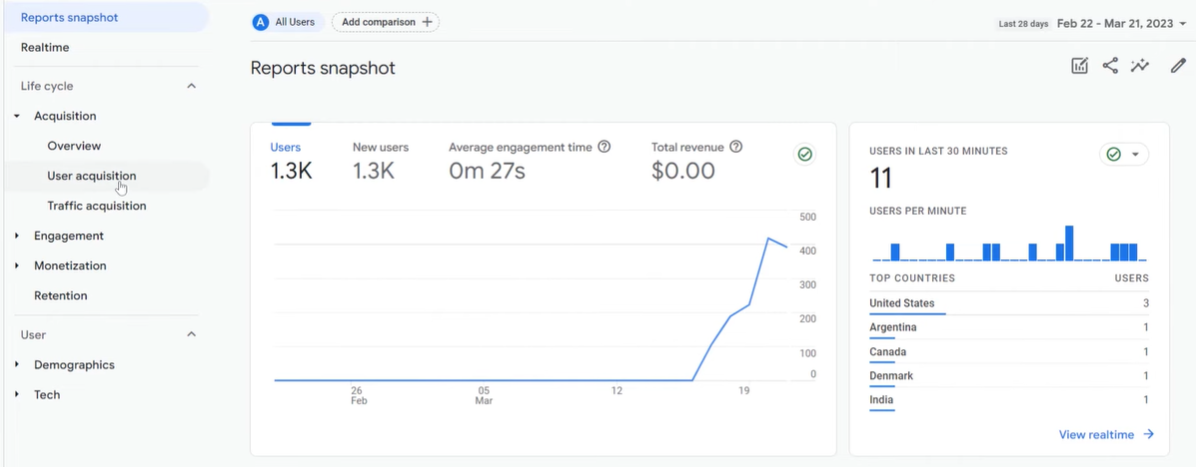
Real-Time Reports: Use real-time reports in Google Analytics to verify that external traffic is coming through to your website immediately after launch.
-
Site Search Parameters: Update site search parameters in Google Analytics to ensure that site search queries are accurately recorded.
-
Transaction Tracking: Check transactions, such as orders, are properly recorded in Google Analytics, which usually happens within 10 minutes after a transaction is made.
Third-Party Services
Your website can rely on 3rd party modules for added features. When launching a site, these may face licensing challenges, which can lead to modules to not work. Thus, be proactive and check potential issues immediately.
-
Site Search: Run a re-index to ensure search results are accurate and as expected.
-
Email: Sign up for marketing email lists to verify that email functionality works as intended.
-
Live Chat: Test live chat functionality to ensure it’s operational.
-
Personalization Software: Check any personalization features or modules to confirm they are functioning correctly.
-
Reviews: Verify that product reviews display accurately and feed through to the Magento admin for approval.
-
Tax Extensions: Ensure tax calculations are accurate based on the configured extensions.
-
Shipping Extensions: Test shipping options and rates to ensure they work as expected.
Payment Service Provider (PSP) Modules: Confirm that payment gateways and PSP integrations are functioning properly.
Magento 2 Post-Go Live Checklist
Google Analytics (GA)/ Google Tag Manager (GTM)
-
Traffic Sources: Examine the following traffic sources and compare them with the data from the previous site.
-
Organic Traffic: Visitors who find your site through search engines like Google.
-
Direct Traffic: Visitors who directly type your website URL or use bookmarks.
-
Referral Traffic: Visitors who arrive via external links from other websites.
-
Conversion Tracking: Verify that orders continue to be tracked in Google Analytics (GA).
-
GTM: Confirm that all tags within Google Tag Manager (GTM) are functioning as expected.
SEO
-
Conduct ongoing evaluations using webmaster tools.
-
Review error logs, validate sitemaps and robots files, and confirm search listings.
-
Make sure that sitemap(s) is read and processed successfully.
-
Ensure the accuracy of title tags, meta descriptions, and schema markup.
-
Display schema markup where necessary.
-
Validate robots.txt.
-
Verify spot-check search listings.
-
Ensure title tags, meta descriptions, and schema markup are displayed correctly.
-
Check review ratings and store versions in search engine locales.
-
Ratings for reviews appear where they fit.
-
Verify daily updates to XML sitemap.
-
Optimize new content and images.
Customer support
After launching your website, it’s essential to collaborate with the customer service team to identify any user feedback or issues they are getting about the website. This approach can uncover problems that need to be improved and help maintain a positive user experience.
Orders
It is crucial to ensure that orders continue to flow seamlessly to Magento, maintain the correct status, and are fed through to relevant third-party software. While some items on the checklist may not apply to your specific website, adhering to these guidelines will significantly contribute to your website’s commercial success from the outset.
Conclusion
After this blog of 37 points in our Magento 2 go-live checklist, we hope you got the idea of everything you need to do before publishing your store to avoid unnecessary mistakes as well as a smooth opening.
If there’s anything else I might have missed, don’t hesitate to share your thoughts in the Comments section below. For expert assistance with Magento 2 store setup, feel free to contact us anytime.


