


5 mins read
|
07-30-2026
Magento 2 B2B Full User Guide [2025 updated]
Vinh Jacker
|
03-17-2025
![Magento 2 B2B Full User Guide [2025 updated] - Mageplaza](https://placehold.co/874x291?text=Loading)
Free 1:1 consultation with Magento experts
Real-time sync to prevent errors & downtime
11+ years of expertise to maximize efficiency
Free 2-month support after the project
Learn more
![Magento 2 B2B Full User Guide [2025 updated] - Mageplaza](https://cdn2.mageplaza.com/media/blog/B2B-user-guide/magento-2-b2b-full-user-guide-cover.png)
In today’s fast-paced and ever-evolving business landscape, e-commerce has become crucial to B2B (business-to-business) transactions. While Magento 2 B2B Commerce holds immense business potential, harnessing its power and maximizing its benefits requires a comprehensive understanding of its valuable features and functionalities.
In this Magento 2 B2B user guide, Mageplaza would like to explore the critical elements of Magento 2 B2B and provide an all-encompassing user guide to consolidate essential information simultaneously. Whether you are new to Magento 2 B2B or seeking to deepen your knowledge, this guide will drive your platform effectively and exploit its true potential.
Overview of Magento 2 B2B Commerce
First of all, before going to the main part about Magento 2 B2B User Guide, we would like to give you some basic information about B2B Commerce and its applications.
What is B2B Commerce?
As its name suggests, B2B stands for “Business-to-Business” and refers to transactions, interactions, or relationships between two businesses rather than between a business and individual customers (B2C). In B2B Commerce, the focus is on selling products or services from one business to another, fulfilling the needs and requirements of the business customers.
B2B transactions typically involve larger quantities, higher order values, and more complex purchasing processes compared to B2C transactions. The customer in B2B transactions can range from small businesses to large enterprises and can span various industries and sectors.
Read more: What is B2B and B2C? Differences between B2B and B2C
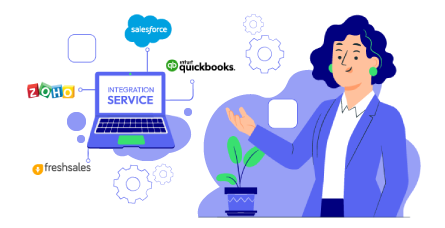
What are APIs?
API stands for Application Programming Interface. It is a set of rules, protocols, and tools that allows different software applications to communicate and interact with each other. APIs define the methods and data formats that software components can use to request services from each other and exchange information.
Get Seamless Magento Integration Today!
Why should we adapt APIs to B2B?
Adapting an API to B2B brings more advantages to your business than you think. By harnessing the power of APIs, your business can unlock new opportunities, improve efficiency, and stay ahead in the competitive B2B landscape. However, it’s not very easy to be accomplished. Fortunately, all crucial points are provided in this Magento 2 B2B User Guide. Here are five keys you need to pay attention to:
- Enhance collaboration by allowing your company to collaborate more effectively with its partners, suppliers, or service providers. By exposing specific functionalities or data through APIs, B2B companies can empower other organizations to build upon their services, develop integrations, and create innovative solutions. This fosters collaboration and encourages the growth of an ecosystem around the business, leading to increased opportunities and mutual benefits.
- Smooth integration of Old and New data within your business. API provides a standardized approach to connect and synchronize data from legacy systems with modern applications or platforms. By leveraging AIPs, you can ensure a smooth and seamless data flow between various systems, enabling you to leverage existing data assets while embracing new technologies and functionalities.
- Improve your customer experience by integrating your services with customer systems through APIs. This way, businesses can provide real-time data, personalized interactions, and seamless experiences. APIs also facilitate self-service options, enabling customers to access relevant information and perform desired actions without manual intervention. This leads to increased customer satisfaction and loyalty.
- Provide the flexibility to scale and adapt B2B operations according to changing business needs. They allow businesses to add or remove features, modify integrations, and expand services without disrupting existing systems. APIs also facilitate the adoption of new technologies and platforms, enabling online stores to stay competitive in a rapidly evolving market.
- Permit businesses to consolidate Software as a Service (SaaS). APIs facilitate the integration of various software applications or services, such as customer relationship management (CRM), enterprise resource planning (ERP), or marketing automation tools. This consolidation streamlines operations, improves data visibility, and enhances overall efficiency by eliminating silos and enabling seamless data flow across different systems.
Several applications of APIs in B2B Commerce
PWA (Progressive Web Application) for a seamless user experience.
PWA is a modern web technology that combines the best features of web and mobile applications. It allows businesses to create web applications that function like native apps, providing a seamless user experience across devices. PWAs utilize APIs to leverage device capabilities, offline functionality, push notification, and more.
In the B2B context, PWAs offer several advantages. They provide mobile accessibility, enabling B2B users to access business applications and services on the go, increasing productivity, and facilitating remote work. PWAs also work offline or in low-connectivity environments, allowing users to continue working and accessing critical information even without an internet connection. Additionally, PWAs ensure cross-platform compatibility, working seamlessly on different operating systems and reducing the need for separate native apps. With features like push notifications, PWAs enable real-time updates and communication, keeping B2B users informed about important information or events.
Headless E-commerce for greater flexibility and customization
Organizations using traditional eCommerce platforms are forced to compromise by changing their solution to fit their tech stack rather than the other way around. These barriers are removed by the headless design, which is flexible and quick to create unique encounters.
The headless technique implies the ability to provide B2B buyers with a completely unique retail facade, web, TV, telephone, or voice-actuated buying while relying on B2B-focused features for back-of seamlessly-fice capabilities. This may include creating requests, itemizing executives, and performing reconciliations with your PIM, CRM, or ERP. In the headless environment, different frameworks communicate with one another using APIs, successfully separating the backend from what happens in the front.
Business Incorporation to reduce human errors
Usually, there are two reasons for online retailers to seek eCommerce solutions: the first is to improve the efficiency of their eCommerce directors, deals, and staff working; the second is to assist their business clients in achieving their goals. This entails going above and beyond one’s self to help others at the door and oblige their smallest shopping, requesting, and purchasing inclinations.
B2B customers can legitimately use the eCommerce API to push information to their ERP, reducing manual information transmission and human error. Without having to invest time and money into complicated combinations with various 3rd-party frameworks, open customer-facing facade eCommerce APIs let you manage critical item information to your client’s preferred frameworks. In general, the API may be used to quickly rebrand or replicate self-administration entryways to better answer end-user concerns and make B2B situations simple to manage.
Step-by-step Magento 2 B2B User Guide
In this Magento 2 B2B User Guide, we will provide you with the most informative and detailed instructions.
Now, let us show you how to configure B2B features in the Magento platform with easy steps:
- From Admin Panel, please enter Store-> Settings -> Configuration.
- Choose B2B Features under General and follow these steps:
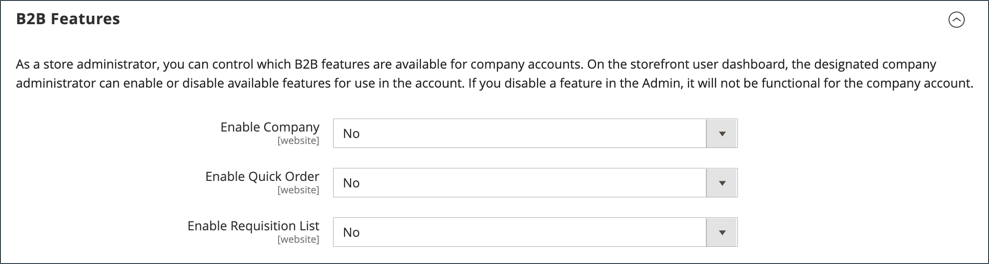
- Set Enable Company to Yes to allow your customers to manage their company account as well as enable support for further B2B features. The Shared Catalog, B2B Quote, B2B Payment Methods, and B2B Shipping Methods are immediately activated after you enable company support.
- Set Enable Shared Catalog to Yes to make custom pricing accessible to different companies. It means that you also enable category permissions for all stores.
- Set Enable B2B Quote to Yes to enable your customers to negotiate prices.
- In Default B2B Payment Methods:
- Set Applicable Payment Methods to All Payment Methods or Specific Payment Methods to set up the B2B orders’ default payment method.
- Choose suitable Payment Methods that you allow customers to use from the list.

- Click Save Config to complete.
Company Accounts to Manage Buying Roles
This is an essential step in our Magento 2 B2B user guide. In each instance of status setting, the Companies Grid keeps track of all active company accounts and pending requests. Additionally, it provides the necessary tools for creating and managing company accounts. The list can be filtered, and the standard grid controls can change the column format.
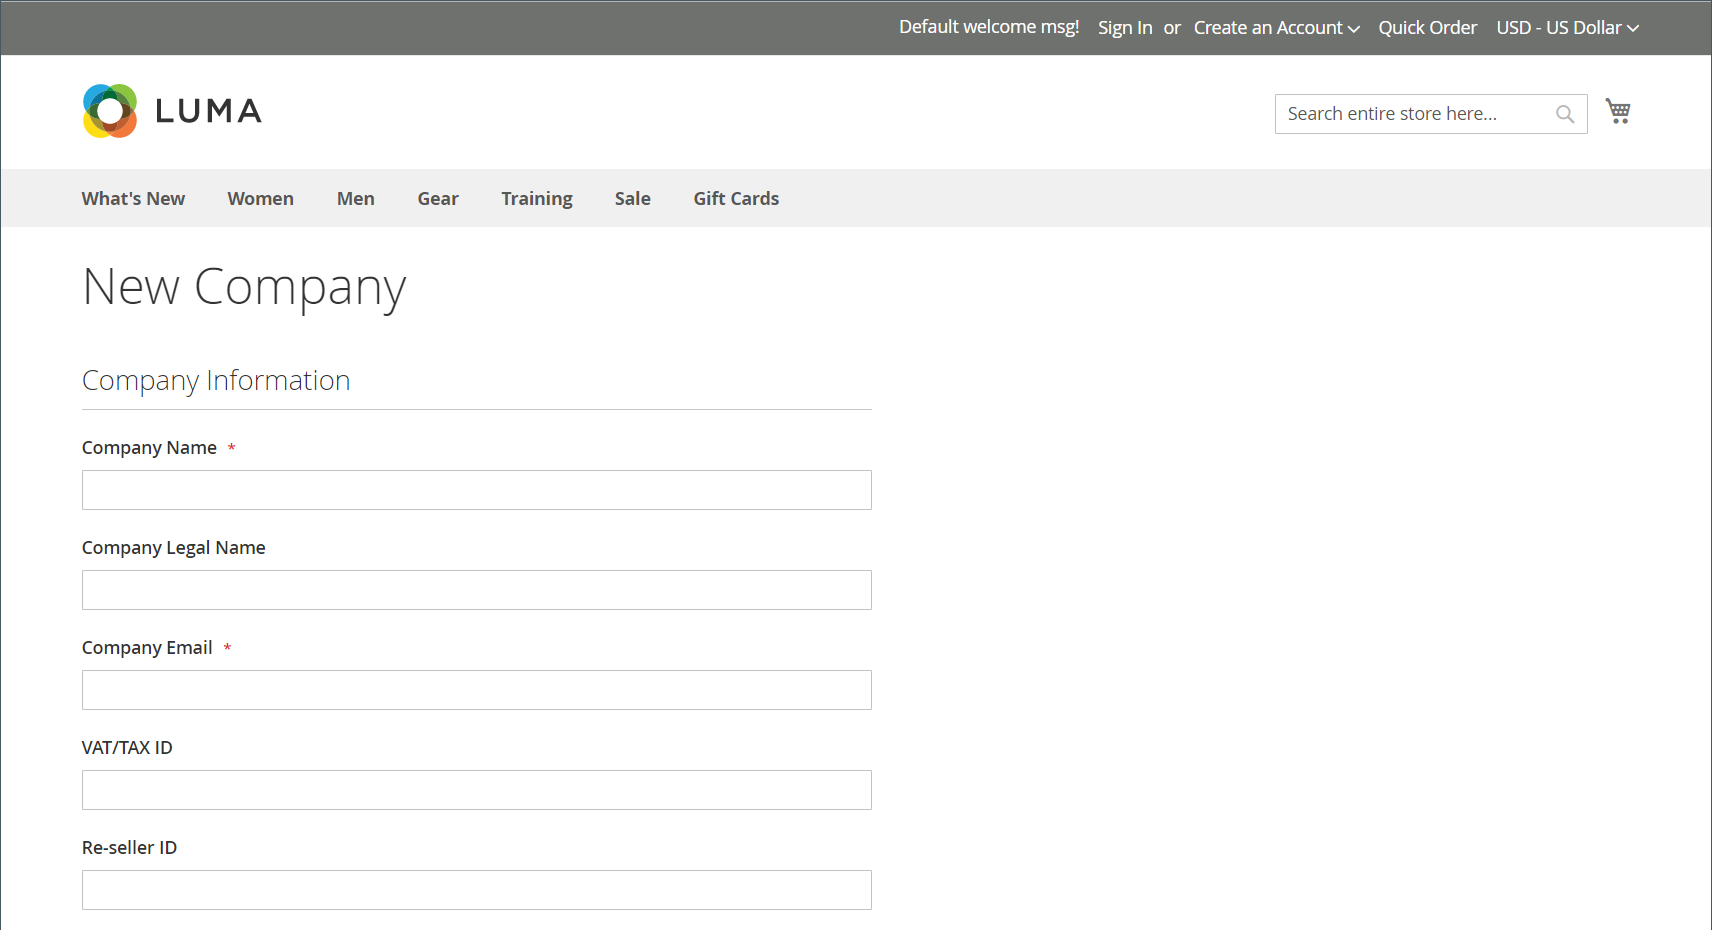
You can set up the Company accounts from the storefront or back end by following our Magento 2 B2B User Guide. Setting up company accounts from the storefront is default enabled. As a result, guests can ask to open company accounts when they access the store. After accepting accounts, the company admin can set up the structure and users with various permission levels. To list the company account, you should:
- Enter Customers in the Admin Sidebar -> Companies
- Click Add New Company
- Create a new Company Account from the storefront/ backend.
- From storefront:
- Click Create an Account -> Create New Company Account
- Enter required fields such as company information, company administrator, and address.
- From backend:
- From Customers -> Companies -> Add New Company
- Enter required information
- To approve pending company accounts:
- From Customers -> Companies -> Edit in the Action column
- Select Active in Action -> Change Status -> Save to complete
- Company Structure
An account can reflect the company structure. Users can be organized into teams or groups inside a company’s hierarchy of divisions and departments.
Steps to add a new company team:
- From Company Structure -> Business Structure -> Add team
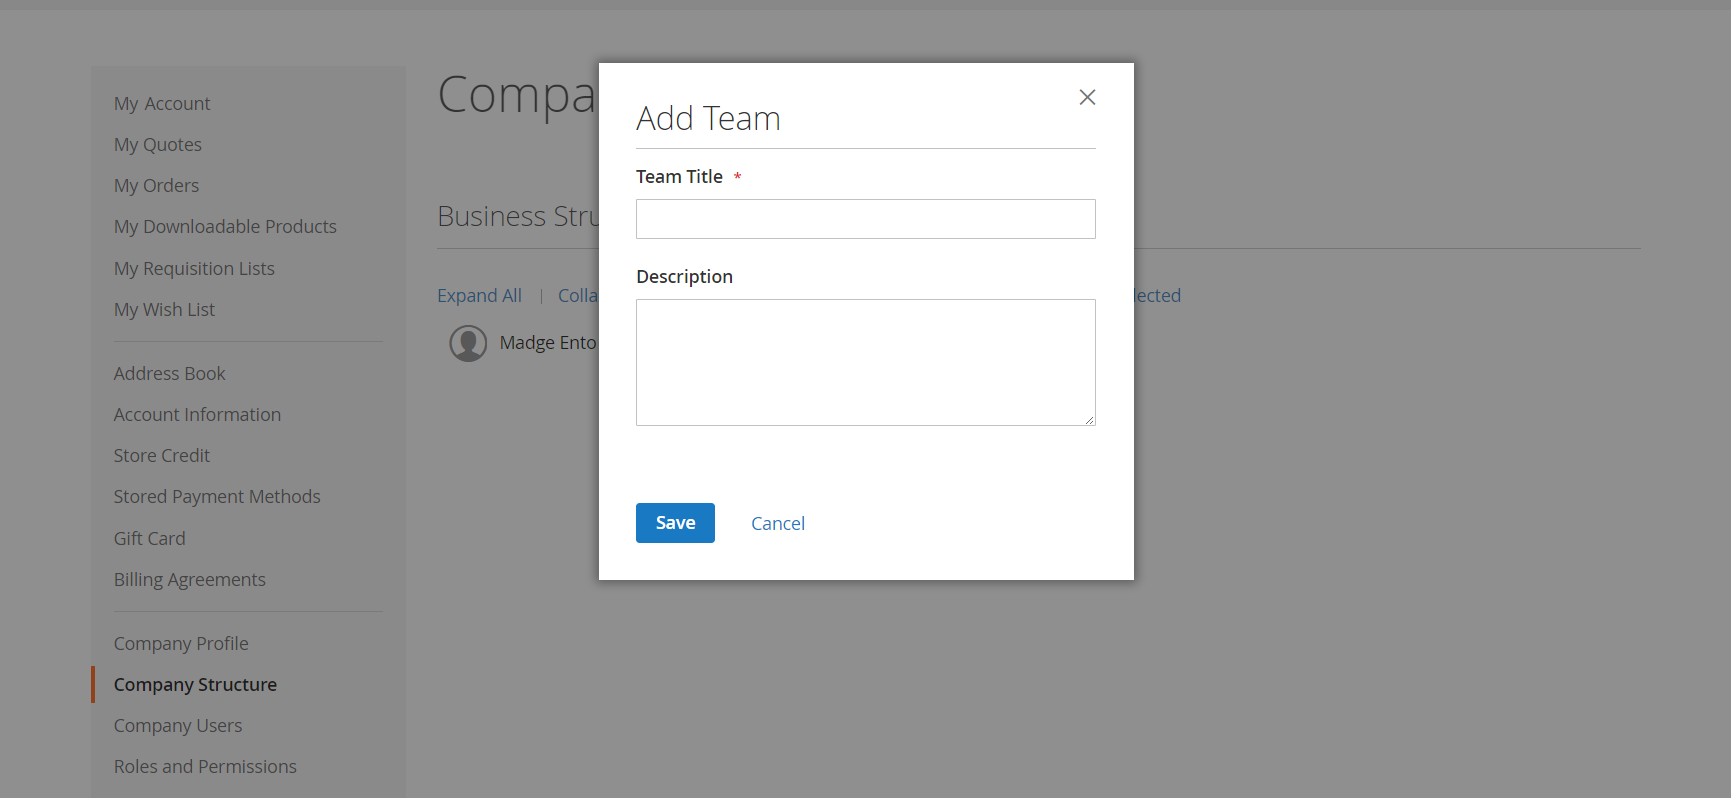
- Fill required information
- Click Save
To move a company team to another position:
- Click and drag that team to the place that you want in the company structure.
To delete a company team:
- Define the team to delete
- Click Delete Selected -> Delete
- Company Users
Company users are people associated with a business. They are also often customers with varying access rights to storage resources.
Steps to add a Company User:
- Sign in as the administrator from the storefront
- From Company User -> Add New User -> Fill in the necessary information
- Click Save

Steps to assign a user to a team:
- Choose Company Structure
- Drag the user under the intended team
Steps to assign a customer to a company from the backend:
- From Customers -> All Customer, choose the customer you want, -> Edit
- Choose Account Information -> Associate to Company
- Choose the company you want -> click Done
- Click Save Customer
- Company Roles And Permissions
You can utilize the system’s one specified Default User role, or you can change it to suit your needs. To match your business structure and organizational duties, you can create as many roles as necessary, such as:
- Default User: The default user can perform all sales and quote-related tasks, but they are only allowed to view the company profile and credit data.
- Senior Buyer: A senior buyer may have view-only access to the Company Profile, Payment Information, User and Teams, and Company Credit but full access to all Sales and Quotes resources.
- Assistant Buyer: An assistant buyer may be able to use Checkout with Quote to place an order, see orders, quotes, and also the company profile.
In Roles and Permissions, the admin can quickly create, modify, duplicate, or delete any role. Steps to assign a role to a company user:
- Sign in as the administrator -> choose Company Users
- Choose a user -> click Edit
- Choose a User Role
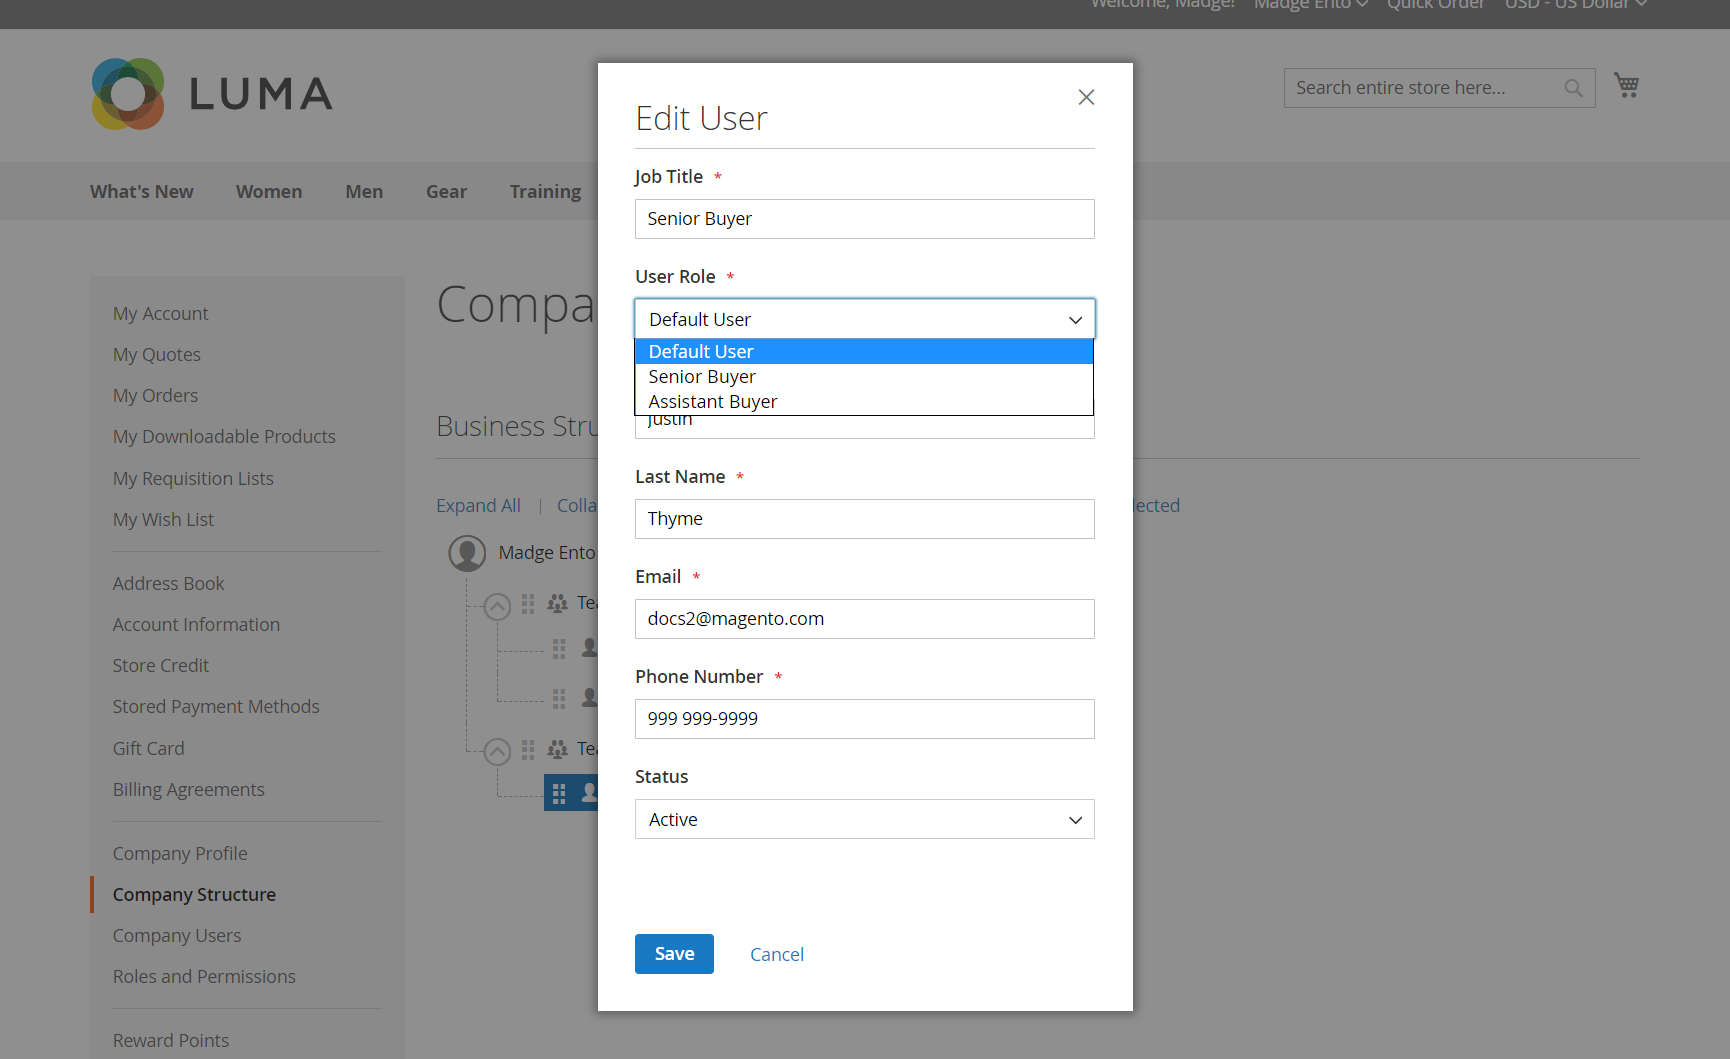
- Click Save
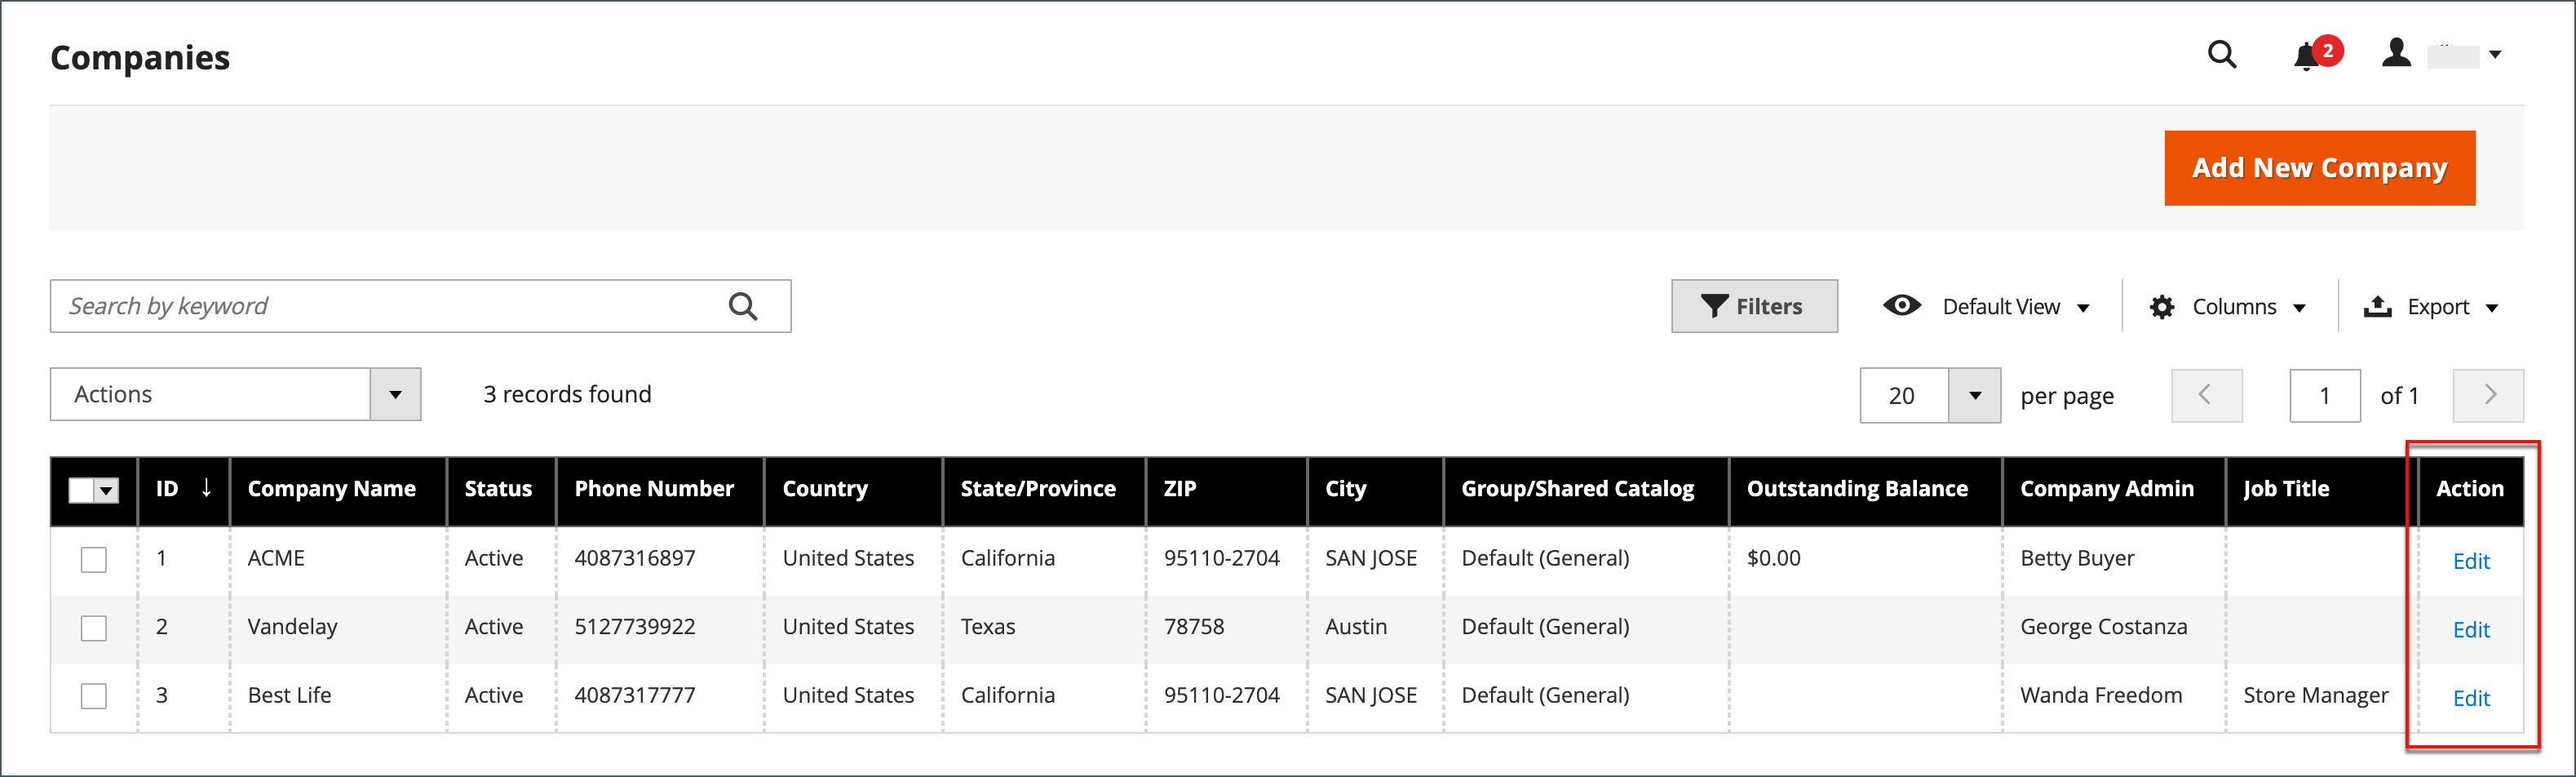
Magento 2 allows store owners to activate, edit, delete, or block any company accounts. Here are the guidelines:
- From Customers -> Companies
- Select a row to update -> click its checkbox
- Set the Action column, then choose the action you want
- Click OK/ Save
To convert credit currency:
- In the Action column, set to Convert Currency
- Click OK to confirm
- Select your desired credit currency
- Select Proceed to finish
Quick Order to Streamline the Checkout Process
“Quick order” is a B2B feature designed to streamline the ordering process for businesses that frequently place bulk orders or reorder the same set of products. It allows customers to quickly and efficiently place orders by entering item SKUs and product codes or using other identification methods instead of manually selecting individual items from a catalog or website.
The primary goal of the “Quick order” feature is to save time and effort for B2B customers who already know what products they need and want to expedite the ordering process. By providing a dedicated input field or interface, customers can input a list of item codes or SKUs (Stock Keeping Units and the desired quantities and proceed directly to the checkout or order submission page.
This Magento 2 B2B User Guide will show you how to utilize this fantastic feature.
Step 1: Enable Quick Orders
- From the Admin Panel -> Store -> Configuration
- From the General section, choose B2B Features
- Set Enable Quick Order to Yes
- Click Save Config to finish
Step 2: Specify Products for Quick Order
There are two ways to specify products for Quick Order
- Method 1: Single Product
- Click the Quick Order link
- Select products:
- By SKU: Enter the SKU -> click Add to List. After that, the SKU and the product information will appear
- By Product Name: Enter the Product name -> click on the product you are finding -> Enter Qty -> Click Add to Cart
- Method 2: Enter Multiple Products
- In the Enter Multiple SKUs box, you can: enter an SKU per line; or all SKUs in line with commas without spaces to separate them
- Enter Multiple SKUs
- Click Add to List
- Enter Qty
- Select options if they are required
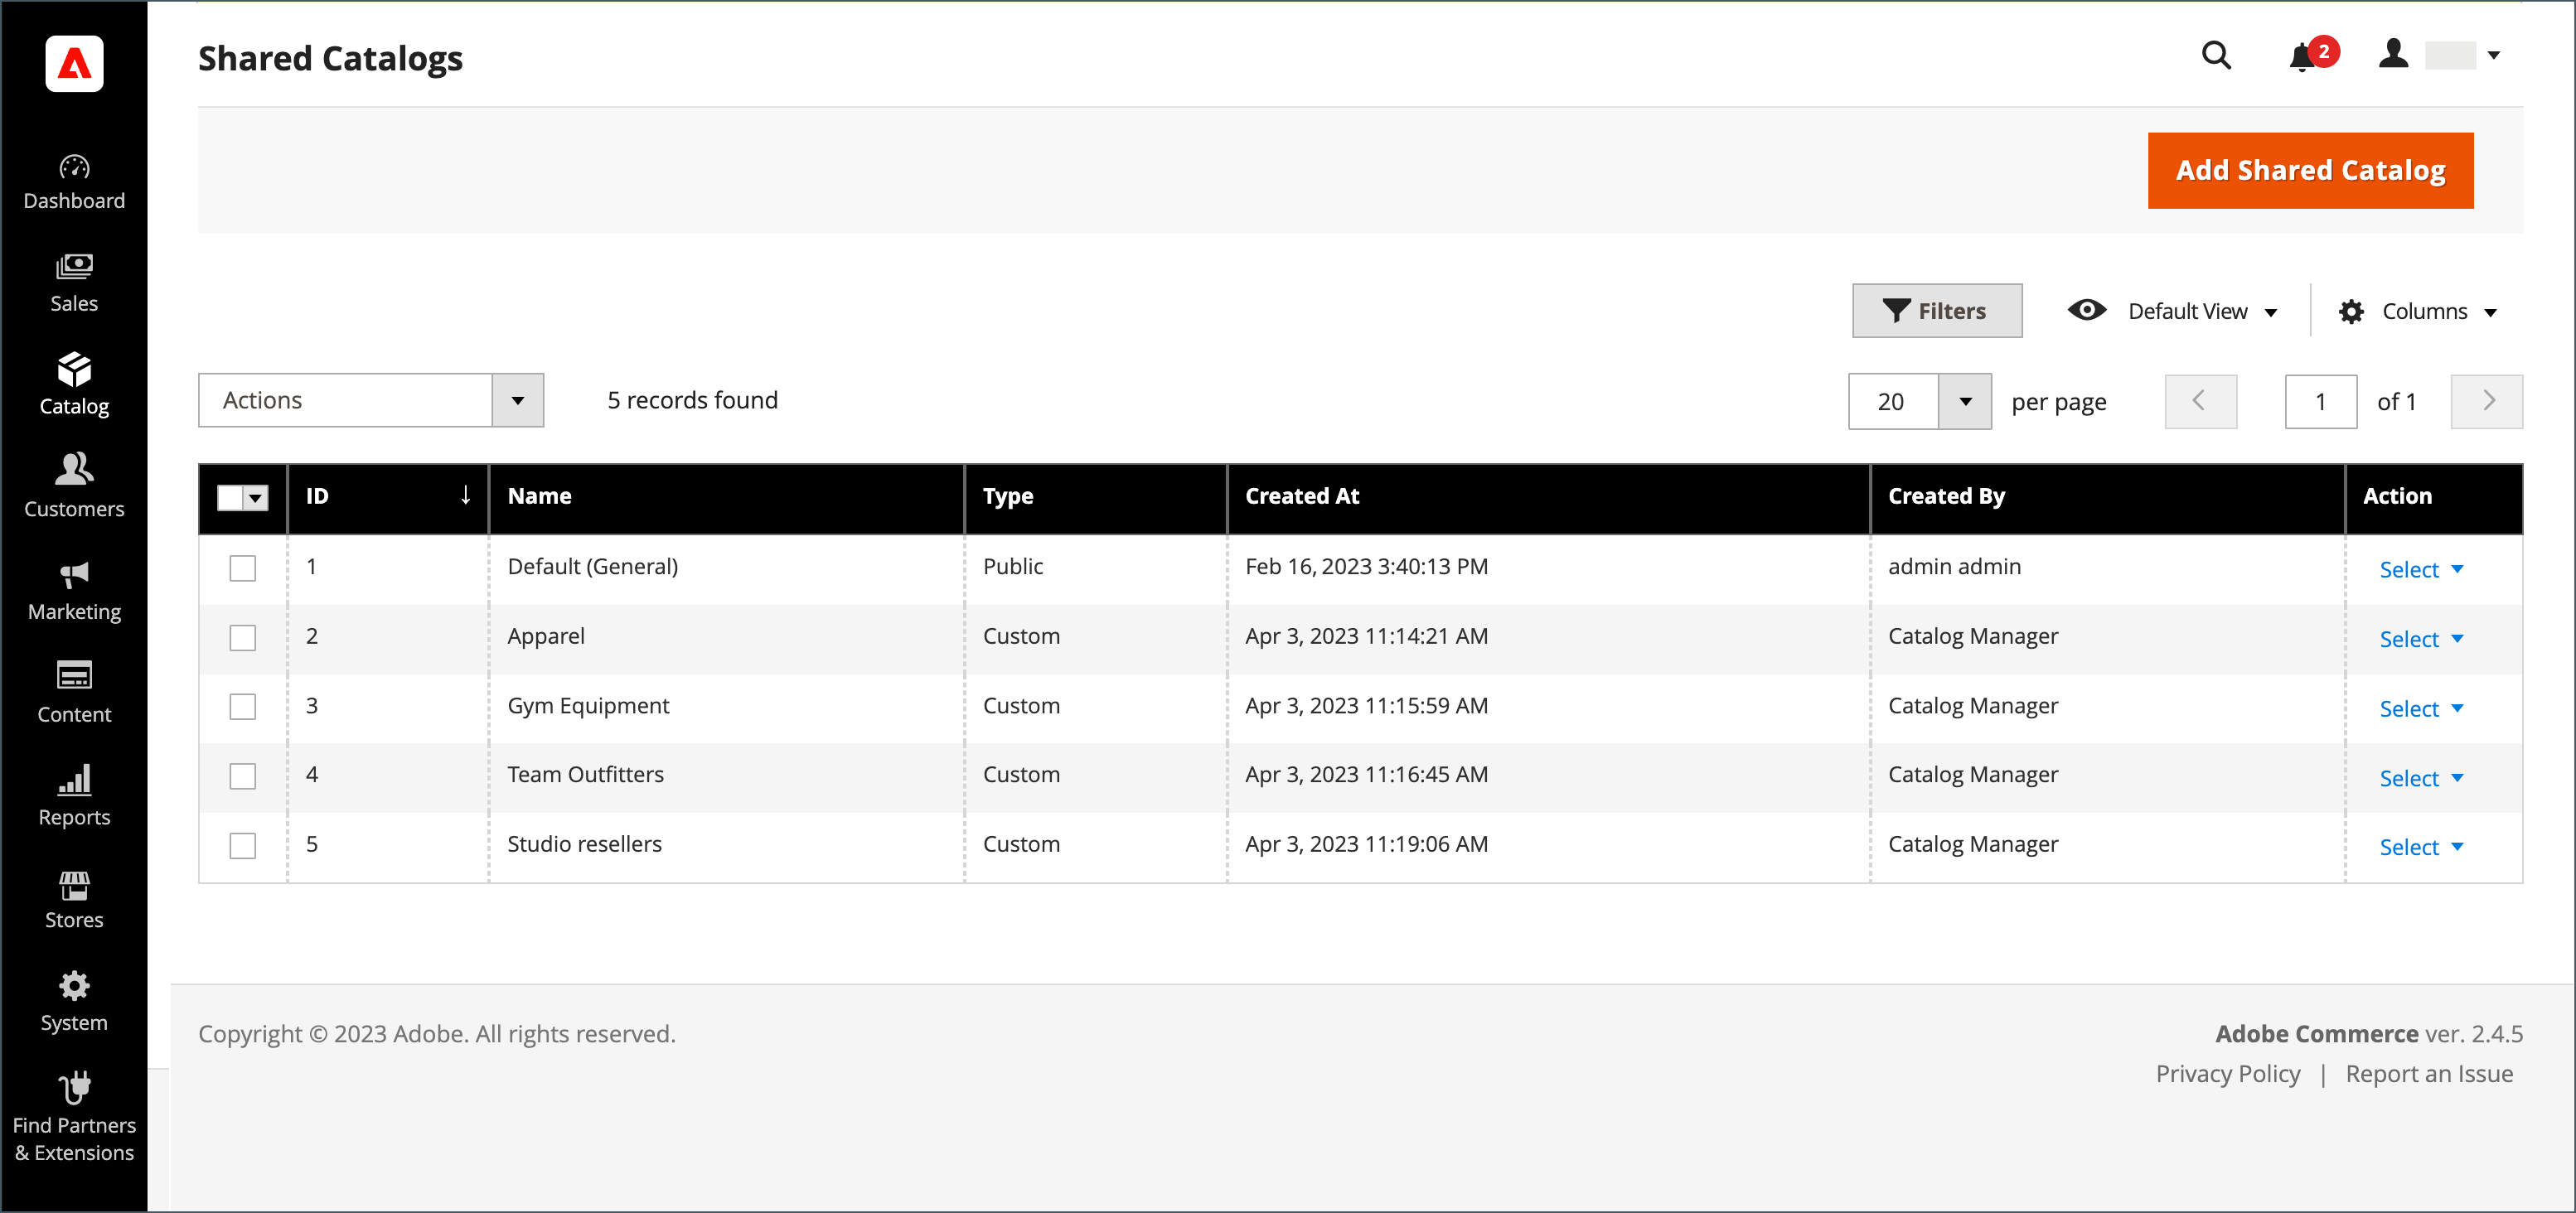
Shared Catalog to Create Custom Pricing
Magento B2B allows store owners to manage shared categories with custom pricing for different companies. Besides, customers also have access to two types of shared catalogs with various pricing structures and the standard, primary product catalog.
Only the Default (General) public shared catalog is visible from the storefront if the Shared Catalog functionality is enabled in the setup. The original primary catalog is still viewable from the Admin. Additionally, exclusive company accounts can have their members only have access to personalized records.
If the Shared Catalog feature status is “enable,” only the Default (General) public shared catalog is visible from the storefront, while the original primary catalog is still viewable from the Admin. Additionally, custom catalogs can be created to be visible only for members of some specific accounts.
In this Magento 2 B2B User Guide, we would like to show you how to access the Shared Catalogs page:
-
Click Catalog on the Admin Sidebar
-
Select Shared Catalogs, then config the price scope:
- From Admin Panel -> Store -> Settings -> Configuration -> Catalog
- Expand Price part -> Set Catalog Price Scope to “Website”
- Click Save Config
2.1. Create a New Shared Catalog
- Choose Shared Catalog -> Add a Shared Catalog
- Fill necessary information
- Click Save
Steps to duplicate the existing shared catalog:
- From Catalog -> Shared Catalog
- Select the shared catalog you want
- From the Action field, choose General Settings
- From the options at the page top, click Duplicate
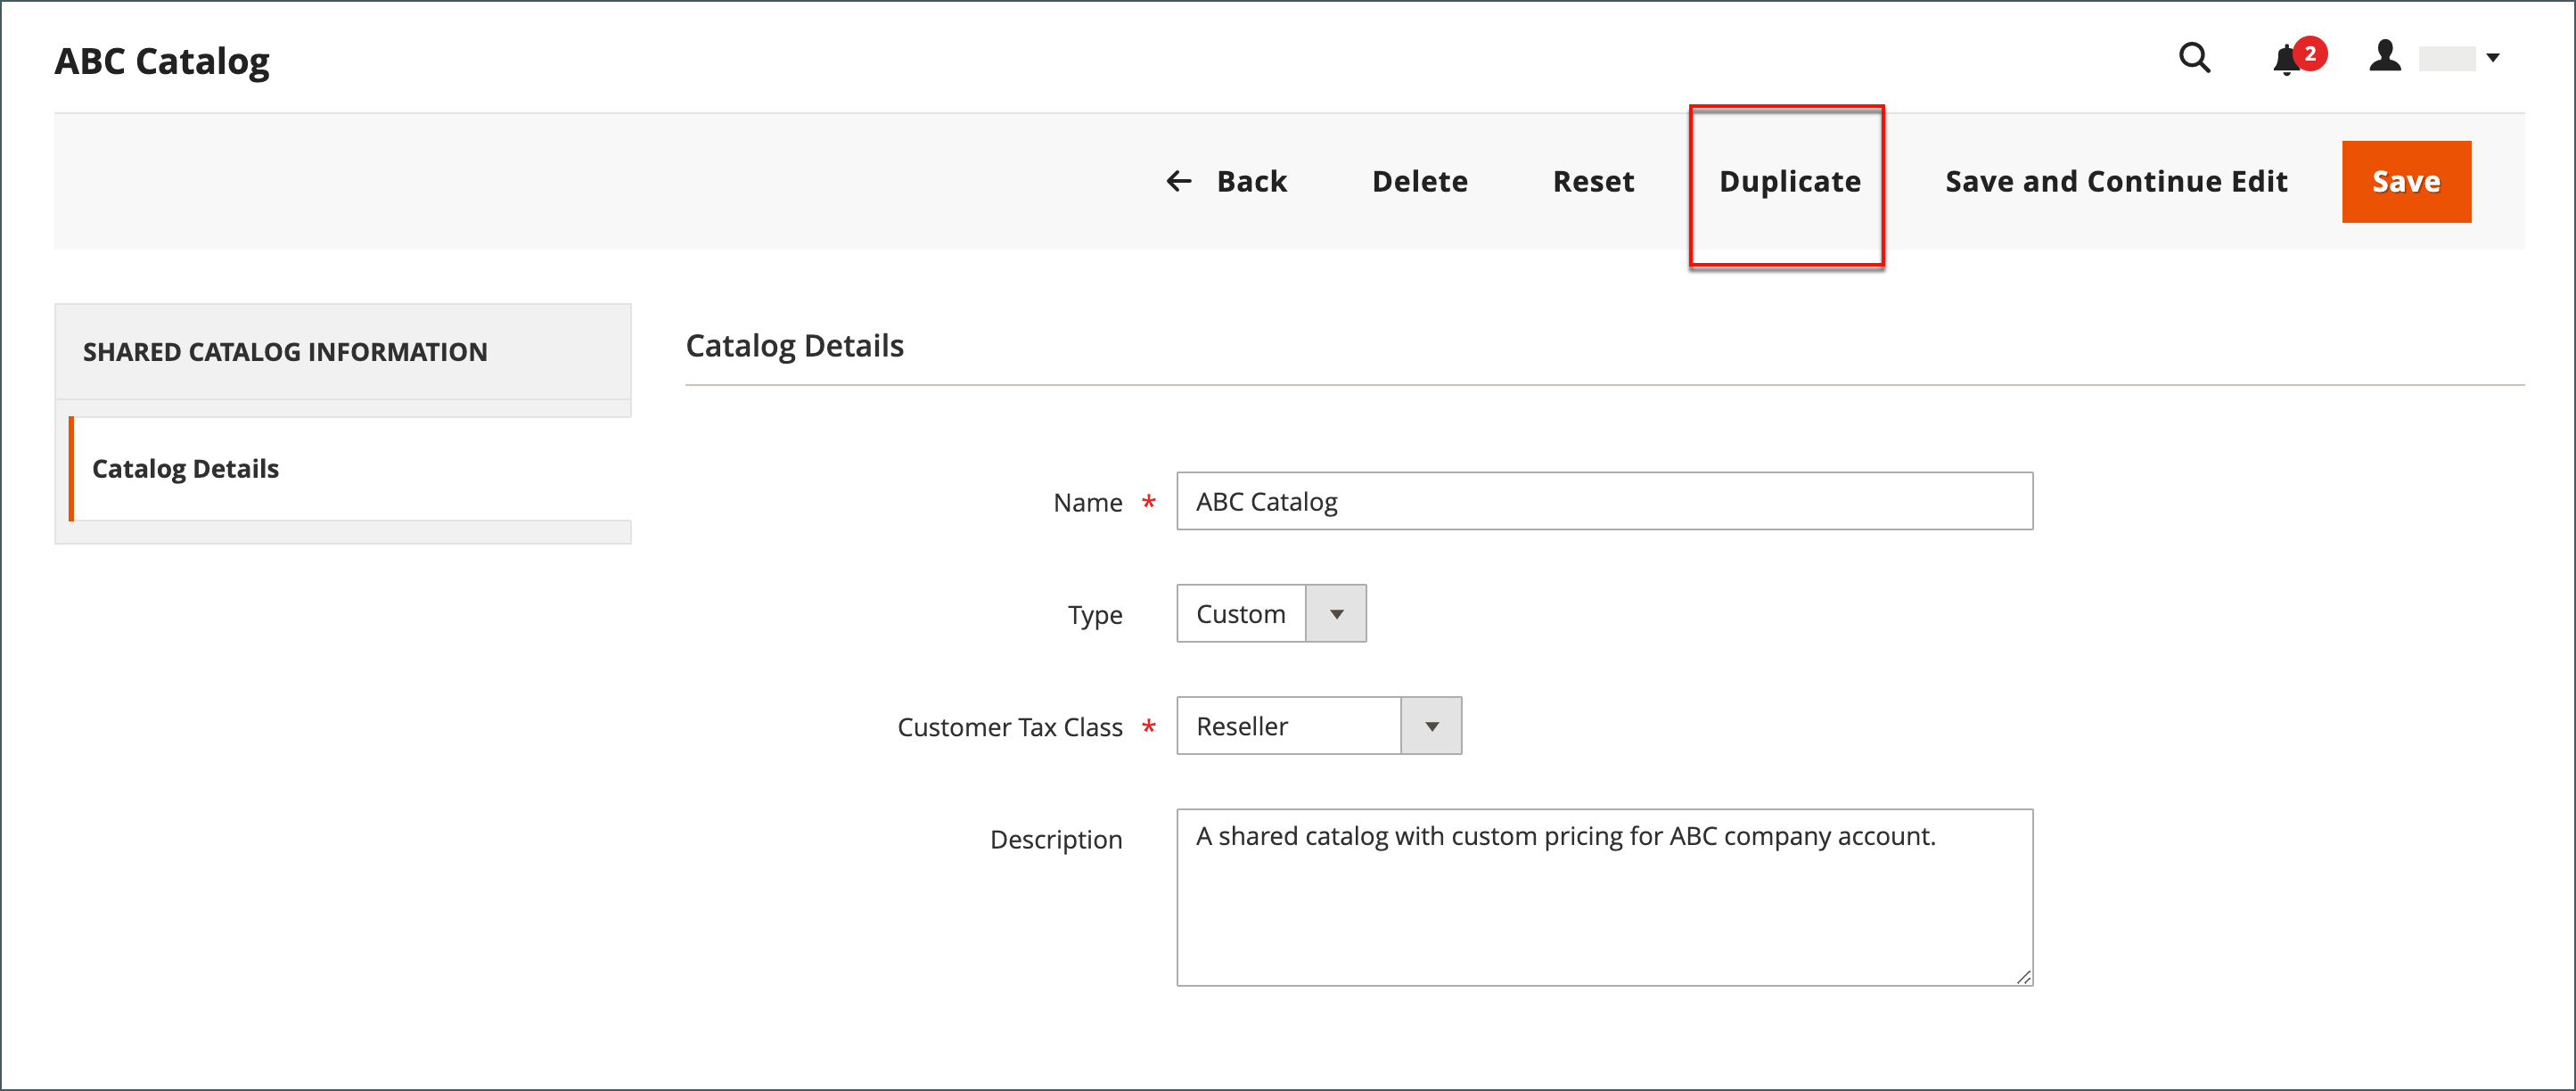
- Modify fields if you want
- Click Save
- Configure company assignments, product selection, and category permissions.
2.2. Set up Pricing and Structure
- From Catalog, choose Shared Catalogs
- From Actions, choose Set Pricing and Structure -> Configure
Step 1: Select the products
- Choose the products you want to add to the Shared Catalog
- Choose the configuration’s scope
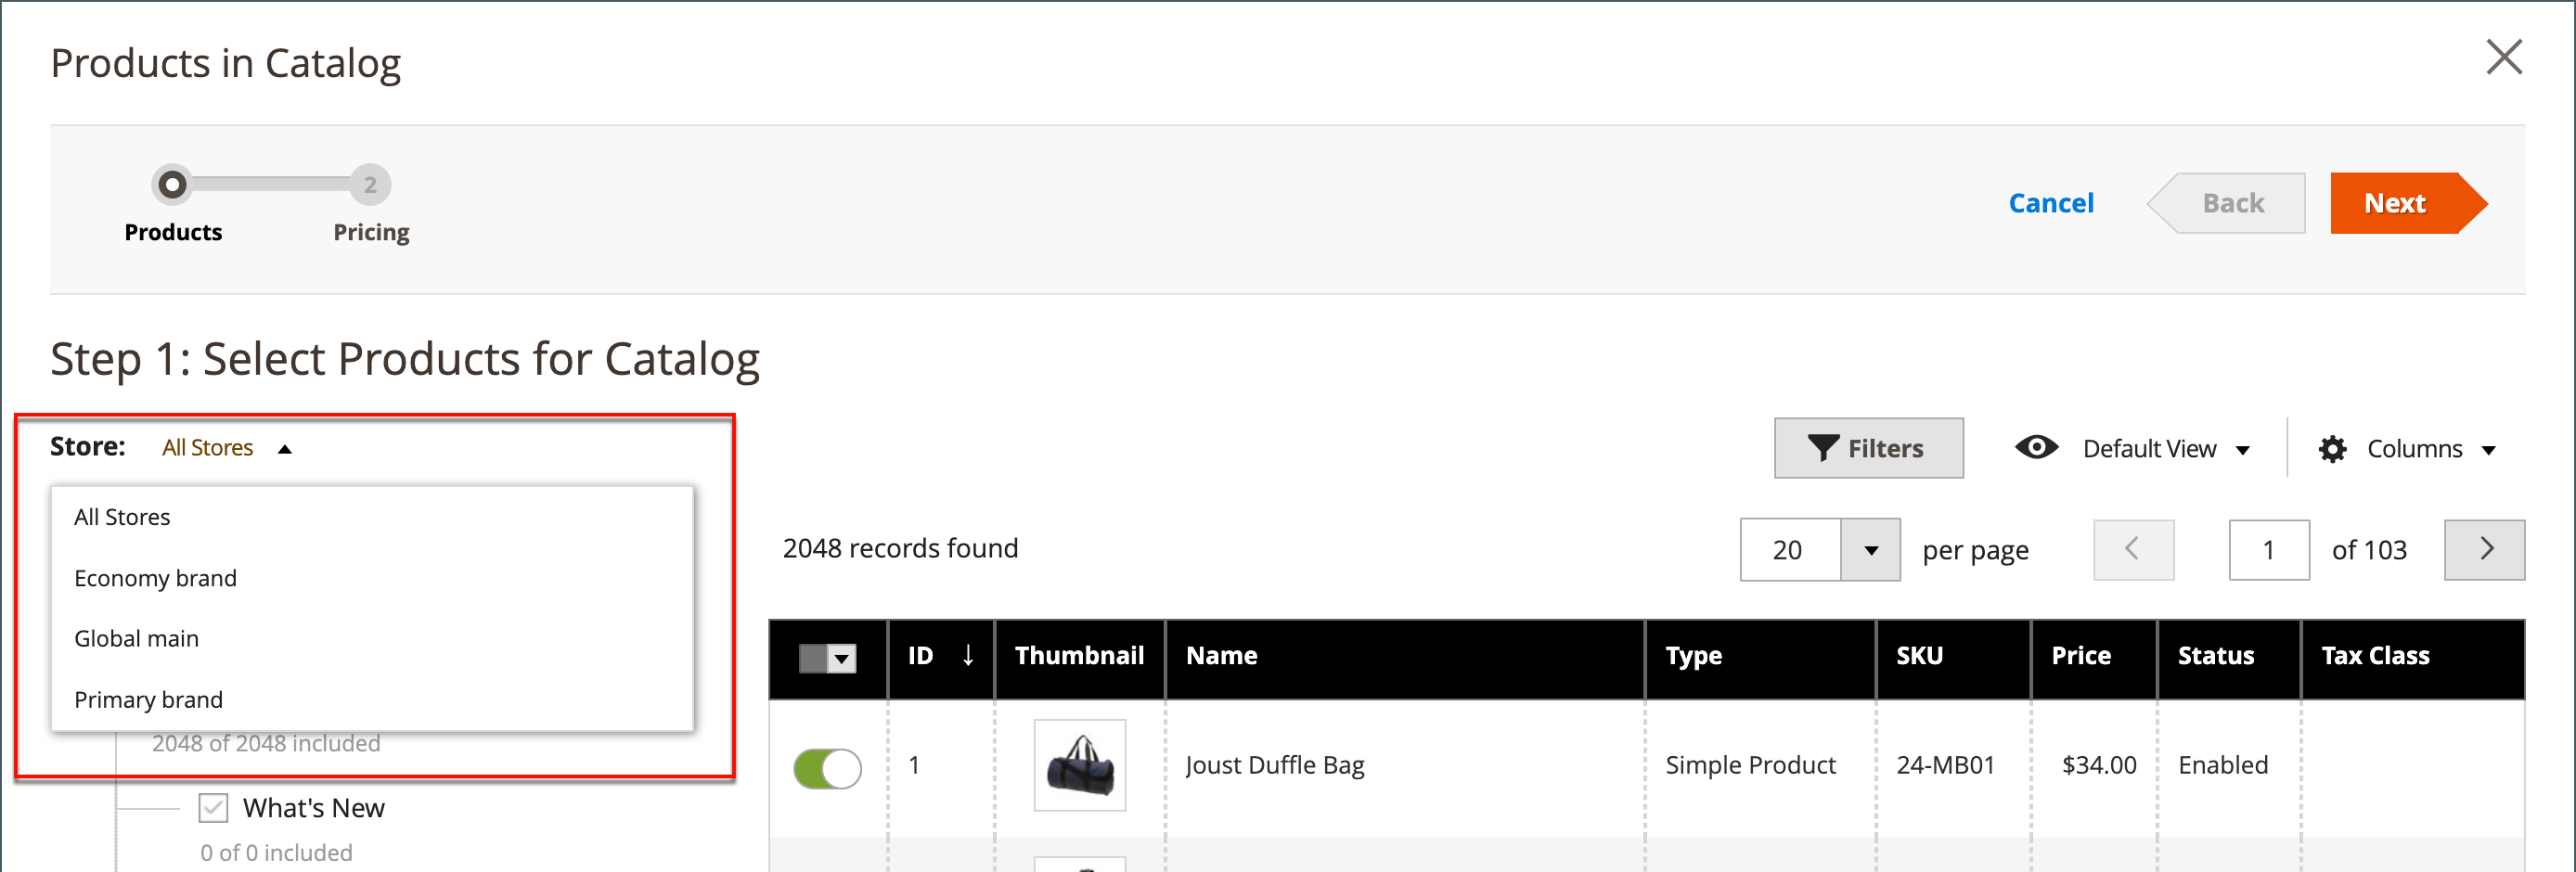
- Select specific items from the checkbox or Select all
- Click the category name to show the category product
- Click Next
Step 2: Set custom prices
- You can use mass actions for a variety of products or define specific custom pricing as a fixed amount or % for each product.
- For these product types: Simple, Bundle, Downloadable, and Virtual, use Custom Price to define a discount to percentages or a fixed sum. For Group items, Configurable products, and Gift cards, this column is empty.
Apply a custom price:
- Define the website and product for applying a custom price
- From the Action field -> choose Set Discount or Set Fixed Price
- Write your expected value
- Click Apply
- Click General Catalog -> Save to finish.
Apply a tier price:
- Define the website and product for applying a tier price
- From the Tier Price field -> choose Configure
- In the Advanced pricing page, choose Add Price
- Set Price to Fixed or Discount, then add the discount amount.
- Repeat those steps to add more tiers
- Click Done to finish
2.3. Assign Companies:
There are two ways to assign companies. They are:
Method 1: Shared Catalogs
- From Catalog -> Shared Catalogs
- Select a shared catalog. In the Action field, choose Assign Catalog
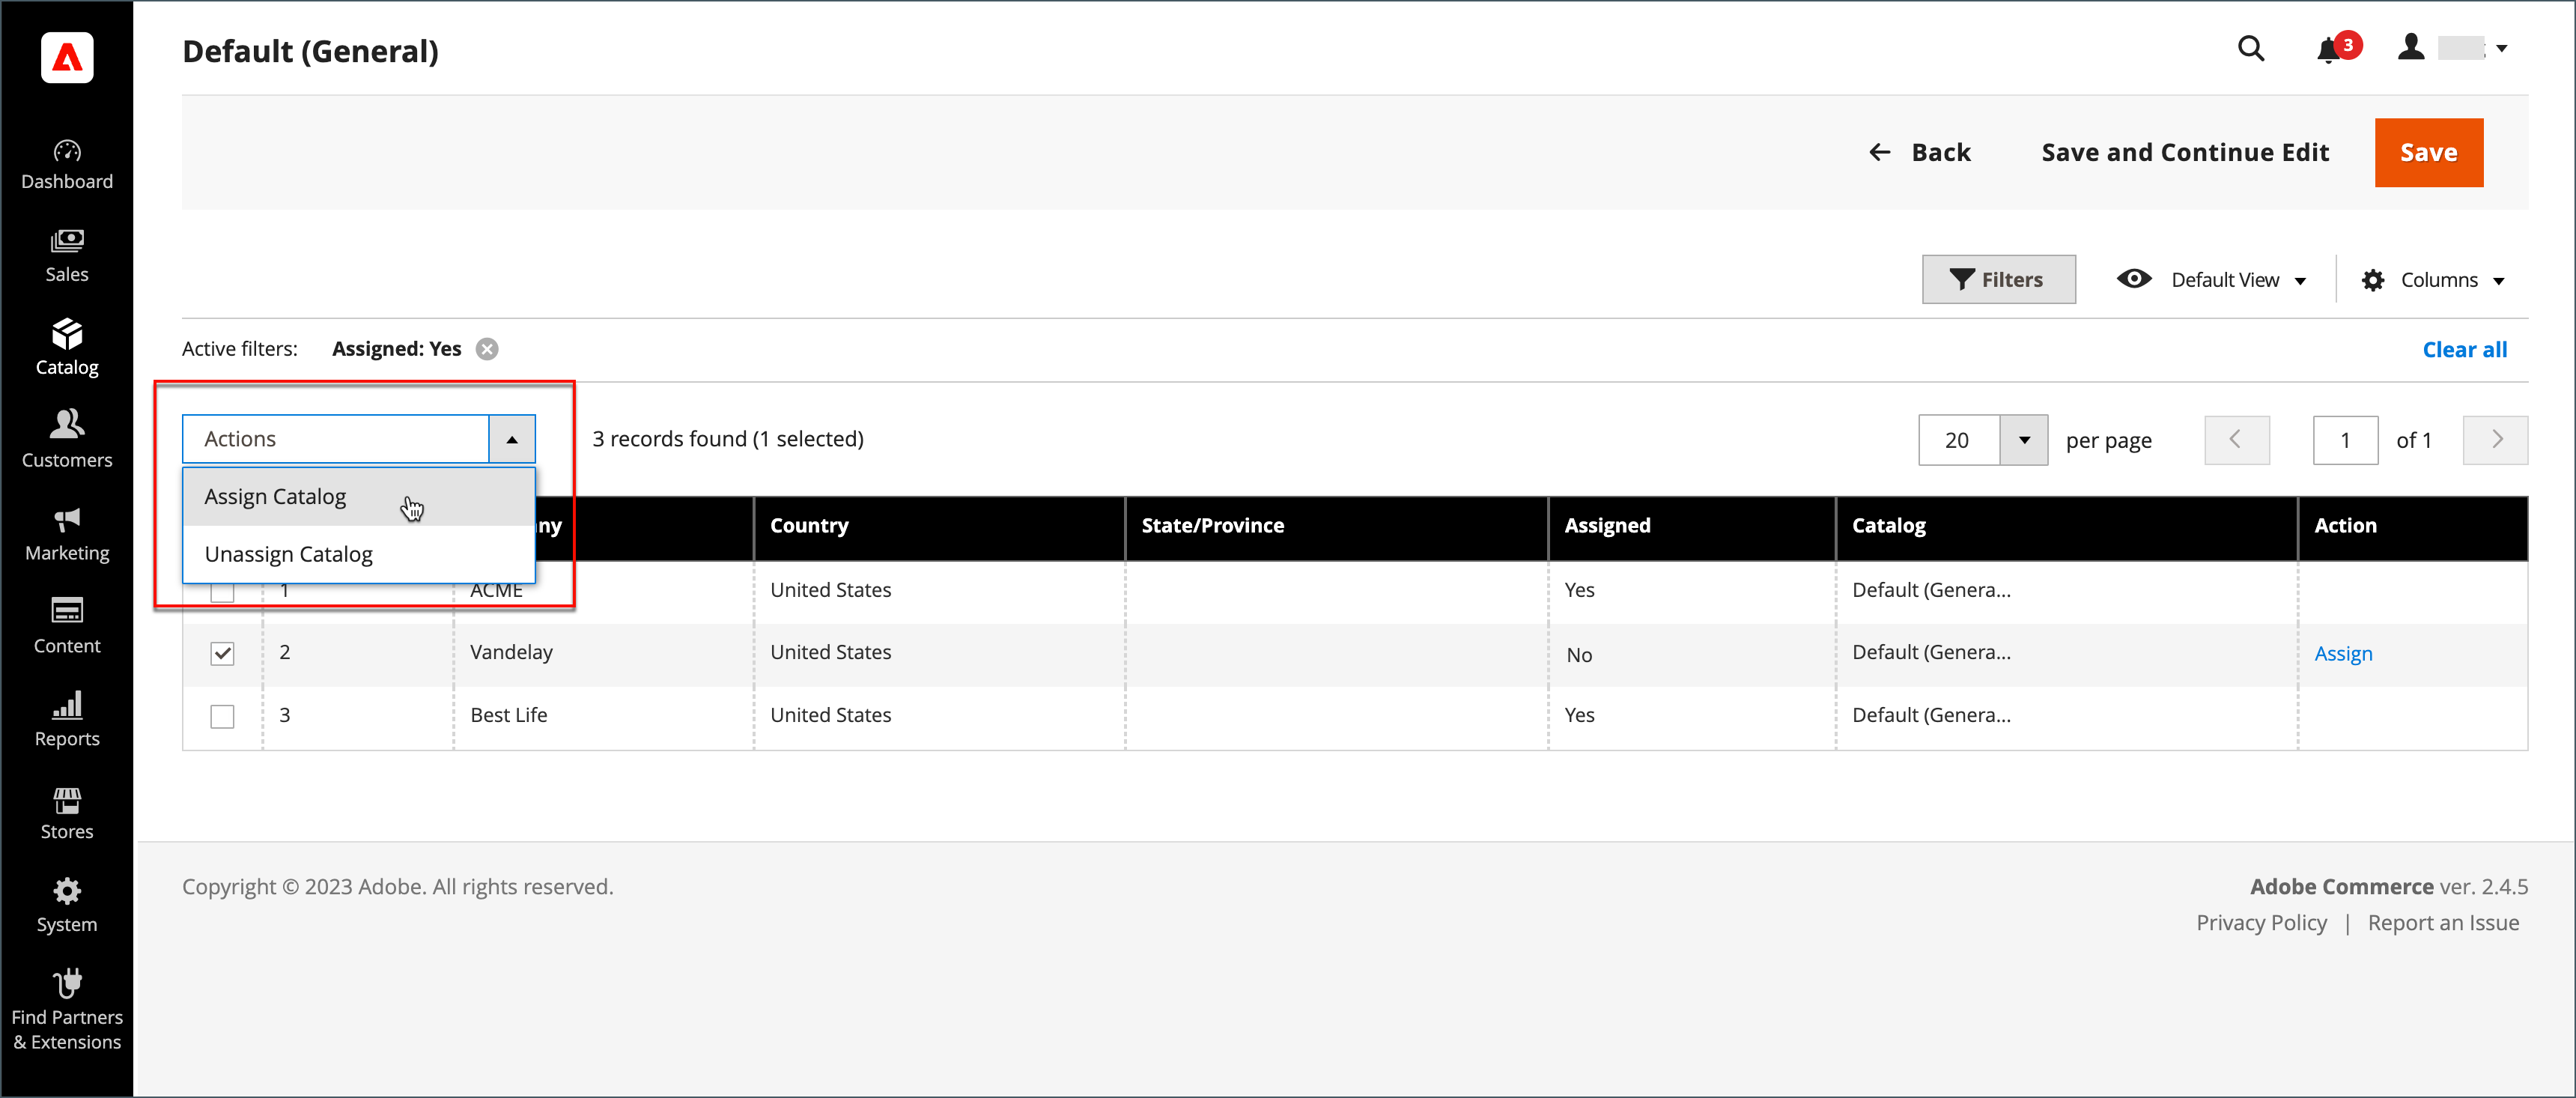
- Select the company you want -> click Assign from the Action column
- Click Save to finish
Method 2: Edit the Company
- From Customers -> Companies
- Select the company -> click Edit from the Action column
- From Advanced Settings, select Customer Group
- Click Proceed -> Save to finish
2.4. Manage A Shared Catalog:
Magento 2 store administrators can use management tools in the Action column to manage their Shared Catalogs. In addition, this feature also provides many actions for multiple catalogs in the grid’s upper left corner.
Requisition List to Save Time in Reordering
In Magento 2 B2B, the “Requisition List” feature provides a convenient way for B2B customers to create and manage lists of frequently ordered products. It allows customers to create customized lists of items they often purchase, making it easier and faster to reorder those items in the future.
Besides, store owners can maintain various records that are focused on products from multiple merchants, buyers, organizations, campaigns, or anything. A customer account is capable of keeping up to 999 active requisition lists. The quantity is determined by how Magento B2B Commerce is configured.
1. How to create a Magento 2 B2B Requisition List
- Method 1: By Customer Account
- Choose My Requisition List from your account sidebar
- Click Create New Requisition List
- Method 2: By Product Page
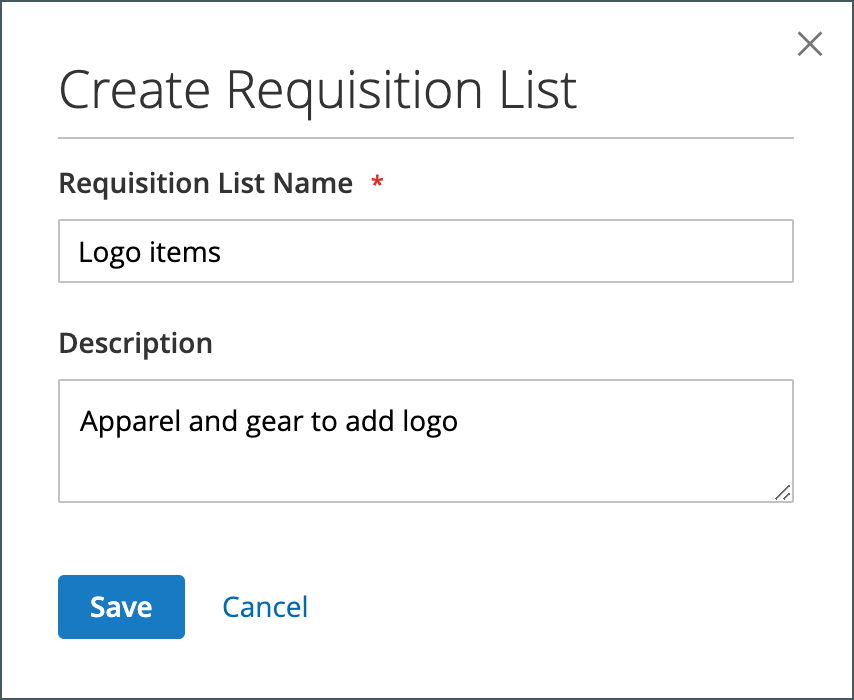
- From any product page, choose Add to Requisition List
- Click Create New Requisition List After completing one of two above methods, please fill in the Requisition List Name and Description -> Click Save to finish.
2. How to add Products to a Magento 2 B2B Requisition List
Hope that our Magento 2 B2B user guide helped you create a requisition list successfully. Now, let’s move to the next step - adding products to requisition list. You can add products from the Product Pages, Shopping Cart, and even from an Existing order
- Add products from the Product Page
- From the storefront, access to the detail page of the product that you want
- Click Add to Requisition List. You can choose an available requisition list or create a new one there.
- Add products from an Existing Order
- Click My Orders in your dashboard.
- Click Add to Requisition List. You can choose an available requisition list or create a new one there.
3. How to view the Updated Magento 2 B2B Requisition List
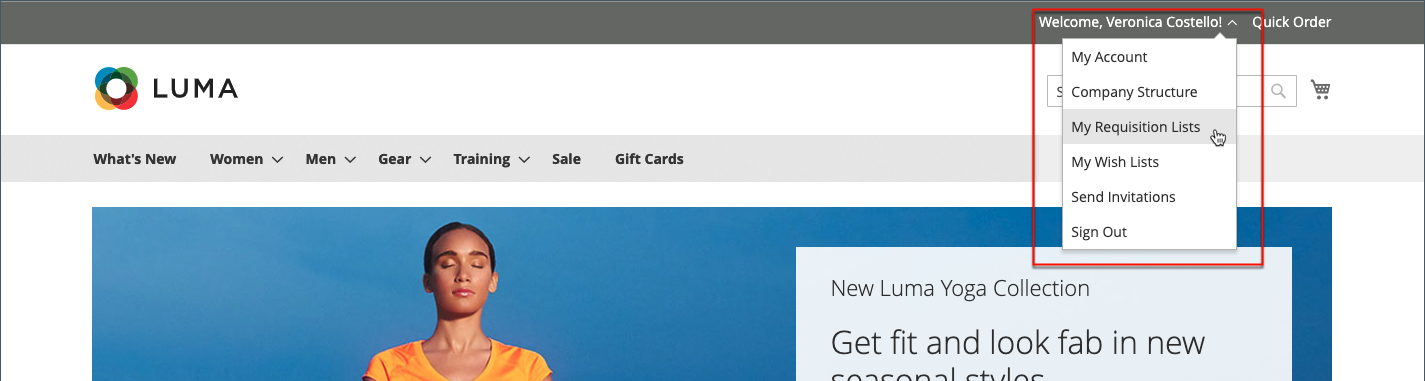
After signing into your account, you have two options to view the Updated List:
- By Your Account: Choose My Requisition List -> Click View in the Actions column
- By the Storefront: Click your U*ser name at the site top -> click My Requisition Lists
Conclusion
To sum up, Magento 2 B2B Commerce is a comprehensive platform that caters to the unique needs of B2B businesses with features such as Company Accounts, Customer Approval, Shared Catalog, Quick Order, Pay on Account, and so on. By following the Magento 2 B2B User Guide of Mageplaza, you can fully leverage the power of Magento B2B and unlock its potential to transform their B2B e-commerce journey.
We hope that this Magento 2 B2B user guide will bring improvements to your brand. If you have any questions, please contact us or just write down your issues in your comment box. Mageplaza is always here to listen and solve your problem.
Thank you for your time!
Table of content

Jacker is the Chief Technology Officer (CTO) at Mageplaza, bringing over 10 years of experience in Magento, Shopify, and other eCommerce platforms. With deep technical expertise, he has led numerous successful projects, optimizing and scaling online stores for global brands. Beyond his work in eCommerce development, he is passionate about running and swimming.
Related Post

7 mins read
|
06-30-2026

How to Enable DebugView in GA4 for your Magento 2 store - Mageplaza
Step-by-step guide to enabling GA4 DebugView for Magento 2 merchants — verify your GA4 events are firing correctly before trusting your data.
8 mins read
|
06-09-2026

Table Rate Shipping in eCommerce: A Practical Guide
Master Magento 2 Table Rate Shipping. Learn how to configure an accurate, automated shipping matrix to optimize your checkout and boost sales.
10 mins read
|
06-02-2026
3 mins read
|
05-30-2026

Google Analytics Ecommerce Reports for Magento Merchants: What to track & Tips
A practical guide to GA4 ecommerce reports for Magento merchants, covering what to track, how to read each report, and specific tips to turn data into revenue decisions.
18 mins read
|
05-20-2026
5 mins read
|
07-30-2026
7 mins read
|
06-30-2026
How to Enable DebugView in GA4 for your Magento 2 store - Mageplaza
Step-by-step guide to enabling GA4 DebugView for Magento 2 merchants — verify your GA4 events are firing correctly before trusting your data.
8 mins read
|
06-09-2026
Table Rate Shipping in eCommerce: A Practical Guide
Master Magento 2 Table Rate Shipping. Learn how to configure an accurate, automated shipping matrix to optimize your checkout and boost sales.
10 mins read
|
06-02-2026
3 mins read
|
05-30-2026
Google Analytics Ecommerce Reports for Magento Merchants: What to track & Tips
A practical guide to GA4 ecommerce reports for Magento merchants, covering what to track, how to read each report, and specific tips to turn data into revenue decisions.
18 mins read
|
05-20-2026