


5 mins read
|
07-30-2026
How to add Custom Fields to Magento 2 Checkout programmatically
Vinh Jacker
|
08-12-2025

The default Magento 2 does not allow users to add custom checkout fields right from the admin panel. To do so, you need to add them programmatically by creating a module. This guide provides step-by-step instructions for developers to add custom fields to the Magento 2 checkout page, as well as optimization tips and checklists on what to do next.
Prerequisites - What you need to do beforehand
- Magento 2.4.x installed
- Basic knowledge of PHP, JavaScript, and Magento 2 architecture
- Access to server command line
- Understanding of Magento 2 checkout flow
Resources
- Magento 2 Developer Documentation
- Magento 2 Checkout Documentation
- Magento 2 Plugin Development
- Magento 2 Observer Development
Steps to add custom checkout fields to Magento 2
Step 1: Create Module Structure
First, start by deciding which checkout fields you want to create, and its position on the checkout page.
Then, you’ll need to set up a dedicated module for adding custom checkout fields. This is the foundation for your custom checkout field development.
Our new module will be called Mageplaza_CustomCheckoutFields and all the files will be located under app/code/Mageplaza/CustomCheckoutFields/. To create a new module, the following files has to be created:
1.1. Create Module Directory
mkdir -p app/code/Mageplaza/CustomCheckoutField/{etc,Model,Plugin,Observer,view/frontend/web/{js/view,template,css/source}}
1.2. Create Basic Files
touch app/code/Mageplaza/CustomCheckoutField/registration.php
touch app/code/Mageplaza/CustomCheckoutField/composer.json
touch app/code/Mageplaza/CustomCheckoutField/etc/module.xml
Step 2: Module Registration
Next, register the new module with Magento, define the module’s name and version. Additionally, set up the composer.json file to define the module’s dependencies and configuration details.
2.1. Register with Magento via registration.php
<?php
\Magento\Framework\Component\ComponentRegistrar::register(
    \Magento\Framework\Component\ComponentRegistrar::MODULE,
    'Mageplaza_CustomCheckoutField',
    __DIR__
);
2.2. Define module name and version with module.xml
<?xml version="1.0"?>
<config xmlns:xsi="http://www.w3.org/2001/XMLSchema-instance" xsi:noNamespaceSchemaLocation="urn:magento:framework:Module/etc/module.xsd">
    <module name="Mageplaza_CustomCheckoutField" setup_version="1.0.0">
        <sequence>
            <module name="Magento_Checkout"/>
        </sequence>
    </module>
</config>
2.3. Set up composer.json
{
    "name": "mageplaza/module-custom-checkout-field",
    "description": "Custom Checkout Field Module for Magento 2",
    "type": "magento2-module",
    "version": "1.0.0",
    "license": "OSL-3.0",
    "require": {
        "php": "~7.3.0||~7.4.0||~8.1.0",
        "magento/framework": "103.0.*",
        "magento/module-checkout": "100.4.*"
    },
    "autoload": {
        "files": ["registration.php"],
        "psr-4": {"Mageplaza\\CustomCheckoutField\\": ""}
    }
}
Step 3: Database Schema
To store the custom field data, you’ll need to define a database schema for the new field in the db_schema.xml file. This includes creating the new columns in both the quote and sales_order tables for storing customer input. This schema will ensure that customer input is persisted and available during checkout and order processing.
<?xml version="1.0"?>
<schema xmlns:xsi="http://www.w3.org/2001/XMLSchema-instance" xsi:noNamespaceSchemaLocation="urn:magento:framework:Setup/Declaration/Schema/etc/schema.xsd">
    <table name="quote" resource="checkout">
        <column xsi:type="varchar" name="custom_field" nullable="true" length="255" comment="Custom Field"/>
    </table>
    <table name="sales_order" resource="sales">
        <column xsi:type="varchar" name="custom_field" nullable="true" length="255" comment="Custom Field"/>
    </table>
</schema>
Step 4: Dependency Injection
In this step, you’ll set up dependency injection for the layout processor. This allows Magento to render the new field in the checkout process dynamically.
<?xml version="1.0"?>
<config xmlns:xsi="http://www.w3.org/2001/XMLSchema-instance" xsi:noNamespaceSchemaLocation="urn:magento:framework:ObjectManager/etc/config.xsd">
    <type name="Magento\Checkout\Block\Checkout\LayoutProcessor">
        <plugin name="custom_checkout_field_layout_processor" type="Mageplaza\CustomCheckoutField\Plugin\Checkout\LayoutProcessor" sortOrder="100"/>
    </type>
</config>
Step 5: Layout Processor Plugin
Create a plugin for LayoutProcessor (Plugin/Checkout/LayoutProcessor.php) to modify the checkout page layout. This will involve adding a new block for the custom field to appear in the payment section of the checkout page. You’ll specify its component, template, and sorting order, ensuring that it fits seamlessly into the checkout flow.
<?php
namespace Mageplaza\CustomCheckoutField\Plugin\Checkout;

class LayoutProcessor
{
    public function afterProcess(
        \Magento\Checkout\Block\Checkout\LayoutProcessor $subject,
        array $jsLayout
    ) {
        // Add custom field to payment step
        $jsLayout['components']['checkout']['children']['steps']['children']['billing-step']['children']
        ['payment']['children']['afterMethods']['children']['custom-field'] = [
            'component' => 'Mageplaza_CustomCheckoutField/js/view/custom-field',
            'template' => 'Mageplaza_CustomCheckoutField/custom-field',
            'sortOrder' => 10,
            'dataScope' => 'custom_field'
        ];

        return $jsLayout;
    }
}
Step 6: JavaScript Component
You’ll need a JavaScript component to manage the custom field’s dynamic behavior. This includes creating a new JS file that observes the value of the custom field and binds it to the checkout form. The component will manage how the data is displayed and updated in the checkout process.
define([
    'ko',
    'uiComponent'
], function (ko, Component) {
    'use strict';

    return Component.extend({
        defaults: {
            template: 'Mageplaza_CustomCheckoutField/custom-field',
            customFieldValue: ko.observable('')
        },

        initObservable: function () {
            this._super().observe('customFieldValue');
            return this;
        }
    });
});
Step 7: HTML Template
Create the HTML template (view/frontend/web/template/custom-field.html) for the custom field. The template will define how the field looks on the checkout page, including its label, input type, and any validation messages. You’ll also ensure that the custom field is integrated properly with other elements on the checkout page.
<div class="field custom-field" data-bind="attr: {id: 'custom_field'}">
    <label class="label" for="custom_field">
        <span data-bind="i18n: 'Custom Field'"></span>
    </label>
    <div class="control">
        <input type="text"
               name="custom_field"
               class="input-text"
               data-bind="value: customFieldValue"
               placeholder="Enter custom value">
    </div>
</div>
Step 8: CSS Styling
Define the styling (view/frontend/web/css/source/_module.less) for the field’s container, label, and input elements to match your store’s theme and enhance the user experience.
.custom-field {
    margin-top: 20px;
    padding: 15px;
    border: 1px solid #ccc;
    border-radius: 4px;
    background-color: #f9f9f9;

    .label {
        font-weight: bold;
        margin-bottom: 10px;
        display: block;
    }

    .control {
        .input-text {
            width: 100%;
            padding: 8px;
            border: 1px solid #ccc;
            border-radius: 4px;

            &:focus {
                border-color: #007bdb;
                box-shadow: 0 0 0 1px #007bdb;
                outline: none;
            }
        }
    }
}
Step 9: Data Persistence
Ensure the custom field data is saved to the order and quote. By creating a QuoteRepository and a plugin for PaymentInformationManagement, you will save the custom field input in the database when the order is placed.
9.1. Model/Quote/QuoteRepository.php
<?php
namespace Mageplaza\CustomCheckoutField\Model\Quote;

use Magento\Quote\Model\QuoteRepository as MagentoQuoteRepository;
use Magento\Framework\Exception\NoSuchEntityException;

class QuoteRepository
{
    protected $quoteRepository;

    public function __construct(MagentoQuoteRepository $quoteRepository)
    {
        $this->quoteRepository = $quoteRepository;
    }

    public function saveCustomField($cartId, $customField)
    {
        try {
            $quote = $this->quoteRepository->get($cartId);
            $quote->setCustomField($customField);
            $this->quoteRepository->save($quote);
            return true;
        } catch (NoSuchEntityException $e) {
            return false;
        }
    }
}
9.2. Plugin/Checkout/PaymentInformationManagement.php
<?php
namespace Mageplaza\CustomCheckoutField\Plugin\Checkout;

use Magento\Checkout\Api\PaymentInformationManagementInterface;

class PaymentInformationManagement
{
    protected $quoteRepository;

    public function __construct(
        \Mageplaza\CustomCheckoutField\Model\Quote\QuoteRepository $quoteRepository
    ) {
        $this->quoteRepository = $quoteRepository;
    }

    public function afterSavePaymentInformation(
        PaymentInformationManagementInterface $subject,
        $result,
        $cartId,
        $paymentMethod,
        $billingAddress = null
    ) {
        if (isset($_POST['custom_field'])) {
            $customField = $_POST['custom_field'];
            $this->quoteRepository->saveCustomField($cartId, $customField);
        }

        return $result;
    }
}
Step 10: Event Handling
Set up an event observer to handle order placement after the custom checkout field is filled. The observer will listen to the sales_order_place_after event and save the custom field data to the order. This ensures that the field’s value is included in the final order details for processing.
10.1 events.xml
<?xml version="1.0"?>
<config xmlns:xsi="http://www.w3.org/2001/XMLSchema-instance" xsi:noNamespaceSchemaLocation="urn:magento:framework:Event/etc/events.xsd">
    <event name="sales_order_place_after">
        <observer name="custom_checkout_field_order_place" instance="Mageplaza\CustomCheckoutField\Observer\OrderPlaceAfter"/>
    </event>
</config>
10.2. Observer/OrderPlaceAfter.php
<?php
namespace Mageplaza\CustomCheckoutField\Observer;

use Magento\Framework\Event\ObserverInterface;
use Magento\Framework\Event\Observer;

class OrderPlaceAfter implements ObserverInterface
{
    protected $orderRepository;

    public function __construct(
        \Mageplaza\CustomCheckoutField\Model\Order\OrderRepository $orderRepository
    ) {
        $this->orderRepository = $orderRepository;
    }

    public function execute(Observer $observer)
    {
        $order = $observer->getEvent()->getOrder();
        $quote = $observer->getEvent()->getQuote();

        if ($quote && $quote->getCustomField()) {
            $this->orderRepository->saveCustomField($order->getId(), $quote->getCustomField());
        }

        return $this;
    }
}
Step 11: Installation and Testing
This step is to enable the module and run the necessary setup commands to install and configure the module in Magento, as test the module by filling in the custom field during checkout, completing the purchase, and verifying that the custom field data is saved correctly.
11.1. Enable the module
bin/magento module:enable Mageplaza_CustomCheckoutField
11.2. Run Setup
bin/magento setup:upgrade
bin/magento setup:di:compile
bin/magento setup:static-content:deploy
11.3. Clear Cache
bin/magento cache:clean
11.4. Test
- Go to checkout page
- Fill shipping information
- Proceed to payment step
- Verify custom field appears below payment methods
- Enter value and complete checkout
- Check database for saved value
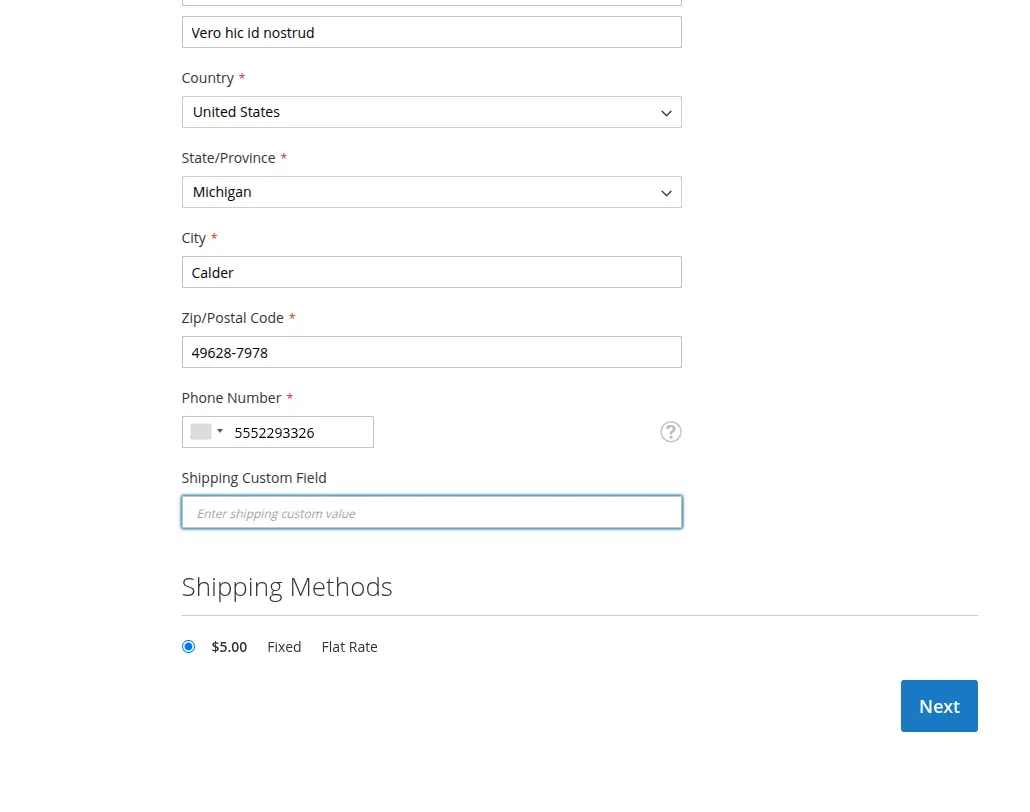
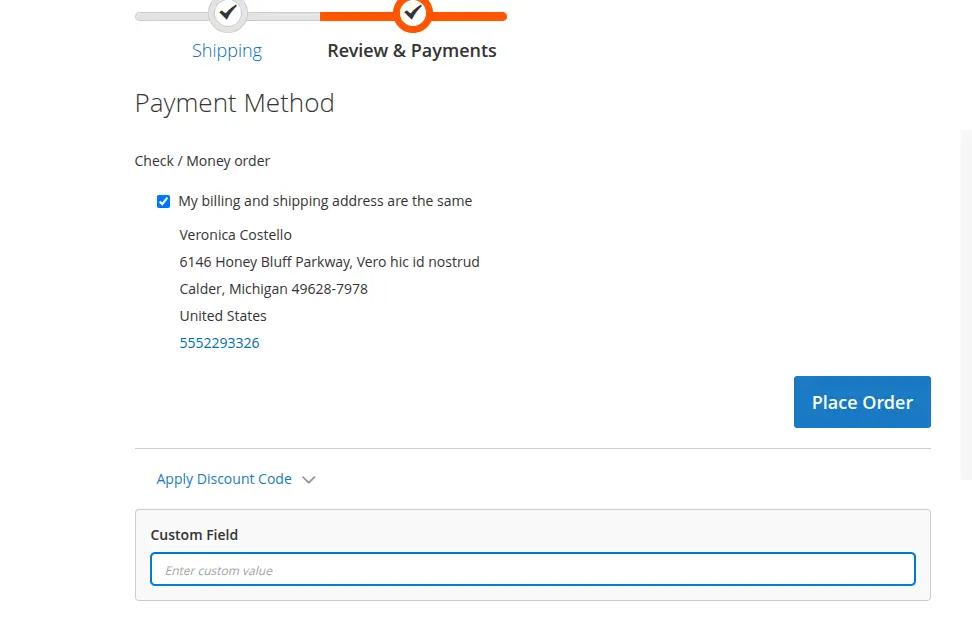
After configuration, you can check how it works on frontend as below:
- In the Shipping Address section:
- In the Review & Payments section:
Step 12: Adding Multiple Fields
To add additional fields, you’ll follow a similar process as for the first field:
- Update LayoutProcessor with new field configuration
- Create JavaScript component for new field
- Create HTML template for new field
- Update database schema with new columns
- Update repositories with new save methods
- Update plugins to handle new field data
- Update observer to save new field to order
Common Issues and Solutions
Issue 1: Field not appearing
Solution:
- Check the browser console for any JavaScript errors that might be preventing the field from rendering
- Ensure that the module is enabled by running the necessary Magento commands, and confirm that the custom field has been correctly added to the layout processor.
Issue 2: Data not saving
Solution:
- Verify that the database schema has been updated correctly to include the necessary columns
- Check if the observer is properly registered and is capturing the data when the order is placed
Issue 3: Styling not applied
Solution:
- Run static content deployment
- Clear the Magento cache and re-deploy static assets to ensure that the CSS is applied correctly to the field.
Best practices for checkout fields
- Use descriptive names for fields and methods: Choose clear and meaningful names for your fields and methods, making your code easy to read and understand for yourself and other developers.
- Implement validation for field inputs: Ensure that all field inputs are validated properly to maintain data accuracy and prevent incorrect entries.
- Handle errors gracefully with try-catch blocks: Use try-catch blocks to manage errors and provide clear, user-friendly error messages, ensuring a smooth experience even when something goes wrong.
- Test thoroughly on different devices and browsers: Your fields may look different across multiple devices and browsers; therefore, it is essential to make sure it works seamlessly for all users, regardless of their platform.
- Document your code for future maintenance: Write clear comments and documentation to explain how your code works, making future updates or debugging easier for developers.
- Follow Magento 2 coding standards: Stick to Magento 2’s coding guidelines to ensure your code is compatible, maintainable, and integrates smoothly with other modules and themes.
Next steps to manage custom checkout fields effectively
After implementing basic custom fields, consider optimizing them with this checklist:
- Field validation: Ensure that each field meets specific requirements, such as being required, following the correct format (e.g., email), and adhering to the appropriate length to ensure accurate data entry.
- Conditional fields: Show or hide fields dynamically based on customer choices, improving the user experience by only displaying relevant information.
- Field dependencies: Link fields together so that selecting one field can automatically adjust or trigger changes in another, making the checkout process smarter.
- Admin configuration: Allow store admins to easily configure and customize which fields appear, making it flexible to meet business needs without code changes.
- Export functionality: Enable fields to be included in order exports, making it easier to manage and analyze customer data in bulk.
- Email integration: Ensure that relevant field information is included in order confirmation emails, providing customers and admins with all necessary details.
💡 If you are in need of a streamlined and easy-to-use solution, check this out - Mageplaza Custom Order Attribute extension, which simplifies the process of adding custom fields to your Magento 2 checkout and offers advanced features like field validation, conditional visibility, and seamless integration with order exports and more.
The final words
Adding custom fields to the Magento 2 checkout process programmatically enhances the shopping experience by collecting valuable information tailored to your business needs. By following the outlined steps, you can efficiently integrate as many custom checkout fields as you need. Not only does this improve data collection, but it also allows for better control over the checkout flow, ensuring it aligns with your business requirements.
If you have any questions, feel free to contact us.
Table of content

Jacker is the Chief Technology Officer (CTO) at Mageplaza, bringing over 10 years of experience in Magento, Shopify, and other eCommerce platforms. With deep technical expertise, he has led numerous successful projects, optimizing and scaling online stores for global brands. Beyond his work in eCommerce development, he is passionate about running and swimming.
Related Post

7 mins read
|
06-30-2026

How to Enable DebugView in GA4 for your Magento 2 store - Mageplaza
Step-by-step guide to enabling GA4 DebugView for Magento 2 merchants — verify your GA4 events are firing correctly before trusting your data.
8 mins read
|
06-09-2026

Table Rate Shipping in eCommerce: A Practical Guide
Master Magento 2 Table Rate Shipping. Learn how to configure an accurate, automated shipping matrix to optimize your checkout and boost sales.
10 mins read
|
06-02-2026
3 mins read
|
05-30-2026

Google Analytics Ecommerce Reports for Magento Merchants: What to track & Tips
A practical guide to GA4 ecommerce reports for Magento merchants, covering what to track, how to read each report, and specific tips to turn data into revenue decisions.
18 mins read
|
05-20-2026
5 mins read
|
07-30-2026
7 mins read
|
06-30-2026
How to Enable DebugView in GA4 for your Magento 2 store - Mageplaza
Step-by-step guide to enabling GA4 DebugView for Magento 2 merchants — verify your GA4 events are firing correctly before trusting your data.
8 mins read
|
06-09-2026
Table Rate Shipping in eCommerce: A Practical Guide
Master Magento 2 Table Rate Shipping. Learn how to configure an accurate, automated shipping matrix to optimize your checkout and boost sales.
10 mins read
|
06-02-2026
3 mins read
|
05-30-2026
Google Analytics Ecommerce Reports for Magento Merchants: What to track & Tips
A practical guide to GA4 ecommerce reports for Magento merchants, covering what to track, how to read each report, and specific tips to turn data into revenue decisions.
18 mins read
|
05-20-2026