


5 mins read
|
07-30-2026
Magento to Shopify Migration: Our Ultimate Guide
09-08-2021

This blog post will walk you through how to migrate from Magento to Shopify.
Exclusive Offer: Get Shopify 33 days for just $1 + The Online Store Starter Kit
Start your 3-day free trial, and enjoy your first month of Shopify for 1$ plus the premium package designed especially for new Shopify merchants!
What Data Can You Migrate from Magento to Shopify?
You can transfer the following data while performing Magento to Shopify migration.
Products
- Name, SKU, full description, status, manufacturer
- Price, special price, URL, meta title, meta description
- Product images, product tags, weight
Product categories
- Name, description, status, image
- Meta description, meta title
Manufacturers
- Name of manufacturers
Customers
- First name, Last name, email, newsletter
- Billing addresses
- Shipping addresses
Orders
- Order date, status, order product info such as name, SKU, price, quantity, discount price, total price, tax price, etc).
- Shipping addresses (Company address, Country, State, Zip Code, Telephone, First Name, Last Name).
- Customer names, email, billing addresses.
Coupons
- Coupon codes
- Coupon dates
Reviews
- Customer rates
- User names
- Created dates
- Titles
What You Cannot Migrate Directly from Magento to Shopify?
Shopify does not offer a native way to import the following elements directly:
- Product collections & categories
- Blogs & page content
- Customer passwords
- Discounts
How to Migrate from Magento to Shopify?
Note: No matter how you choose to migrate your Magento store, the Shopify support team will always be happy to help. Learn more about how you can leverage support from the Shopify platform during migration
Step 1: Back Up Your Magento Store
Before switching to Shopify from Magento, it’s always a good idea to back up your Magneto store in case something goes wrong during the migration process. Here are the steps.
Log into your Magento admin dashboard and select System > Tools > Backups.

There are three options as follows:
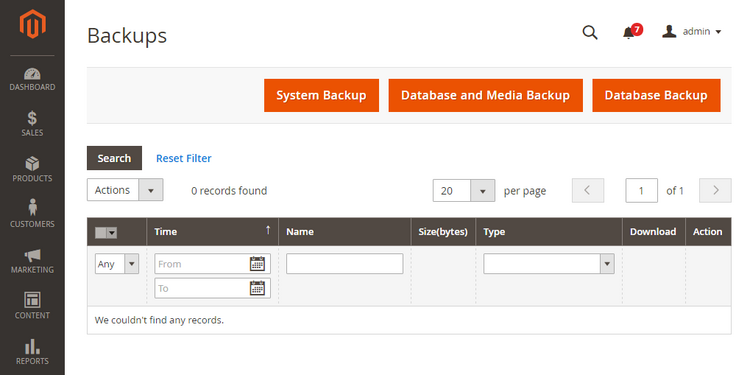
- System Backup. This option will back up the entire system, including your source code and the database.
- Database and Media Backup. This option will sync your database and media folder’s content only. Other things, like store themes, are not included in this backup.
- Database Backup. This option will save your store’s database only.
Select your backup type and set a name for your backup for easy access.
You should inform your visitors of ongoing maintenance on the website. The maintenance mode is disabled automatically when the backup process finishes.
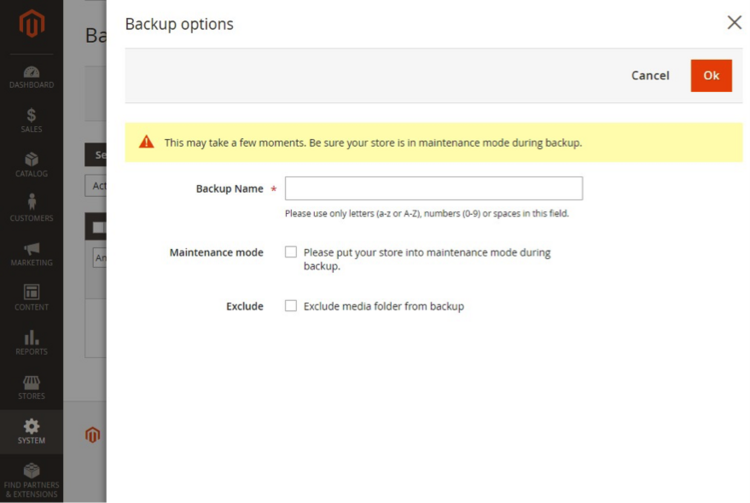
Check the box next to the “Exclude media folder backup” option if you want to exclude the media folder during the backup process.
Hit OK to confirm your action.
Step 2: Pick the right Shopify Pricing Plan
Once you have created a backup of your Magento store, you can now consider a Shopify pricing plan. Shopify offers 5 fixed monthly subscriptions and selecting the right one depends on several factors. They are as follows:
What are your average order value (AOV) and number of sales?
Stores with large monthly orders and a higher AOV will end up paying less with a higher Shopify pricing tier. On the other hand, stores with a smaller monthly revenue and a lower AOV are better off with the basic tiers.
What are your desired features?
It’s better to look at which features each Shopify plan offers and then decide which feature pack you will need to grow your Shopify store.
How much technical support will you need?
Although 24/7 support is included with all the Shopify pricing plans, it’s limited to live chat and email on the Starter plan. Meanwhile, on the Shopify Plus plan, you get 24/7 priority technical support by phone, email, or live chat.
If you wonder which Shopify plan is right for you, we have created a detailed Shopify pricing guide here to help you make the best choice for your business.
Step 3: Get Your Shopify Store Ready
Start A Shopify Free Trial
Once you have selected your pricing plan, it’s time to build your Shopify store. The first step to achieving that goal is to sign up for a Shopify free trial, which lasts 3 days and gives you instant access to all features included in Shopify’s paid subscriptions.
Click here to claim the best offer from Shopify.
Add a product to your Shopify store
When you are properly signed up for Shopify, it will take you to your admin dashboard. From here, you can add a product to your Shopify store. To do it, go to Products > Add your products and enter the required information, such as product title, description, pricing, and more.
Create your product collections
Once you have added a product to your Shopify store, it’s time to organize them into collections. To do it, go to Products > Collections > Create collection. From here, create groups of similar types of products for easy access. You might want to create a link to a particular set of products or add discounts to a collection.
Create your store page
The next thing is to create your store’s page. There are the key pages you need to create for your Shopify store, including About Us, FAQs, Policy, Contact, and Blog. To create a page in Shopify, go to Online Store > Pages > Add page.
Add a theme to your Shopify store
With products, collections, and pages all sorted, you can now choose a Shopify theme for your store. To do this, you can visit the Shopify Theme Store where you will find a wide range of themes available, including both free and premium themes.
Select your payment method
You can activate Shopify Payments, Shopify’s built-in payment gateway to accept payments from customers via credit or debit card. Enabling Shopify Payments will allow you to avoid transaction fees imposed by Shopify for each online purchase, but credit card processing fees will still apply.
Step 4: Export Data from Magento
Now you have your own Shopify store. It’s time to export your store’s data from Magento. You can export data into a CSV file format. Here is how to do it.
From your Magento admin panel, select System > Data Transfer > Export.
In the Export menu, choose Product as the Entity Type and CSV as Export File Format.
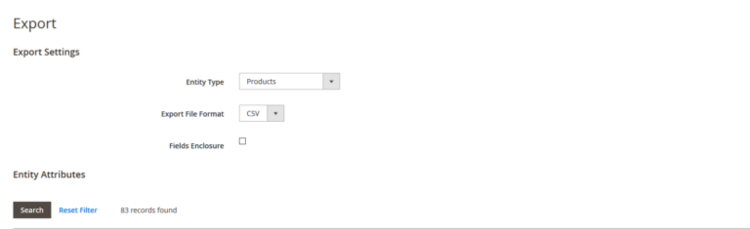
Check the box next to the product attributes you want to exclude from the exporting process. You will get a message saying, “make sure your cron is running to export the file.”
- If you wonder what a cron is, you are not alone. Magento cron job is a Magento 2 feature that lets you create commands or scripts to automate Magento tasks.
- To configure the Cron in Magento 2, go to Stores > Configuration > Advanced > System > Cron (Scheduled Tasks).
Step 5: Import Data from Magento to Shopify
There are 2 methods to import data from Magento to Shopify. We will cover all of them in the section below.
Method 1: Import Data Using a CSV File
If you have a CSV file exported from Magento, you can use it to import your data to your Shopify store. Note:
- Your CSV file needs to be compatible with Shopify’s CSV format.
- Your CSV file must be at most 15 MB.
- You cannot export your images to a CSV file, so you need to upload your image URLs instead.
- To get URLs for your images, go to Shopify admin > Settings > files > upload your pictures and get your images URLs in the Link column.
From your Shopify admin, select Products and click Import at the top right corner.
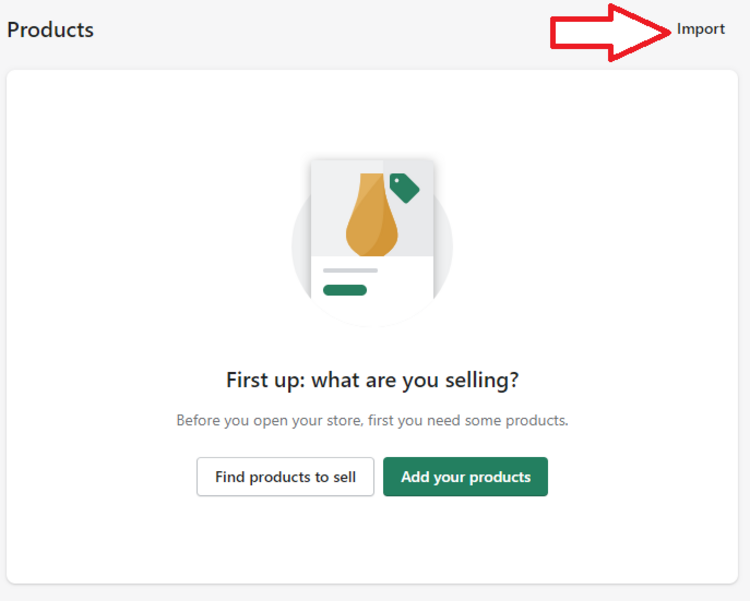
Click Add file and select the CVS file you want to import from.
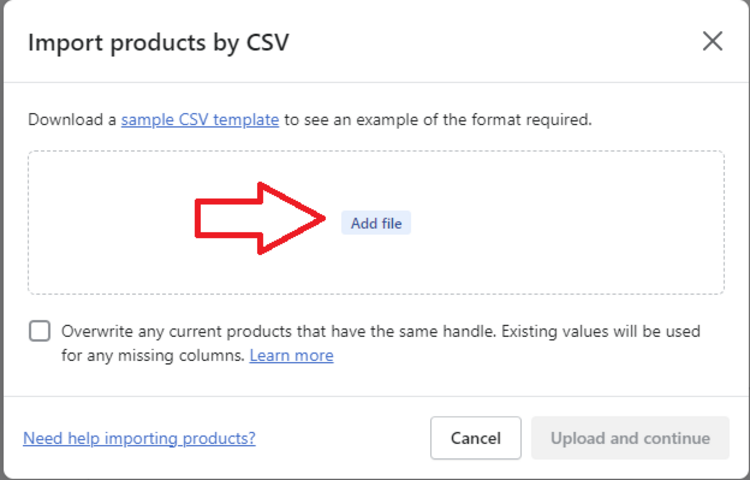
- (Optional) You can download a sample CSV template to check out Shopify’s CSV file sample.
- (Optional) Check the box next to “Overwrite any current products that have the same handle. Existing values will be used for any missing volumes” if you want to overwrite your product details.
Click Upload and Continue.
Review your import list and hit Import products. The process may take a while, depending on how much data you are importing. You should receive a confirmation email when the importing process finishes.
Method 2: Import Data Using an Importer App
You can use third-party importer apps from the Shopify App Store to handle data import. The best thing about this method is that everything is automatic. All you need to do is to set up your migration, choose the entities you want to move, and let them do the rest.
You can refer to a few apps below for importing data to your Shopify store.
- LitExtension eCommerce Migration (most recommended solution)
- Cart2Cart Store Migration
- Matrixify
- Multichannel Importer
Step 6: Tell Your Customers About Platform Change
Whether it be a platform change, an URL redirect, or service maintenance, it’s important to understand that any change in service may create anxiety for your longtime customers.
You can inform your customers of the platform change via email and guide them through the steps to create new customer accounts. Also, it’s a good idea to tell them about page redirects and any unavailable services during the migration.
Step 7: Test Your Shopify Store
Before you launch your Shopify store, run multiple tests of your menu navigation, checkout experience, product selection process, and templates. The more you test, the more bugs and glitches you are likely to find.
Step 8: Launch Your Store
Once everything is ready, launch your new online store. It’s important that you plan your launch window to avoid disruption to your visitors and longtime customers.
Magento to Shopify Migration: 6 Tips for Smooth Migration
Platform migration is not just about data transition but also involves working on different elements, such as page redirects, content optimization, or app compatibility. There are some tips to ensure a smooth Magento to Shopify migration.
Set Up 301 Redirects
Performing 301 redirects is crucial when migrating from Magento to Shopify. A 301 redirect ensures that the search engine and your visitors follow the same Magento URLs after the migration to avoid a “Page Not Found” or “404 Error” message.
Migrate Your Blog Content to Shopify
Your blog posts or social posts help boost organic traffic. So ensure they make their way to your new Shopify store and are relevant to users and search engines. Shopify does not offer a native way to import pages and blog posts directly into the platform. You will need a third-party app from the Shopify App Store to import blogs and page content into your Shopify store.
Check for Compatible Apps
Shopify has over 8,000 apps to extend the functionality of your store. Most of them differ from those you use on your Magento store. So, check if there are any similar apps in the Shopify App Store after migration.
Migrate Customers
Make sure you have your customer data transferred to Shopify. You can export your customers from your Magento store to a CSV file and then upload it to Shopify. Remember that you cannot migrate customer passwords to Shopify as they are encrypted.
Post-Migration Review
- Click Products from your Shopify admin and ensure everything from product data to product tags and variants.
- Click Customers and ensure that your customer data import was successful.
Get Your Team Ready
Your team members need to know how to operate with the new system. This will help minimize the risks of arising problems that can negatively affect daily operations.
You can schedule training sessions for all team members or employees who will work with your new Shopify store. Also, ensure to get them involved in the re-platforming process right from the beginning.
Use migration services
While the tips above can help with a self-managed migration, transitioning from Magento to Shopify can be intricate. To ensure a seamless and efficient process, consider professional migration services. Experienced teams can minimize downtime and guarantee a smooth transition.
There are several advantages to using a professional service for your migration. Here’s how Mageplaza, a leading Magento 2 migration provider, can ensure a successful move to Shopify:
- Expert-led migration: Their team consists of certified Magento developers with a proven track record in handling complex migrations.
- Uncompromising security: Mageplaza prioritizes data security. You can expect a secure and confidential migration process.
- Minimal disruption: They minimize downtime during the migration, keeping your business operational and minimizing lost sales.
- Continued support: Receive two months of complimentary post-migration support to address any questions or concerns.
Magento to Shopify Migration: How to Save Costs?
Platform migration takes time and money. Fortunately, there are some tips to reduce your costs significantly while migrating from Magento to Shopify.
Sign up for Shopify Free Trial, then pay 1$/ month for 3 months
After the free trial ends, you can pay $1 for three months of full access to Shopify. That means you will have up to 90 days of using Shopify for $3 only.
Sign Up for Shopify’s Yearly Plan
You can get up to 50% off your monthly charge if you are willing to pay for the first year of service upfront.
Sign Up for 2 or 3 years of Shopify
Paying upfront for 2 or 3 years of Shopify plans gives you a 20% and 25% discount, respectively.
- It’s worth noting that Shopify discounts and pricing change depending on your store’s location. Head to the pricing page of Shopify for any region-specific discounts and offers.
Updated in January 2023: You will no longer receive 50%, 20%, or 25% discounts if you sign up for a one, two, or three-year billing cycle.
Instead, you will get a 25% discount on your monthly subscription charge if you pay for one year of service upfront.
Go for free Shopify themes
During your first months of Shopify, you can opt for free themes on the Shopify Theme Store to see if they suit your brand’s style.
Enable Shopify Payments
Shopify imposes a transaction fee for every online and in-person purchase. If you use Shopify Payments, Shopify’s in-house payment gateway, you will be able to avoid transaction fees.
Magento to Shopify Migration: Common Problems & How to Fix
Importing Problems
Shopify allows you to import data into your store directly within the admin dashboard. However, you cannot import some data types like customer passwords, blog posts, or past orders that way. Instead, you need to transfer them via a third-party app or Shopify’s API.
Customer Passwords Not Importing
You cannot import your customer passwords directly into Shopify as they are encrypted. You need to invite your existing customers to re-activate their accounts via email and choose a new password or rely on a third-party app from the Shopify App Store.
Apps Compatibility Issues
These are among the most common problems that could arise at any time during migration. In fact, some of your Magento apps may not work for Shopify, as different developers create apps and extensions. This poses the risk that after installing one app, it will stop working.
To avoid compatibility issues, ensure that you head to the Shopify App Store and check for similar Shopify apps to the ones you use in your Magento store.
Lengthy Data Import Process
Another common problem is that it takes forever to import your data into Shopify. In fact, the length of time required for data migration depends on the size of your data and the speed of your network connection. If you have a large amount of data to import, the process may take a long time.
Magento to Shopify Migration: How Much Does It Cost?
Many factors determine how much it costs to migrate from Magento to Shopify. These include your business size, your needs, your budget, and even more.
If you are a large business with complex data, you can hire an expert to assist you with the migration, the price will range from $45 to $80 per hour. Also, you can go for an automated database migration service which will cost around $200.
If you want to build a custom Shopify storefront, the price may bump up to $80,000 for an enterprise-level theme or template. If you want to save some money, you can buy a pre-designed Shopify theme that will cost you between $100 and $350.
Magento to Shopify Migration Checklist
Prepare your Magento store
- Perform Magento store data analysis
- Back up your Magento store
- Export data from your Magento store to a CSV file
Prepare your Shopify store
- Select the right Shopify plan
- Set up your Shopify store
Import data from Magento into Shopify
- Import using a CSV file
- Import using a third-party app
Post-migration review
- Test your new store
- Launch your Shopify store
Wrapping Up
That’s how to migrate from Magento to Shopify. Switching to a new home has never been easy; we have made that process less painful.
Related Post:
Table of content
Related Post

7 mins read
|
06-30-2026

How to Enable DebugView in GA4 for your Magento 2 store - Mageplaza
Step-by-step guide to enabling GA4 DebugView for Magento 2 merchants — verify your GA4 events are firing correctly before trusting your data.
8 mins read
|
06-09-2026

Table Rate Shipping in eCommerce: A Practical Guide
Master Magento 2 Table Rate Shipping. Learn how to configure an accurate, automated shipping matrix to optimize your checkout and boost sales.
10 mins read
|
06-02-2026
3 mins read
|
05-30-2026

Google Analytics Ecommerce Reports for Magento Merchants: What to track & Tips
A practical guide to GA4 ecommerce reports for Magento merchants, covering what to track, how to read each report, and specific tips to turn data into revenue decisions.
18 mins read
|
05-20-2026
5 mins read
|
07-30-2026
7 mins read
|
06-30-2026
How to Enable DebugView in GA4 for your Magento 2 store - Mageplaza
Step-by-step guide to enabling GA4 DebugView for Magento 2 merchants — verify your GA4 events are firing correctly before trusting your data.
8 mins read
|
06-09-2026
Table Rate Shipping in eCommerce: A Practical Guide
Master Magento 2 Table Rate Shipping. Learn how to configure an accurate, automated shipping matrix to optimize your checkout and boost sales.
10 mins read
|
06-02-2026
3 mins read
|
05-30-2026
Google Analytics Ecommerce Reports for Magento Merchants: What to track & Tips
A practical guide to GA4 ecommerce reports for Magento merchants, covering what to track, how to read each report, and specific tips to turn data into revenue decisions.
18 mins read
|
05-20-2026