Cookies help us enhance your experience on our site by storing
information about your preferences and interactions. You can customize your
cookie settings by choosing which cookies to allow. Please note that disabling
certain cookies might impact the functionality and features of our services,
such as personalized content and suggestions.
Cookie Policy
These cookies are strictly necessary for the site to work and may not be disabled.
Cookie name
Description
Lifetime
Provider
_ce.clock_data
Store the difference in time from the server's time and the current browser.
1 day
Crazy Egg
_ce.clock_event
Prevent repeated requests to the Clock API.
1 day
Crazy Egg
_ce.irv
Store isReturning value during the session
Session
Crazy Egg
_ce.s
Track a recording visitor session unique ID, tracking host and start time
1 year
Crazy Egg
_hjSessionUser_2909345
Store a unique user identifier to track user sessions and interactions for analytics purposes.
1 year
HotJar
_hjSession_2909345
Store session data to identify and analyze individual user sessions.
1 day
HotJar
apt.uid
Store a unique user identifier for tracking and personalization.
1 year
Mageplaza
cebs
Store user preferences and settings.
Session
Mageplaza
cf_clearance
Store a token that indicates a user has passed a Cloudflare security challenge.
1 year
Cloudflare
crisp-client
The crisp-client/session cookie is used to identify and maintain a user session within the Crisp platform. It allows the live chat system to recognize returning users, maintain chat history, and ensure continuity in customer service interactions.
Session
Crisp
_ga
Store a unique client identifier (Client ID) for tracking user interactions on the
2 years
Google
_ga_7B0PZZW26Z
Store session state information for Google Analytics 4.
2 years
Google
_ga_JTRV42NV3L
Store session state information for Google Analytics 4.
2 years
Google
_ga_R3HWQ50MM4
Store a unique client identifier (Client ID) for tracking user interactions on the website.
2 years
Google
_gid
Store a unique client identifier (Client ID) for tracking user interactions on the website.
1 day
Google
_gat_UA-76130628-1
Throttle the request rate to Google Analytics servers.
1 day
Google
Advertising cookies
Advertising cookies deliver ads relevant to your interests, limit ad frequency, and measure ad effectiveness.
Advertising cookies deliver ads relevant to your interests, limit ad frequency, and measure ad effectiveness.
Cookie name
Description
Lifetime
Provider
_gcl_au
The cookie is used by Google to track and store conversions.
1 day
Google
__Secure-3PAPISID
This cookie is used for targeting purposes to build a profile of the website visitor's interests in order to show relevant and personalized Google advertising.
2 years
Google
HSID
This security cookie is used by Google to confirm visitor authenticity, prevent fraudulent use of login data and protect visitor data from unauthorized access.
2 years
Google
__Secure-1PSID
This cookie is used for targeting purposes to build a profile of the website visitor's interests in order to show relevant and personalized Google advertising.
2 years
Google
SID
This security cookie is used by Google to confirm visitor authenticity, prevent fraudulent use of login data and protect visitor data from unauthorized access.
2 years
Google
APISID
This cookie is used by Google to display personalized advertisements on Google sites, based on recent searches and previous interactions.
2 years
Google
__Secure-1PAPISID
This cookie is used for targeting purposes to build a profile of the website visitor's interests in order to show relevant and personalized Google advertising.
2 years
Google
__Secure-3PSID
This cookie is used for targeting purposes to build a profile of the website visitor's interests in order to show relevant and personalized Google advertising.
2 years
Google
SSID
This cookie is used by Google to display personalized advertisements on Google sites, based on recent searches and previous interactions.
2 years
Google
SAPISID
This cookie is used by Google to display personalized advertisements on Google sites, based on recent searches and previous interactions.
2 years
Google
__Secure-3PSIDTS
This cookie collects information about visitor's interactions with Google services and ads. It is used to measure advertising effectiveness and deliver personalised content based on interests. The cookie contains a unique identifier.
2 years
Google
__Secure-1PSIDTS
This cookie collects information about visitor's interactions with Google services and ads. It is used to measure advertising effectiveness and deliver personalised content based on interests. The cookie contains a unique identifier.
2 years
Google
SIDCC
This security cookie is used by Google to confirm visitor authenticity, prevent fraudulent use of login data, and protect visitor data from unauthorized access.
3 months
Google
__Secure-1PSIDCC
This cookie is used for targeting purposes to build a profile of the website visitor's interests in order to show relevant and personalized Google advertising.
1 year
Google
__Secure-3PSIDCC
This cookie is used for targeting purposes to build a profile of the website visitor's interests in order to show relevant and personalized Google advertising.
1 year
Google
1P_JAR
This cookie is a Google Analytics Cookie created by Google DoubleClick and used to show personalized advertisements (ads) based on previous visits to the website.
1 month
Google
NID
Show Google ads in Google services for signed-out users.
6 months
Google
Analytics cookies
Analytics cookies collect information and report website usage statistics without personally identifying individual visitors to Google.
Analytics cookies collect information and report website usage statistics without personally identifying individual visitors to Google.
Cookie name
Description
Lifetime
Provider
_dc_gtm
Manage and deploy marketing tags through Google Tag Manager.
1 year
Google
1P_JAR
Gather website statistics and track conversion rates for Google AdWords campaigns.
1 month
Google
AEC
1 month
Google
ar_debug
Debugging purposes related to augmented reality (AR) functionalities.
1 month
Doubleclick
IDE
The IDE cookie is used by Google DoubleClick to register and report the user's actions after viewing or clicking on one of the advertiser's ads with the purpose of measuring the effectiveness of an ad and to present targeted ads to the user.
1 year
Doubleclick
ad_storage
Enables storage, such as cookies (web) or device identifiers (apps), related to advertising.
1 year
Google
ad_user_data
Sets consent for sending user data to Google for online advertising purposes.
1 year
Google
ad_personalization
Sets consent for personalized advertising.
1 year
Google
analytics_storage
Enables storage, such as cookies (web) or device identifiers (apps), related to analytics, for example, visit duration.
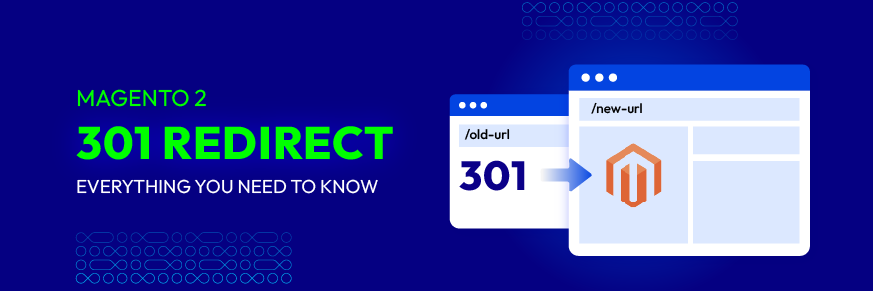
Magento 2 301 Redirect: Everything You Need to Know - Mageplaza
Magento 2 301 Redirect: Everything You Need to Know
Vinh Jacker|03-17-2025
FFor webmasters and developers, 301 redirects are not new. They are essential when managing product, category, or custom page relocations in Magento 2. Using redirects properly ensures you retain SEO value, maintain a seamless user experience, and avoid traffic loss.
In this guide, we’ll explain what a Magento 2 301 redirect is, when to use it, its SEO benefits, and most importantly, how to create a Magento 301 redirect using 3 methods.
Magento 301 Redirects: Definition, When to Use, and Its Benefits
Definition of Magento 301 Redirects
A Magento 301 redirect is a permanent redirection from one URL to another. It informs both search engines and visitors that a page has permanently moved and transfers approximately 95% of the link equity from the old page to the new one.
Without setting up 301 redirects, users may encounter 404 errors when accessing outdated URLs, which can harm your site’s SEO performance and user experience
What's a Magento 301 redirect?
When should you use Magento 301 redirect?
Here are common situations where a Magento 2 301 redirect is necessary:
Moving from an old website to a new domain without losing SEO impact (e.g., from “abc.tk” to “abc.com”).
Seamlessly merging multiple websites into a single store.
Migrating a site to a new platform (e.g., from Magento 1 to Magento 2 or from Shopify to Magento).
Making changes to the site’s menu, product attributes, or structure updates.
Directing traffic from multiple URLs to a preferred destination for SEO or marketing purposes.
Implementing 301 redirects on your website brings various benefits, including:
Preserve SEO rankings: Passes link equity to the new page.
Prevent 404 errors: Redirects visitors to the correct page.
Improve indexation: Signals search engines to remove the old URL.
Protect traffic sources: Avoids losing visitors from outdated links on social media, forums, or PR publications.
Enhance user experience: Prevents broken links and poor navigation.
Types of Redirects in Magento 2: 301, 302, and More
Redirects play a crucial role in guiding both users and search engines to the correct page when a URL changes. Below are the most common types of redirects used in Magento 2, along with their specific purposes:
1. 301 Redirect – Permanent redirect
A 301 redirect indicates that a page has been permanently moved to a new URL. It tells search engines to:
Transfer SEO value and link equity from the old URL to the new one.
Update their index to reflect the new URL.
This redirect is essential when you permanently remove or restructure pages, ensuring that you preserve search rankings and incoming traffic.
Important:
Search engines may take some time to process 301 redirects. If you’re changing your website structure or domain, ensure the redirect map is accurate to avoid traffic loss.
2. 302 Redirect – Temporary redirect
A 302 redirect signals that a page is temporarily moved to a different URL. Unlike 301 redirects, it does not pass link equity to the new page. Search engines continue to index the original URL.
You should use a 302 redirect when:
Running A/B tests on page layouts or content.
Gathering customer feedback on a new page without affecting SEO.
Temporarily removing or updating a page.
Redirecting out-of-stock or seasonal products to similar pages.
Creating short-term promotional landing pages.
Caution:
Using a 302 redirect for a permanent change can harm your SEO, as search engines will continue to index the old page.
3. Other redirect types in Magento 2
Besides 301 and 302, Magento supports several additional redirect types:
303 Redirect – Redirect after form submission
The 303 redirect is used to prevent duplicate form submissions. It redirects users to a new page after a form is submitted, ensuring the form action is not repeated when the page is refreshed.
307 Redirect – Temporary redirect (HTTP 1.1)
A 307 redirect is similar to a 302 redirect but used with HTTP 1.1 protocol. It indicates a temporary change, instructing the browser to maintain the request method (GET, POST, etc.) when following the redirect.
410 Redirect – Content permanently removed
A 410 redirect informs search engines that a page has been permanently deleted and is no longer available. It is ideal when content has been intentionally removed without a replacement, signaling search engines to remove it from their index.
Site Audit Services
Mageplaza offers FREE site health check (15hrs) to help you identify any website flaws & weaknesses and fix them before they start costing you a fortune.
Setting up 301 redirects in Magento 2 is essential when permanently moving pages to new URLs. It ensures a seamless user experience and helps preserve your website’s SEO rankings. Below are three methods you can use:
Magento allows you to manually create a Magento 2 301 redirect through the Custom URL Rewrite feature. Follow 3 steps:
Step 1: Collect old URLs and create a 301 redirect map
Basically, this step is when you collect and write down all the old URLs and where they redirect to. The action’s purpose is to help you avoid unwanted mistakes.
Most importantly, you can organize your Magento 2 URLs when using 301 redirects more effectively and efficiently. We advise you to write all mapping URLs onto a Google spreadsheet for convenience.
Step 2: Create 301 redirect with Custom URL Rewrites in Magento 2
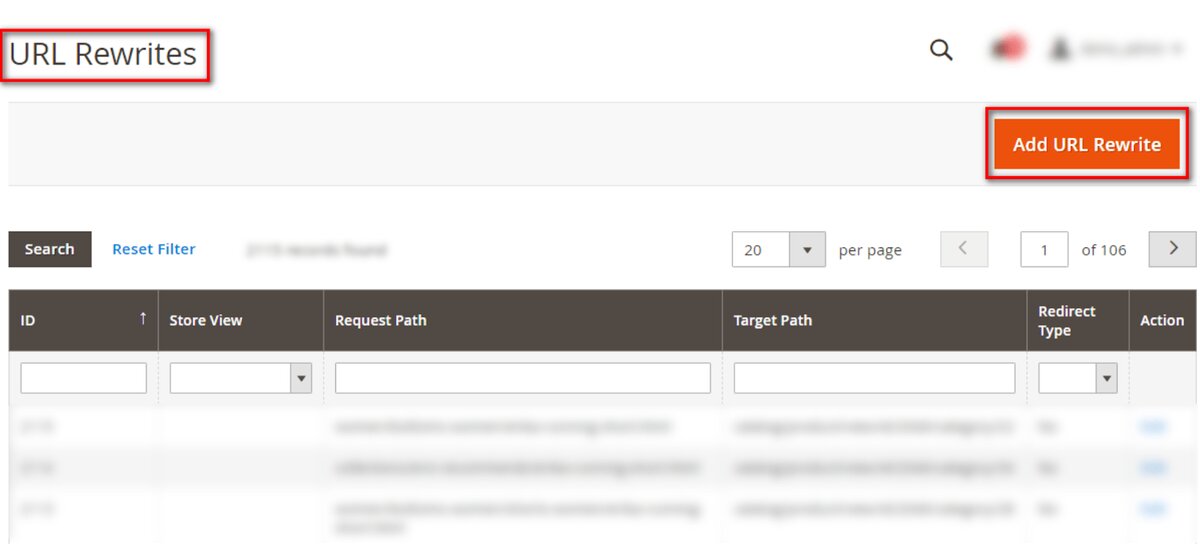
Log in to your admin account on Magento 2
Navigate to Marketing > SEO & Search > URL Rewrites > Click on the “Add URL Rewrite” button in the top-left corner
Click on the Add URL Rewrite button to start creating a 301 redirect
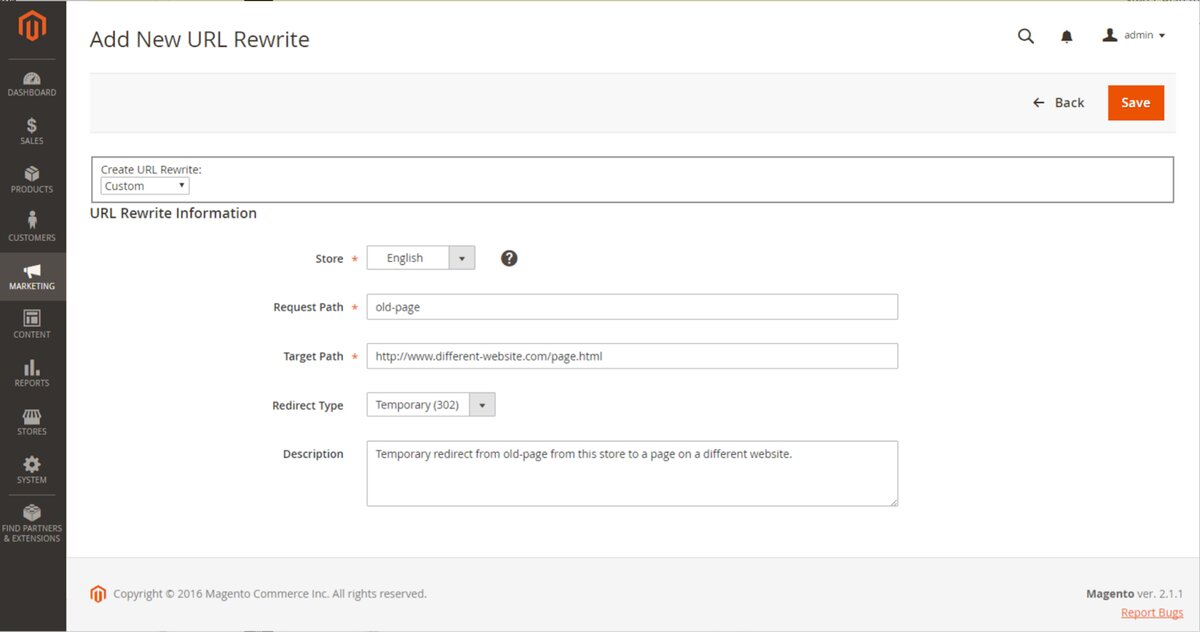
Magento allows merchants to generate URL rewrite for items, categories, CMS pages, and custom URLs. You can select the URL types needed to redirect from the dropdown list on the settings page.
If you select Create URL Rewrite = For category/ For product/ For CMS page, the system will let you choose a specific category/ CMS page/ product that requires changes.
The settings section of a new URL Rewrite at the store backend
Back to the settings of a new URL Rewrite in the Magento store’s backend. Here, enter the required information in the field accordingly, particularly:
Choose Create URL Rewrite = Custom
Store: Select your wanted store view where you’re about to implement the URL Rewrite
Request Path: Enter in this field the URL of the page that you want to use the 301 redirects (the old web page) without the domain name - For instance, your URL is “https://www.example.com/abc.html,” just need to enter “abc.html”
Target Path: Fill in the new page’s URL without the domain name, just like the above field. Note: This part will be automatically filled if you select Create URL Rewrite = For category/ For CMS page/ For product earlier
Select Redirect Type = Permanent (301)
Description (optional): Enter a short description of why you use 301 redirect
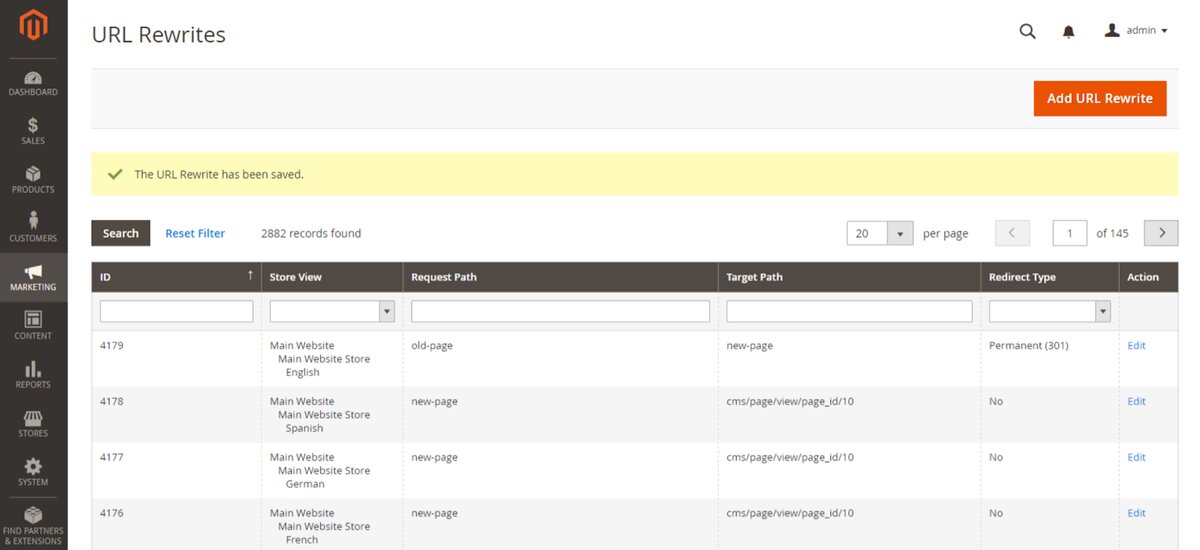
Once completed, click on the Save button in the top-right corner. You can see the new URL rewrite when returning to the main working screen of Magento’s URL Reviews
The main screen of Magento’s URL Rewrites
Step 3: Conduct Magento 301 Redirect test
To make sure nothing can go wrong, having a test after setting the 301 redirects is essential. You can:
Go to your store home page and try to open the old web page
Or search for the old URL on Google’s searching bar
If you successfully implement the 301 redirects on that web page, you will be redirected to the new page instead of the original one.
Method 2: Create 301 redirects with Magento 2 Seo Redirect extension
The all in one SEO solution of Mageplaza
For store owners managing a large number of redirects, using an extension is a more efficient option. The Mageplaza SEO Redirect module automates the process and offers advanced features.
Along with its ability to manage and handle 301 and 302 redirects, this module comes with a wide range of other outstanding features focusing on improving SEO performance.
Method 3: Set up 301 redirects using the .htaccess file
For developers and technical users, you can create 301 redirects at the server level via the .htaccess file in your Magento root directory.
5 Steps:
Locate the .htaccess file in your Magento installation folder.
Open the file and look for the following section:
```
apache
## Enable rewrites
Options +FollowSymLinks
RewriteEngine on
```
3. Add your redirect rule below:
```
Redirect 301 /old-page.html /new-page.html
```
*Note: Use the full path without the domain name.*
4. Save the file and upload it back to the server if edited locally.
5. Test the redirect by visiting the old URL — it should now redirect to the new page.
## The bottom line!
Properly configuring Magento2 301 redirects is crucial for maintaining your website’s SEO performance, enhancing user experience, and ensuring smooth site structure changes. Whether you choose to set them up manually, via an extension, or through the server, always double-check your redirects and test their functionality.
If you have any questions about Magento 2 redirect URLs or need assistance setting them up, feel free to contact us.
Thanks for reading!
Jacker is the Chief Technology Officer (CTO) at Mageplaza, bringing over 10 years of experience in Magento, Shopify, and other eCommerce platforms. With deep technical expertise, he has led numerous successful projects, optimizing and scaling online stores for global brands. Beyond his work in eCommerce development, he is passionate about running and swimming.
Learn how to track and measure abandoned cart recovery performance in Magento 2 such as KPIs, native reporting gaps, and how to use Mageplaza's built-in ACE reports to find what's working and optimize your emails.
A practical guide to GA4 ecommerce reports for Magento merchants, covering what to track, how to read each report, and specific tips to turn data into revenue decisions.