



18 mins read
|
11-30-2026
Enable Ajax Add To Cart Magento 2 in 2 Ways
Vinh Jacker
|
03-17-2025

Numerous inquiries revolve around Ajax and enabling Ajax add-to-cart functionality in Magento 2 for product widgets. In this article, we address common queries related to these issues. Additionally, we provide two effective methods to optimize the add-to-cart process. Follow along to gain further insights.
What Is Ajax?
AJAX – a web technology with both pros and cons – short for Asynchronous JavaScript and XML, comprises a suite of technologies for developing web applications. By integrating these technologies, web pages become more responsive. With AJAX, users can interact with a web page without waiting for it to reload entirely. Only specific elements of the page are refreshed during interactions on the website.
In traditional web applications, when users interact with the web interface, HTTP requests are sent to a web server. The server then processes the request and sends back an HTML page to the client. During this transportation via HTTP, users cannot engage with the web application.
Does Magento 2 Support AJAX Add to Cart by Default?
Yes, but only at a basic level.
On the default Luma theme, Magento 2 already sends add-to-cart requests via AJAX, on both category pages and product pages. When After Adding a Product Redirect to Shopping Cart is set to No (Stores > Configuration > Sales > Checkout > Shopping Cart), the shopper stays on the current page. A success message appears at the top and the mini cart counter updates. No full page reload happens.
Here’s what the native behavior doesn’t cover:
- No confirmation popup. The success message sits at the top of the page. Shoppers who have scrolled down a category page often miss it.
- No quick view. To check details or compare options, shoppers still have to open the product page.
- Configurable products need a page visit. On category pages, products with required options (size, color) redirect to the product page instead of being added directly.
- Wishlist and Compare still reload the page.
- Fixed mini cart. You can’t change its layout or behavior, or show coupons and totals in it, without custom development.
Your next step depends on what you need. If the native behavior is enough, Method 1 shows how to check it’s switched on. If you want popups, quick view and a better mini cart, go to Method 2.
If your store runs on Hyvä, this section doesn’t apply as written. Hyvä replaces Luma’s RequireJS/jQuery frontend, so add-to-cart behavior depends on the Hyvä theme version and modules you use.
How to enable Ajax add to cart in Magento 2
Method 1: Programmatically
Step 1: Create a Custom module
For example, I have created a Mageplaza Catalog Module.
Step 2: Add JavaScript for AJAX Handling
Create a JavaScript file that will handle the AJAX request.
File Path:
app/code/Mageplaza/Catalog/view/frontend/web/js/ajax-add-to-cart.js
Content:
require([
    'jquery'
], function ($) {
    'use strict';


    $('body').delegate('button.action.tocart', 'click', function (e) {
        var form      = $(this).closest('form'),
            actionUrl = form.attr('action');// replace by your Url
        e.preventDefault();
        $.ajax({
            url: actionUrl + '?isajaxcard=1',
            data: form.serialize(),
            type: 'POST',
            processData: 'json',
            showLoader: true,
            success: function (res) {
                Debugger;
            // Insert your custom code
                console.log("Ajax Cart");
                console.log(res);
            }
        });
    });
});
Step 3: Require the JavaScript in Your Layout XML
Add the JavaScript file to your layout.
File Path:
app/code/Mageplaza/Catalog/view/frontend/layout/default.xml
Content:
<page xmlns:xsi="http://www.w3.org/2001/XMLSchema-instance" xsi:noNamespaceSchemaLocation="urn:magento:framework:View/Layout/etc/page_configuration.xsd">
    <head>
        <script src="Mageplaza_Catalog::js/ajax-add-to-cart.js"/>
    </head>
</page>
Step 4: Clear Cache and Deploy Static Content
Run the following commands to clear the cache and deploy the static content:
bin/magento setup:upgrade
bin/magento setup:static-content:deploy -f
bin/magento cache:clean
bin/magento cache:flush
Method 2: Use a third-party extension
If you want more than the native success message, and don’t want to maintain custom code, an extension covers the gaps listed above. Magento 2 Quick View & Ajax Add to Cart module adds the following:
- an add-to-cart confirmation popup
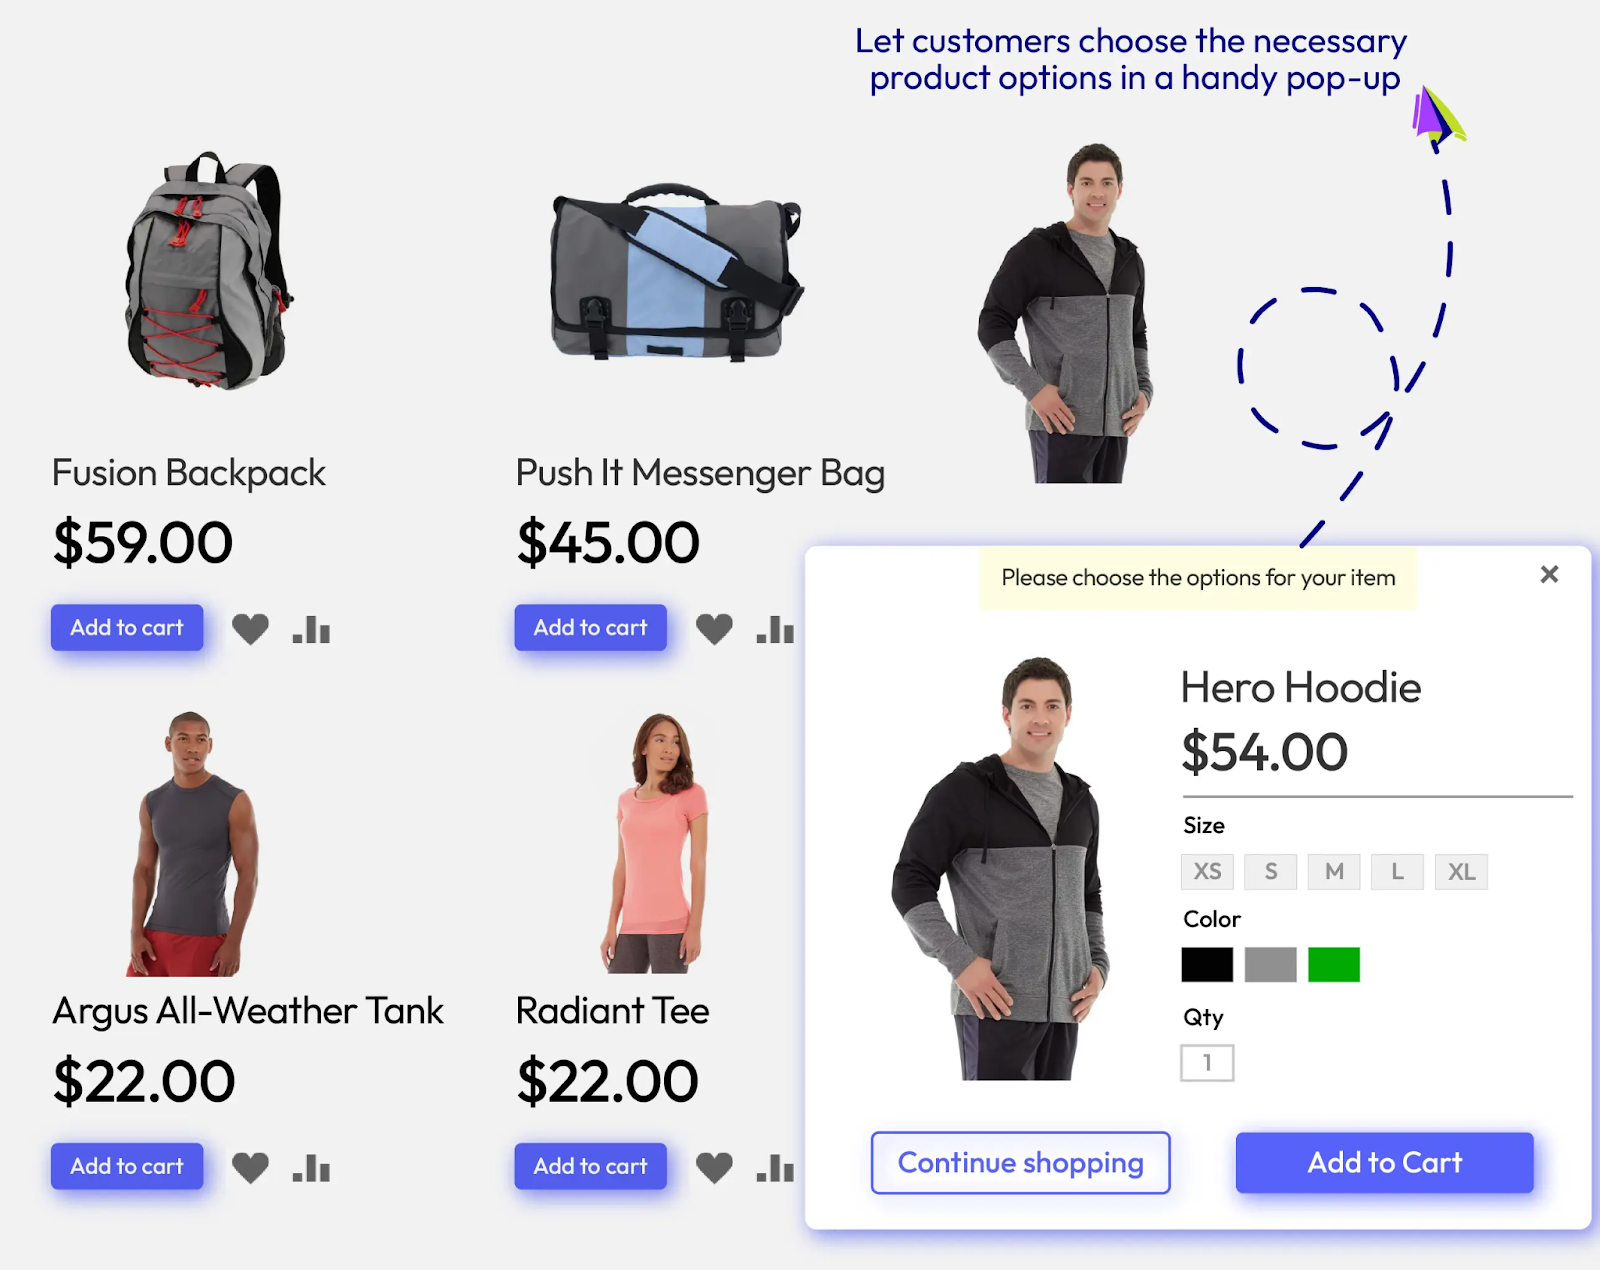
- a quick view popup, so shoppers can choose options and add items from category pages
- AJAX Wishlist and Compare
- a configurable mini cart
Step 1: Install the extension
Install Quick View & AJAX Cart by following the installation guide. It supports Magento 2.4.4–2.4.9 and the Hyvä theme.
Step 2: Configure the AJAX cart popup
Now, let’s move to the configuration!
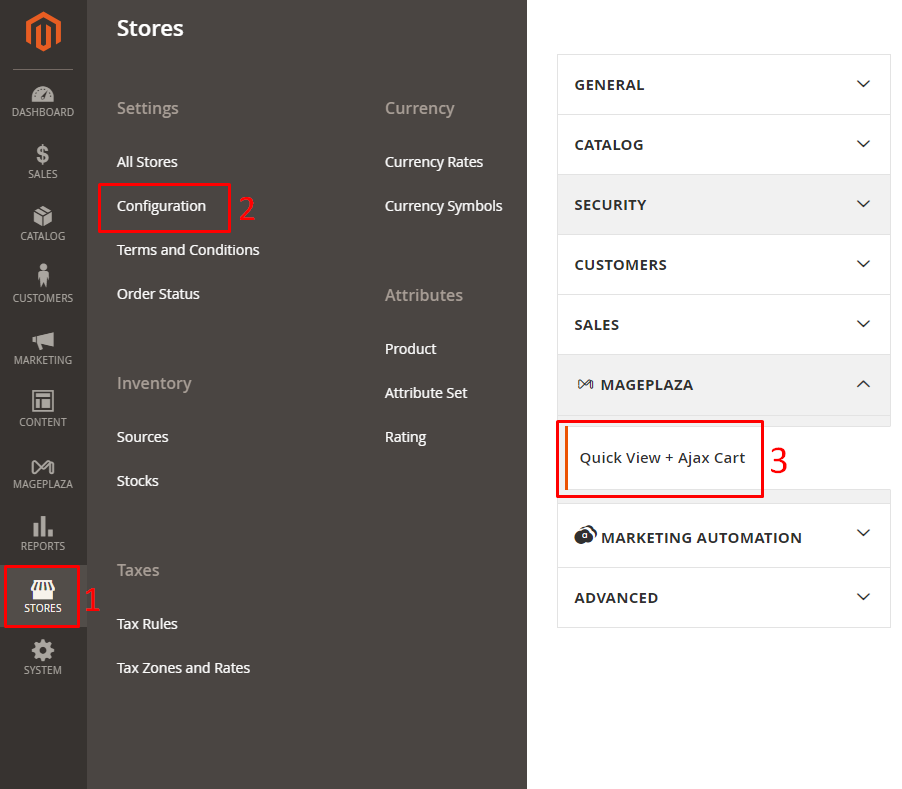
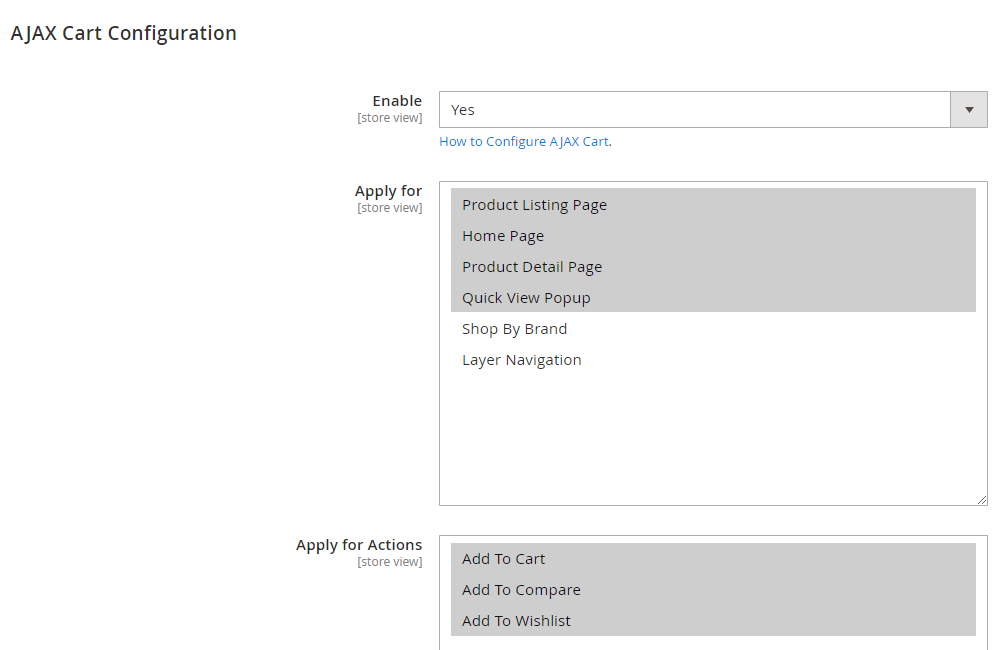
Navigate to Stores > Configuration > Mageplaza > Quick View & AJAX Cart, then expand AJAX Cart Configuration:
- Enable: Choose Yes to activate Ajax cart
- Apply for: Multi-select the pages you would like to display the popup of Ajax Cart
- Apply for actions:
- Add To Cart: Display the popup of Ajax Cart when customers press on Add To Cart button
- Add To Compare: Display the popup of Ajax Cart when customers press on Add To Compare button on Quick View Popup
- Add To Wishlist: Display the popup of Ajax Cart when customers press on Add To Wishlist button on Quick View Popup
-
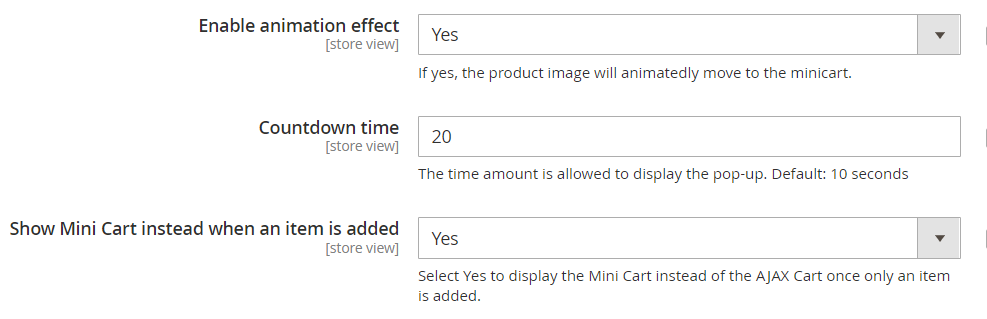
Enable animation effect: Select Yes to use the animation function of your products. It will auto-fly into the cart after clicking the Add To Cart button.
-
Countdown time: Set the number of seconds for displaying the Ajax Cart popup
-
Show Mini Cart instead when an item is added: When the customer only adds 1 item to the cart, display the mini cart instead. If more than 1 product were added, display the Ajax popup as normal.
Step 3: Set up the mini cart
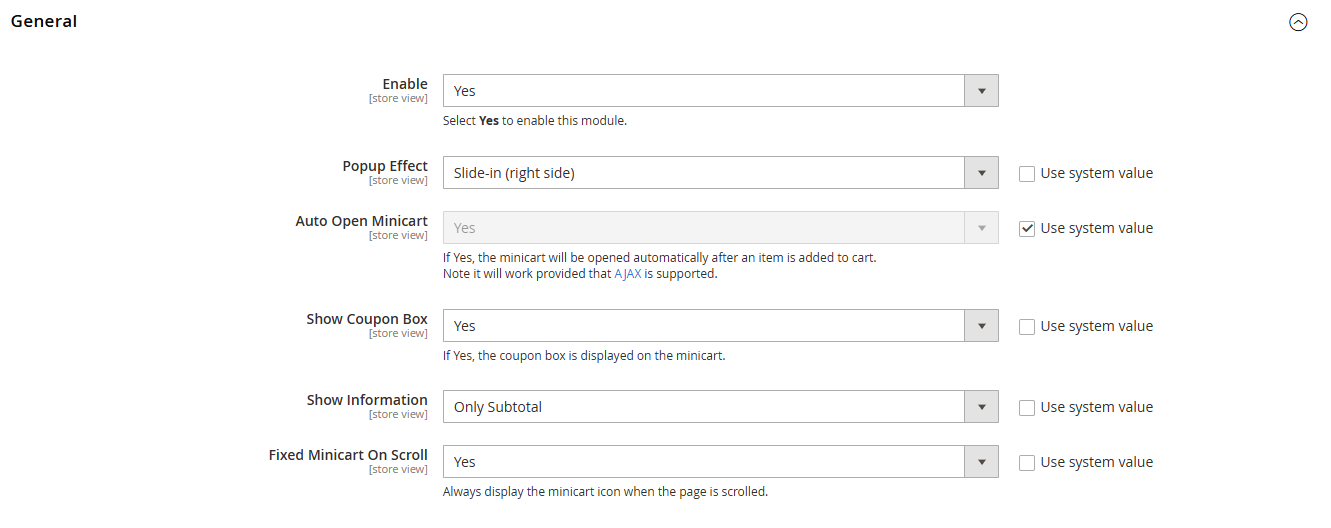
In the General section on the same page:
- Popup Effect: Choose Slide-in (right side) to open the mini cart as a side panel, or Hover-over to open it when shoppers hover over the cart icon.
- Auto Open Minicart: With Slide-in, open the mini cart automatically after an item is added.
- Show Coupon Box: Let shoppers apply a coupon code directly in the mini cart.
- Show Information to control which info is shown (only subtotal or full total information)
Step 4: Save and test
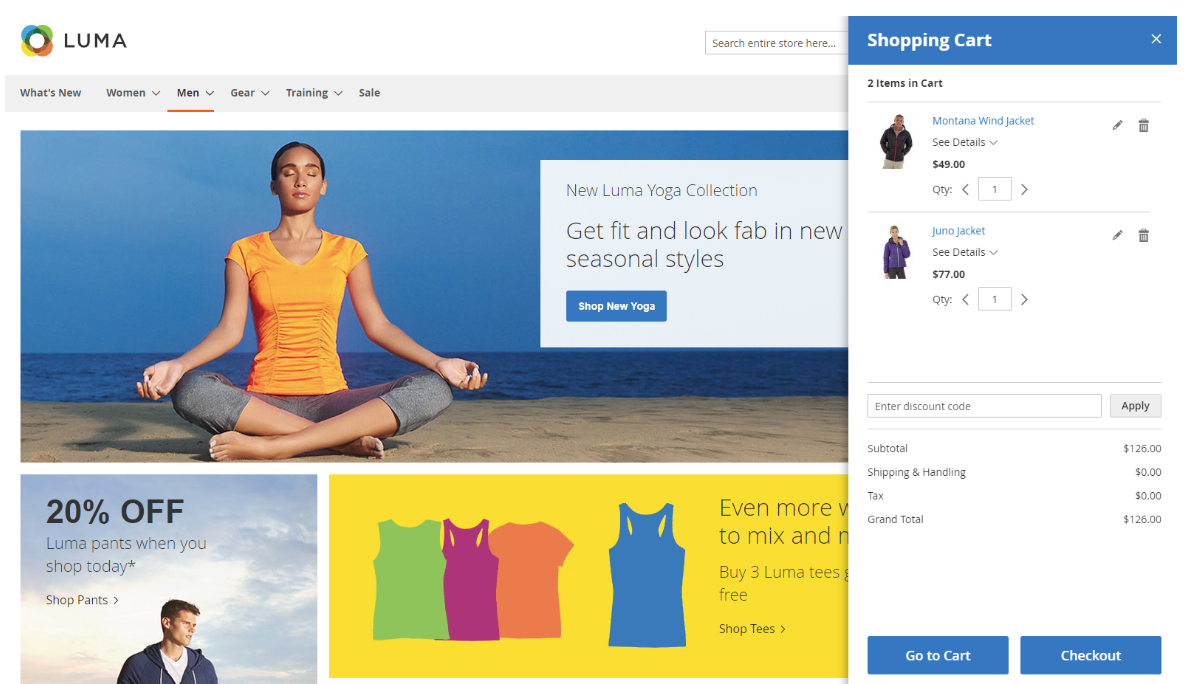
Click Save Config and flush the cache. On the storefront, add a product from a category page. You should see the AJAX popup, or the mini cart if you enabled that option, without a page reload.
Every other setting is documented in the Quick View & AJAX Cart user guide. That includes quick view display, related or cross-sell blocks in the popup, and popup colors.
Conclusion
Magento 2 already handles add to cart via AJAX on Luma, as long as After Adding a Product Redirect to Shopping Cart is set to No. What it doesn’t give you is a confirmation popup, quick view, or a mini cart you can customize.
To close those gaps, you have two options: using custom code (if you have a developer and only need small changes), or using Mageplaza Quick View & AJAX Cart that covers the popup, quick view, AJAX Wishlist/Compare and mini cart from one config page, with Hyvä support.
Want to stop sending shoppers to the cart page instead? See How to disable AJAX add to cart in Magento 2.
Table of content

Jacker is the Chief Technology Officer (CTO) at Mageplaza, bringing over 10 years of experience in Magento, Shopify, and other eCommerce platforms. With deep technical expertise, he has led numerous successful projects, optimizing and scaling online stores for global brands. Beyond his work in eCommerce development, he is passionate about running and swimming.
Related Post


ChatGPT Product Feed for Magento 2: Field Mapping, Variants, Setup and Fixes
Magento 2 has no built-in ChatGPT channel. Map OpenAI's nine required fields to your Magento attributes, handle configurable variants, generate and validate the feed with Mageplaza Product Feed, and fix the errors that get rows rejected.
13 mins read
|
11-09-2026
20 mins read
|
10-30-2026
PHP Security Update 2026: What Magento store must do now
PHP security update Oct 2026: CVE-2026-109618 and CVE-2026-109619 explained for Magento. Affected versions, fixes, and a 7-step checklist.
6 mins read
|
10-23-2026
15 mins read
|
09-30-2026
16 mins read
|
08-30-2026
18 mins read
|
11-30-2026
ChatGPT Product Feed for Magento 2: Field Mapping, Variants, Setup and Fixes
Magento 2 has no built-in ChatGPT channel. Map OpenAI's nine required fields to your Magento attributes, handle configurable variants, generate and validate the feed with Mageplaza Product Feed, and fix the errors that get rows rejected.
13 mins read
|
11-09-2026
20 mins read
|
10-30-2026
PHP Security Update 2026: What Magento store must do now
PHP security update Oct 2026: CVE-2026-109618 and CVE-2026-109619 explained for Magento. Affected versions, fixes, and a 7-step checklist.
6 mins read
|
10-23-2026
15 mins read
|
09-30-2026
16 mins read
|
08-30-2026