


5 mins read
|
07-30-2026
Creating a Magento 2 Custom Maintenance Page: A Step-by-Step Guide
Vinh Jacker
|
03-17-2025


A store always has times when it needs to maintain and upgrade its website for a certain period of time. For example, you may want to build a new theme, fix website errors, or add new plugins that change the behavior of your website. Having customers see that a website is under maintenance creates a bad user experience and makes people feel like your brand is unprofessional.
One effective solution is to quickly create a maintenance page to redirect them away from the site they’re editing until the maintenance is finished. This article will guide you through the process of creating the Magento 2 Custom Maintenance Page in the simplest and most effective way with or without an extension.
Key Takeaways:
- The maintenance page is essential for a Magento 2 store to avoid customers misunderstanding that your store is unprofessional.
- This article provides you with two solutions to create a Magento 2 Custom Maintenance Page: with or without a 3rd-party extension. The first option is more simple-to-config and time-saving
- Better Maintenance extension for Magento 2 by Mageplaza is one of the high-rated modules for all use cases.
EXPLORE MAGENTO 2 MAINTENANCE EXTENSION!
What is the Maintenance Page in Magento 2?
The maintenance page is created to inform customers that your sites are down and unable to be accessed until the pages are ready. This page can block visitors from viewing the whole store site or several pages.
The page not only works as a notification with simple words. It should include information like information when the site is available or extra actions on sites such as a countdown timer, sharing on social sites, registering emails to pile up the email list. All of this should be available when you are using the sites.
Website Support
& Maintenance Services
& Maintenance Services
Make sure your store is not only in good shape but also thriving with a professional team yet at an affordable price.
Get Started
Merits from using Magento 2 Custom Maintenance Page mode
Flexible customization
Instead of having a developer design the maintenance page, you can create a custom maintenance page on your own with simple settings on the backend. Although you are not a coding expert, admins and owners can create an appealing maintenance mode site with variable customizing function. These functions have a Countdown timer with multiple template selections, a subscribe button or social contact, and other elements on the page such as title, description, and text color. You can take advantage of this marvelous flexibility to design your unique maintenance page.
Live up to customer demand
Whenever stores have any technical issues/ updates, you can instantly block the current site to ease any issue that can be caused by your repaired sites. Although maintenance sites can interfere with your store shopping journey, stores can prevent any dissatisfaction when experiencing the sites. Also, proper information from the site’s customers will comfort your visitors when they cannot access the website temporarily.
Show some respect to the customers
It is quite rude when customers paid their free time to visit your site, and they cannot access it. The feeling of dissatisfaction should be some part mitigated if your maintenance page clearly explains and apologize for the inconvenience.
How to create a Magento 2 Custom Maintenance Page without using an extension?
So, we have provided you with some basic information about the Custom Maintenance page. Now, let us show you how to create a Magento 2 Custom Maintenance page for your online store by yourself.
Step 1: Create a new theme
- In your Magento 2 installation directory, navigate to
app/design/frontend - Create a new directory for your theme, for example,
Custom/maintenance - Inside the
maintenancedirectory, create the following directories:web/css, andMagento_Theme - Inside the
Magento_Themedirectory, create another directory namedlayout - Your theme directory structure should look like this:
app/design/frontend/Custom/maintenance
├── web
│   ├── css
│   └── js
└── Magento_Theme
    └── layout
Step 2: Create the maintenance page layout XML
- Inside the
layoutdirectory, create a new XML file namedmaintenance_page.xml - Open the
maintenance_page.xmlfile and add the following content:
<?xml version="1.0"?>
<page xmlns:xsi="http://www.w3.org/2001/XMLSchema-instance" xsi:noNamespaceSchemaLocation="urn:magento:framework:View/Layout/etc/page_configuration.xsd">
    <body>
        <referenceContainer name="page.wrapper">
            <container name="maintenance.container" htmlTag="div" htmlClass="maintenance-container" before="-">
                <block class="Magento\Framework\View\Element\Template" name="maintenance.content" template="Magento_Theme::maintenance.phtml" />
            </container>
        </referenceContainer>
    </body>
</page>
Step 3: Create the maintenance page template
- Inside the
Magento_Themedirectory, create a new directory namedtemplates - Inside the
templatesdirectory, create a new file namedmaintenance.phtml - Open the
maintenance.phtmlfile and add the HTML content for your maintenance page - Customize the content and design of your maintenance page according to your requirements
Step 4: Activate the new theme
- In your Magento 2 installation directory, open the
app/design/frontend/Custom/maintenancedirectory. - Create a
theme.xmlfile with the following content:
<?xml version="1.0"?>
<theme xmlns:xsi="http://www.w3.org/2001/XMLSchema-instance" xsi:noNamespaceSchemaLocation="urn:magento:framework:Config/etc/theme.xsd">
    <title>Custom Maintenance Theme</title>
    <parent>Magento/blank</parent>
    <media>
        <preview_image>media/preview.jpg</preview_image>
    </media>
</theme>
- Add a preview image for your theme by placing an image file named
preview.jpginside themediadirectory.
Step 5: Configure Magento to use the new theme
- Log in to your Magento 2 admin panel.
- Go to
Content>Design>Configuration. - Click on
Editfor the appropriate store view or website. - In the
Applied Themesection, select your custom maintenance theme. - Save the configuration.
Step 6: Enable maintenance mode
- Access your server via SSH or FTP.
- Navigate to your Magento 2 installation directory.
- Run the following command to enable maintenance mode:
bin/magento maintenance:enable
Now, when you access your Magento 2 store, it should display the custom maintenance page you created. Once you’re ready to disable maintenance mode and resume normal operations, run the following command in your Magento 2 installation directory:
bin/magento maintenance:disable
Remember to clear the Magento cache after making any changes to ensure that the new maintenance page is properly displayed.
How to create the Magento 2 Custom Maintenance Page with the Mageplaza Better Maintenance extension?
This sufficient function is featured Better Maintenance module provided by Mageplaza. If you are curious about how “hard” it can be to customise this page, then continue to this section.
For any function to work correctly, it requires the general function to be set appropriately in the general configuration. Thus, you can read the Better Maintenance user guide for detailed guidance on deploying this module.
And, the custom maintenance mode page will be created with ease when you follow my instructions below:
In the Admin Panel, choose Stores > Settings > Configuration, then select the Better Maintenance tab in the Mageplaza extension.
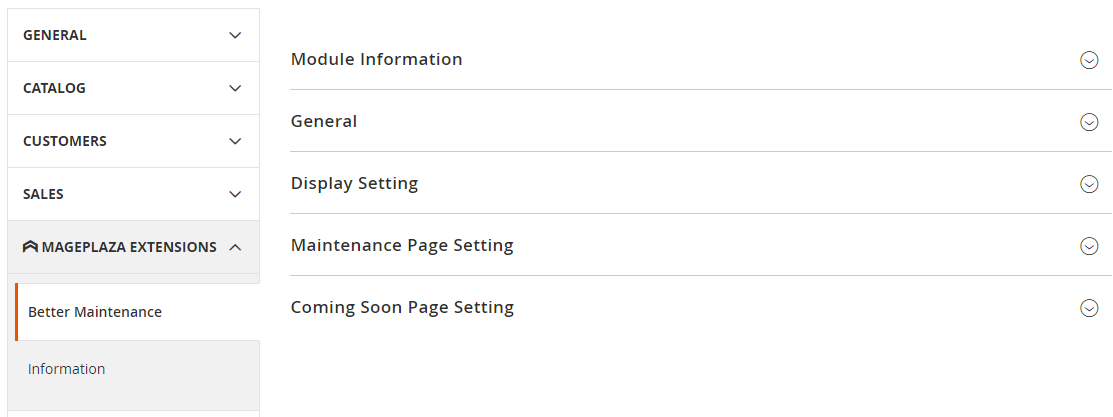
General Configuration
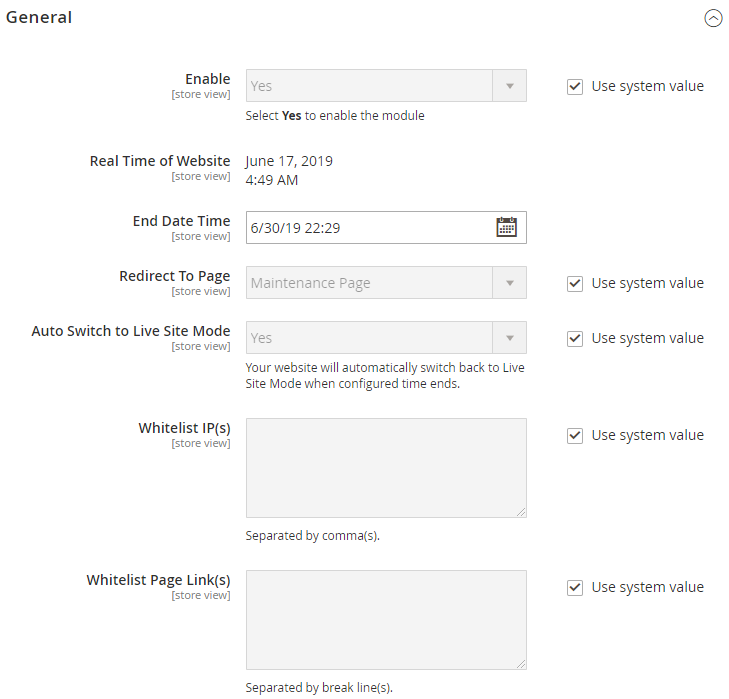
After you click on the Better Maintenance tab, the general configuration grid will appear to set several fields:
- In the Enable field, the admin can turn on the module by selecting Yes.
- In the Real-Time of Website field, the module will be based on the timezone of the websites to display the current time. You cannot fix the time directly in this field, but it can be checked at Configuration, Locale Options in General Options of General tab
- In the End Date Time field, you can choose the time maintenance process to wrap up. Based on the end date, the countdown timer will count down until the finished date. The maintenance period starts from the save configuration time to the end date.
- In the Redirect To Page field, continue to select a specific page to navigate customers to the maintenance site by choosing Maintenance Page. Keep in mind that any store link will be redirected to the selected page except for Whitelist IPs and Whitelist Page Links.
- For the Auto Switch to Live Site Mode field, set Yes to change back to live site mode when it comes to End Date Time. If you set No, the page will shift to live sites only when the admin turns it off.
- For the Whitelist IP(s) field, the setting will let visitors who have the specific IP address access the page without being redirected to the Maintenance Page. The value allows using commas to separate 1 IP address, multiple IP addresses, 1 range of IP addresses, or multiple IP address ranges, IP addresses. You can allow IP addresses as follows:
- 10.0.0.10, 10.0.0., 10.0.., 10.0.0. - 123.0.0., 12.3..* - 222.0..
- Symbol “*” in the range 0 - 255
- For the Whitelist Page link(s) field, you can cross out the pages that are not affected by the maintenance process. Inserting the page links in separate lines will help customers access these pages normally.
Display Setting
Clock Setting
The clock displayed on the maintenance page provided by Mageplaza is capable of multiple styles (Simple, Circle, Square, Stack, Modern), background color, clock interior color, and the color of the clock number. In detail, admins can save time using the ready-to-use template to create the best or create a unique one for their sites, which suits their store theme.
Subscribe Setting
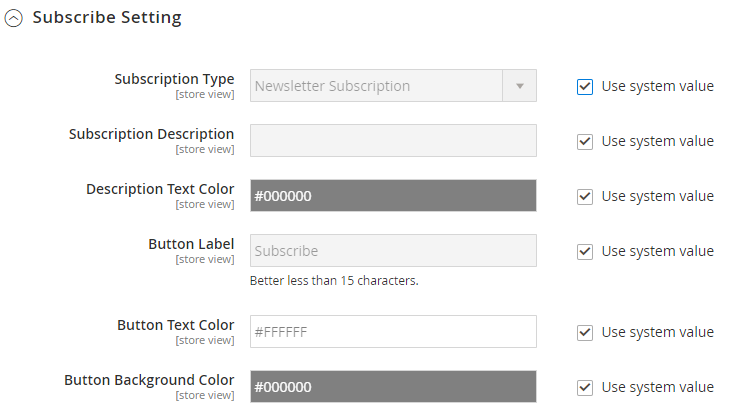
Another beneficial tool that can be displayed on this page is a subscription. If the customer arrives at the sites and is unable to access the official page, they can subscribe to keep frequent contact with the store. It will be a great tool to increase the number of subscriptions and also to retain customers when they are unable to visit the sites.
There are 2 primary subscriptions. which are newsletter subscriptions and account registration:
- For the newsletter subscription, the customers will enter their email and click on the subscribe button. The admin can easily control the information in the backend by accessing Marketing > Communications > Newsletter > Subscribers.
- For the Account Registration, the visitors will create an account to receive the email newsletter. If you leave the Subscription Description field blank or choose None as the Subscription type, no description will appear on your maintenance page.
Moreover, the module allows admins to customize the label button to show different languages and adjust the color of the button text and button background to suit the admin’s intentions.
Social Contact
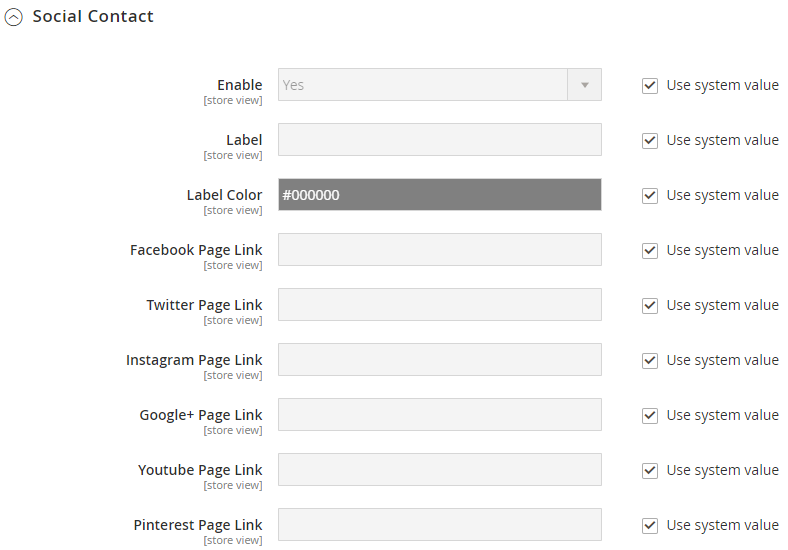
You can add social contact to keep in touch with customers via social sites before they bounce off the site. You can interact with the customers via Facebook, Twitter, Instagram, Google+, YouTube, and Pinterest. You only need to add your social site links, and the icons will appear on the front end. You can also modify the label for the social contact field and label color.
Maintenance Page Setting
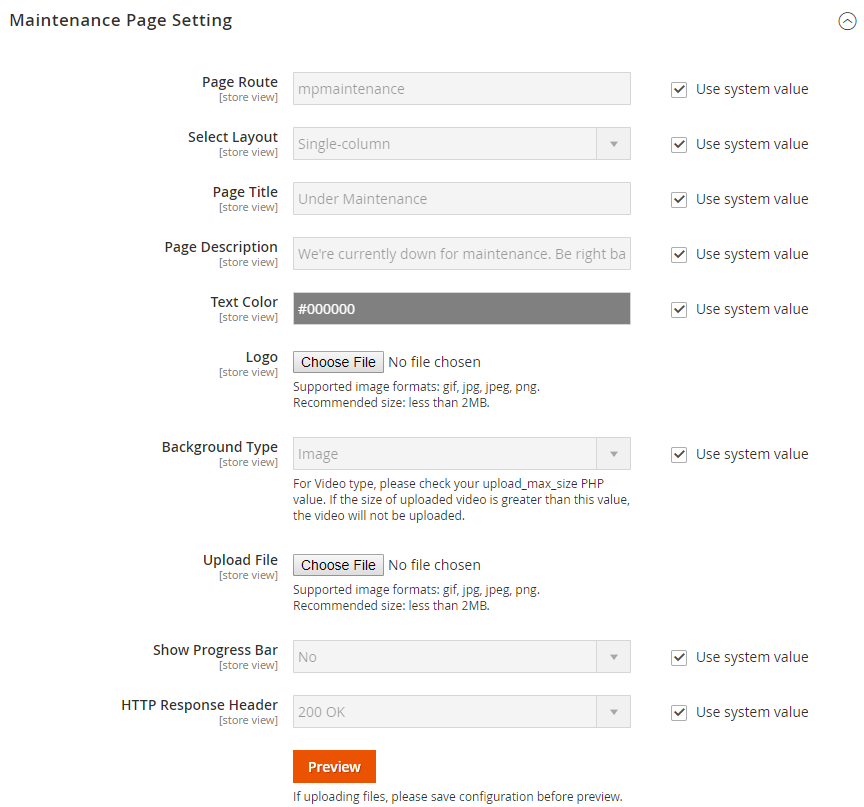
In this final section, you will make the general modification for the page route, layout, page title, description, text color, logo, background type, progress bar, and HTTP response header.
In specific, the progress bar is the section that shows the progress of your site maintenance process. If you apply it to the store sites, you can customize the Progress Value, Progress Label, Label Color, Progress Bar Color.
You can send the page status to Google via HTTP Response Header:
- 503 Service Unavailable

- 200 OK

Finally, users can preview their page instead of accessing the Frontpage. The preview page will show the exact content on the front page. To use it, you can click on the Previewing button. Furthermore, you need to remember that is you uploading files, and it is essential to save the configuration before previewing.
Features of Mageplaza Better Maintenance extension for Magento 2
The Better Maintenance extension for Magento 2 by Mageplaza helps you to prepare for new products and services while also informing customers that your website is currently undergoing maintenance or an upgrade. Visitors to the store are comfortably informed of the status of repair work and the launch date, thanks to the Better Repair module.
Here are the outstanding features that this extension brings to customers:
- Coming Soon page and Maintenance page redirection: a new destination for redirecting customers when your stores have to update or fix errors.
- Ready-to-use countdown timer during maintenance: a countdown timer displayed to reduce confusion and comfort customers about launching time.
- Subscribe or social contact to maintain customers’ connection: a subscription section on Coming Soon/ Maintenance Page to collect customer information
- Customize Maintenance Page & Coming Soon Page: store owners can freely adjust these two pages’ layout, title, text color, description, even image and video, etc.
- Make an exception by whitelist: Whitelist IPs that are added in the backend can continue to visit the store website without having to navigate.
- Quick preview: This is an incredibly convenient and time-saving method for administrators to test out different changes to the appearance of the page.
- AVADA Marketing Automation by Mageplaza (recommended): This is an all-in-one platform designed for email marketing with many innovative features such as Welcome series, Order follow-up, Advanced Segmentation, and so on.
- Footer link: You can attach links at the page footer to make it easier for customers to access
- Page background: This module offers three styles of page background, including single image, multi-image, and video
- Progress bar: This extension includes a progress value bar to keep customers informed about the upgrade status and provide an estimate of the store site’s maintenance progress.
- SEO metaData: You can add meta titles, descriptions, and keywords to improve SEO performance
FAQs about Magento 2 custom maintenance page
What is the role of plugins, modules, and extensions on the maintenance page?
Plugins, modules, and extensions help to improve your Magento 2 maintenance page. You can use them to add features like a newsletter subscription field, social media buttons (e.g., Instagram), or a product reviews section. For example, consider using a Magento 2 Maintenance Mode extension to customize your maintenance page further.
What steps should I take to add a “Coming Soon” or “Under Construction” message while my site is in maintenance mode?
You need to follow these steps below to add a “Coming Soon” or “Under Construction” message during maintenance mode:
-
Create an “under construction” HTML page and upload it to your Magento root directory.
-
Update your .htaccess file to prioritize the index.html file over index.php.
This way, visitors will see the maintenance page, but you can still access the site for development purposes by appending /index.php to the URL.
Is it possible for certain IP addresses to access the Magento site while it is in maintenance mode?
Yes, Magento 2 allows whitelisting specific IP addresses. Developers or authorized users can continue working on the site while others see the maintenance page.
Can I schedule maintenance periods in advance?
Yes, The Magento 2 Custom Maintenance Page allows you to schedule maintenance periods in advance, giving you the flexibility to plan updates and repairs at convenient times for your business and customers.
How can I keep track of my product files and order numbers while my site’s in maintenance mode?
During maintenance, Magento 2’s backend remains fully operational, allowing you to manage product files and order numbers. Take advantage of this time to update product descriptions, images, and stock levels, or process pending orders. You should also remember to back up your data before maintenance to prevent any loss of information.
Can I track visitor interactions during the maintenance period?
Yes, the maintenance page includes analytics tracking functionality, enabling you to monitor visitor interactions, such as subscription form submissions or social media clicks, and gain insights into user behavior even when your store is temporarily offline.
Is it possible to update my Magento 2 version while in maintenance mode, and what’s the impact?
Yes, it’s possible to update Magento 2 while in maintenance mode. Thanks to this, you can access new features and security updates. However, thoroughly test the update on a staging environment first. Be aware that updating may affect your account, so proceed with caution.
Is the maintenance page optimized for SEO? Absolutely! The maintenance page is SEO-friendly, allowing you to optimize meta tags, keywords, and content to ensure visibility and relevance during downtime.
What methods can be applied to use extensions as a marketing solution on the maintenance page of Magento 2?
Extensions can add marketing elements to your maintenance page. Consider features like countdown timers, subscription forms, or social media links to engage users about your services, even when you’re under maintenance.
How do I ensure a positive user experience during maintenance?
To provide a good user experience during maintenance, you should consider the following things:
-
Clearly explain the situation on your maintenance page.
-
Apologize for any inconvenience caused and provide a timeframe for completion.
-
Ensure the site will be back soon
-
Make sure that your page layout is responsive and consistent with your brand’s theme.
-
Add a customizable touch, such as a “thoughts” or “suggestions” box, to attract your users.
-
Select reliable Magento hosting, which helps to enhance site performance and security during maintenance, ultimately improving the overall user experience.
Wrapping it up
Creating a Magento 2 Custom Maintenance page will make users’ work tasks more manageable. Whenever your site needs to be updated or fixed, our free maintenance module will help you navigate customers to a maintenance mode page in a short period on the admin panel. Even the non-developers will be able to take the initiative to create this page without the interference of the developers or complex coding process.
Hence, the Better maintenance extension does provide a coming soon page which you can give customers some hints and notifications to attract buyers to visit the sites on the day it is released.
Table of content

Jacker is the Chief Technology Officer (CTO) at Mageplaza, bringing over 10 years of experience in Magento, Shopify, and other eCommerce platforms. With deep technical expertise, he has led numerous successful projects, optimizing and scaling online stores for global brands. Beyond his work in eCommerce development, he is passionate about running and swimming.
Related Post

7 mins read
|
06-30-2026

How to Enable DebugView in GA4 for your Magento 2 store - Mageplaza
Step-by-step guide to enabling GA4 DebugView for Magento 2 merchants — verify your GA4 events are firing correctly before trusting your data.
8 mins read
|
06-09-2026

Table Rate Shipping in eCommerce: A Practical Guide
Master Magento 2 Table Rate Shipping. Learn how to configure an accurate, automated shipping matrix to optimize your checkout and boost sales.
10 mins read
|
06-02-2026
3 mins read
|
05-30-2026

Google Analytics Ecommerce Reports for Magento Merchants: What to track & Tips
A practical guide to GA4 ecommerce reports for Magento merchants, covering what to track, how to read each report, and specific tips to turn data into revenue decisions.
18 mins read
|
05-20-2026
5 mins read
|
07-30-2026
7 mins read
|
06-30-2026
How to Enable DebugView in GA4 for your Magento 2 store - Mageplaza
Step-by-step guide to enabling GA4 DebugView for Magento 2 merchants — verify your GA4 events are firing correctly before trusting your data.
8 mins read
|
06-09-2026
Table Rate Shipping in eCommerce: A Practical Guide
Master Magento 2 Table Rate Shipping. Learn how to configure an accurate, automated shipping matrix to optimize your checkout and boost sales.
10 mins read
|
06-02-2026
3 mins read
|
05-30-2026
Google Analytics Ecommerce Reports for Magento Merchants: What to track & Tips
A practical guide to GA4 ecommerce reports for Magento merchants, covering what to track, how to read each report, and specific tips to turn data into revenue decisions.
18 mins read
|
05-20-2026