


2 mins read
|
07-30-2026
How to Create a Countdown Timer to Boost Sales in Magento 2
Vinh Jacker
|
03-17-2025

Let’s learn how to easily create, customize, and display a countdown timer in Magento 2. Maximize your store profits, increase conversion rates, and enhance promotion strategies with eye-catching and motivating timers.
Why create a countdown timer?
Countdown timers can be a powerful tool for online stores to boost sales and user engagement. Here are some reasons why you should create a countdown timer for your store:
-
Create a sense of urgency: Countdown timers create a sense of scarcity, which can motivate customers to complete their purchases before the time runs out. This can be particularly effective for limited-time offers, flash sales, or product launches.
-
Increase conversion rates: By highlighting the limited time available for a specific offer, countdown timers can nudge customers who are on the fence about making a purchase to take action.
-
Boost excitement and engagement: Countdown timers can add a sense of excitement and anticipation to your website, which can keep customers engaged and coming back for more.
-
Highlight product availability: Timers can be used to indicate when a product will be back in stock or when pre-orders will close. This can be helpful for managing customer expectations and generating interest.
-
Improve perceived value: By emphasizing the limited time of an offer, countdown timers can make your products or services seem more valuable.
Notes when using countdown timers
- Be transparent: Make sure the timer accurately reflects the remaining time for the offer. Don’t use misleading tactics.
- Use them strategically: Don’t overuse countdown timers, as this can lose their effectiveness.
- Target the right audience: Use timers for offers that are relevant to your target audience.
- Combine with a strong call to action: Clearly tell customers what you want them to do before the timer runs out (e.g., “Add to cart” or “Shop Now”).
How to create a countdown timer on Magento 2?
The Magento 2 Countdown Timer extension enables store owners to easily customize and display attractive discounts on various pages, naturally motivating shoppers to place more orders in a short period of time.
To create a countdown timer, first and foremost, you need to download the extension, then log in to the admin panel, and follow the instructions below.
Navigate to Mageplaza > Countdown Timer > Manage Rules. This is where you make a new timer and edit created ones.
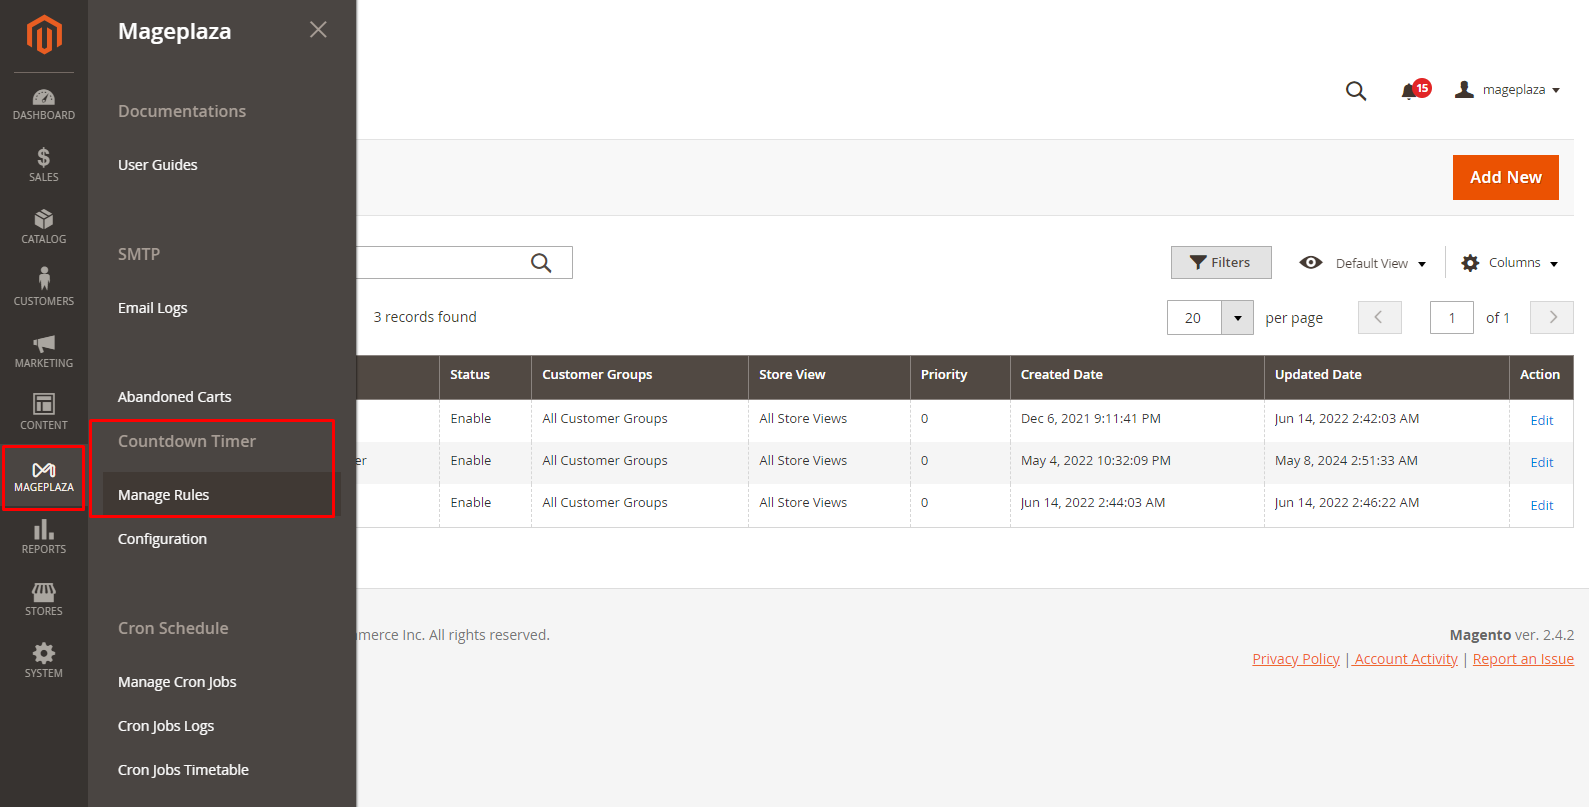
Now, click the Add New button on the top right corner.
General section
In the first part, you need to fill out these fields.

- Name: Provide a name for your timer (mandatory)
- Status: Choose
Enableto display it in the storefront - Store Views: Select the store in which the Countdown Timer is displayed (you can choose one or multiple stores)
- Customer Groups: Pick the customer group that can see the timer (you can also choose various groups at the same time)
-
Apply for: Decide how the Countdown Timer will be applied. There are 4 options:
- All Products with Special Price: Countdown Timer is displayed on all products with special price at Frontend.
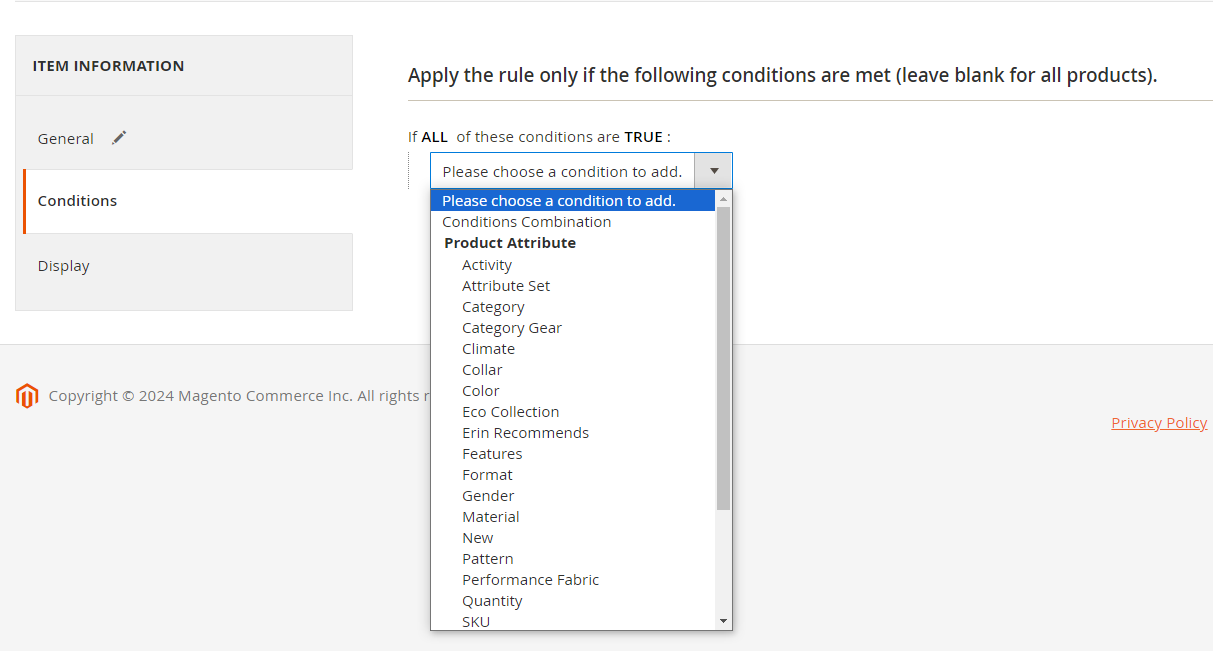
- Specific Products with Special Price: Choose to apply to each product with special price. When choosing this, the system will show another section called
Conditions. Here, you can set conditions to identify the products you want to apply the timer.
- Inherit condition from Catalog Rules: The system will automatically inherit previous conditions you made from the catalog rule and show another field: Select
Catalog Price Rulefield. Now, you can quickly choose any option without having to configure it from the beginning.

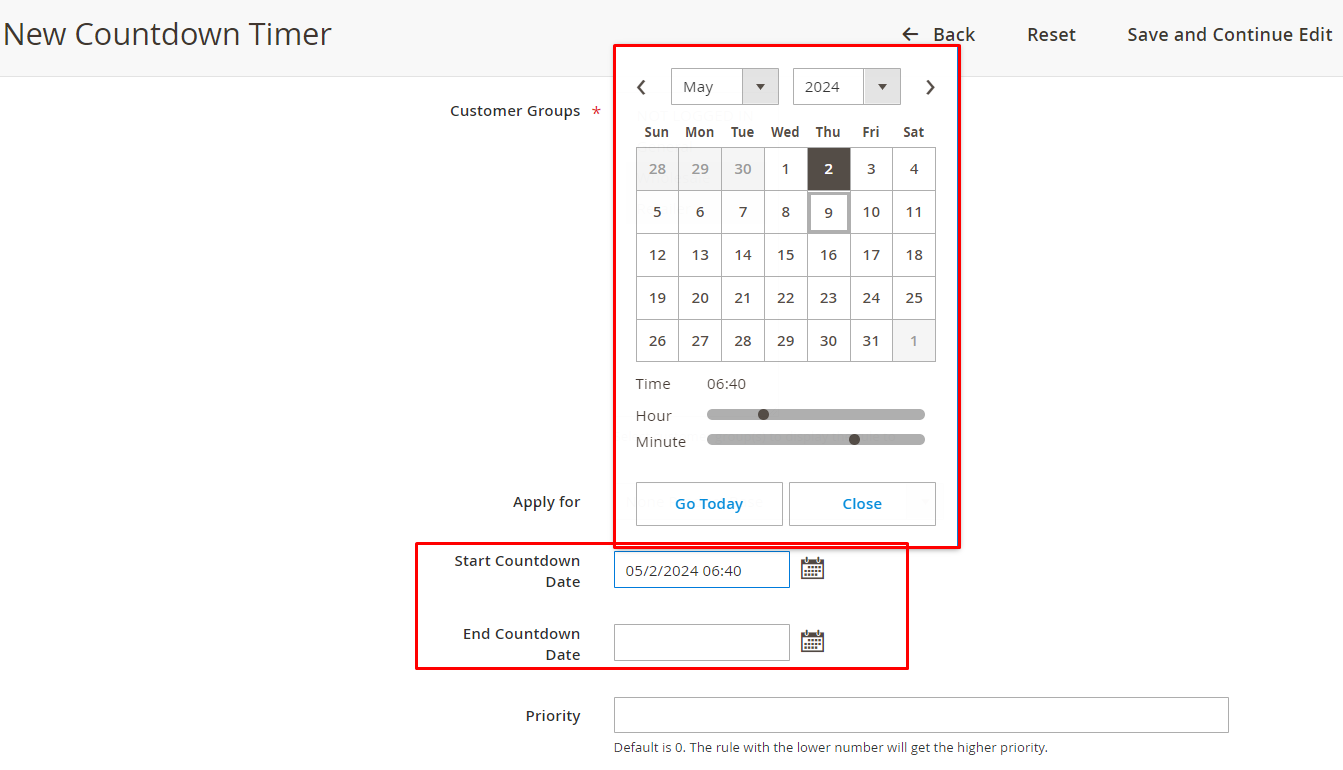
- None Product Base: not applicable based on product, the position to show the clock will depend on where you put the widget. If you choose this option, 2 more fields will be shown:
- Start countdown date
- End countdown dates
- Priority: The default value is 0, which is the highest priority level. In this case, the smaller the number, the higher its priority when showing at the frontend.
Display section
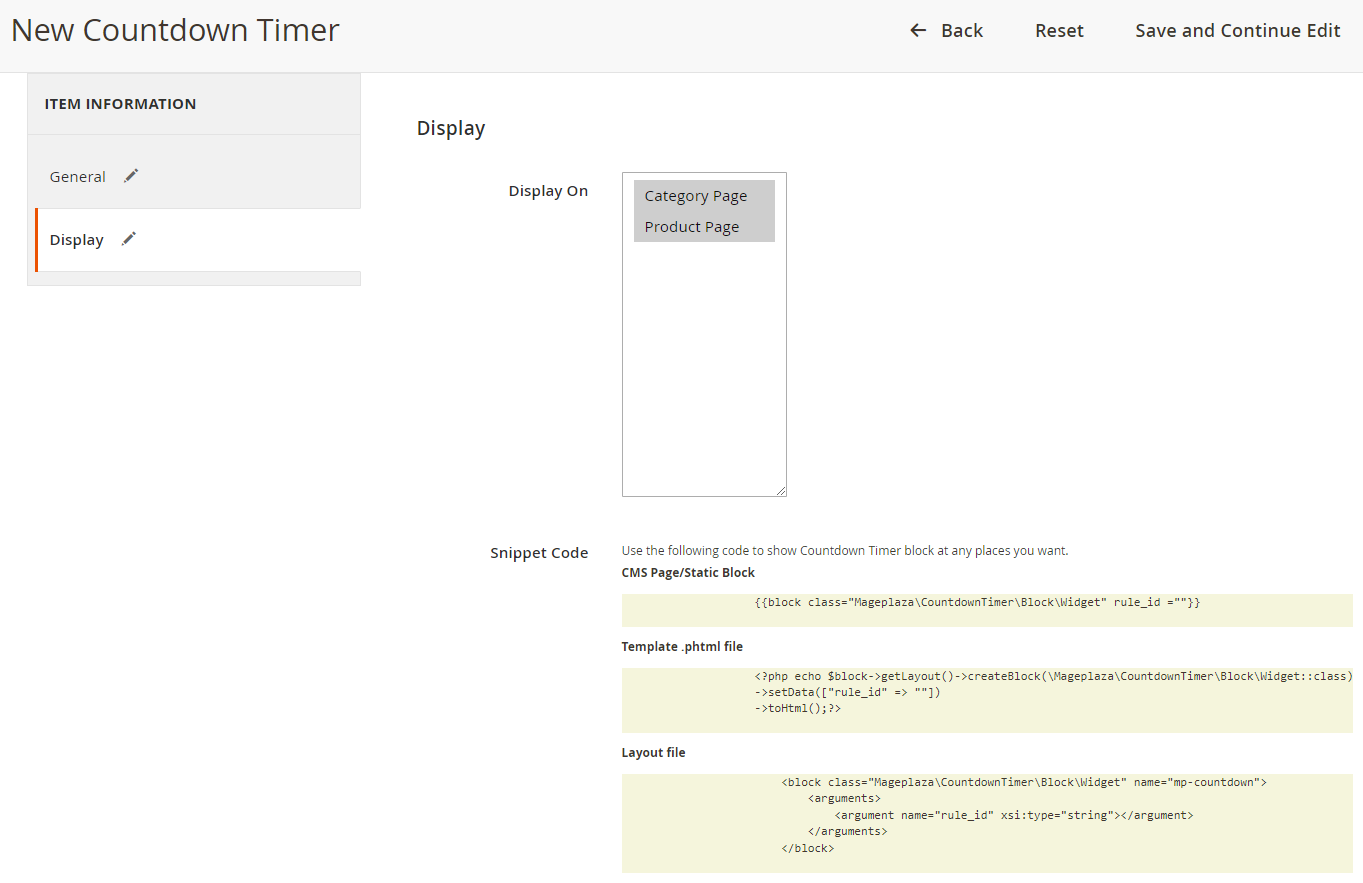
- Display On: Choose where you want to display the timer in frontend: Category or Product Page
-
Snippet Code: display the code segment.
- CMS Page/Static Block: Copy and paste the code into the page in which you want to display the Countdown Timer
- Phtml file file: Copy and paste the code into the .phtml file in which you want to display the Countdown Timer
- Layout file: Copy the code and insert it into Magento’s .xml file or other extensions you want to display Countdown Timer.
- Before Starting Countdown:
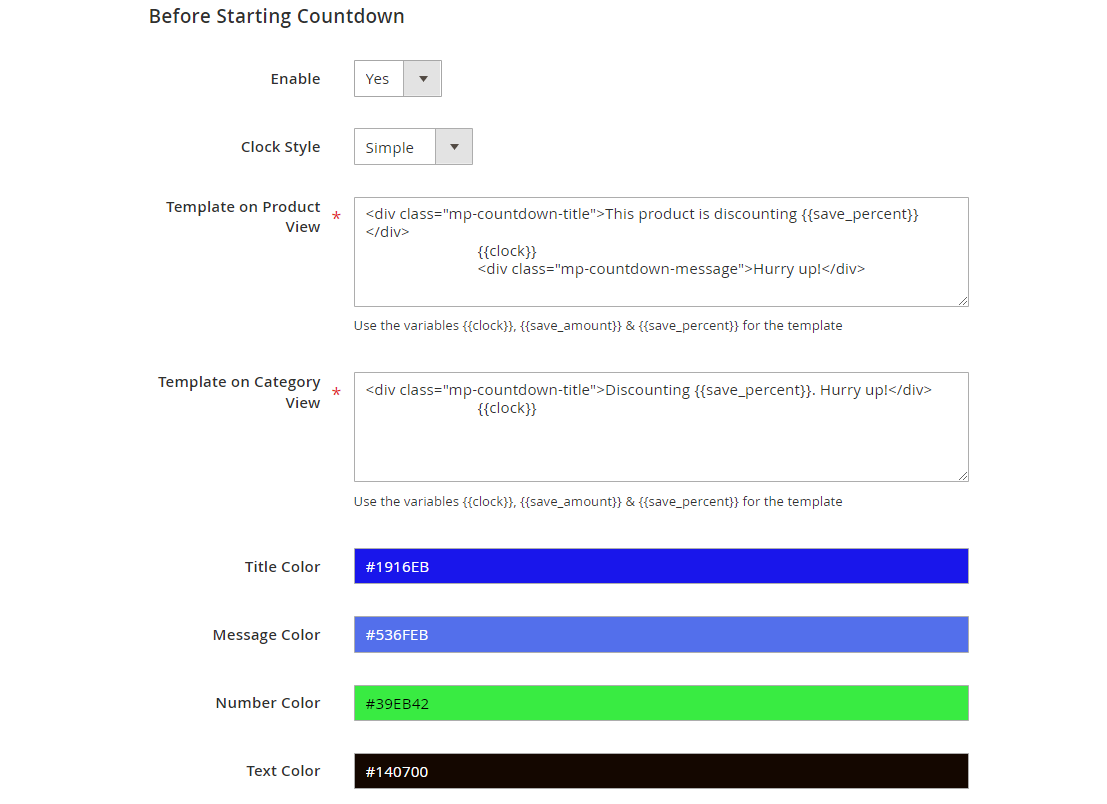
- Select
Yesin theEnablefield to allow displaying the countdown timer before product promotion starts. - Choose 1 of 5 available timer types: Simple, Circle, Square, Stack, and Modern.
- Template on Product View: Insert the variables , & , allow showing countdown timer at Product View before sales with the default template: ```
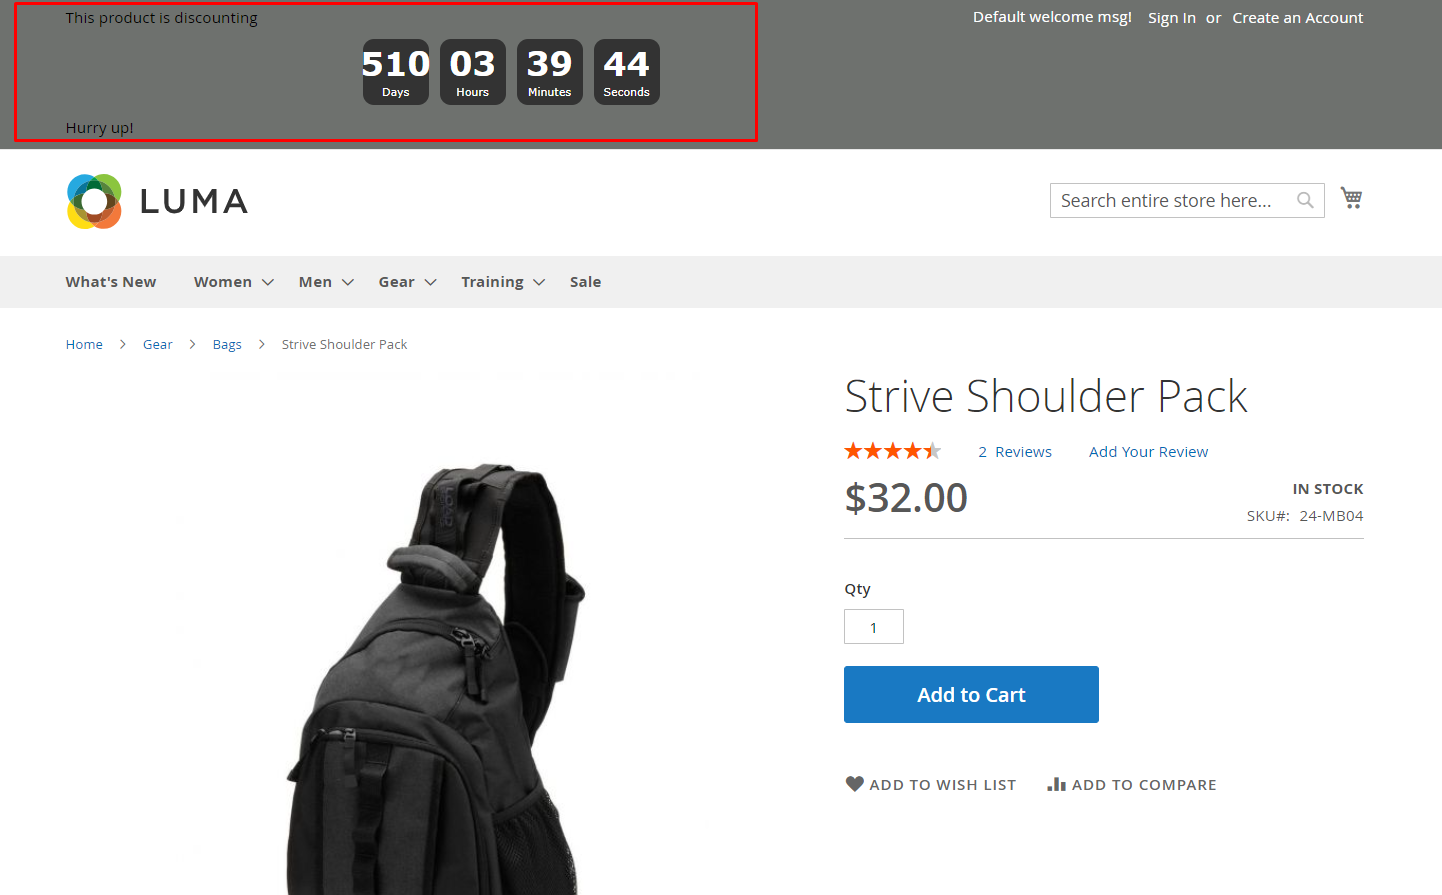
This product is discounting
<div class="mp-countdown-message">Hurry up!</div> ```
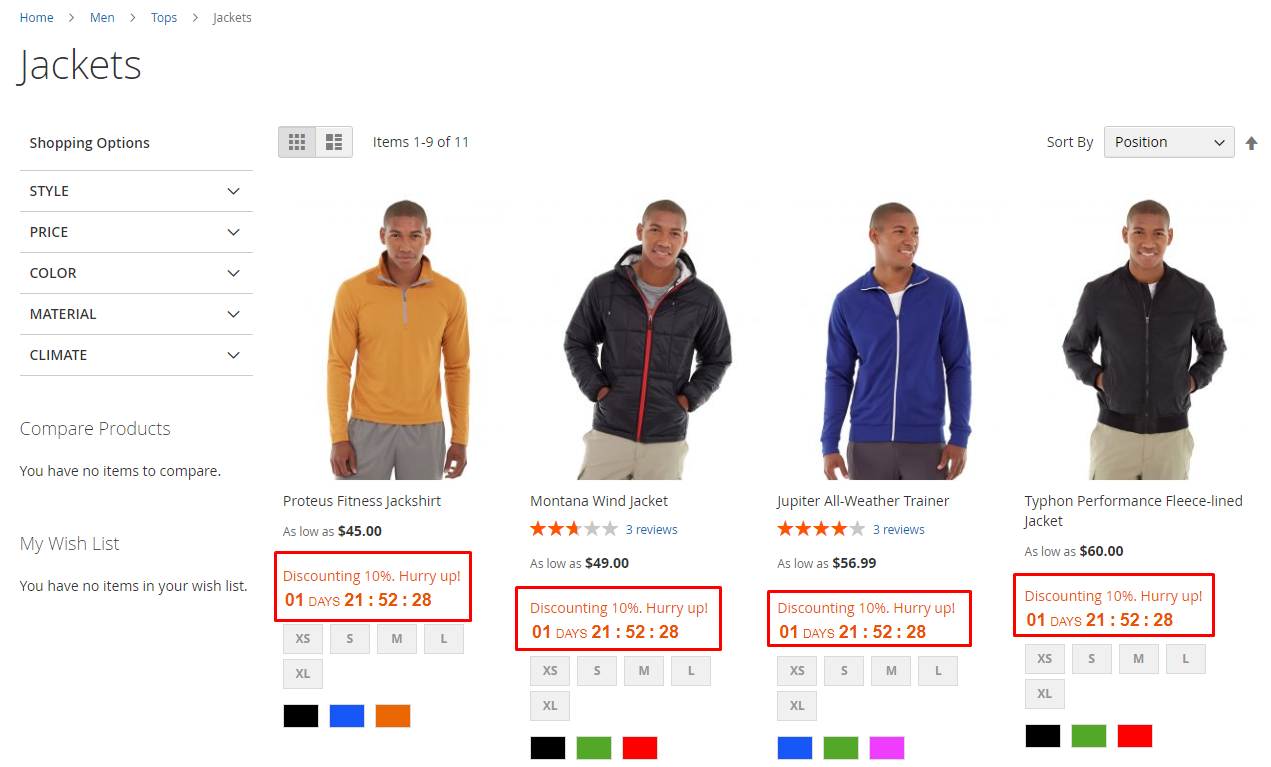
- Template on Category View: Insert the variables , & allow showing countdown timer at Category View before sales with the default template: ```
Discounting . Hurry up!
``` * : Show clock * : Show discounted amount * : Show discounted percentage
- Then, just choose the color you want for the title, message, background, number, and text
- Time Remaining Countdown
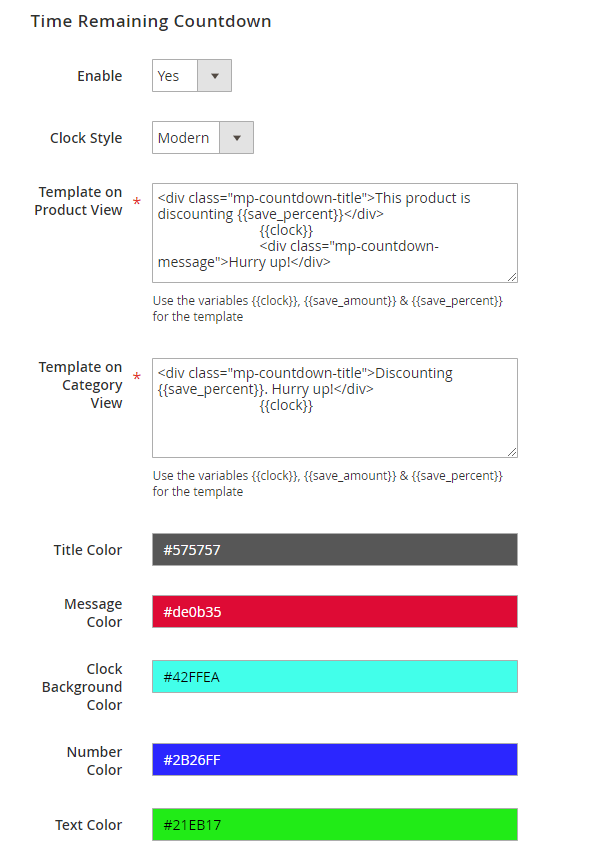
- Select Yes to display the Countdown Timer while the product is on the discount program
- The rest are similar to Before Starting Countdown
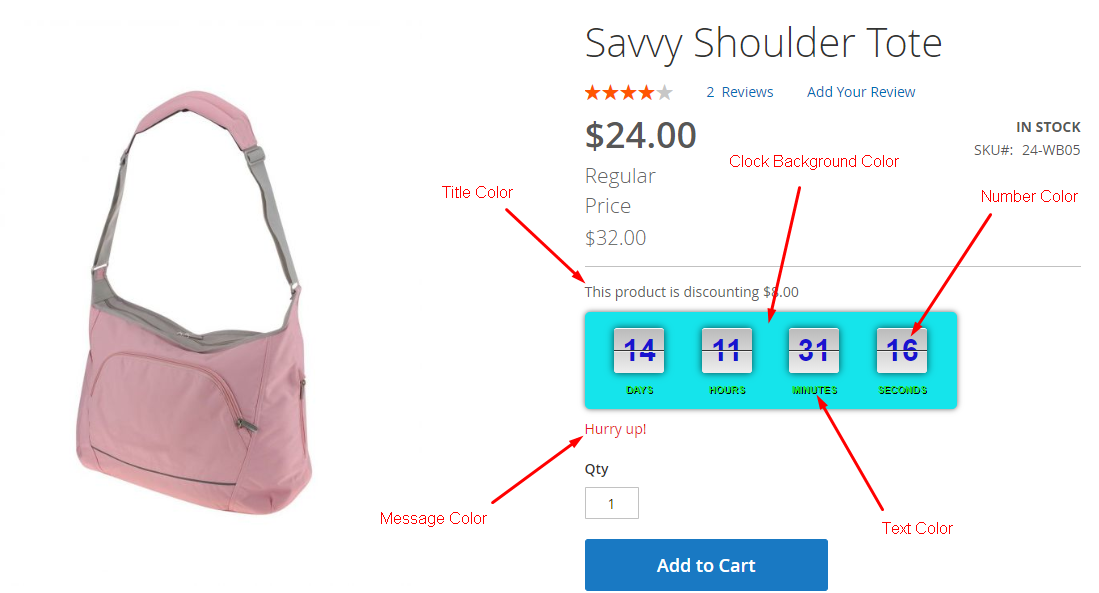
Here’s how a countdown timer looks like on storefront:
Wrap up
A successful campaign is not just about offering great deals but also how you attract people to notice your incentives. A countdown timer, designed with appealing visuals can absolutely draw customers’ attention. Moreover, the strong message in the timer would be a great motivation as well.
So, why not take advantage of countdown timer right away?
Table of content

Jacker is the Chief Technology Officer (CTO) at Mageplaza, bringing over 10 years of experience in Magento, Shopify, and other eCommerce platforms. With deep technical expertise, he has led numerous successful projects, optimizing and scaling online stores for global brands. Beyond his work in eCommerce development, he is passionate about running and swimming.
Related Post

7 mins read
|
06-30-2026

How to Enable DebugView in GA4 for your Magento 2 store - Mageplaza
Step-by-step guide to enabling GA4 DebugView for Magento 2 merchants — verify your GA4 events are firing correctly before trusting your data.
8 mins read
|
06-09-2026

Table Rate Shipping in eCommerce: A Practical Guide
Master Magento 2 Table Rate Shipping. Learn how to configure an accurate, automated shipping matrix to optimize your checkout and boost sales.
10 mins read
|
06-02-2026
3 mins read
|
05-30-2026

Google Analytics Ecommerce Reports for Magento Merchants: What to track & Tips
A practical guide to GA4 ecommerce reports for Magento merchants, covering what to track, how to read each report, and specific tips to turn data into revenue decisions.
18 mins read
|
05-20-2026
2 mins read
|
07-30-2026
7 mins read
|
06-30-2026
How to Enable DebugView in GA4 for your Magento 2 store - Mageplaza
Step-by-step guide to enabling GA4 DebugView for Magento 2 merchants — verify your GA4 events are firing correctly before trusting your data.
8 mins read
|
06-09-2026
Table Rate Shipping in eCommerce: A Practical Guide
Master Magento 2 Table Rate Shipping. Learn how to configure an accurate, automated shipping matrix to optimize your checkout and boost sales.
10 mins read
|
06-02-2026
3 mins read
|
05-30-2026
Google Analytics Ecommerce Reports for Magento Merchants: What to track & Tips
A practical guide to GA4 ecommerce reports for Magento merchants, covering what to track, how to read each report, and specific tips to turn data into revenue decisions.
18 mins read
|
05-20-2026