


7 mins read
|
06-30-2026
How to add Google Analytics 4 code to Magento 2?
Vinh Jacker
|
04-15-2024


In eCommerce, having accurate data isn’t just a bonus—it’s the backbone of your business decisions. Without clear insights into things like traffic sources, bounce rates, or session times, how can you know what’s working and what isn’t? Data reports help you fine-tune your marketing strategies and understand what keeps customers coming back.
For years, Google Analytics has been the go-to tool for gathering these insights. It’s reliable, easy to use, and trusted by businesses around the world. But with Universal Analytics being retired, many store owners are scrambling to figure out what’s next.
That’s where Google Analytics 4 (GA4) comes in. Designed for the future of analytics, GA4 offers smarter tracking, better insights, and a more modern approach. But let’s be honest—some people haven’t given it the chance it deserves, assuming it’s too complicated to set up.
But trust us, it’s not. In fact, adding GA4 to your Magento 2 store is easier than you think, especially with the help of a Google Analytics 4 extension. This guide will provide clear steps for effortlessly integrating GA4 with your Magento 2 store.
How to add Google Analytics 4 to Magento 2
Google Analytics is an essential tool for businesses aiming to make data-driven decisions and improve conversion rates. With over 56.5% of websites worldwide relying on it, it’s clear how valuable it is for tracking and analyzing online traffic.
If you’re managing a Magento store and want to gain deeper insights into customer behavior, integrating Google Analytics 4 (GA4) is the way forward. This guide will show you exactly how to set up GA4 for Magento 2.
Method 1: Add Google Analytics 4 to Magento 2 manually
Step 1. Set Up a Google Analytics Property
#1. Log in to your Google account and navigate to Google Analytics.
If you don’t already have an account, signing up is quick and free. Simply visit the Google Analytics homepage, click the Get Started Today button, and press Start measuring to create your GA4 account. From there, you can configure your new property and begin tracking valuable insights for your website.

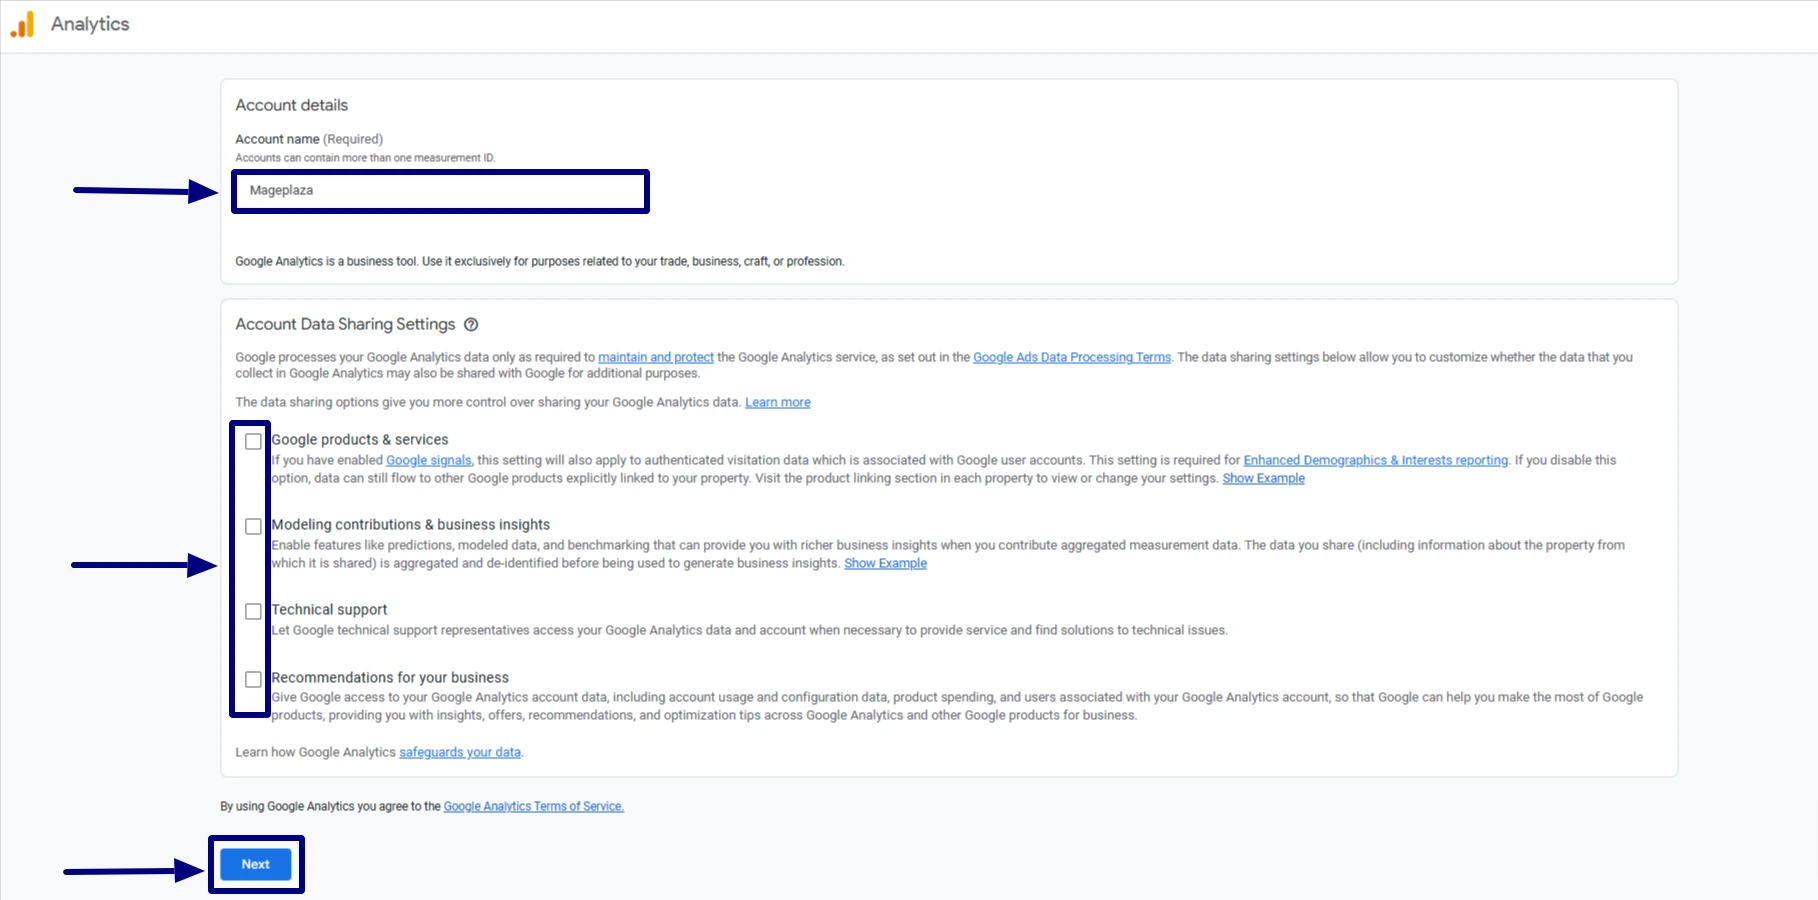
#2. Provide an account name that makes it easy to identify your account within the Analytics dashboard. This could be your company name, website name, or any descriptive label that suits your business needs.
#3. Next, customize your Account Data Sharing Settings by checking or unchecking the relevant boxes. These options allow you to control how your tracking data is shared with Google. If you prefer, you can uncheck all the boxes—this won’t affect your ability to integrate Google Analytics with Magento.
Once you’ve configured the settings to your preference, click Next to move to the next step.
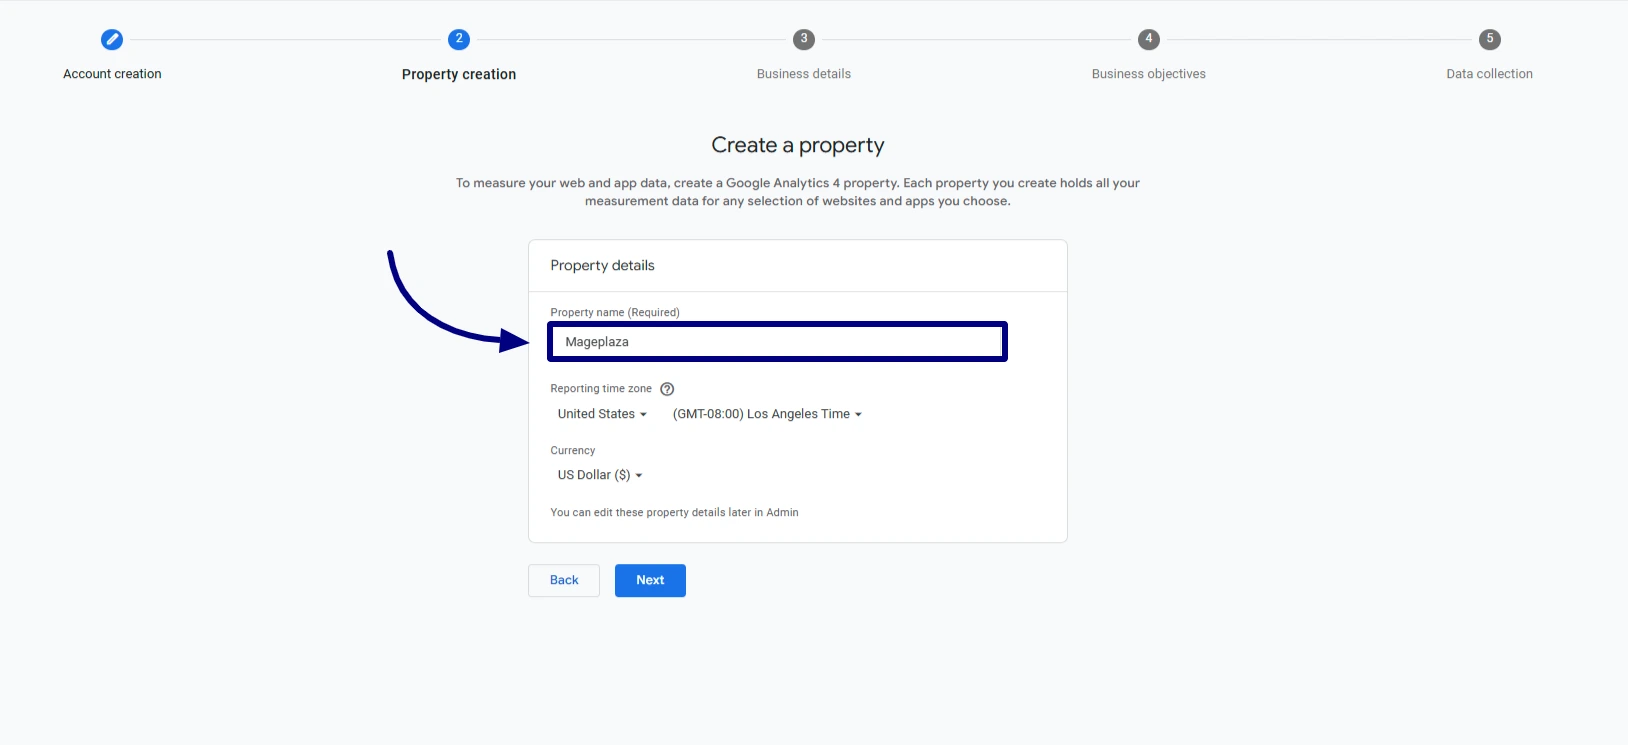
#4. In the Property creation section, enter a name for your Google Analytics property, such as your website or business name, to help you easily identify it. Then, set your reporting time zone and currency to match your business location and transaction preferences.
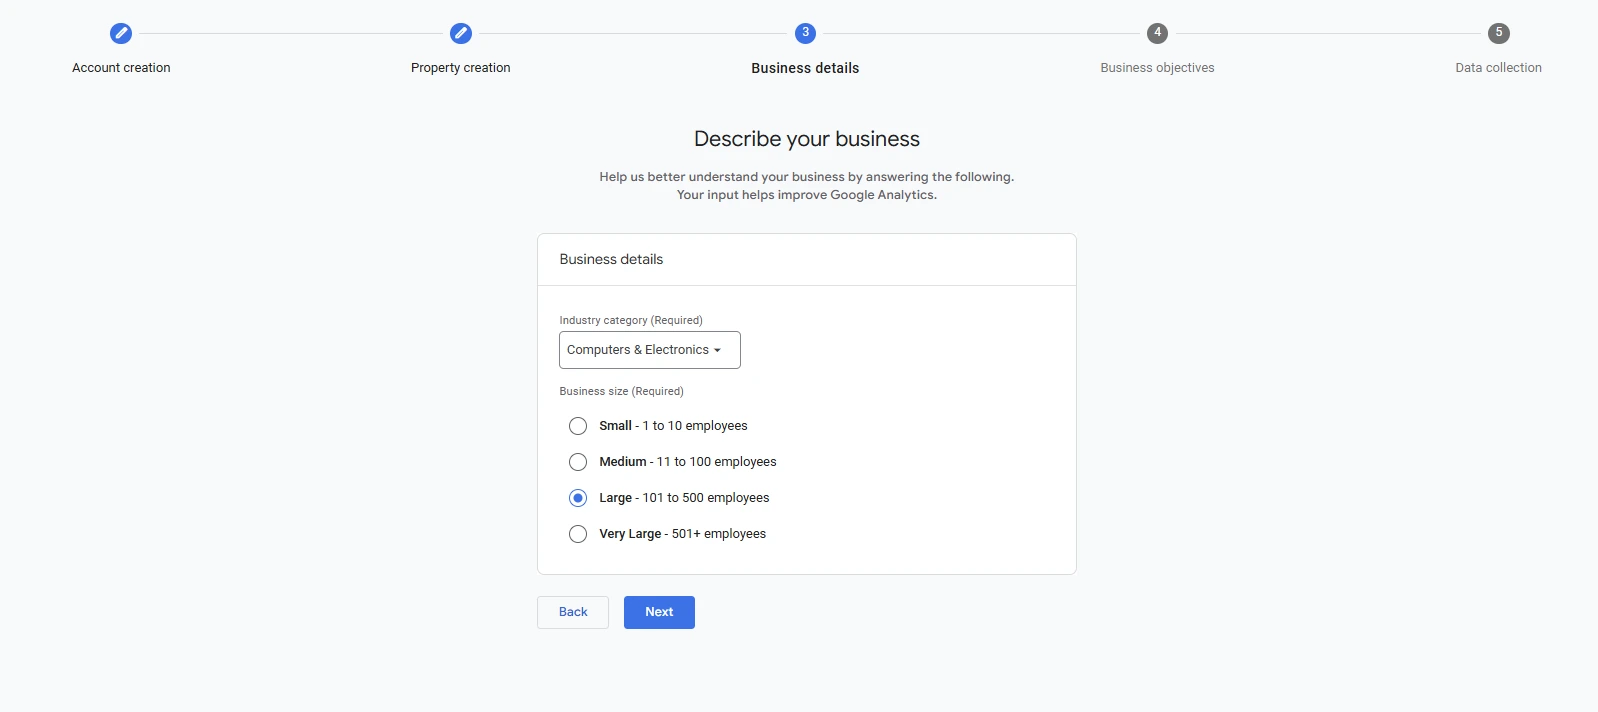
#5. Click Next to move on to Business details. Then, select your industry and business size to allow GA4 to provide insights tailored to your business.
#6. Click Next to move to the next step. Here, choose your business objectives to outline how you plan to use Google Analytics, such as tracking customer engagement, boosting sales, or measuring traffic. Remember, you can choose multiple answers in this section.

#7. Once you’ve made your selections, click Create to finalize your setup.
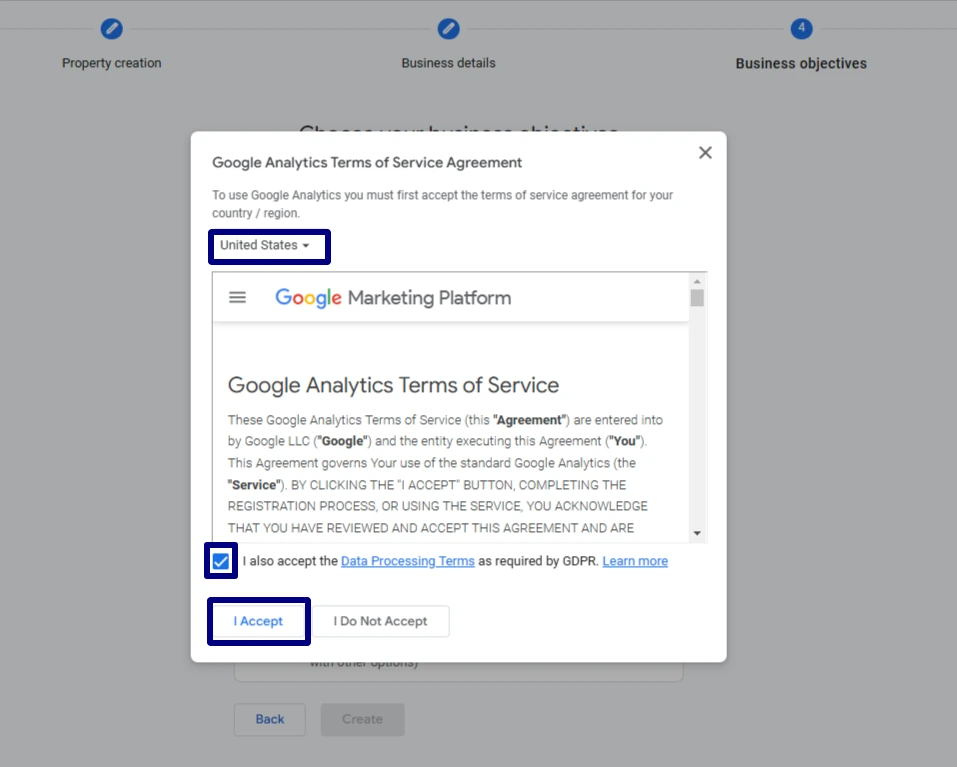
A Google Analytics Terms of Service Agreement popup will appear. Select your country, review the data processing terms, and click I Accept to proceed.
#8. Next, you need to set up a data stream, which tells GA4 where to collect data from. Since you’re integrating with a website, choose Web as your platform. This step ensures Google Analytics 4 can track data from your Magento store effectively.
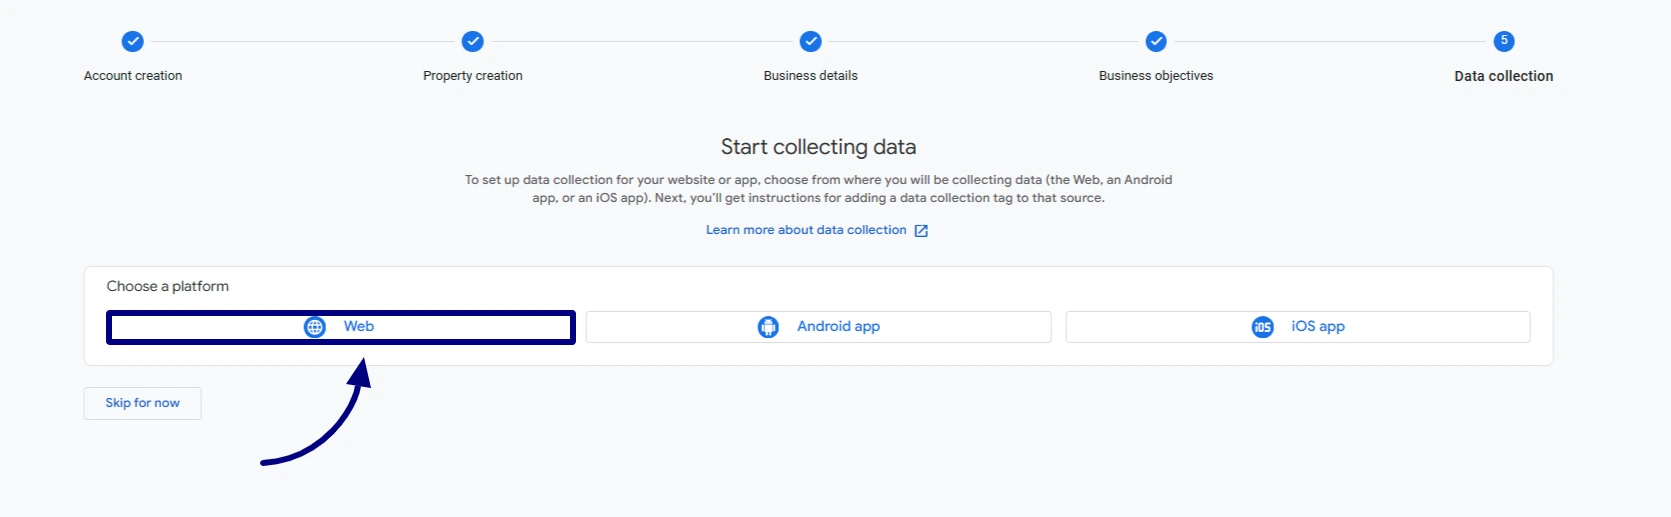
#9. Enter your Website URL and a descriptive Stream Name.

#10. Finally, click Create & continue to complete the setup. Congratulations! You’ve successfully created a Google Analytics 4 property and data stream.
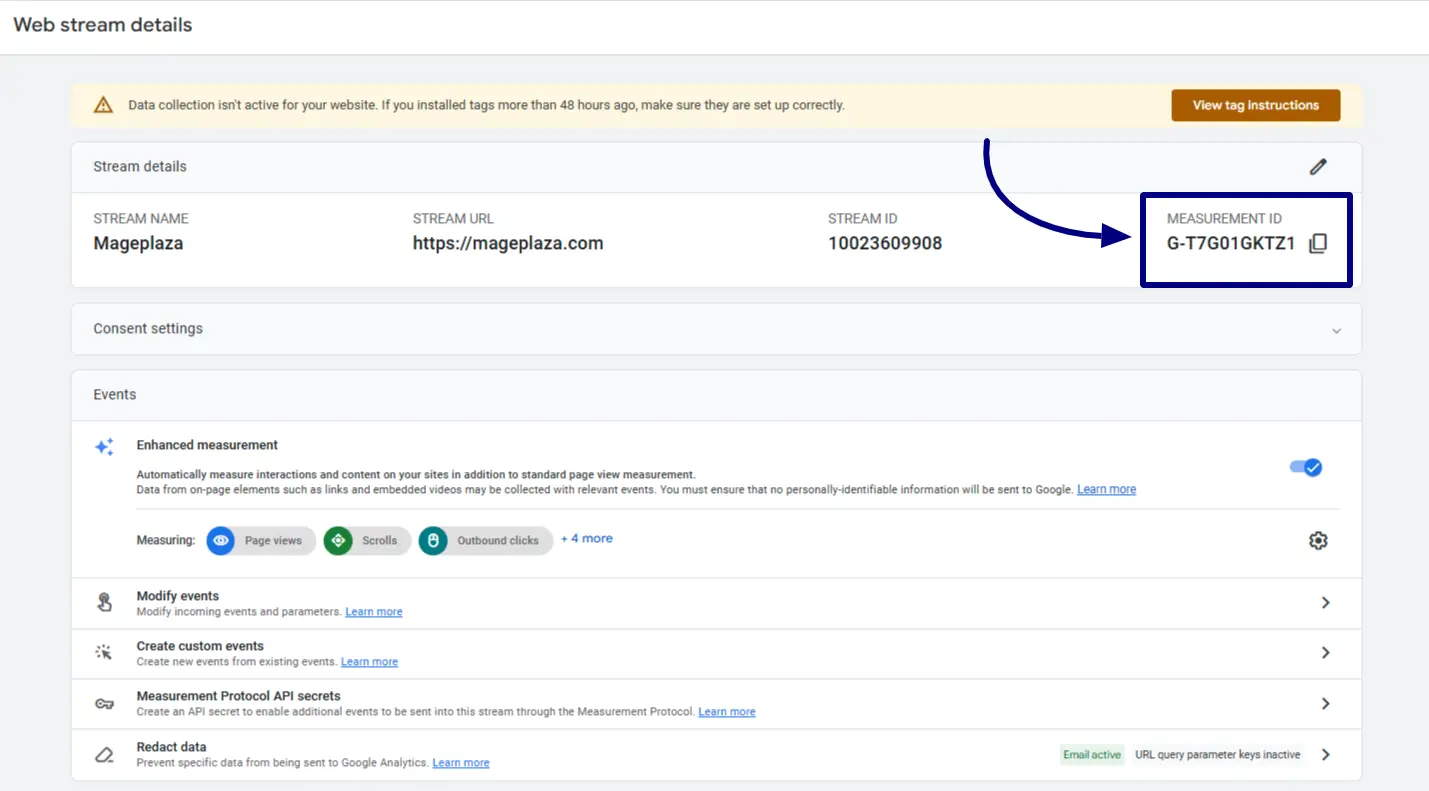
Step 2: Get Measurement ID
After setting up a GA property, you’ll be redirected to the Web Stream Details page. Here, you’ll find your Measurement ID (e.g., G-XXXXXXXXXX), which is essential for integration later.
If you already have an existing property, simply login to your GA account, go to the admin panel and click on Data Streams. Select the relevant data stream, and you’ll see the Measurement ID displayed there.
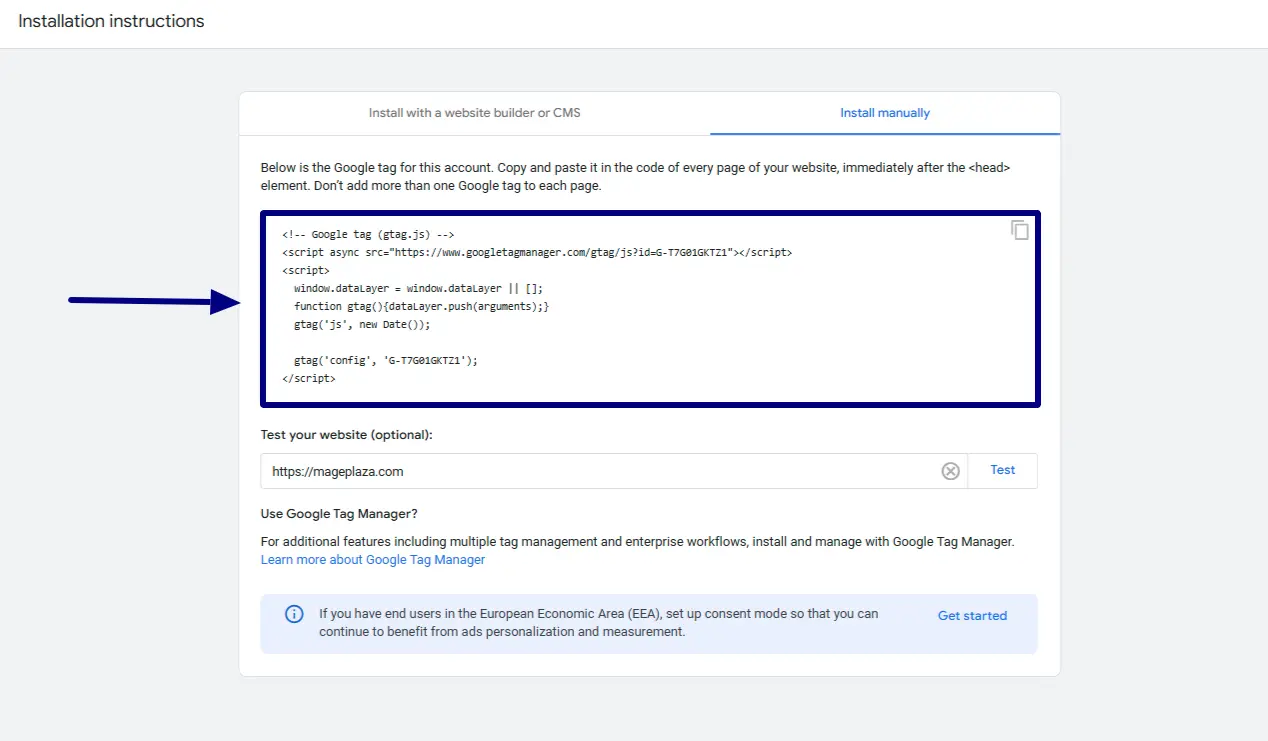
In the Google tag section, click on View tag instructions and copy the code snippet inside Installation Instructions > Install manually > Google tag (gtag.js). Head over to the Magento admin to add Google Analytics in Magento.
Step 3: Add GA4 to Magento 2 store
After setting up GTM, the next step is to integrate Google Analytics 4 (GA4) with Magento 2.
Note: The Mageplaza Google Tag Manager extension also supports Google Analytics 4, so both work in the same way.
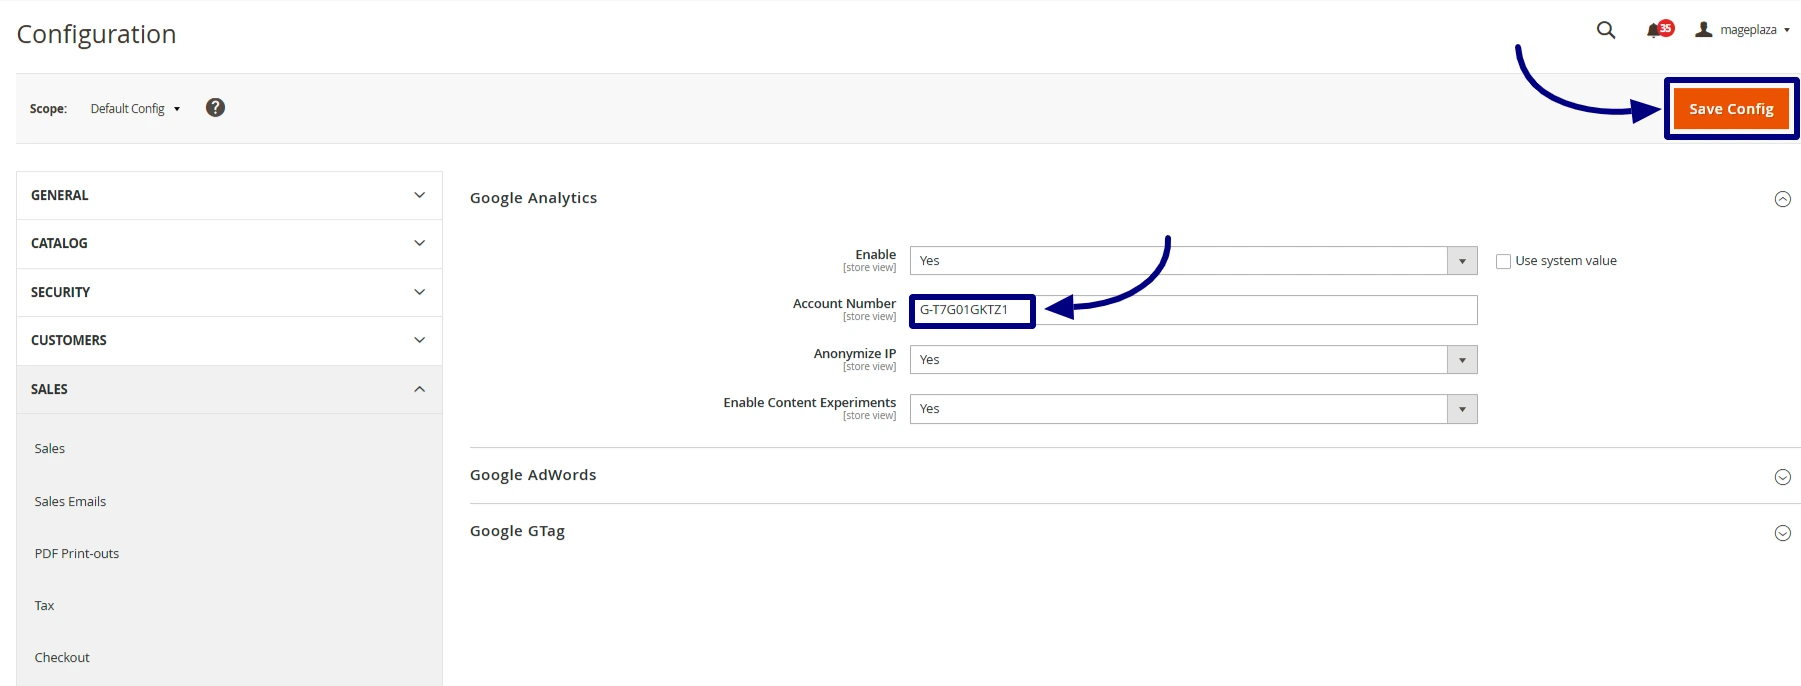
Login to the admin panel > Stores > Configuration > Sales > Google API. Expand the Google Analytics tab, uncheck Use system value, and set Enable to Yes. Then, enter your Measurement ID in the Account Number field and click Save Config.
Optionally, you can enable Anonymize IP to hide visitor IP addresses and set Enable Content Experiments to Yes if you want to use eCommerce tracking with A/B testing.
If you’re using a GA4 property, you’ll need to add the global site tag to your website’s <head> section. Inserting the code at the beginning of the head section ensures that events are tracked, even if users stop the page from loading prematurely.
To add Google Analytics in Magento using the global site tag, go to Content > Design > Configuration in the Magento admin. In the Action column on the Design Configuration page, click the Edit link next to the store view you want to configure.
Scroll down to the HTML Head section, expand it, and paste the GA4 site tag into the Scripts and Style Sheets section.
Click Save Configuration, and don’t forget to refresh the Magento cache to apply the changes on the frontend.
Step 4: Verify that Google Analytics is working
Open the Google Analytics dashboard and navigate to the Realtime overview section of your newly created property. Here, you’ll be able to track live visitors to your site and monitor their interactions in real-time.
If you can’t see any live visitors on your Google Analytics dashboard, try these troubleshooting steps for Magento analytics tracking:
- Disable any ad blockers or analytics blocking features in your browser, as these can prevent the tracking code from firing properly.
- Verify that the Google Analytics code in the Magento backend is correctly implemented, especially the GA4 or Measurement ID.
- Flush the Magento store cache to ensure the changes take effect and the updated tracking code is active on the frontend.
Method 2: Add Google Analytics 4 to Magento 2 by using the extension
Step 1: Set up a Google Analytics property
Follow the same steps as in method 1.
Step 2: Get Measurement ID
After setting up a GA property, you’ll be redirected to the Web Stream Details page. Here, you’ll find your Measurement ID, which is essential for integration later.
If you already have an existing property, simply login to your GA account, go to the admin panel and click on Data Streams. Select the relevant data stream, and you’ll see the Measurement ID displayed there.
Step 3: Create a GTM container
Since Google Tag Manager (GTM) will be used to integrate Google Analytics 4 with Magento, you’ll need to set up GTM as well. If you already have a GTM account, you can skip to the next step. If not, follow these instructions to set one up:
Go to the Google Tag Manager website and click Create Account button.
Next, fill in the required fields, including Account Name, Country, Container Name, and Target platform.
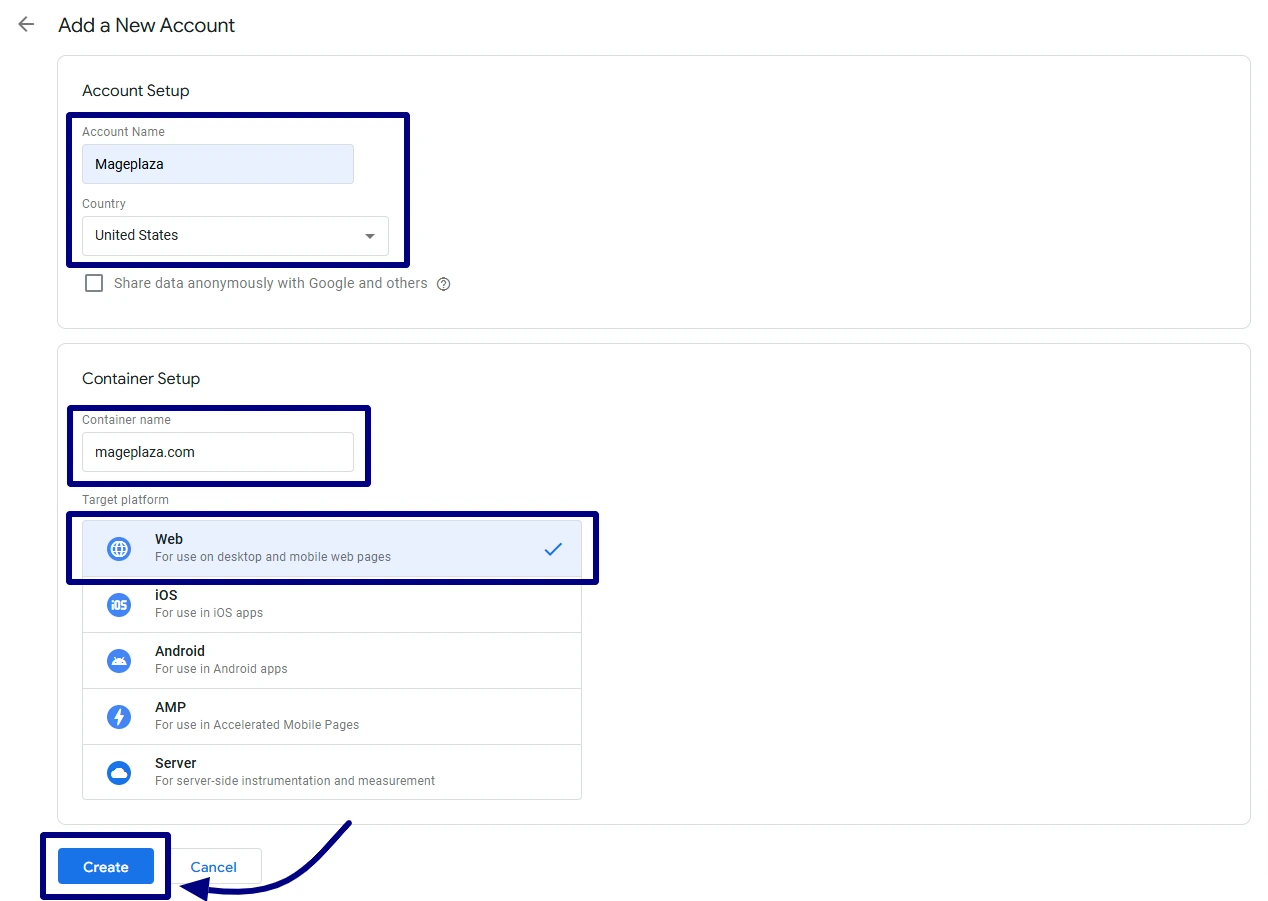
Once completed, click Create to set up your account and container.
Remember: The container name serves as a descriptive title that helps link the container to your website.
Click Create, review the GTM Terms of Service, and click Yes to accept.
Step 4: Locate the Account and Container ID
In addition to the Google Analytics Measurement ID, you’ll also need to gather tracking IDs from Google Tag Manager (GTM). To do this, simply login to the GTM homepage and select the container you plan to use for tracking.
- Account ID: To find the Account ID, go to the Workspace tab in your container. The Account ID will be visible in the browser address bar, right after /accounts/.
- Container ID: The Container ID can be easily found in several places, including right after you log into your GTM account. It is displayed at the top of the container page, typically in the format of a string like “GTM-XXXXXX.”
Step 5: Add your GTM codes to Magento 2 store
We use Mageplaza Google Analytics 4 to simplify the integration with GA4 and Google Tag Manager. This module allows merchants to track customer behavior, monitor store performance, and evaluate the success of marketing and promotional efforts.
Log into your Magento 2 store and go to Stores > Configuration > Mageplaza > Google Tag Manager to configure the GA4 extension.
In this step:
- Select Yes in the Enable field to activate the extension.
- Paste the Container ID you obtained earlier into the Google Tag ID field.
- Click Save Config to apply the changes.
Step 6: Check GTM on your site
Verifying whether Google Tag Manager (GTM) has been successfully added to your store is a crucial step to ensure your setup is functioning as intended. Here are two simple methods to check:
Method 1: Using View Source
- Open your website’s homepage in a browser.
- Press CTRL + U (or Command + Option + U on Mac) to view the page source.
- Press CTRL + F (or Command + F on Mac) to open the search bar and type GTM.
- If you locate the GTM code snippet (e.g., GTM-XXXXXX) in the source code, congratulations! Google Tag Manager has been successfully added to your site.
Method 2: Using GTM Preview Mode
#1. Log in to your Google Tag Manager account and navigate to the Workspace tab.
#2. Click on the Preview button.
#3. Enter your site URL in the provided field and click Connect.
#4. If the configuration is correct, a confirmation message will appear, indicating that GTM is successfully connected and active on your site.
Common Mistakes to Avoid When Setting Up GA4 in Magento 2
Integrating Google Analytics 4 (GA4) into your Magento 2 store is a straightforward process, but there are a few common mistakes that can hinder your tracking efforts. Here are some pitfalls to watch out for and how to avoid them:
- Incorrect Measurement ID: Ensure the correct Measurement ID is used to avoid data tracking errors.
- Not Refreshing Cache: Many users forget to refresh the Magento cache after integrating GA4, causing the changes to not reflect on the frontend.
- Missing Privacy Compliance: Failing to enable Cookie Restriction Mode can lead to non-compliance with GDPR and CCPA.
- Skipping Debugging: Always verify the setup using Google Tag Assistant or GTM Preview Mode to ensure the tracking works correctly.
Important Privacy Considerations for Google Analytics
Integrating Google Analytics 4 (GA4) with Magento 2 is a powerful way to track customer behavior and optimize your store. However, it’s equally important to ensure that your setup complies with privacy regulations like the General Data Protection Regulation (GDPR) in the European Union and the California Consumer Privacy Act (CCPA) in the United States. Here’s what you need to know:
1 . Enable Cookie Consent
Both GDPR and CCPA require explicit user consent before collecting data through cookies or trackers. To comply:
- Use a cookie consent banner that explains what data is collected and why.
- Allow users to opt-in or opt-out of specific tracking categories, like analytics cookies.
- For Magento, consider integrating a cookie consent management module for easier compliance.
Additionally, enabling Cookie Restriction Mode in Magento will prevent Google Analytics from collecting visitor data unless users have explicitly accepted cookies. This ensures compliance with privacy regulations while respecting user consent.
2 . Anonymize IP Addresses
To comply with GDPR rules against collecting personally identifiable information (PII), activate the Anonymize IP option in Google Analytics. This ensures that only partial IP addresses are stored, reducing privacy risks.
3 . Include Privacy Disclosures
Your website’s privacy policy should explicitly outline your use of Google Analytics, including:
- The types of data collected.
- How the data is used.
- Whether it is shared with third-party services (like Google).
This transparency is vital for GDPR and CCPA compliance.
4 . Allow Data Access and Deletion Requests
Under GDPR and CCPA, users have the right to:
- Access their personal data.
- Request the deletion of their data.
Ensure your Magento store has processes in place to handle such requests promptly.
5 . Configure Data Retention Settings
In Google Analytics 4, you can set limits on how long user and event data are stored. Adjust these settings to align with privacy regulations:
- Go to Admin > Data Settings > Data Retention in Google Analytics.
- Set the retention period to the minimum necessary (e.g., 14 months) unless otherwise justified.
6 . Provide an Opt-Out Option
CCPA requires that users be able to opt out of having their data sold or shared. Include an opt-out link on your website and make it prominent. Google offers a GA opt-out browser add-on that you can direct users to as well.
7 . Review Data Transfers
If your data is shared across borders (e.g., stored in the US but collected from EU users), ensure you comply with GDPR cross-border data transfer rules, such as using Standard Contractual Clauses (SCCs) or Privacy Shield (if applicable).
Conclusion
Setting up Google Analytics 4 (GA4) in your Magento 2 store might seem daunting at first, but it’s easier than you think—and definitely worth the effort. Whether you go with a manual setup or use an extension, GA4 gives you the tools to understand your customers better, optimize your store, and make smarter business decisions. By following this guide, you’ll have everything you need to get started and ensure your setup runs smoothly. Don’t forget to test your integration and double-check privacy settings to keep things compliant and running flawlessly.
Now’s the perfect time to take your eCommerce analytics to the next level. Get started today and see the difference GA4 can make for your Magento store!
Table of content

Jacker is the Chief Technology Officer (CTO) at Mageplaza, bringing over 10 years of experience in Magento, Shopify, and other eCommerce platforms. With deep technical expertise, he has led numerous successful projects, optimizing and scaling online stores for global brands. Beyond his work in eCommerce development, he is passionate about running and swimming.
Related Post


How to Enable DebugView in GA4 for your Magento 2 store - Mageplaza
Step-by-step guide to enabling GA4 DebugView for Magento 2 merchants — verify your GA4 events are firing correctly before trusting your data.
8 mins read
|
06-09-2026

Table Rate Shipping in eCommerce: A Practical Guide
Master Magento 2 Table Rate Shipping. Learn how to configure an accurate, automated shipping matrix to optimize your checkout and boost sales.
10 mins read
|
06-02-2026
3 mins read
|
05-30-2026

Google Analytics Ecommerce Reports for Magento Merchants: What to track & Tips
A practical guide to GA4 ecommerce reports for Magento merchants, covering what to track, how to read each report, and specific tips to turn data into revenue decisions.
18 mins read
|
05-20-2026

5 Ways to Hide Products on Shopify (2026 Guide)
Explore the best 5 ways to hide products on Shopify. Learn how to manage visibility, protect pricing, and create a tailored shopping experience for buyers.
18 mins read
|
05-16-2026
7 mins read
|
06-30-2026
How to Enable DebugView in GA4 for your Magento 2 store - Mageplaza
Step-by-step guide to enabling GA4 DebugView for Magento 2 merchants — verify your GA4 events are firing correctly before trusting your data.
8 mins read
|
06-09-2026
Table Rate Shipping in eCommerce: A Practical Guide
Master Magento 2 Table Rate Shipping. Learn how to configure an accurate, automated shipping matrix to optimize your checkout and boost sales.
10 mins read
|
06-02-2026
3 mins read
|
05-30-2026
Google Analytics Ecommerce Reports for Magento Merchants: What to track & Tips
A practical guide to GA4 ecommerce reports for Magento merchants, covering what to track, how to read each report, and specific tips to turn data into revenue decisions.
18 mins read
|
05-20-2026
5 Ways to Hide Products on Shopify (2026 Guide)
Explore the best 5 ways to hide products on Shopify. Learn how to manage visibility, protect pricing, and create a tailored shopping experience for buyers.
18 mins read
|
05-16-2026