How to Add Shopify Personalization Option to Maximize Sales
In the booming era of e-commerce, personalizing the shopping experience has become a crucial key to attracting customers, increasing conversion rates, and boosting sales. Recognizing this, Shopify, a leading e-commerce platform, offers merchants various options to personalize their stores. Let’s explore the vast potential of personalization and how it can boost your Shopify business!
What Is a Personalization Option on Shopify?
A personalization option on Shopify allows shoppers to add special information or requests to their orders. Customers can select specific attributes, such as color, size, or text customization, directly on the product page. By offering these options, merchants can enhance the shopping experience, making it more engaging and tailored to each customer’s needs.
Why Does Personalization on Shopify Matter?
Personalization is a critical strategy in modern e-commerce, especially on platforms like Shopify. Here’s why it is so significant:
1. Enhance Customer Experience
Personalization customizes the shopping experience to individual preferences, making it more relevant and engaging. By offering customized product recommendations and personalized content, customers enjoy a more user-friendly shopping experience, leading to higher satisfaction and loyalty.
Personalized interactions, such as tailored emails, exclusive offers, and targeted promotions, foster a sense of value and connection, encouraging repeat business and long-term customer retention.
2. Boost Conversion Rates
When customers see products and offers that align with their interests and previous behaviors, they are more likely to convert. Adding personalization options can significantly improve conversion rates by presenting users with products that match their preferences, thereby reducing the time and effort required for them to find what they want. This targeted approach can turn casual browsers into paying customers.
3. Increase Average Order Value
Personalized product recommendations and upselling techniques can encourage customers to purchase more. By suggesting complementary products or exclusive options based on their browsing history or past purchases, you can effectively increase the average order value. This strategy not only enhances the shopping experience but also drives higher revenue for your store.
4. Improve Marketing Effectiveness
This improves the success of marketing campaigns by delivering more relevant content to your audience. By segmenting your customer base on various groups and targeting each group with personalized messages and offers, you increase the likelihood of engagement and conversion. This focused strategy guarantees that your marketing efforts are more effective and influential, leading to better results and a higher return on investment.
5. Create Competitive Advantages
In a competitive e-commerce landscape, personalization helps differentiate your brand from competitors. Offering a unique and customized shopping experience sets your store apart and positions it as a leader in customer-focused service. This differentiation not only attracts new customers but also strengthens your brand’s reputation and trustworthiness.
6. Provide Valuable Insights
Personalization tools and strategies offer valuable data and insights into customer preferences and behavior. By examining this data, you can gain a better insight into your customers’ needs and make informed decisions to enhance your product range, marketing strategies, and overall business approach.
Implementing personalized options also enables you to collect detailed information on customer preferences, behavior, and buying habits, enabling you to customize your offerings and manage your inventory more effectively.
How to Add Personalization Option on Shopify?
Method 1. Create product variant options
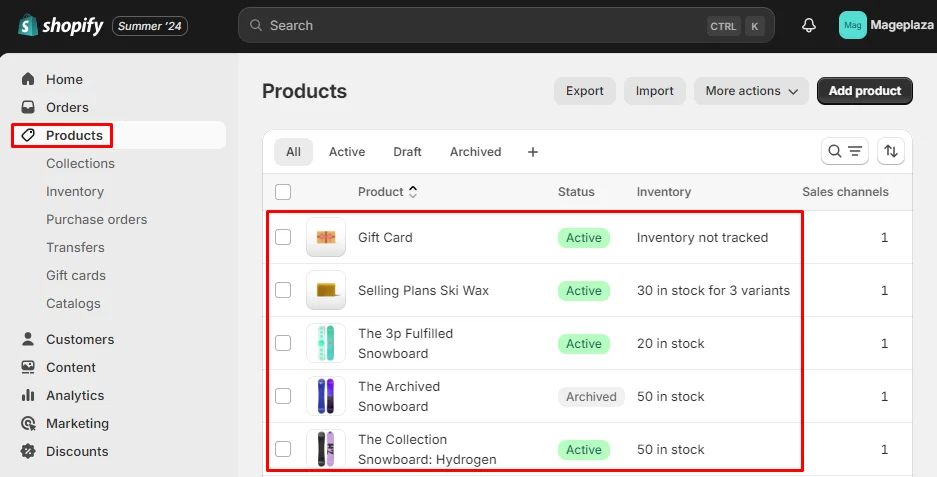
Step 1: Log in to Shopify admin, in the left menu, click on Products, and select the product you want to customize for personalization.
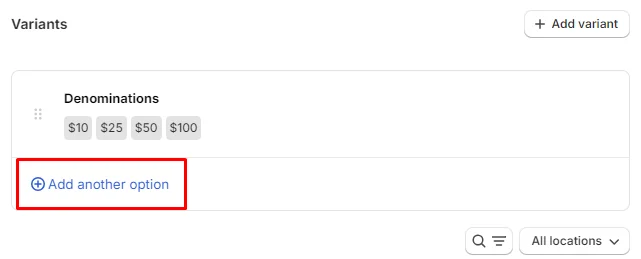
Step 2: Scroll down to the Variants field and click Add another option
Step 3: Add Option name and Option values
Enter the name for your option and add its values
For example: We named it Size and added suitable values such as: S, M, L, etc.
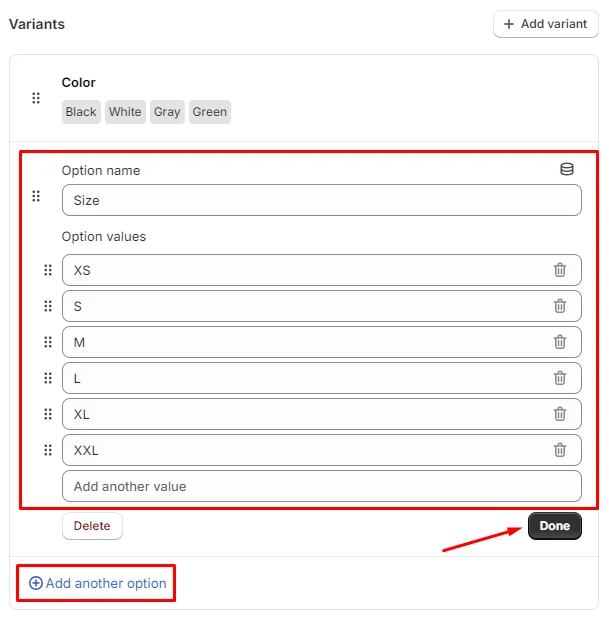
Step 4: After finishing, click Done to save the information for each option. You can also add multiple options as needed by clicking the Add another option button.
Once your items have been added with the corresponding variants in Shopify, your customers can customize the personalization data before adding the item to their cart.
Note: In the default version, it should be noted that one product will be limited to 3 options and 100 variants.
Method 2. Use Shopify Apps
At Shopify App Store, you can install free or paid apps personalization.
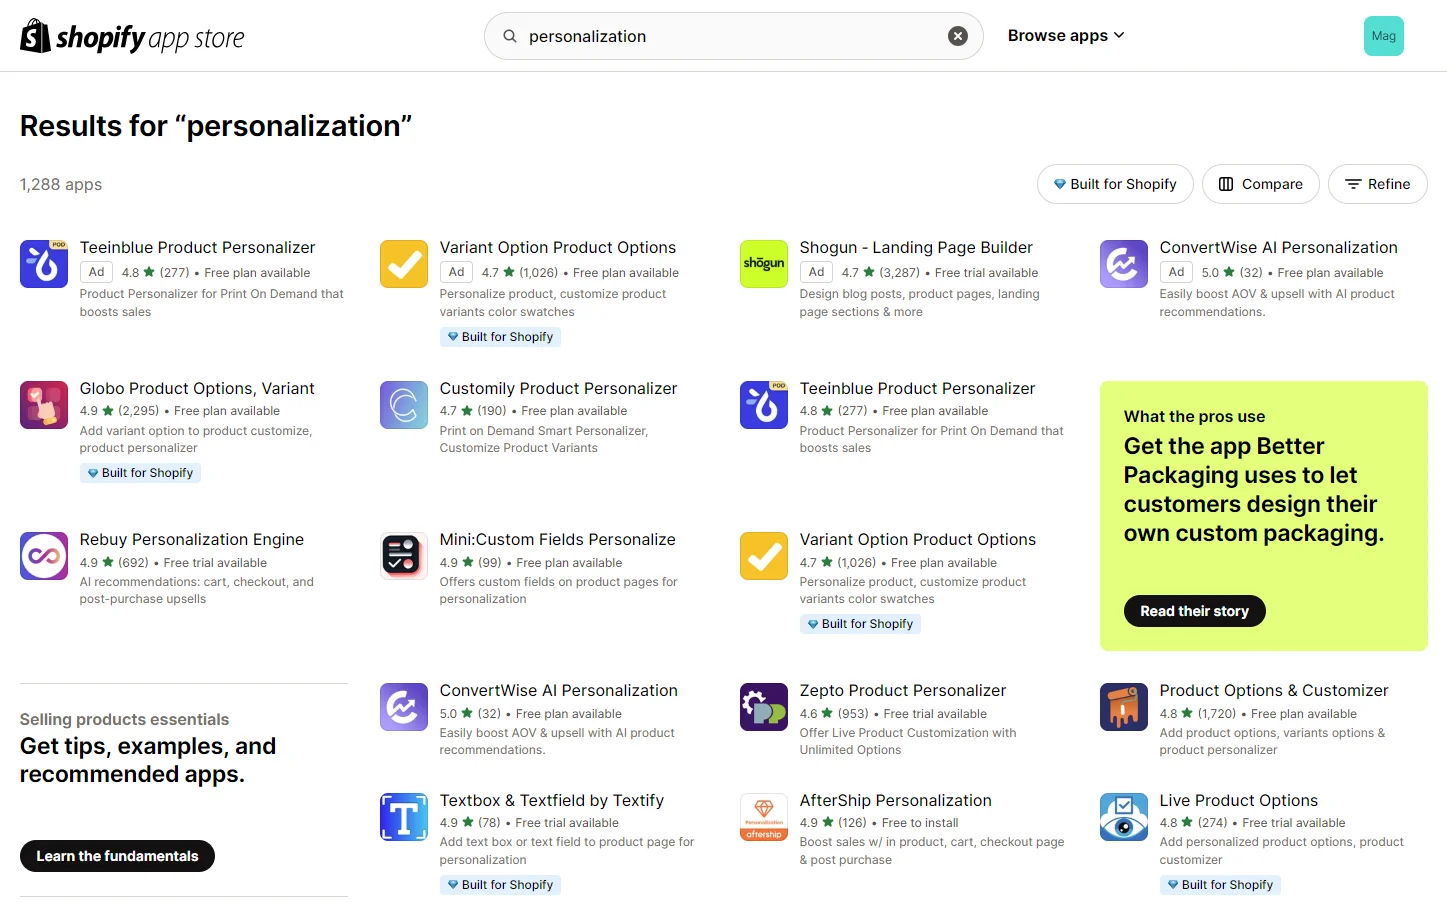
Here are some popular personalization apps:
1. Globo Product Options, Variant
-
Rating: 4.9/5
-
Pricing:
- Free: Free
- Premium: $12.90/ month
- Pro: $24.90/ month
-
Highlight features:
- Add an extra cost when customers select a product variant.
- Implement conditional logic to show or hide relevant options based on previous selections.
- Import and export product variants using CSV files with the complete product customization tool.
- Apply an option set to all products or specific groups of products.
-
Rating: 4.8/5
-
Pricing:
- Development stores: Free
- Essentials: $18/ month
- Premium: $480/ month
-
Highlight features:
- Personalize multi-channel experiences across web, mobile, email, SMS, and Google Ads.
- Segment each shopper according to their affinity, lifecycle stage, and context.
- Provide personalized bundle discounts and smart content tailored to audience segments.
- Optimize different personalization strategies using the built-in A/B/n testing platform.
-
Rating: 4.7/5
-
Pricing:
- Development: Free to install
- Basic plan: $9.99/ month
- Advanced: $19.99/ month
-
Highlight features:
- Provide a broad selection of customization options such as color swatches, custom text boxes, radio buttons, checkboxes, and file uploads.
- Provide unlimited product options and customizations to meet various customer needs and preferences
- Enable detailed product personalization including custom product builders, and custom variant image swatches.
- Manage and display product variants effectively with options for custom fields and bold product options.
4. Teeinblue Product Personalizer
-
Rating: 4.8/5
-
Pricing:
- 14-day free trial
- Starter: $19/ month
- Growth: $59/ month
- Premium: $159/ month
- Enterprise: $549/ month
-
Highlight features
- Best-selling options: Include text, photos, clipart, street maps, and star maps.
- Trending options: Offers vector designs, scrabble tiles, spiral text, cartoon effects, background removal, and face cutouts.
- Real-time visualization: Live product previews that update instantly as customers customize their designs.
- Efficient design tools: Bulk upload files, auto-sync custom options, and set up multi-condition displays with ease.
- Streamlined order fulfillment: Automatically generate production files and send personalized orders quickly to POD providers.
- Boost revenue: Add additional charges and localize product page content and option titles based on customer’s locations.
Method 3. Use HTML
The great thing about this method is that you can use free tools to auto-generate code with just a few clicks. Moreover, these tools usually offer most-used fields like text, drop-down select, checkbox, etc.
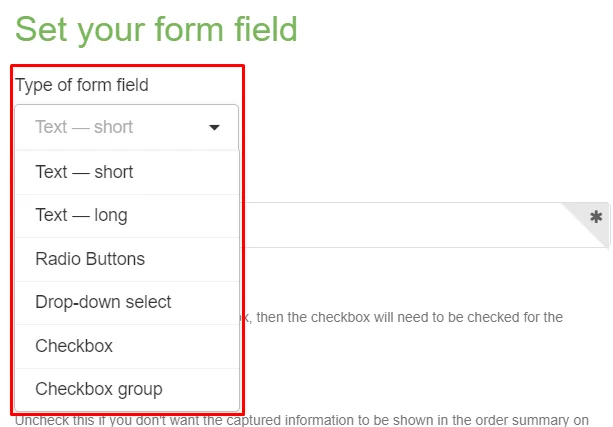
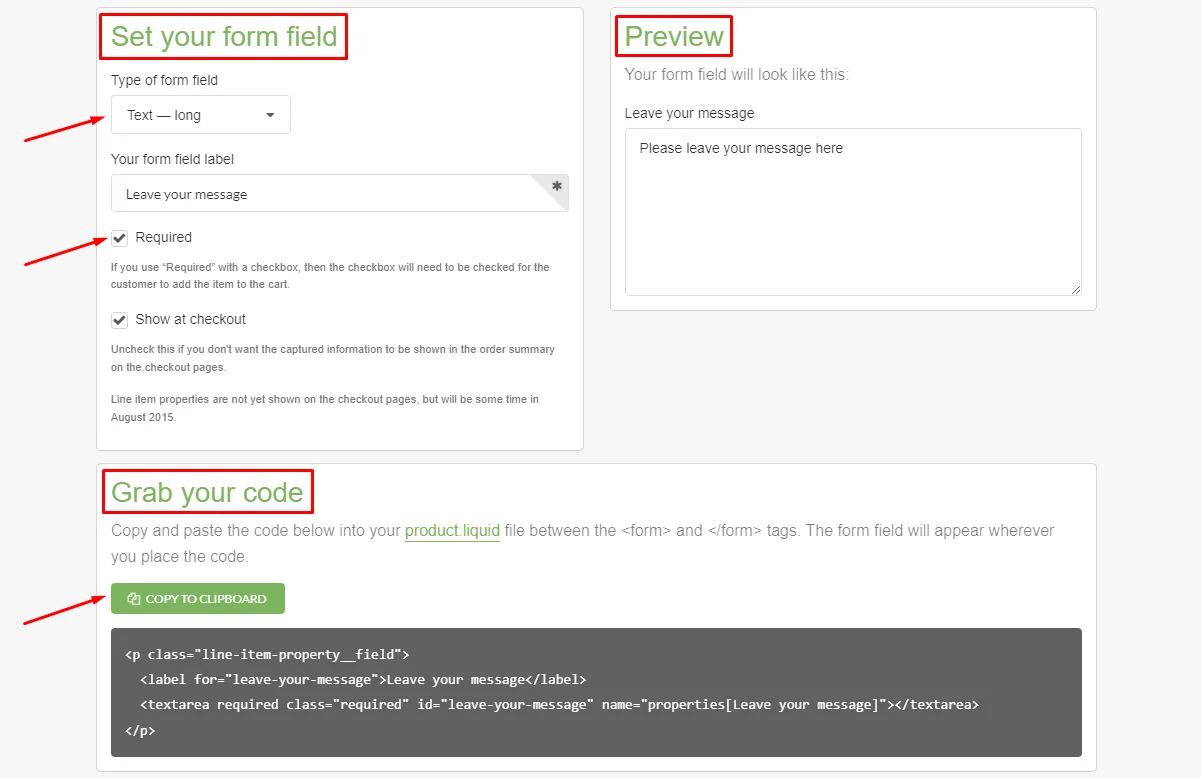
Step 1: First, navigate to the Shopify UI Elements Generator. Then, select the desired form element type from the Type of form field dropdown menu in the Set your form field section.
Click the Required box if you want your theme to prevent users from adding items to their shopping carts until they have completed the required form field.
Afterward, you will see a preview of your form field in the Preview section. Copy the code provided in the Grab your code box.
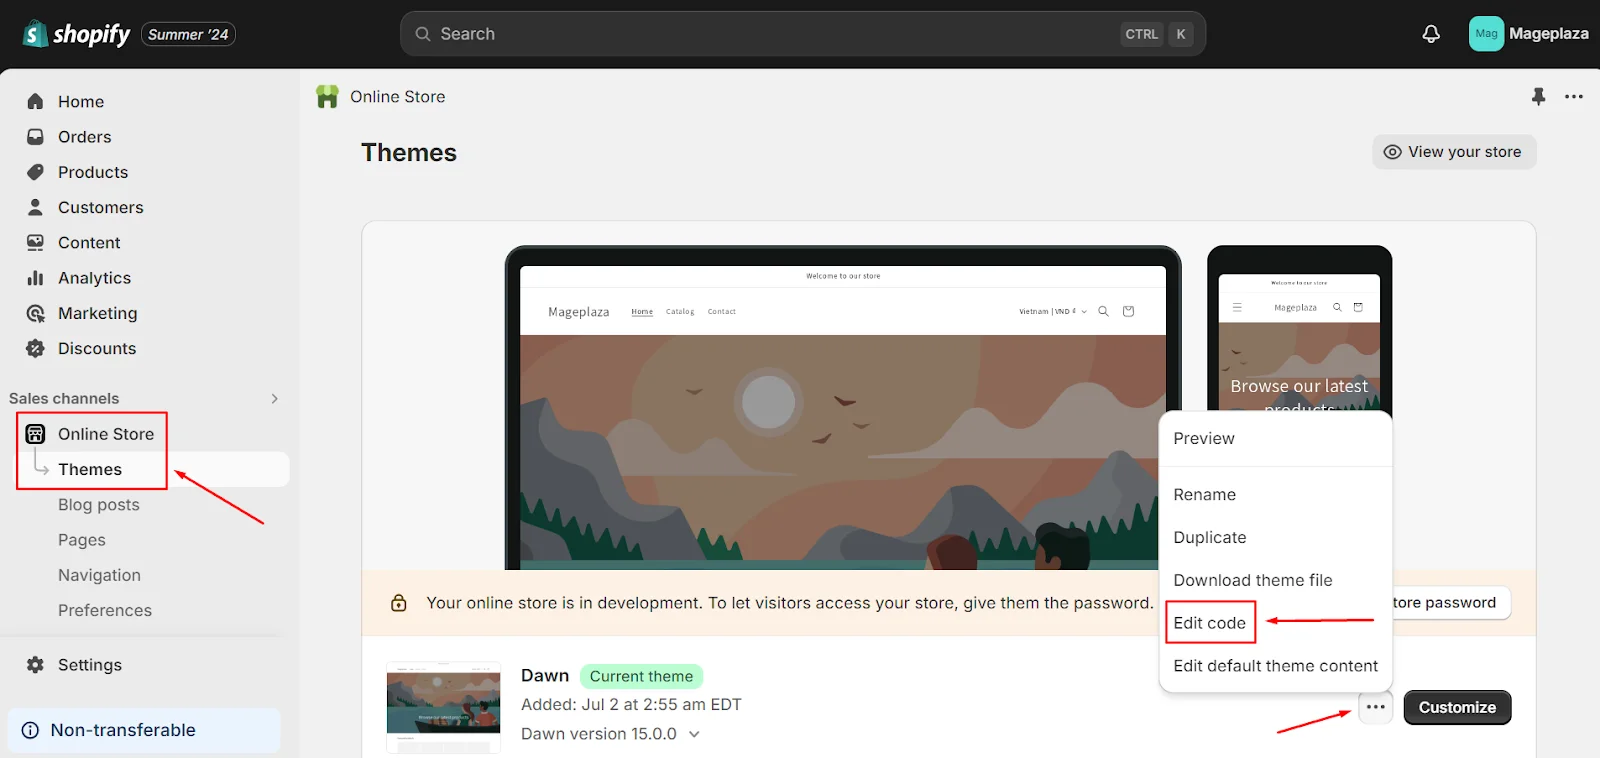
Step 2: Go to Shopify admin > click Online Store > Themes > Click on the three-dot icon (…) > choose Edit code.
Step 3: In the Section folder, choose main.product.liquid, then paste the code that you generated at Step 1.
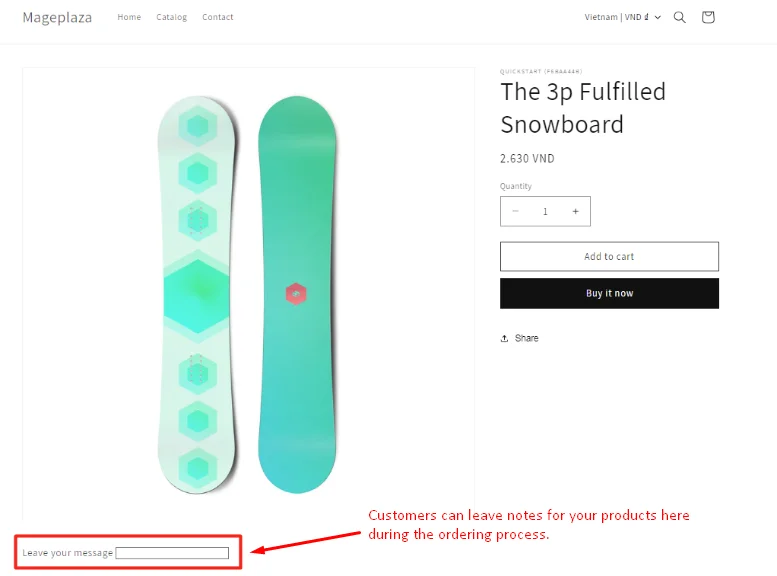
Regardless of where you place the code, the form field will appear.
In the example, we will put it at the bottom of HTML code.
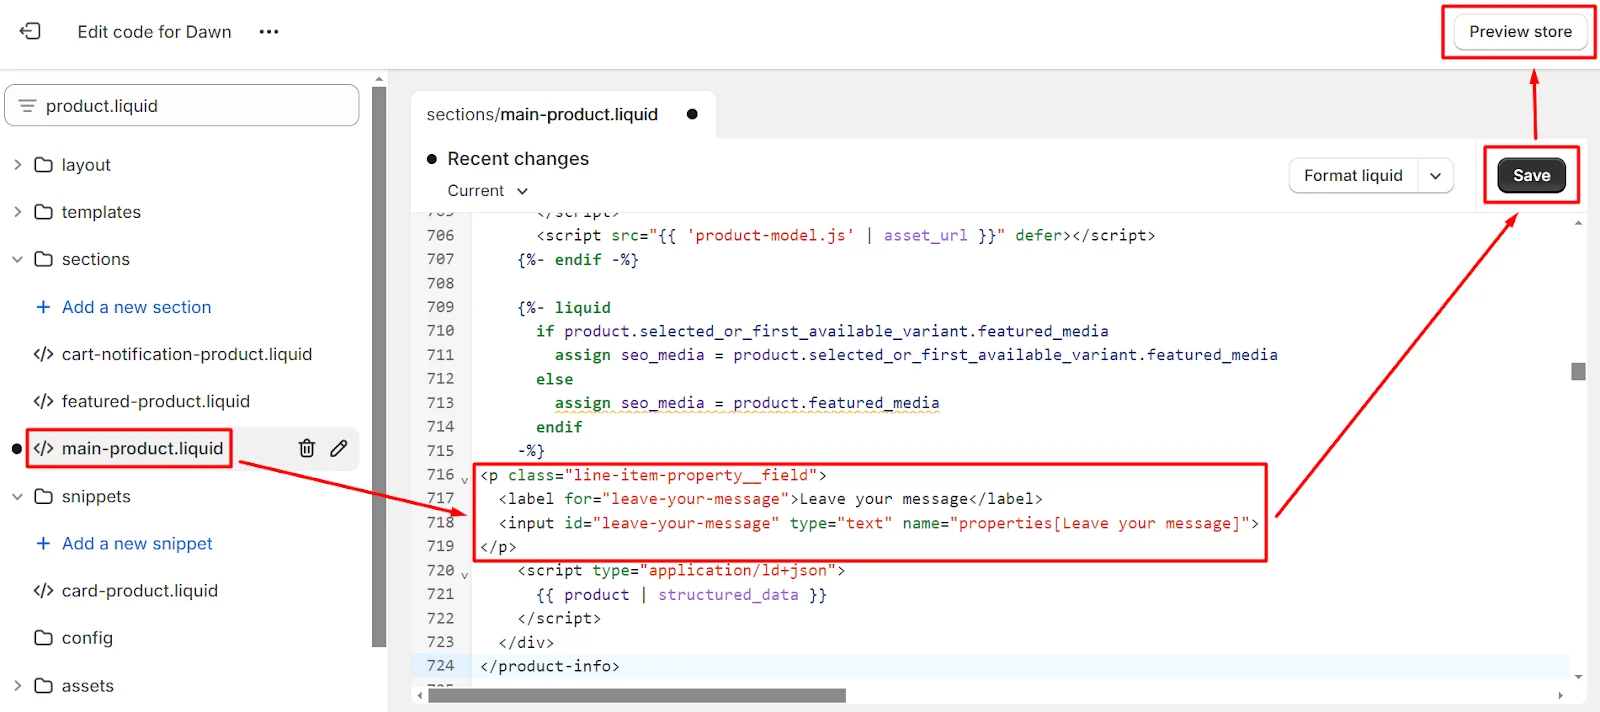
Step 4: Click Save and Preview to check before live
Method 4. Mockup Product
Step 1: Use design creation tools to produce mockups
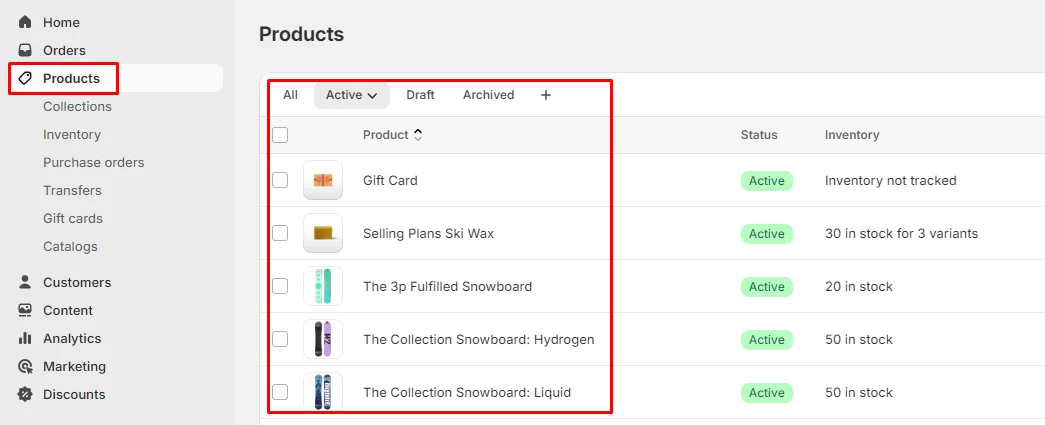
Step 2: From Shopify Admin > Products, then pick products you want.
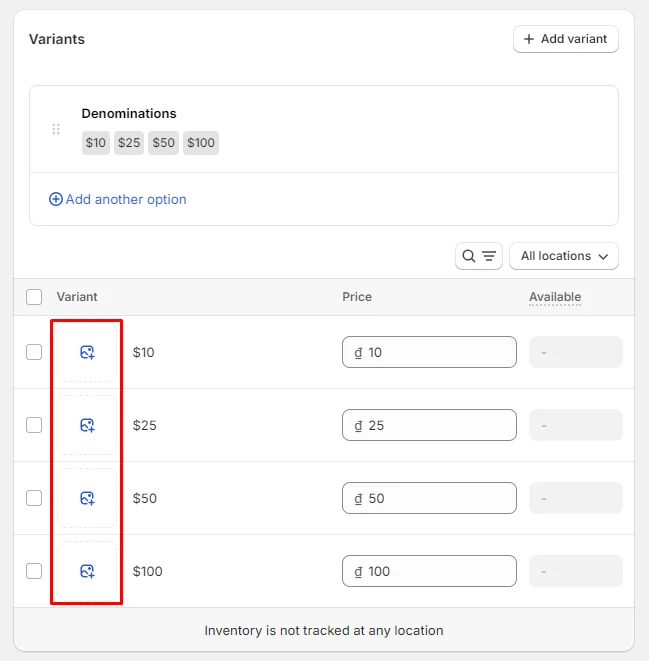
Step 3: In the Variants section, choose a variant image and add an image. After that, upload your mockup design. Then Save the change.
Method 5. Add Action buttons
Step 1: From Shopify admin, click Online store > Themes > Click on the three-dot icon (…) > Edit code

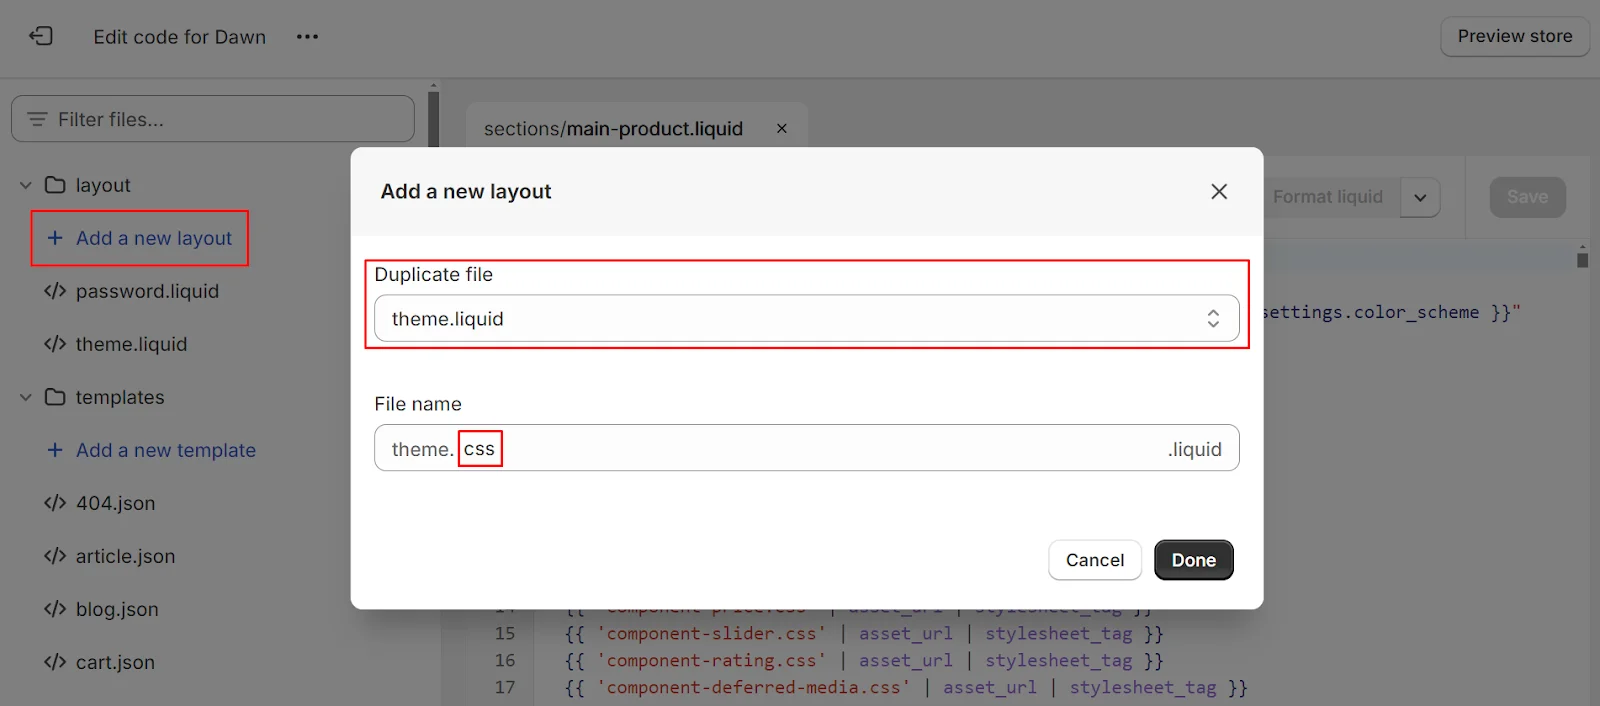
Step 2: Click Add a new layout, in the Duplicate file choose theme.liquid, and type css in the end of the File name. Then click Done.
After creating a theme.css.liquid layout, scroll down to the bottom and, just before the </body> tag, add the code for the “Add to Cart” button and “Buy It Now” button by copying the code provided below:
.product-form_cart-submit {
  background-color: black;
  border: 20px solid green;
  color: black;
}
/* Hover */
.product-form_cart-submit:hover {
  background-color: blue !important;
  border: 50px solid orange !important;
  color: black !important;
}
.shopify-payment-button_button.shopify-payment-button_button--unbranded {
  background-color: green !important;
  border: 20px solid red !important;
  color: white important;
}

/* Hover */
.shopify-payment-button_button.shopify-payment-button_button--unbranded:hover {
  background-color: blue !important;
  border: 50px solid orange !important;
  color: green important;
}
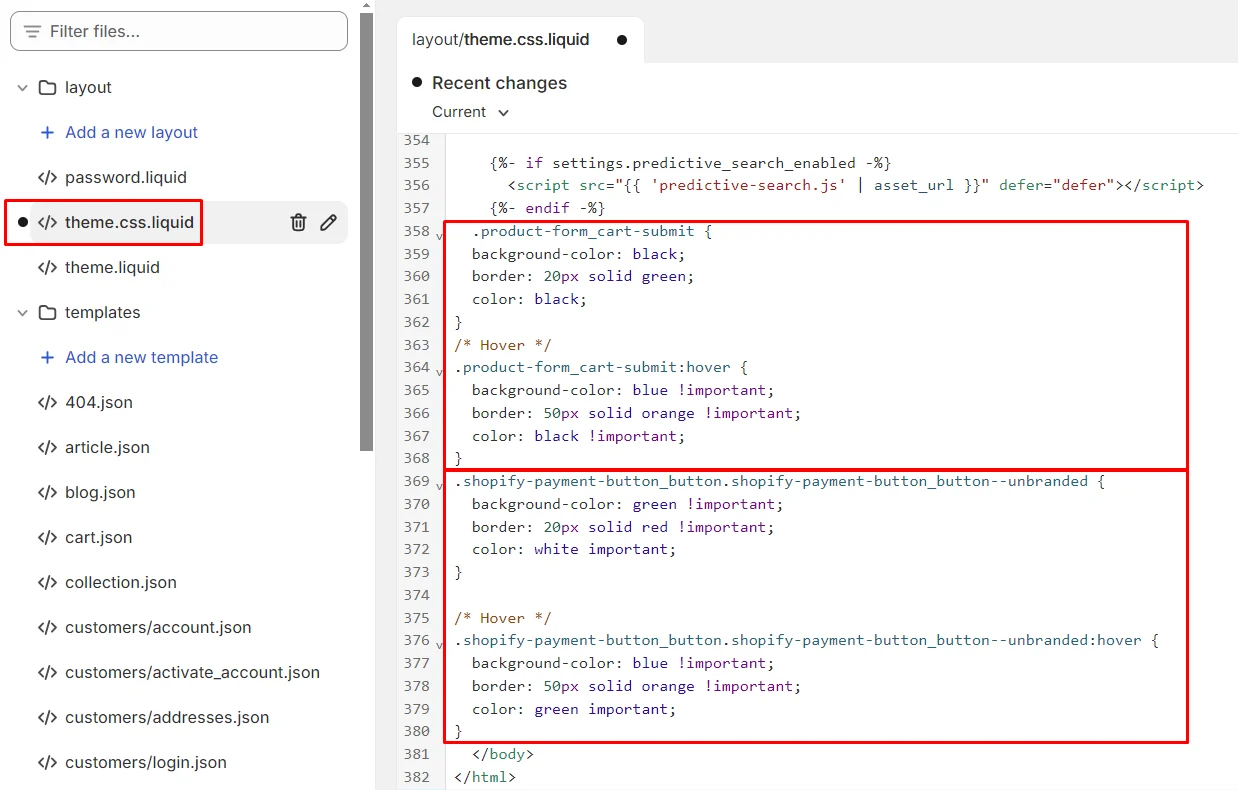
Step 3: You can edit the code to adjust the background color, border, and text color of the button.
Step 4: Finally, click Save.
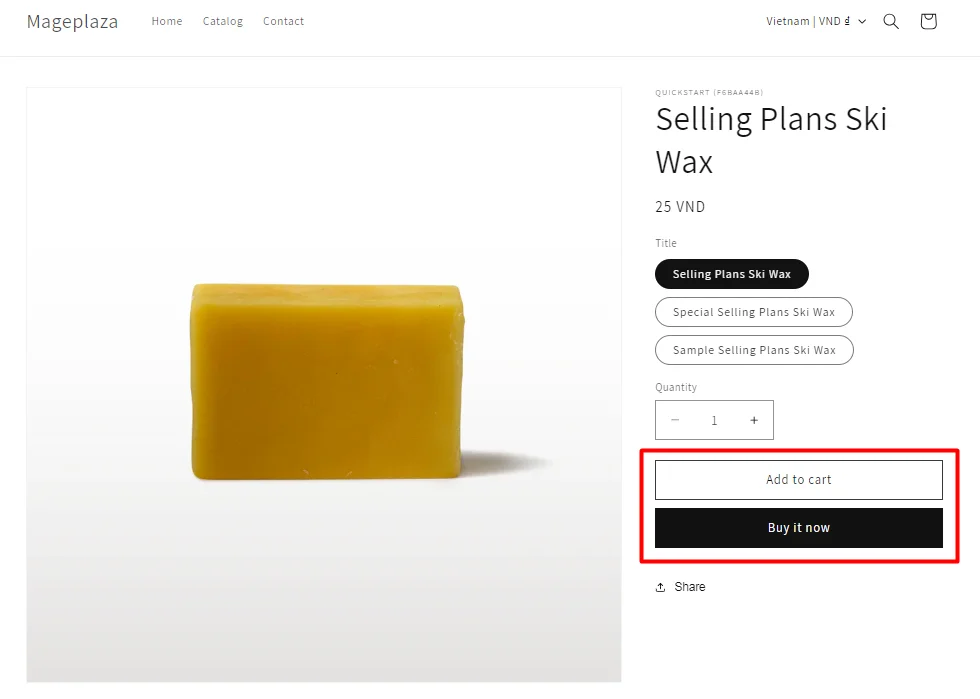
When you click Preview, you’ll see that the Add to Cart and Buy it Now buttons are ready to use.
Take Away
Embracing personalization is more than just a passing trend; it’s a powerful tool to drive customer engagement, satisfaction, and loyalty. By integrating personalization options into your Shopify store, you can provide a unique shopping experience that connects with customers and makes your business stand out in a competitive market.
Start exploring these options today and see how personalized products can transform your business and delight your customers. Happy personalizing!


