


5 mins read
|
07-30-2026
How to Configure Magento Shipping Tracking in 2025
Summer Nguyen
|
03-17-2025

As we navigate through 2025, configuring shipping tracking in Magento stands as a pivotal aspect of managing online storefronts effectively. With consumers increasingly demanding transparency and real-time updates on their orders, mastering the intricacies of Magento’s shipping tracking functionalities is essential for merchants to stay competitive in today’s market.
Importance of Magento Shipping Tracking?
Magento Shipping Tracking refers to the capability within the Magento eCommerce platform to provide real-time tracking information to customers regarding their orders. It allows customers to monitor the status and location of their shipments from the moment they are dispatched until they reach their destination.
-
Enhanced Customer Experience: Shipping tracking in Magento improves customer satisfaction by providing real-time visibility into order status and delivery progress.
-
Reduced Customer Inquiries: Providing tracking information upfront helps decrease the number of customer inquiries and support tickets related to order status. If you’re not sure how to add tracking numbers into your Magento store, this guide shows you how to do it manually, programmatically, or in bulk using extensions.
-
Optimized Operational Efficiency: Tracking orders enables better logistical planning, leading to improved efficiency and reduced shipping errors.
-
Proactive Issue Resolution: With shipping tracking, merchants can identify and address potential issues before they escalate, minimizing the risk of shipment delays or errors.
-
Customer Retention and Loyalty: Offering a seamless shipping experience, including tracking, is crucial for retaining customers and fostering long-term loyalty.

Setting up Magento Shipping Tracking
Integrating Carriers with Magento
Setting up shipping carriers in Magento 2 might seem overwhelming, particularly for newcomers. With options like FedEx, UPS, USPS, and DHL, it can be challenging to determine the right choice and configure it correctly.
This segment aims to offer a comprehensive walkthrough for configuring these carriers within Magento 2. By following this guide, you’ll be able to choose the most suitable carrier for your requirements and establish it with confidence.
FedEx Configuration
1. Enable FedEx for Checkout
-
Set “Enabled for Checkout” to “Yes.”
-
Provide FedEx account details: account ID, meter number, key, and password.
-
Switch Sandbox Mode to “Yes” for testing.
-
Specify Web-Service URL (Production) accordingly.
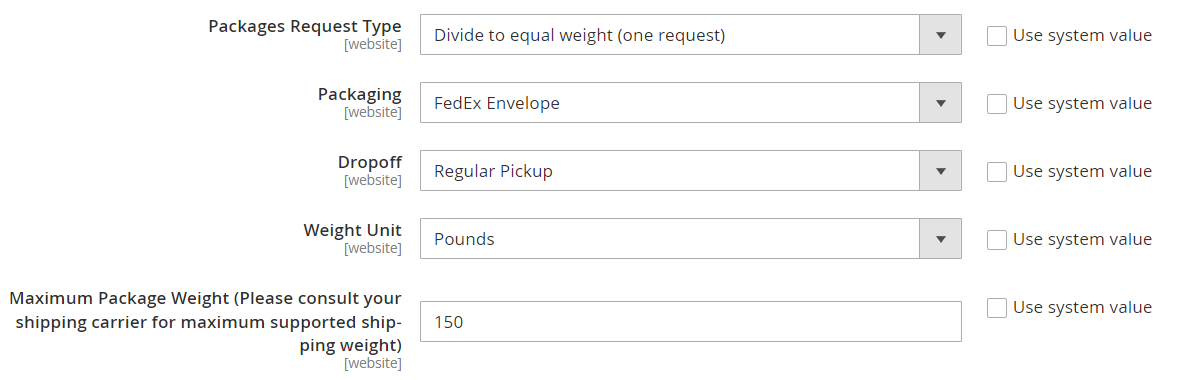
2. Set up FedEx Packaging
-
Choose a method for calculating weight of multiple packages.
-
Define Packages Request Type.
-
Select carton type for packaging products.
-
Choose Dropoff method.
-
Specify Weight Unit and Maximum Package Weight.
3. Determine the FedEx Handling Fee
-
Decide handling fee calculation method: percentage or fixed.
-
Specify how handling fee should be applied: per order or package.
-
Define Calculate Handling Fee method and Handling Applied.
-
Set Handling Fee amount based on chosen calculation method.

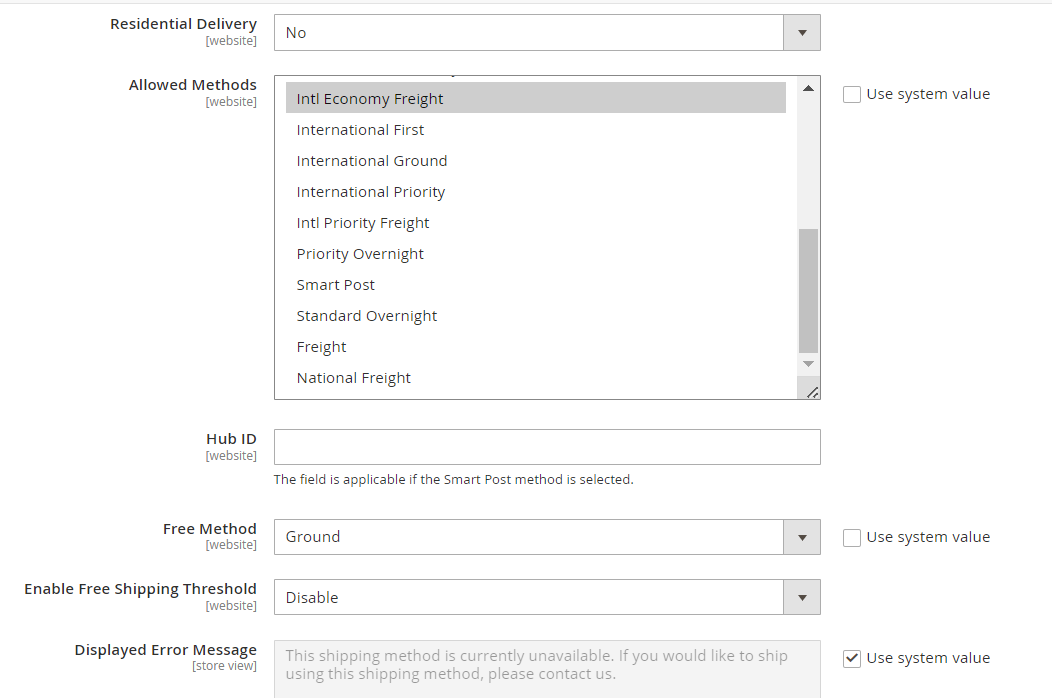
4. Choose FedEx Delivery Methods
-
Select suitable delivery options: B2C or B2B.
-
Configure Residential Delivery option.
-
Choose Allowed Methods based on FedEx account, shipment frequency, and international shipments.
-
Optionally, set up Free Shipping and specify Free Shipping Threshold and Error Message.
UPS Setup
UPS, another widely-used shipping carrier, provides a diverse array of services to its customers, operating as a global package delivery service with various shipping options available. To configure UPS within Magento, adhere to the following steps:
1. Establish a UPS XML Account:
-
Enable UPS for checkout by marking “Yes” in the Enabled for Checkout field. Subsequently, input the necessary UPS account details:
-
Gateway URL: URL linking to the UPS system for retrieving dynamic shipping rates.
-
Access License Number: Access license number associated with your UPS shipper account.
-
User ID: User ID linked to your UPS shipper account.
-
Origin of the Shipment: Region or country of origin for your product shipments (UPS XML Only).
-
Password: Password linked to your UPS shipper account.
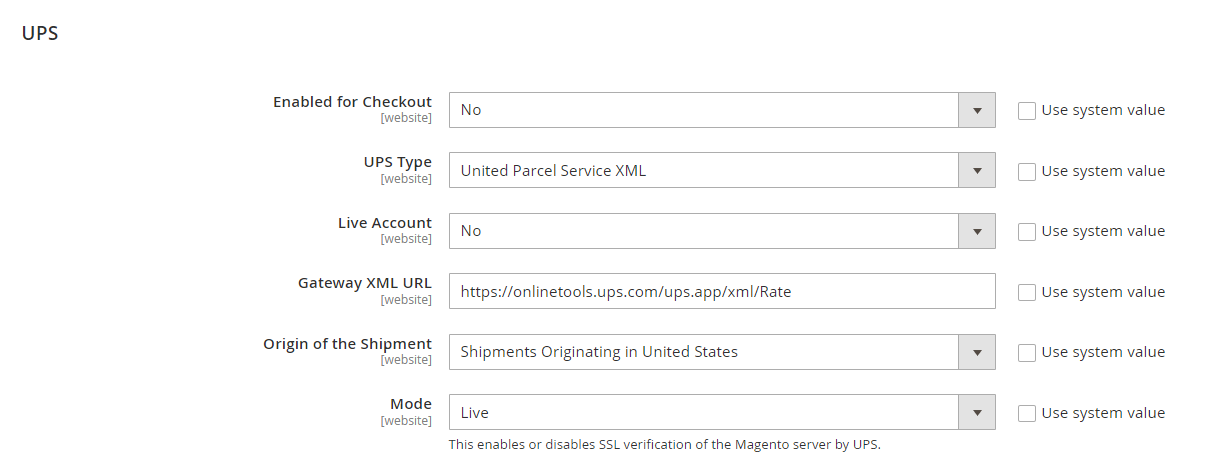
Specify a descriptive Title for this shipping method during checkout.
2. Configure UPS Package Information:
-
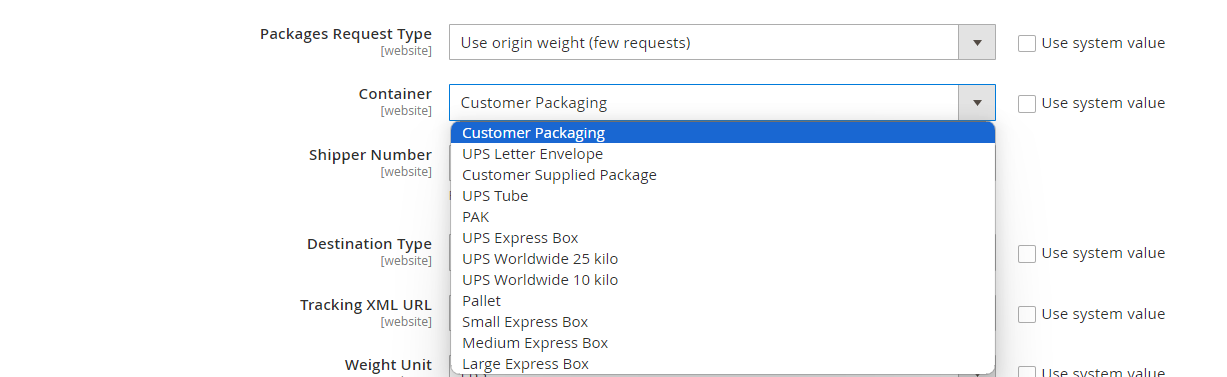
Choose the method for calculating weight for multi-pack shipments, opting between “Use origin weight” or “Divide to equal weight.”
-
Select the container type utilized for package shipping and specify the Destination Type (business or residential).
-
Eight UPS container setup options are available, including Customer Packaging, UPS Letter Envelope, UPS Tube, UPS Express Box, UPS Worldwide 25 kilo, and UPS Worldwide 10 kilo.
3. Define UPS Allowed Methods:
-
Determine the new shipping method UPS offers customers within Magento 2.
-
Establish your free shipping method via UPS.
-
Set up the Minimum Order Amount for Free Shipping and customize the error message displayed when UPS is unavailable.
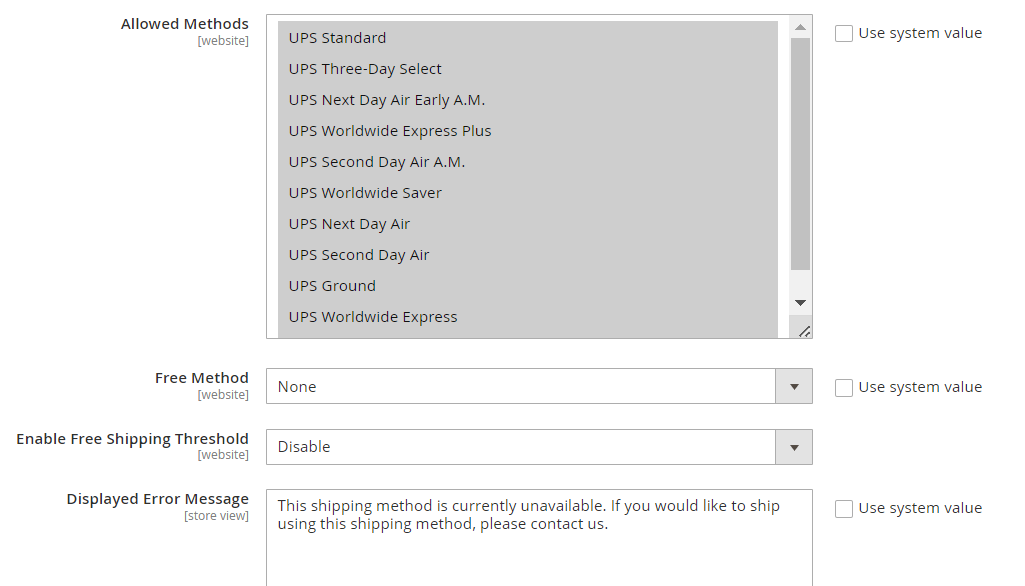
4. Configure UPS Applicable Countries and Additional Settings:
-
Specify the countries where customers can utilize UPS services.
-
Adjust settings such as Displayed Error Message, Sort Order, and Debug as required.
USPS Settings
USPS, another widely-used shipping carrier, can be seamlessly integrated into Magento 2 with the following steps:
1. Establish a USPS Account
-
Begin by setting up a USPS account. Once set up, input the following details into Magento 2:
-
Gateway URL: Your URL connects to the USPS system for retrieving shipping rates.
-
Secure Gateway URL: Your secure URL linking to the USPS system via a secure socket layer (SSL) for retrieving shipping rates.
-
User ID: Your USPS shipper account user ID.
-
Password: Your USPS shipper account password.
-
Choose a Mode: Select either Live or Development mode.

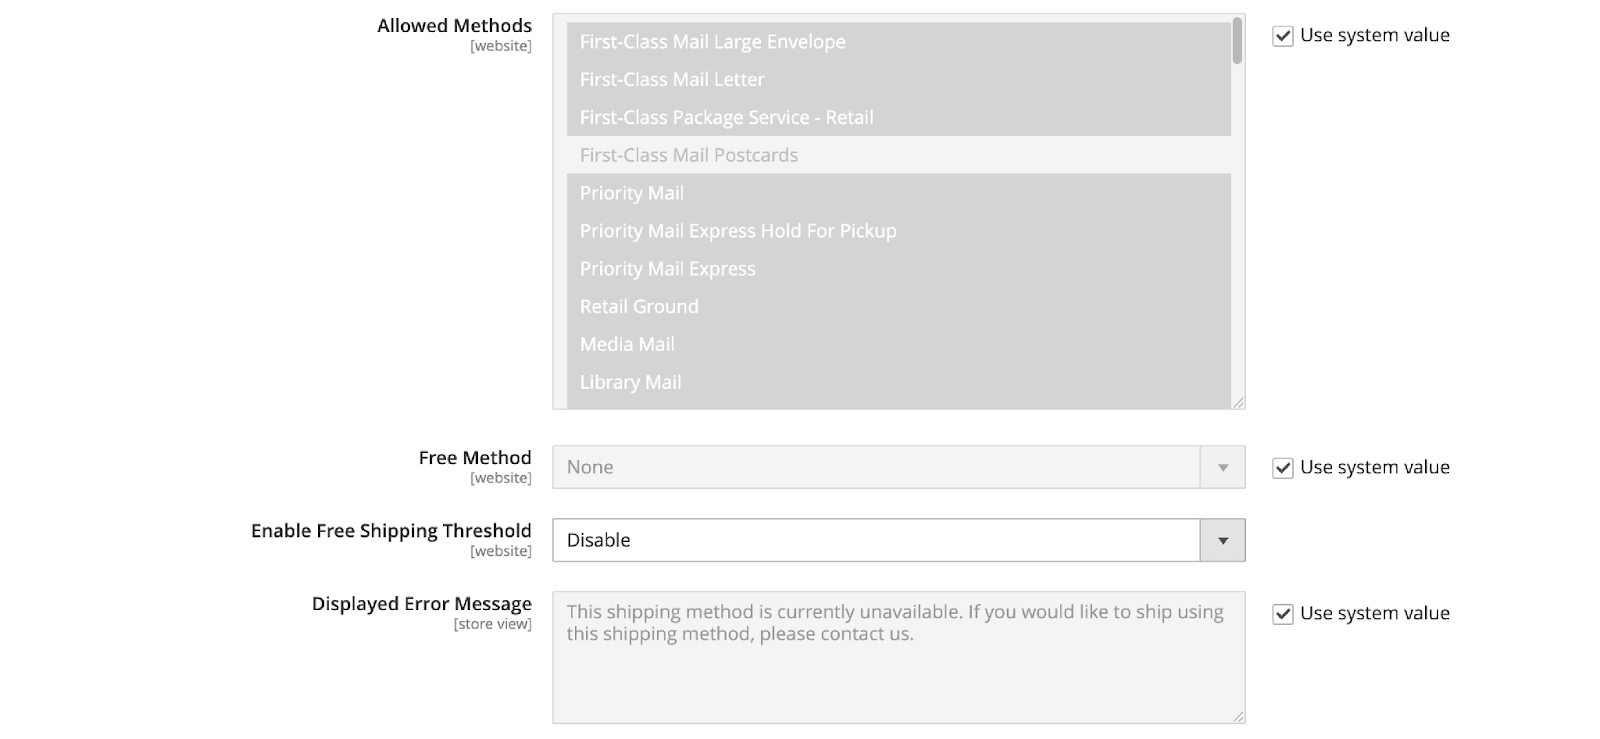
2. Configure USPS Packaging:
-
Determine how to calculate weight for multi-pack shipments, choosing between:
-
Using origin weight (multiple requests).
-
Dividing to equal weight (one request).
-
Select the type of container for packing shipments from five options: Variable, Flat Rate Box, Flat Rate Envelope, Rectangular, or Non-rectangular.
-
Provide dimensions for package sizes to calculate shipping rates.
-
Set the typical shipment package size as Regular, Large, or Oversize.
-
Configure the Maximum Package Weight as specified by USPS.

3. Set up USPS Handling Fee:
-
Similar to FedEx, configure the USPS Handling Fee with options including:
-
Calculate Handling Fee.
-
Handling Applied.
-
Handling Fee.

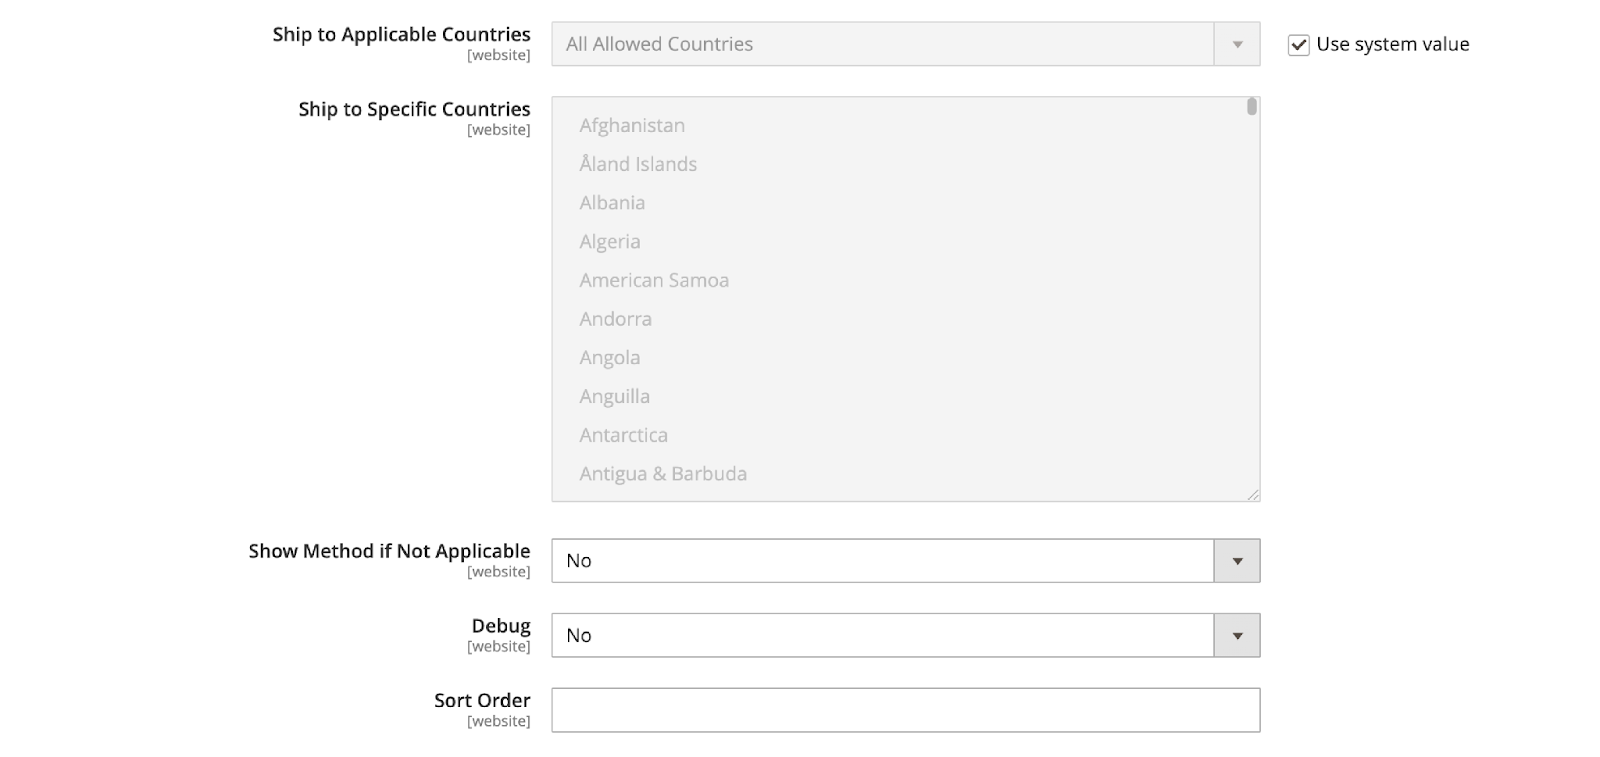
4. Define USPS Allowed Methods and Applicable Countries:
-
Allowed Methods
-
Minimum Order Amount for Free Shipping
-
Displayed Error Message
-
Ship to Applicable Countries
-
Show Method if Not Applicable
-
Debug
-
Sort Order
Following these steps will enable you to effortlessly configure USPS as a shipping carrier for your Magento 2 store.
Magento DHL Shipping Method
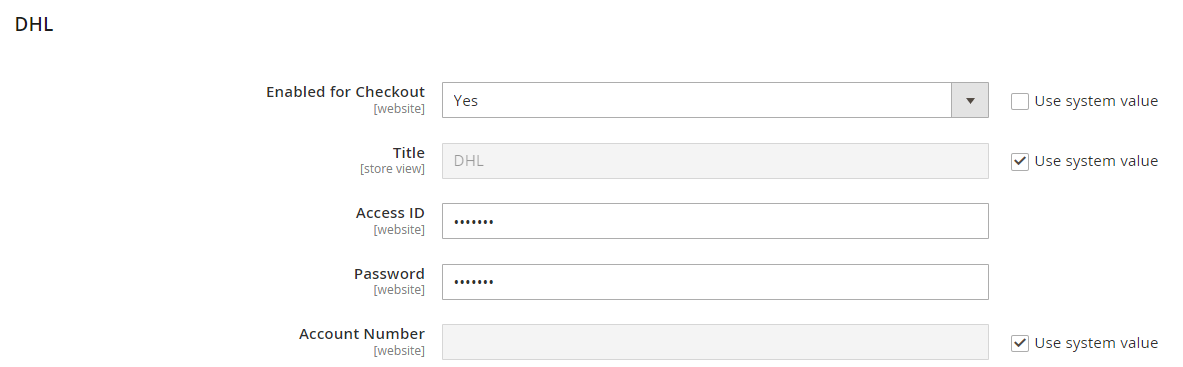
1. Establishing a DHL Account:
Activate DHL shipping by selecting “Yes” under Enabled for Checkout in the Magento 2 shipping methods.
Enter the required details:
- Gateway URL: Provided by DHL, or use the default if not provided.
- Access ID: Your DHL shipper account’s access ID.
- Password: Your DHL shipper account’s password.
- Account Number: Your DHL shipper account number.
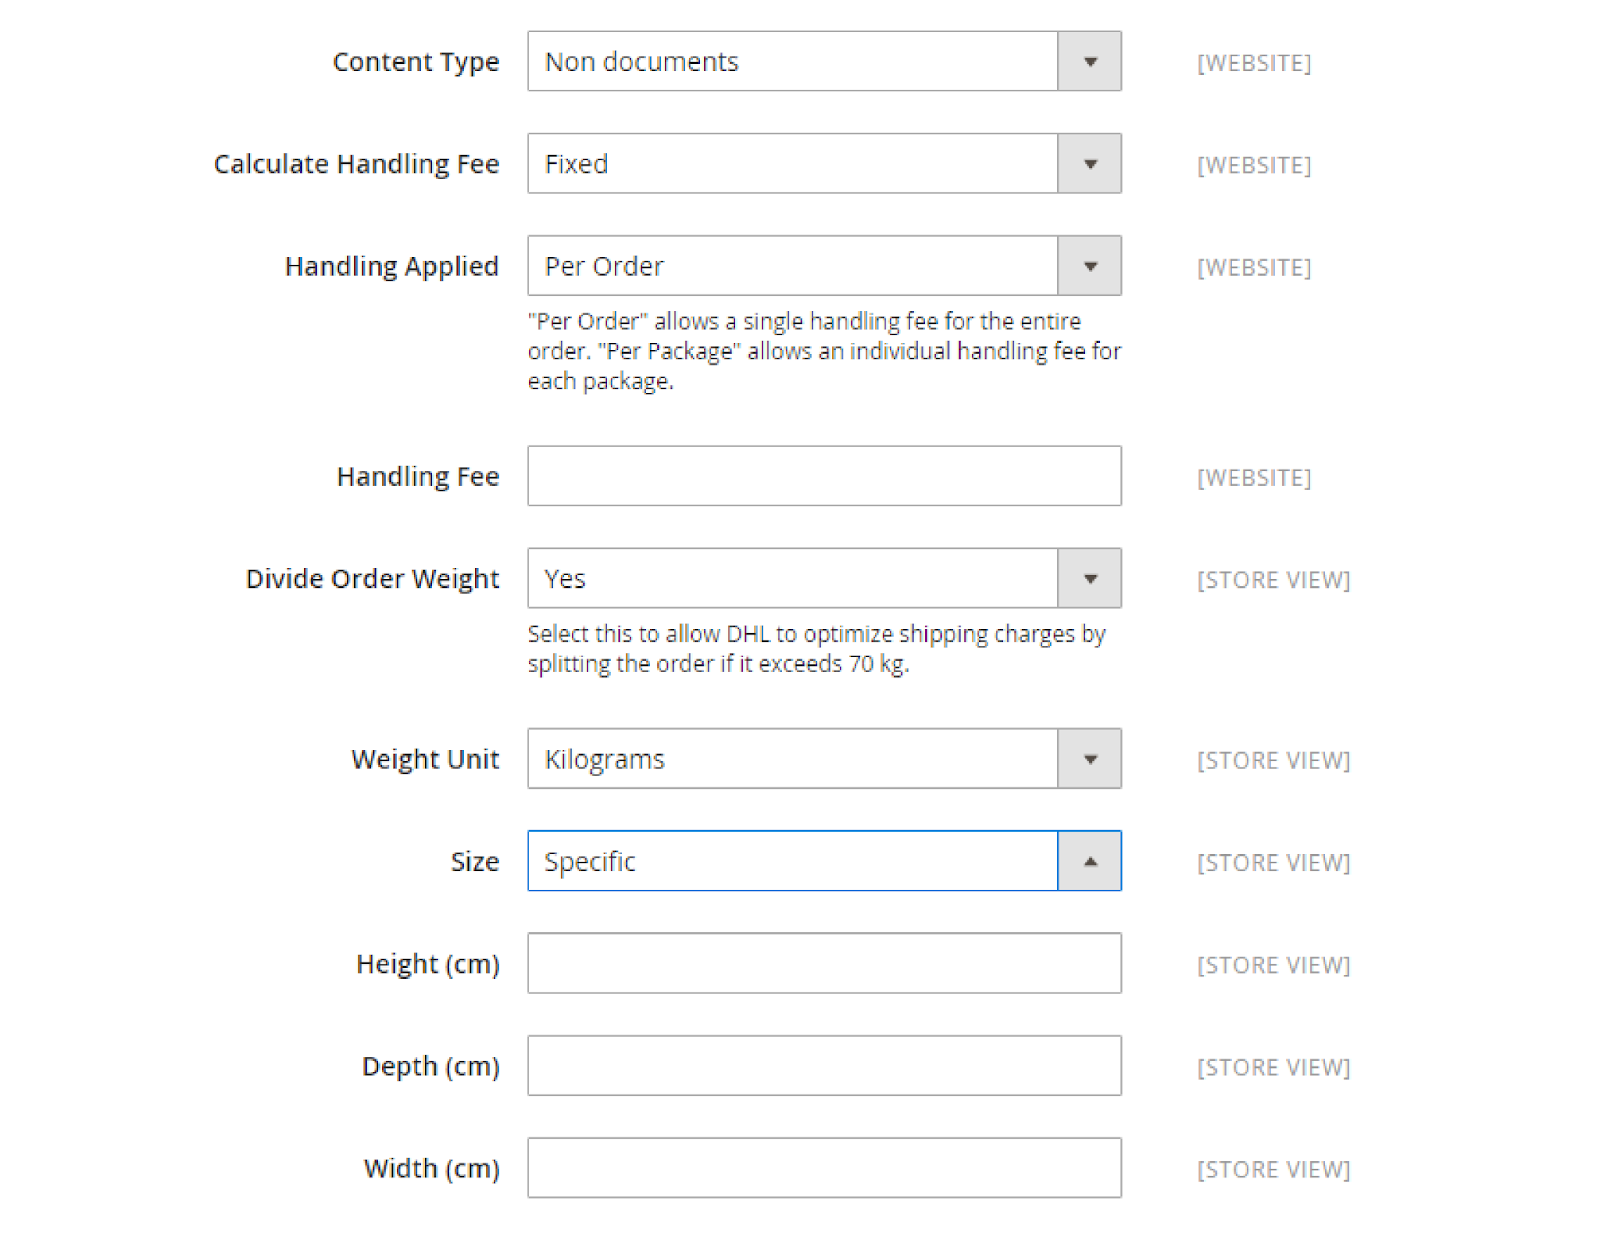
2. Configuring DHL Package:
-
Choose between Handling Applied options: Per Order or Per Package.
-
Determine how the Handling Fee is calculated: Fixed Fee or Percentage. Set the Handling Fee amount.
-
Specify the unit of weight for shipping calculations: Kilograms or Pounds. Optionally allow DHL to split orders over 70kg into smaller units for better shipping.
Define package size:
-
Specific: If packages have custom sizes, provide details like Height, Depth, and Width.
-
Regular: Packages follow standard DHL packaging methods
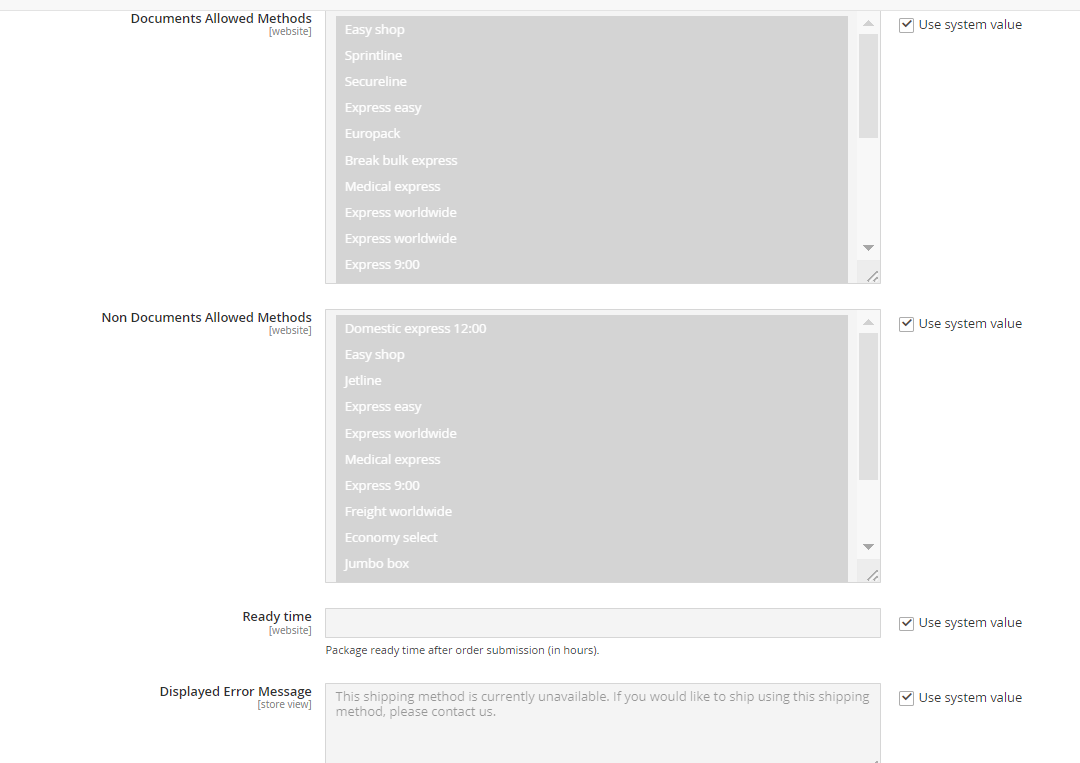
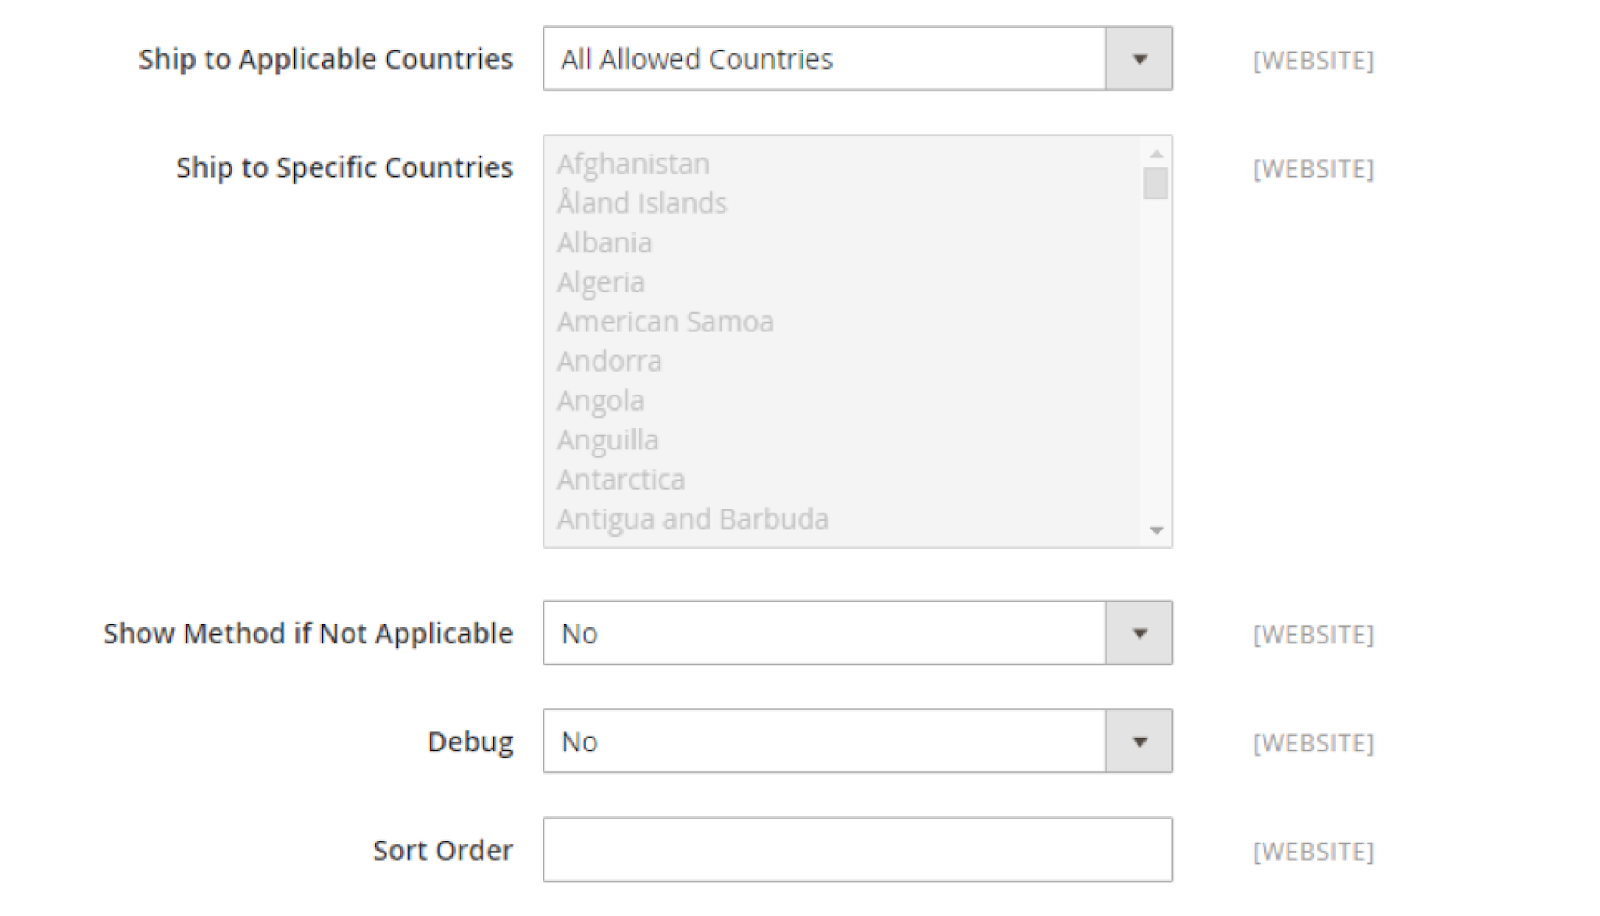
3. Setting up DHL Allowed Methods, Applicable Countries, and Minimum Order Amount:
Configure Magento’s DHL integration with the following settings:
-
Allowed Methods
-
Ready Time
-
Displayed Error Message
-
Free Method
-
Minimum Order Amount for Free Shipping
-
Ship to Applicable Countries
-
Ship to Specific Countries
-
Show Method if Not Applicable
-
Debug
-
Sort Order
Enhancing Tracking with Extensions
Magento 2 initially offers limited options for setting shipping method rules, causing inconvenience for store owners in various situations where certain methods need restriction.
In specific scenarios, store owners may desire to provide shipping methods like free shipping or fixed rates to attract customers, which isn’t feasible with Magento 2’s default settings.
By utilizing the Shipping Pro pack from Mageplaza, you can introduce diverse shipping rules, restrictions, method labels, and custom checkout fields to your Magento 2 store.
These solutions enable you to:
-
Restrict shipping methods for more convenient delivery.
-
Exercise full control over the shipping fee calculation process.
-
Drive sales and foster loyalty through Free Shipping rules.
-
Showcase special shipping methods to customers.
-
Connect with customers emotionally and establish trust through considerate actions.
-
Alleviate concerns regarding failed shipments for any purchaser.
-
Embrace “late” customers and maintain ongoing connections.
Adding to the solutions mentioned above, another effective approach to enhancing tracking capabilities in Magento 2 is by leveraging suitable tracking extensions. One notable example is the magestore or Evincemage extension, renowned for its advanced tracking features and seamless integration with Magento 2.
Enabling Guest Tracking
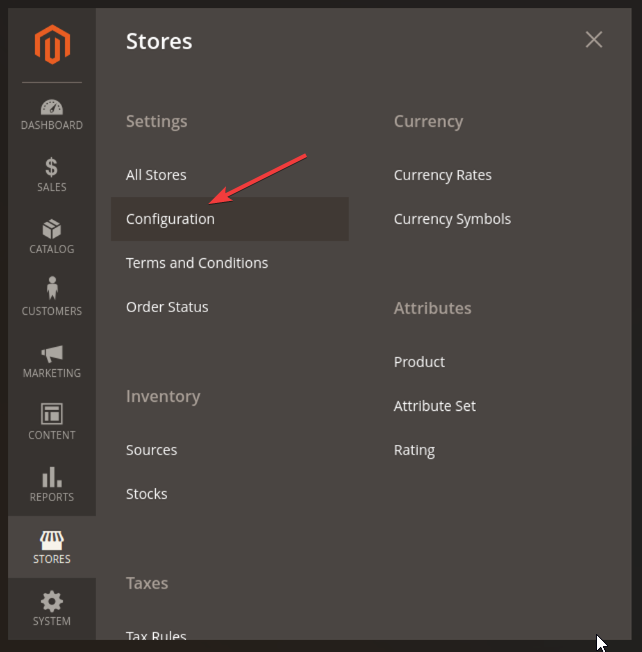
- Log in to your Magento Admin Panel. Navigate to Stores > Settings > Configuration > Sales > Checkout.
- Expand Checkout Options > Select Yes in the Allow Guest Checkout field
-
After enabling guest checkout, click on “Save Config” to apply the changes.
-
Place a test order on your website without logging in to ensure that guest tracking is functioning correctly.
Utilizing API for Advanced Tracking Solutions
-
Obtain API Access: Sign up for API access with your preferred shipping carriers or third-party tracking services. Obtain API keys or credentials required for integration.
-
Research Compatible APIs: Explore available APIs that offer advanced tracking functionalities compatible with Magento. Ensure compatibility with your Magento version and desired features.
-
**Integration with Magento: ** Integrate the chosen API into your Magento store. Follow the documentation provided by the API provider to implement the integration correctly.
-
Configure API Settings: Configure API settings within Magento to enable advanced tracking features. This may include setting up authentication credentials, specifying tracking endpoints, and defining data formats.
-
Customize Tracking Experience: Customize the tracking interface in your Magento store to display additional information provided by the integrated API. Enhance the user experience by presenting shipment status, estimated delivery dates, and other relevant details.
-
Test Integration: Test the API integration thoroughly to ensure proper functionality and accuracy. Place test orders and monitor tracking updates to verify that the advanced tracking solutions are working as expected.
Optimizing Tracking for Mobile Users
Optimizing tracking for mobile users in Magento ensures a seamless experience for customers accessing tracking information on their mobile devices. Here’s how to optimize tracking for mobile users:
-
Responsive Design: Ensure tracking pages adapt well to various screens, using responsive design techniques.
-
Simplified Interface: Prioritize essential info with clear language, larger fonts, and clickable buttons for mobile users.
-
Mobile-Friendly Navigation: Optimize menus, search, and navigation bars for easy access on mobile devices.
-
Fast Loading Speed: Improve page loading by optimizing images, reducing HTTP requests, and utilizing caching.
-
Touchscreen Compatibility: Design interactive elements for accurate touchscreen interaction.
-
Test Across Devices: Validate tracking functionality across different devices and OS for consistency.
-
Mobile-Specific Features: Consider features like push notifications and location-based tracking to enhance the mobile tracking experience.
Troubleshooting Common Tracking Issues
Common tracking issues and troubleshooting steps include:
-
Incorrect Tracking Numbers: Verify the accuracy of tracking numbers provided by customers. Ensure they match the format required by the shipping carrier. If incorrect, request the correct tracking number from the customer.
-
Delayed Updates: Check for delays in tracking updates from the carrier’s end. Monitor the tracking information regularly and communicate any delays to customers. Provide estimated delivery times and reassure customers that their packages are still in transit.
-
Missing or Inaccurate Information: Ensure all necessary shipment details, such as addresses and package weights, are accurately provided to the carrier. Verify address accuracy and completeness to prevent delivery issues. Double-check the information provided by the customer and correct any errors.
-
Failed Deliveries: Investigate reasons for failed deliveries, such as incorrect addresses, missed delivery attempts, or issues with access to delivery locations. Contact the carrier to arrange for redelivery or provide instructions for package pickup at a nearby location, if applicable.
-
Lost Shipments: In the event of lost shipments, initiate a trace with the carrier to locate the package. Communicate with the customer to inform them of the situation and provide options for refunds or replacements as needed.
-
Technical Glitches: Troubleshoot any technical issues with your tracking system or integration with carrier APIs. Check for bugs or errors in the tracking process and address them promptly. Ensure that your website or platform is functioning correctly to display tracking information to customers.
Conclusion
Magento Shipping Tracking is a vital component of providing a seamless and transparent eCommerce experience for customers. By setting up tracking features, integrating carriers, leveraging extensions and APIs, and optimizing for mobile users, you can enhance the tracking experience and improve customer satisfaction. Stay vigilant in troubleshooting common issues to ensure smooth operations and happy customers.
Table of content

Summer is the CMO and Digital Commerce Solution Expert with 10+ years of experience. She specializes in Magento, Shopify, ERP, CRM, AI, and Blockchain, delivering strategic solutions that transform businesses. With a deep understanding of digital commerce, she helps brands scale and stay ahead in a competitive market.
Related Post

7 mins read
|
06-30-2026

How to Enable DebugView in GA4 for your Magento 2 store - Mageplaza
Step-by-step guide to enabling GA4 DebugView for Magento 2 merchants — verify your GA4 events are firing correctly before trusting your data.
8 mins read
|
06-09-2026

Table Rate Shipping in eCommerce: A Practical Guide
Master Magento 2 Table Rate Shipping. Learn how to configure an accurate, automated shipping matrix to optimize your checkout and boost sales.
10 mins read
|
06-02-2026
3 mins read
|
05-30-2026

Google Analytics Ecommerce Reports for Magento Merchants: What to track & Tips
A practical guide to GA4 ecommerce reports for Magento merchants, covering what to track, how to read each report, and specific tips to turn data into revenue decisions.
18 mins read
|
05-20-2026
5 mins read
|
07-30-2026
7 mins read
|
06-30-2026
How to Enable DebugView in GA4 for your Magento 2 store - Mageplaza
Step-by-step guide to enabling GA4 DebugView for Magento 2 merchants — verify your GA4 events are firing correctly before trusting your data.
8 mins read
|
06-09-2026
Table Rate Shipping in eCommerce: A Practical Guide
Master Magento 2 Table Rate Shipping. Learn how to configure an accurate, automated shipping matrix to optimize your checkout and boost sales.
10 mins read
|
06-02-2026
3 mins read
|
05-30-2026
Google Analytics Ecommerce Reports for Magento Merchants: What to track & Tips
A practical guide to GA4 ecommerce reports for Magento merchants, covering what to track, how to read each report, and specific tips to turn data into revenue decisions.
18 mins read
|
05-20-2026