


5 mins read
|
07-30-2026
How to Create Content for Magento 2 Modal Popup?
Summer Nguyen
|
03-17-2025

In this guide, we will delve into the intricacies of crafting content for Magento 2 popups, exploring various techniques, strategies, and best practices to effectively captivate and engage your target audience. Whether you’re a seasoned Magento developer or a novice exploring the platform’s possibilities, mastering the art of creating content for modal popups is essential for optimizing your e-commerce presence and driving success in the competitive digital marketplace.
What is Magento 2 modal widget?
The Magento modal widget creates an additional window that appears above the primary window, comprising both an overlay and modal content.
The modal widget’s settings can:
-
Customize as either a popup or sliding modal
-
Manage the stacking order of modal widgets
-
Configure buttons for the action bar
Benefits of Magento 2 Popup
-
Increased Conversion Rates: Well-designed pop-ups effectively capture visitors’ attention, prompting them to take actions like purchasing, newsletter sign-ups, or accessing special offers. Strategically placing pop ups during the customer journey can boost conversion rates and sales.
-
Promotion of Special Offers: Pop Ups offer a prominent platform to showcase discounts, promotions, and limited-time deals to visitors. Whether it’s a seasonal sale or new product launch, popups effectively communicate these offers, encouraging purchases.
-
Email List Growth: Newsletter popups incentivize email sign-ups by offering exclusive discounts or valuable content. This strategy expands your reach and nurtures leads through targeted email marketing campaigns.
-
Cart Abandonment Recovery: Popup overlays address cart abandonment by offering incentives or reminders to customers who left items in their carts. Providing a discount code or highlighting abandoned items encourages customers to complete their purchases, reducing abandonment rates.
-
User Engagement and Interaction: Pop-ups deliver important messages, announcements, or alerts in an interactive way, enhancing user engagement. Whether it’s site maintenance updates or live chat support, popups improve user satisfaction.
-
Data Collection and Customer Insights: Popups collect valuable customer data and insights through embedded forms. By asking for feedback, preferences, or demographic information, businesses gather actionable insights to optimize marketing strategies and improve customer experiences.
-
Cross-Sell and Upsell Opportunities: Popups strategically promote related or complementary products based on browsing or purchase history. Showcasing relevant product recommendations within popups increases the average order value and drives additional revenue.
Create Content for Magento 2 Modal Popup
You can craft your unique popup modal to interact with customers and market products, potentially enhancing your conversion rates. Within Magento 2, generating popup content is achieved as follows:
<div id="modal-content">
    <div class="modal-inner-content">
       <!-- Insert Your Modal Content Here -->
       <p>Placeholder Content...</p>
    </div>
</div>
Now, let’s proceed to understand the process of incorporating this customized modal popup using Magento 2’s modal widget. Step to Create Modal Popup in Magento 2
Step 1: Register the Magento Modal Module
To register the Magento Modal Module, you need to create the registration.php file in the root directory of the module located at $Magento2Root/app/code/Mageplaza/Customize/. Add the following code to the registration.php file:
<?php
use Magento\Framework\Component\ComponentRegistrar;
ComponentRegistrar::register(
  ComponentRegistrar::MODULE,
    'Mageplaza_Customize',
    __DIR__
);
Step 2: Declare a Module For Magento 2 Popup Modal
Begin by crafting a configuration file named module.xml within the directory $Magento2Root/app/code/Mageplaza/Customize/etc/. Insert the following code into the module.xml file:
<?xml version="1.0"?>
<config xmlns:xsi="http://www.w3.org/2001/XMLSchema-instance" xsi:noNamespaceSchemaLocation="urn:magento:framework:Module/etc/module.xsd">
    <module name="Mageplaza_Customize" setup_version="1.0.0" />
</config>
Step 3: Construct the Layout of the Magento 2 Popup Modal
Begin by establishing a layout folder to organize the directory structure as follows:
$Magento2Root/app/code/Mageplaza/Customize/view/frontend/layout/
Then, proceed to create a default.xml file within the module’s layout folder. Insert the provided code snippet into the default.xml file:
<page xmlns:xsi="http://www.w3.org/2001/XMLSchema-instance" xsi:noNamespaceSchemaLocation="urn:magento:module:View/Layout:etc/page_configuration.xsd">
    <body>
        <referenceContainer name="main">
            <block class="Mageplaza\Customize\Block\Example" name=”example-modal-mageplaza” template="example.phtml" />
        </referenceContainer>
    </body>
</page>
In the above code, observe the definition of a block within the main container. This block extends the Mageplaza\Customize\Block\Example block, with the name “example-modal-mageplaza” and utilizes the template “example.phtml”.
Step 4: Develop the Template for the Magento 2 Popup Modal
To create the template folder structure, navigate to the view folder directory as shown below:
$Magento2Root/app/code/Mageplaza/Customize/view/frontend/templates/
Option 1: Utilizing Custom Generated JavaScript
Subsequently, include an example.phtml file within the templates folder and insert the provided code snippet:
<div id="modal-content">
    <?php echo $block->getContent(); ?>
</div>
<button id="example-modal-button" data-mage-init='{"example-modal": {"target": "#modal-content"}}'>
    Open Modal
</button>
In this code, the data-mage-init=’{“example-modal”: {“target”: “#modal-content”}}’ **attribute, utilizing a declarative notation, integrates a JavaScript component in the **example.phtml template.
Now, introduce a JavaScript file to initialize the modal widget and execute the component. Ensure the presence of JQuery and JQuery UI to initiate the modal widget.
Establish a file named example-modal.js in the $Magento2Root/app/code/Mageplaza/Customize/view/frontend/web/js/ directory and populate it with the following code:
define([
        "jquery", "Magento_Ui/js/modal/modal"
    ], function($){
        var ExampleModal = {
            initModal: function(config, element) {
                $target = $(config.target);
                $target.modal();
                $element = $(element);
                $element.click(function() {
                    $target.modal('openModal');
                });
            }
        };
        return {
            'example-modal': ExampleModal.initModal
        };
    }
);
Note the usage of the define function at the beginning of example-modal.js, incorporating an array of dependencies from RequireJS, including jquery and Magento_Ui/js/modal/modal.
The example-modal.js file should be referenced in the requirejs-config.js file, as RequireJS utilizes this configuration file.
Now, generate the requirejs-config.js file in $Magento2Root/app/code/Mageplaza/Customize/view/frontend/ and insert the provided code:
var config = {
    map: {
        '*': {
            'example-modal': 'Mageplaza_Customize/js/example-modal'
        }
    }
};
Option 2: Employing Magento 2 Modal UI Widget Please note that in the former method, the modal is displayed with a custom-generated JavaScript component, example-modal.js, within the example.phtml file.
Alternatively, you can directly exhibit the modal utilizing the Magento UI widget component in the created template. Initialize the Magento 2 modal widget with the following code snippet copied into the example.phtml file:
<div id="modal-content">
    <?php echo $block->getContent(); ?>
</div>
<script>
    require(
        [
            'jquery',
            'Magento_Ui/js/modal/modal'
        ],
        function(
            $,
            modal
        ) {
            var options = {
                type: 'popup',
                responsive: true,
                innerScroll: true,
                title: 'Example Modal’,
                buttons: [{
                    text: $.mage.__(‘OK’),
                    class: '',
                    click: function () {
                        this.closeModal();
                    }
                }]
            };

            var popup = modal(options, $('#modal-content’));
            $('#modal-content’).modal('openModal');
        }
    );
</script>
It’s advisable to call this JS code in a separate JS file and pass data from phtml to JS. The Magento UI component is already registered in Require JS.
Step 5: Crafting Block Class for Content of Magento 2 Modal
Since the block Mageplaza\Customize\Block\Example is already specified in the layout file, proceed to generate the Example.php block file within the $Magento2Root/app/code/Mageplaza/Customize/Block/ directory. Populate it with the subsequent code:
<?php
namespace Mageplaza\Customize\Block;

class Example extends \Magento\Framework\View\Element\Template
{
    public function getContent() : string
    {
        return 'Placeholder content';
    }
}
Step 6: Execute the Commands
For the final step, execute the commands as follows:
Enable the module:
php bin/magento module:enable Mageplaza_Customize
Run the setup upgrade command:
php bin/magento setup:upgrade
To register a new module, execute the command mentioned above.
Clear the Magento 2 cache:
You can clear the cache using either of the following commands:
php bin/magento cache:flush
Or
php bin/magento clear:cache
The Better Solutions to Create Magento 2 Popup
While employing the Magento 2 modal popup upon clicking is a viable approach, it falls short of being optimal. Primarily, customization options for the popup are limited, hindering efforts to enhance its visual appeal and reduce visitor annoyance. Consequently, you should refer to other solutions for crafting Magento 2 popups by extensions. You can explore the following extensions for reference:
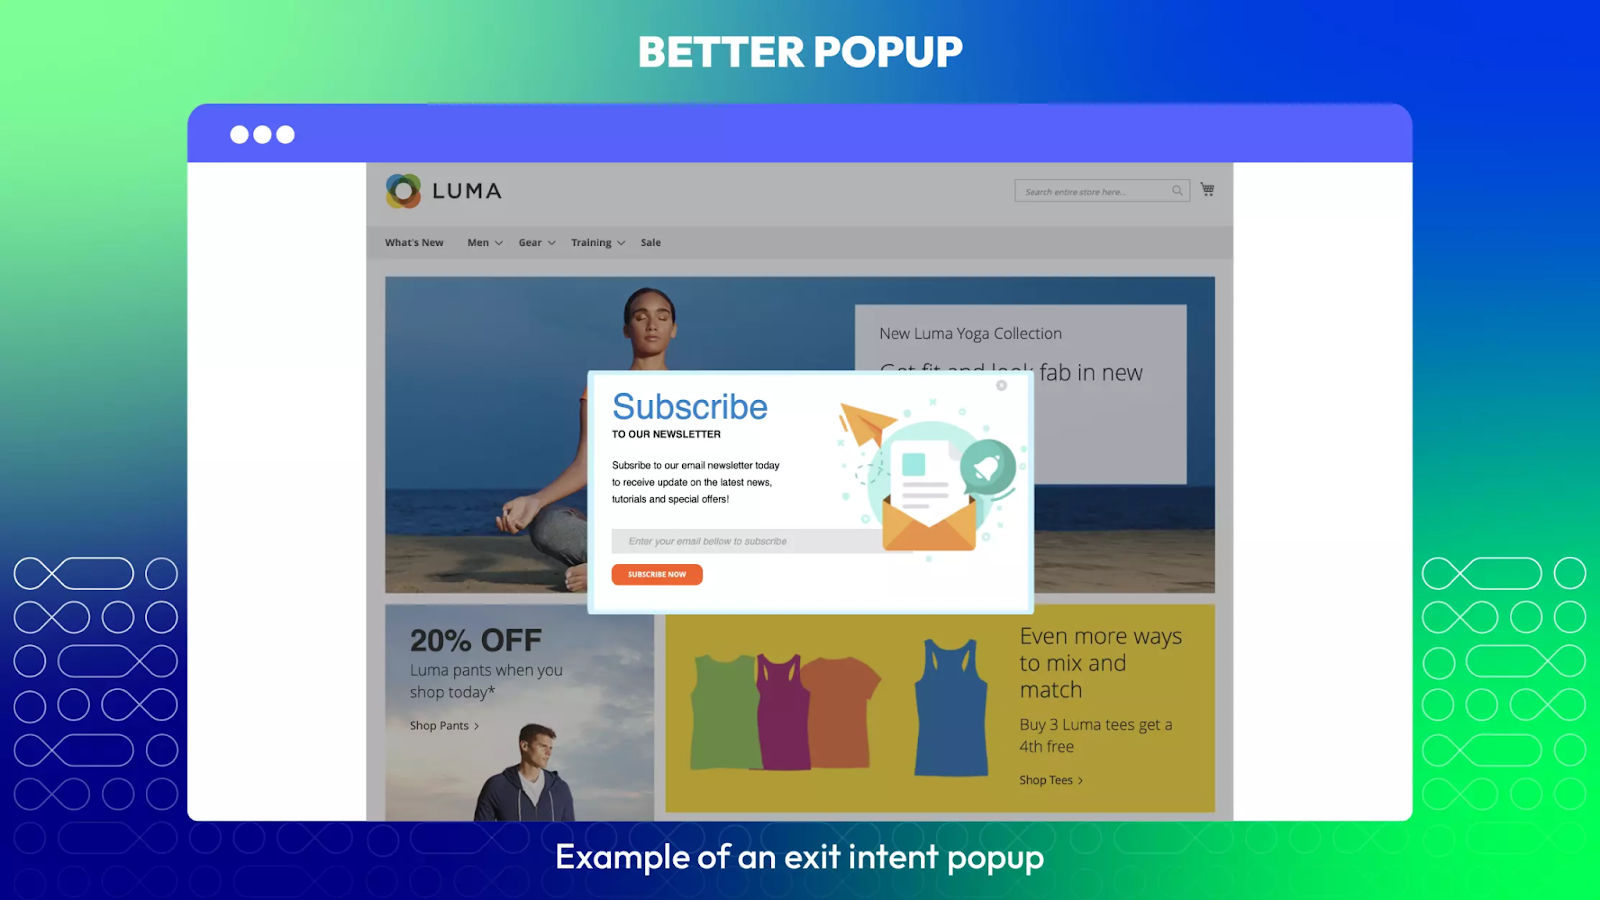
Better Popup
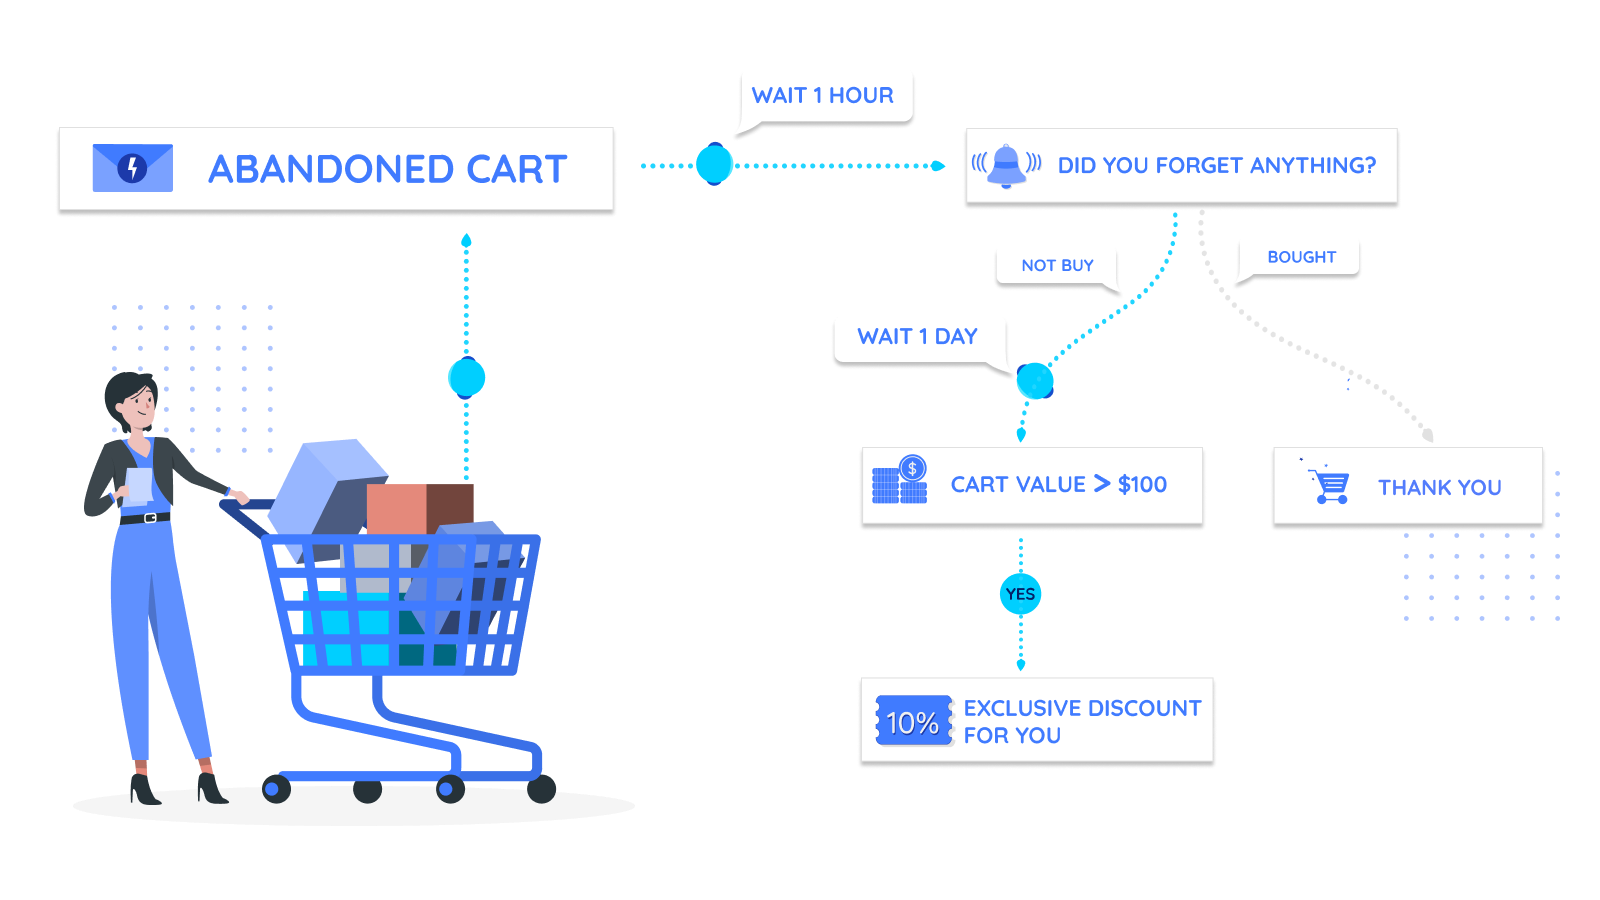
Problems
On average, about 70% of online shopping carts are abandoned at the checkout page, posing a frustrating challenge that results in financial losses for online retailers. In efforts to maintain a healthy business, online stores constantly seek to reduce this figure. Customers who initially express interest in a product may abandon the page without adding it to their cart for various reasons. They might no longer find the product appealing or may be waiting for an additional incentive to make the purchase. Solutions One solution is the Exit Intent Popup for Magento 2, which appears just before visitors intend to leave the site without adding items to their cart. This pop-up delivers an urgent message, prompting visitors to subscribe to the newsletter or offering them a discount. If customers choose not to exit by clicking the button, they are temporarily detained on the site until they click “Subscribe Now.”

Key highlights
-
Boost email list with subscription box popup
-
Exit Intent Popup
-
Highly customizable pop-ups
-
Premade popup templates
-
Exit-intent Popup, Spin to Win
-
Newsletter Popup
-
Problems
Since the inception of the Internet, marketers have recognized the significance of newsletters, a form of email marketing that keeps customers informed about a company’s latest activities and campaigns. This strategy is highly advantageous because it provides a personalized means of cultivating relationships with audiences. As trust develops, these audiences are more inclined to make purchases.
However, the challenge lies in how online stores can reach as many potential customers as possible. Undoubtedly, the primary focus should be on maximizing the visibility of the newsletter form on the website, in addition to ensuring an attractive design and offering compelling incentives to view the newsletter content.
Solutions
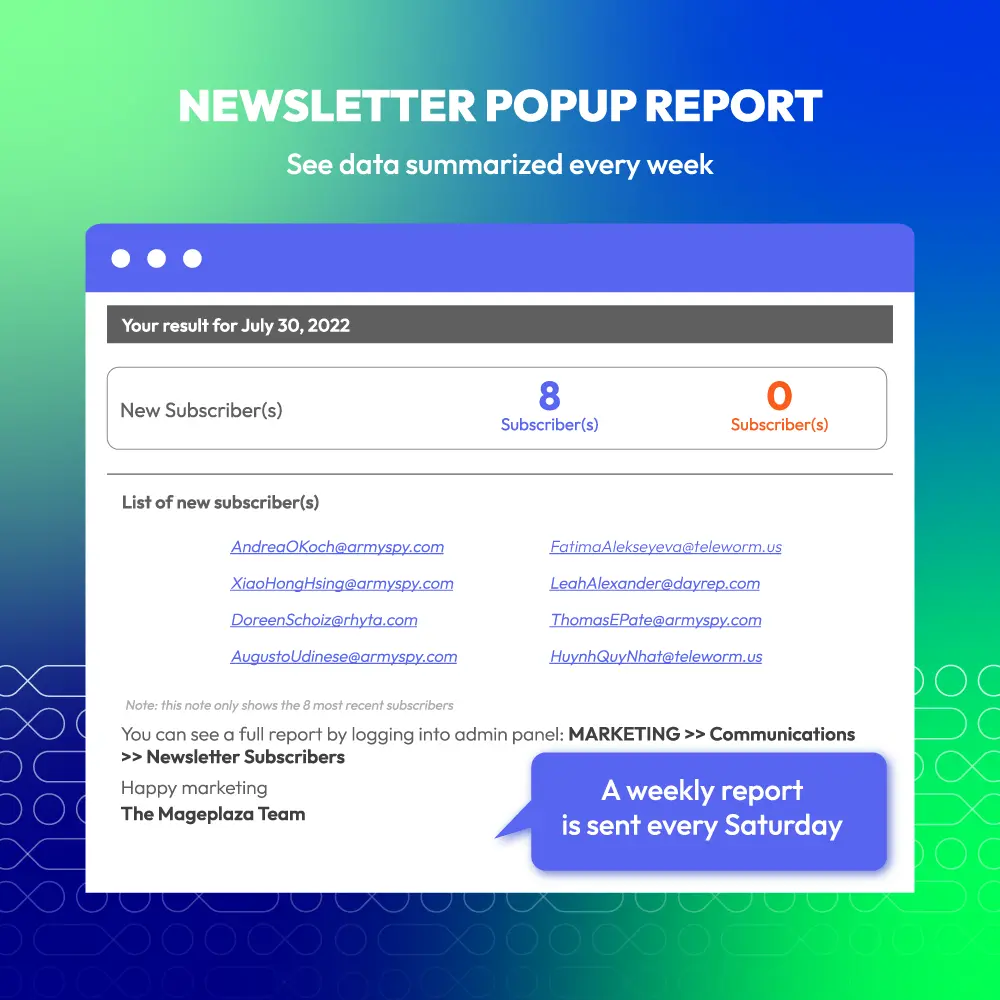
The most effective method to garner attention for your newsletter is undoubtedly through popups. Popups grab visitors’ attention, guaranteeing maximum visibility and ensuring that the content is read. This explains their effectiveness in driving conversions. With theMagento 2 Newsletter Popup Extension, store administrators can customize the popup design, create visually appealing newsletter content, and configure the timing and placement of the popup display, among other options.
Tip: Use popups sparingly and judiciously to avoid frustrating visitors due to overuse. However, consider redisplaying them after several days to remind customers of your updates when they return to your web pages.
Key highlights
-
Customizable newsletter content
-
Newsletter Subscription popup and report
-
Various displayed timing
-
Congratulations popup
-
Pre-made newsletter templates
Conclusion
In conclusion, crafting compelling content for Magento 2 modal popups is an essential aspect of maximizing their effectiveness in engaging visitors and driving conversions. By following the strategies outlined in this guide, you can create modal popups that capture attention, encourage interaction, and ultimately contribute to the success of your Magento 2 store. With careful planning and creativity, your modal popups can become powerful tools for enhancing user experience and achieving your business objectives.
Table of content

Summer is the CMO and Digital Commerce Solution Expert with 10+ years of experience. She specializes in Magento, Shopify, ERP, CRM, AI, and Blockchain, delivering strategic solutions that transform businesses. With a deep understanding of digital commerce, she helps brands scale and stay ahead in a competitive market.
Related Post

7 mins read
|
06-30-2026

How to Enable DebugView in GA4 for your Magento 2 store - Mageplaza
Step-by-step guide to enabling GA4 DebugView for Magento 2 merchants — verify your GA4 events are firing correctly before trusting your data.
8 mins read
|
06-09-2026

Table Rate Shipping in eCommerce: A Practical Guide
Master Magento 2 Table Rate Shipping. Learn how to configure an accurate, automated shipping matrix to optimize your checkout and boost sales.
10 mins read
|
06-02-2026
3 mins read
|
05-30-2026

Google Analytics Ecommerce Reports for Magento Merchants: What to track & Tips
A practical guide to GA4 ecommerce reports for Magento merchants, covering what to track, how to read each report, and specific tips to turn data into revenue decisions.
18 mins read
|
05-20-2026
5 mins read
|
07-30-2026
7 mins read
|
06-30-2026
How to Enable DebugView in GA4 for your Magento 2 store - Mageplaza
Step-by-step guide to enabling GA4 DebugView for Magento 2 merchants — verify your GA4 events are firing correctly before trusting your data.
8 mins read
|
06-09-2026
Table Rate Shipping in eCommerce: A Practical Guide
Master Magento 2 Table Rate Shipping. Learn how to configure an accurate, automated shipping matrix to optimize your checkout and boost sales.
10 mins read
|
06-02-2026
3 mins read
|
05-30-2026
Google Analytics Ecommerce Reports for Magento Merchants: What to track & Tips
A practical guide to GA4 ecommerce reports for Magento merchants, covering what to track, how to read each report, and specific tips to turn data into revenue decisions.
18 mins read
|
05-20-2026