


7 mins read
|
06-30-2026
How to Add Checkbox to Checkout in Magento 2
Vinh Jacker
|
03-17-2025

Magento’s default configuration provides basic functionality for the checkout process, but relying only on the default setup may not collect valuable data for store owners. Forward-thinking entrepreneurs often find ways to enhance the checkout process by adding a checkbox to the checkout page. This checkbox not only allows customers to select additional options but also collects important customer information for the store owner.
In this article, we’ll explore two methods for adding a checkbox to the Magento 2 checkout page. They consist of customizing code manually or using a Magento Edit Checkout Fields.
Method 1: Use Code to Add Checkbox to Checkout Page
Step 1: Create the layout file
Firstly, create a new file named in the below-given path
VendorName/ModuleName/view/frontend/layout/checkout_index_index.xml
This file depends on the Magento_Checkoutmodule to customize the checkout page.
Note: Replace VendorName and ModuleName with the actual module names in your custom module.
Step 2: Create a custom JavaScript file
Under the folder VendorName/ModuleName/view/frontend/web/js/view, create a custom JavaScript file named yourcustom.js.
Now, add the below-mentioned code:
define(
    [
        'ko',
        'uiComponent'
    ],
    function (ko, Component) {
        "use strict";

        return Component.extend({
            defaults: {
                template: 'VendorName_ModuleName/yourtemplatefileName'
            },
            isRegisterNewsletter: true
        });
    }
);
Step 3: Create the HTML template file
In the folder VendorName/ModuleName/view/frontend/web/template, create a theme extending file named yourtemplatefileName.html.
<div class="col-mp mp-12">
    <input type="checkbox" name="newsletter" data-bind="checked: isRegisterNewsletter, attr: {id: 'place-order-newsletter'}"/>
    <label data-bind="attr: {for: 'place-order-newsletter'}"><span data-bind="i18n: 'Custom checkbox'"></span></label>
</div>
Step 4: Add components to checkout page layout
Finally, add JavaScript-powered components to the checkout page layout, using an HTML file as a template, located at
VendorName/ModuleName/view/frontend/layout/checkout_index_index.xml
<page xmlns:xsi="http://www.w3.org/2001/XMLSchema-instance" layout="1column" xsi:noNamespaceSchemaLocation="urn:magento:framework:View/Layout/etc/page_configuration.xsd">
    <body>
        <referenceBlock name="checkout.root">
                <arguments>
                    <argument name="jsLayout" xsi:type="array">
                        <item name="components" xsi:type="array">
                            <item name="checkout" xsi:type="array">
                                <item name="children" xsi:type="array">
                                    <item name="steps" xsi:type="array">
                                        <item name="children" xsi:type="array">
                                            <!-- Modifying an existing step-->
                                            <item name="shipping-step" xsi:type="array">
                                                <item name="children" xsi:type="array">
                                                    <item name="shippingAddress" xsi:type="array">
                                                        <item name="children" xsi:type="array">
                                                            <item name="before-form" xsi:type="array">
                                                                <item name="children" xsi:type="array">
                                                                    <item name="newsletter" xsi:type="array">
                                                                        <item name="component" xsi:type="string">VendorName_ModueName/js/view/yourcustom</item>
                                                                    </item>
                                                                </item>
                                                            </item>
                                                        </item>
                                                    </item>
                                                </item>
                                            </item>

                                        </item>
                                    </item>
                                </item>
                            </item>
                        </item>
                    </argument>
                </arguments>
        </referenceBlock>
    </body>
</page>
Method 2: Use Magento 2 Custom Checkout Fields Extension
Another way to create multiple checkboxes or additional fields within minutes is to use Magento 2 Custom Checkout Fields extension. With this extension, you can generate new fields directly from your admin panel without requiring any programming skills.
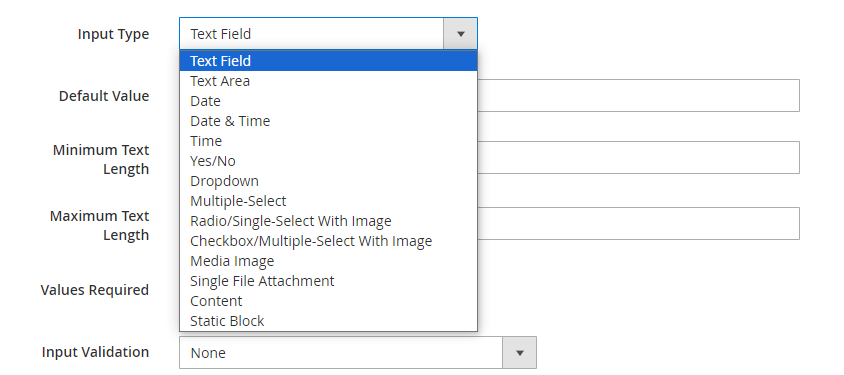
Magento 2 Custom Checkout Fields allow online owners to add and customize additional fields to the checkout pages. With this module, businesses can efficiently collect essential customer information through 14 input types, including text field, text area, date, date & time, yes/no, dropdown, multiple-select, radio/ single-select with image, checkbox/ multiple-select with image, media file attachment, content, and static block.
You have the flexibility to add custom fields and position them anywhere on your checkout pages. This allows you to create concise surveys and collect valuable customer data. From the results, you can quickly address any issues that impact your website’s shopping experience and enhance your business’s brand.
Furthermore, this module packs in extra outstanding features for store owners.
- Collect customer information with unlimited attributes
- Limit fields to specific customer groups and store views
- Set attribute priority for frontend display
- Configure fields to appear depending on others
- Show new attributes in various positions
- Manage custom fields easily in order grid
- Display custom fields in PDFs and emails as needed
Here is the step-by-step guide to adding a checkbox to the checkout page via Magento 2 Custom Checkout Fields extension:
-
Navigate to
Mageplaza > Order Attributes > Manage Attributes -
Click
Create New Attributeto make a new custom field -
Fill in the following details:
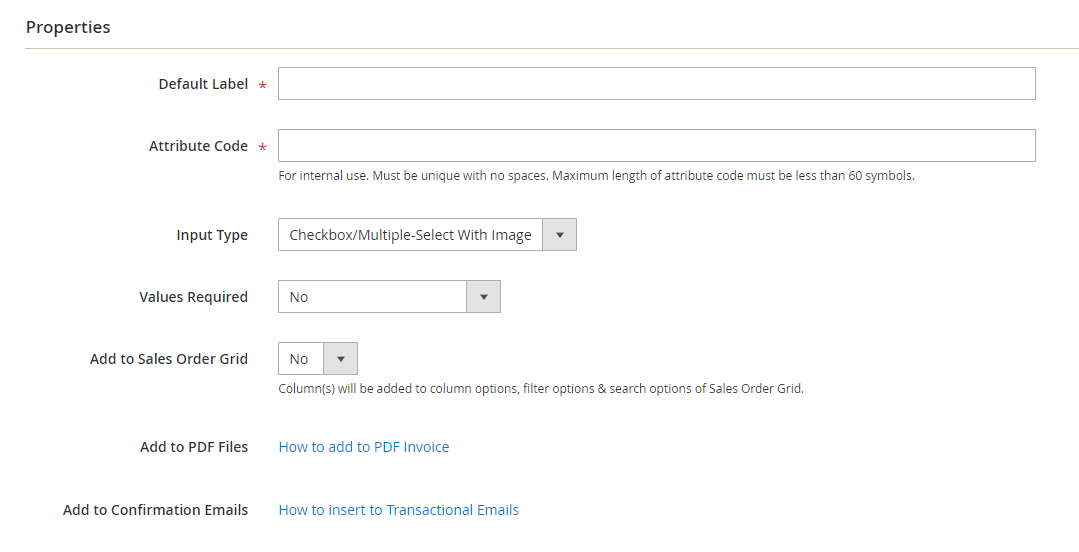
- Default Label: Add the name of the new custom field
- Attribute Code: Add a code for the new custom field (no spaces, max 30 symbols).
- Input Type: Choose Checkbox/Multiple-Select With Image
- Values Required: Decide whether the custom field is compulsory to fill in.
- Add to Sales Order Grid: Choose whether to add the custom field to the order grid
- Add to PDF Files: Add the custom field to PDF documents
- Add to Confirmation Emails: Insert the custom field to confirmation emails
- Click Save to create the new order attribute.
In conclusion, adding a checkbox to the Magento 2 checkout page can be achieved through two methods. Apart from direct coding, we suggest using the Magento 2 Custom Checkout Fields extension from Mageplaza to enhance user experience and streamline the transaction process. By following the steps outlined above, you’ll find the best option for your website.
Table of content

Jacker is the Chief Technology Officer (CTO) at Mageplaza, bringing over 10 years of experience in Magento, Shopify, and other eCommerce platforms. With deep technical expertise, he has led numerous successful projects, optimizing and scaling online stores for global brands. Beyond his work in eCommerce development, he is passionate about running and swimming.
Related Post


How to Enable DebugView in GA4 for your Magento 2 store - Mageplaza
Step-by-step guide to enabling GA4 DebugView for Magento 2 merchants — verify your GA4 events are firing correctly before trusting your data.
8 mins read
|
06-09-2026

Table Rate Shipping in eCommerce: A Practical Guide
Master Magento 2 Table Rate Shipping. Learn how to configure an accurate, automated shipping matrix to optimize your checkout and boost sales.
10 mins read
|
06-02-2026
3 mins read
|
05-30-2026

Google Analytics Ecommerce Reports for Magento Merchants: What to track & Tips
A practical guide to GA4 ecommerce reports for Magento merchants, covering what to track, how to read each report, and specific tips to turn data into revenue decisions.
18 mins read
|
05-20-2026

5 Ways to Hide Products on Shopify (2026 Guide)
Explore the best 5 ways to hide products on Shopify. Learn how to manage visibility, protect pricing, and create a tailored shopping experience for buyers.
18 mins read
|
05-16-2026
7 mins read
|
06-30-2026
How to Enable DebugView in GA4 for your Magento 2 store - Mageplaza
Step-by-step guide to enabling GA4 DebugView for Magento 2 merchants — verify your GA4 events are firing correctly before trusting your data.
8 mins read
|
06-09-2026
Table Rate Shipping in eCommerce: A Practical Guide
Master Magento 2 Table Rate Shipping. Learn how to configure an accurate, automated shipping matrix to optimize your checkout and boost sales.
10 mins read
|
06-02-2026
3 mins read
|
05-30-2026
Google Analytics Ecommerce Reports for Magento Merchants: What to track & Tips
A practical guide to GA4 ecommerce reports for Magento merchants, covering what to track, how to read each report, and specific tips to turn data into revenue decisions.
18 mins read
|
05-20-2026
5 Ways to Hide Products on Shopify (2026 Guide)
Explore the best 5 ways to hide products on Shopify. Learn how to manage visibility, protect pricing, and create a tailored shopping experience for buyers.
18 mins read
|
05-16-2026