



6 mins read
|
09-30-2026
How to add Customer Attribute to Checkout page in Magento 2
Vinh Jacker
|
07-28-2026


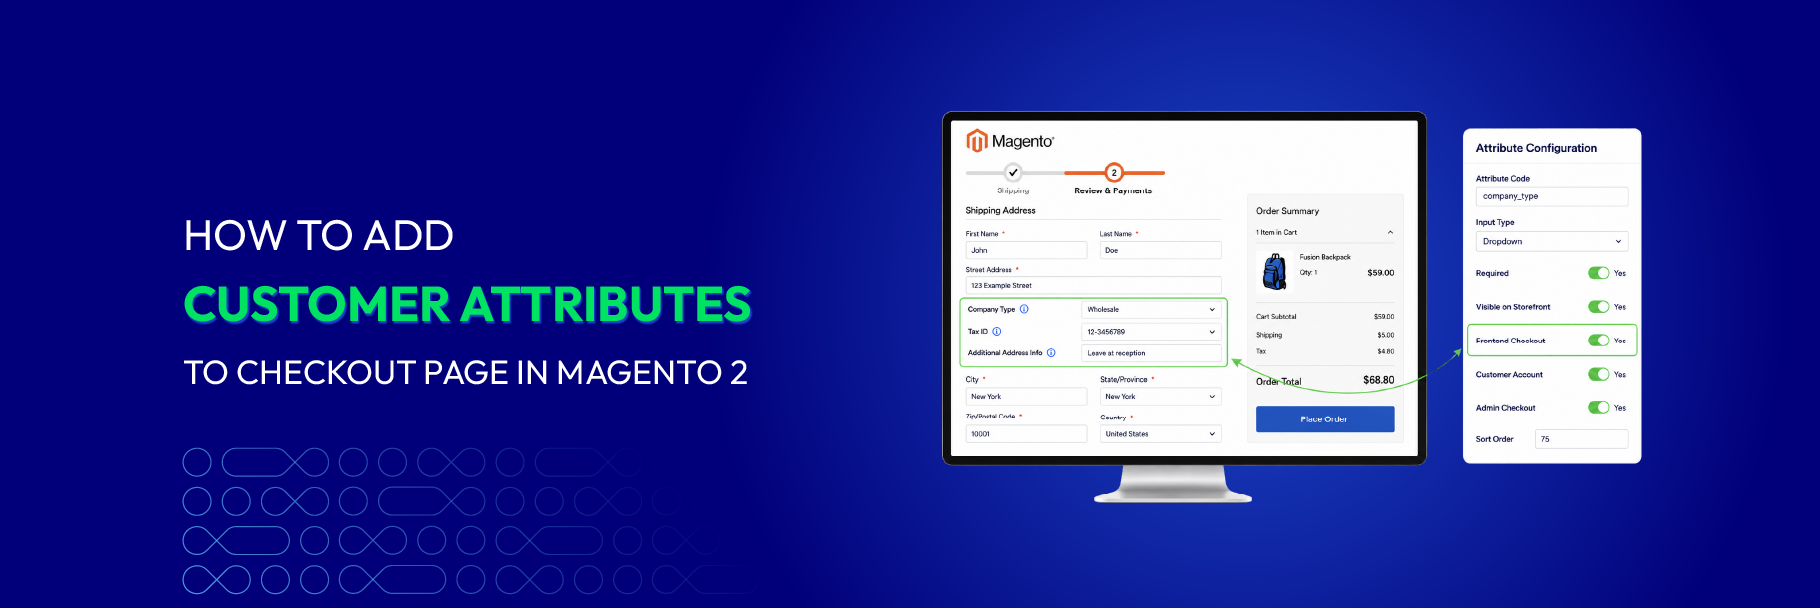
Checkout is the stage every store owner watches most closely — it’s the final step before a visitor becomes a customer, and the product is only one click away from being on its way to the buyer’s door. Because of that, checkout is also a valuable opportunity to collect a bit more information from the customer: an extra email address, a birthday, a preference, or a quick note about their shopping experience.
If you’re looking for a fully code-based approach instead, see our guide on adding custom fields to Magento 2 checkout programmatically.
In this post, we’ll walk through the Customer Attributes function built by Mageplaza, how it works, and how to configure it to show up on your checkout page.
What Are Customer Attributes in Magento 2?
Customer Attributes are custom fields that help stores collect customer information beyond Magento 2’s default fields. Mageplaza Customer Attributes extends this capability by allowing merchants to create and manage flexible attributes for both customer accounts and customer addresses.
Customer Attributes are linked to customer accounts, such as birthdays, customer types, company details, or preferences. These fields can appear during account creation and editing, as well as in Admin Checkout.
Mageplaza Customer Attributes supports a wide range of input formats, so you can choose the type that best fits the kind of information you want to collect. The table below summarizes the most common field types and where they’re typically used:
| Field Type | Example | Attribute Location | Application | Notes |
|---|---|---|---|---|
| Text Field | • Full Name • Phone Number |
Contact Info section | Short text input | • Optional validation (Email, Phone format) • Ensures correct format |
| Text Area | • Street Address • Customer Bio • Order Note |
Additional Info section | Free-form input for longer text entries | • Ideal for plain text notes • Supports multi-line input |
| Content | • Detailed Descriptions • Rich Formatted Notes |
Product / Profile Description | Long and rich text input | • Supports HTML / Rich Text formatting • Ideal for detailed descriptions |
| Date | • Date of Birth • Preferred Delivery Date |
Personal Details section | Date selection via calendar | • Interactive calendar pop-up • Standardized date entry |
| Yes/No | • Subscribe Newsletter • VIP Status |
Preferences section | Simple binary choice | • Quick decisions • Easy Yes/No selection |
| Dropdown | • Country / City • Department |
Address section | Predefined single-option selection | • Ensures consistent data entry • Saves screen space |
| Multiple Select | • Hobbies • Interested Categories |
Interests section | Predefined multi-option selection | • Ensures consistent data entry • Select multiple items from list |
| Single Select with Image | • Color Choice (Red/Blue) • Product Style |
Product Attributes section | Visual single-choice selection | • Uses images for easy choice • Select 1 visual option |
| Multi-Select with Image | • Favorite Colors • Selected Free Gifts |
Customer Preferences section | Visual multi-choice selection | • Uses visual aids • Select multiple visual options |
| Media Image | • Customer Avatar • Photo Attachment |
Account Settings section | Image file upload | • Enables customers to upload images • Makes selection/verification easier |
| Single File Attachment | • Resume (PDF) • Tax Document |
Job Application / Support | Document file upload | • Supports document uploads • Collects extra information/files |
How to Add a Customer Attribute to Checkout
Setting up a Customer Attribute takes three main stages:
- Enter the attribute’s core information (Properties)
- Set the labels shown on the frontend (Manage Labels)
- Choose where the attribute displays (Storefront Properties)
Steps 1 and 2 are covered in detail in our Customer Attributes user guide. This section focuses on Step 3, getting your attribute to appear on the checkout page.
Step 1: Configure in the Backend
From the Admin Panel, navigate to Stores > Attributes > Customer and click Add New Attribute.
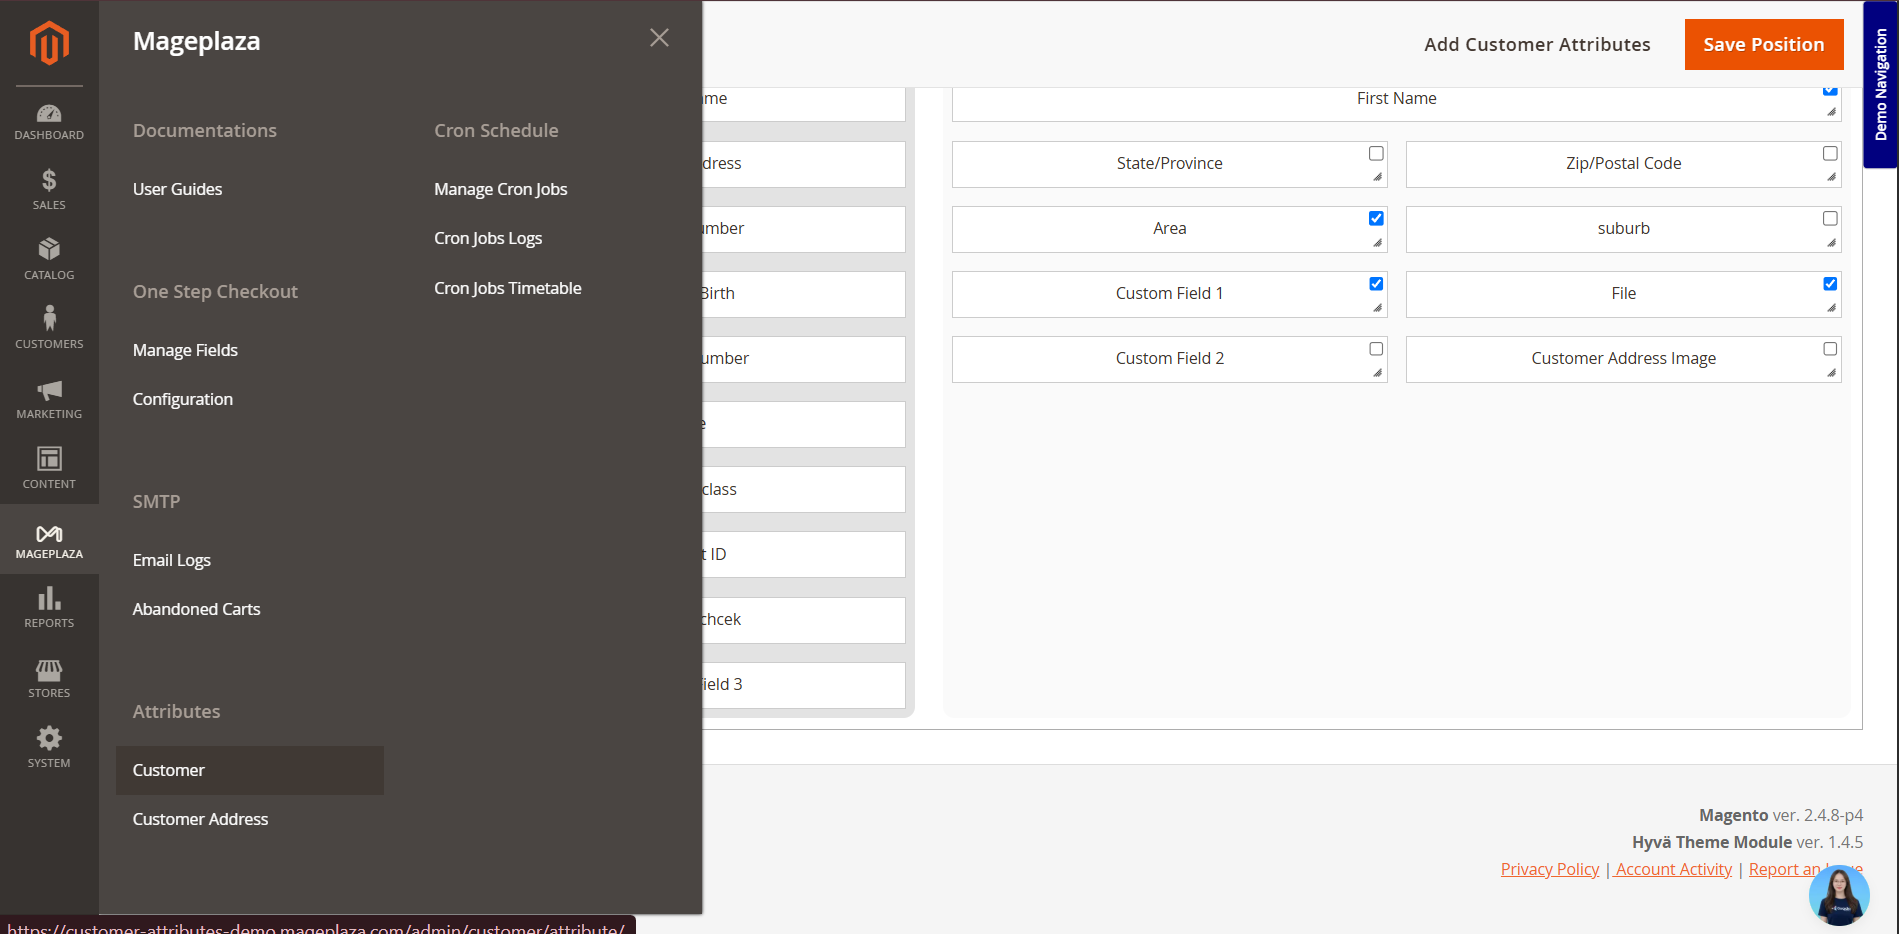
- Complete the Properties and Manage Labels sections.
- Under Storefront Properties, look for the Show on Forms setting.
- To get the field onto the storefront checkout, make sure you’re configuring a Customer Address attribute rather than a plain Customer one — only the Address type includes Frontend Checkout as an option. Tick Frontend Checkout and/or Admin Checkout depending on where you want the attribute to appear.
Step 2: Organize with One Step Checkout
If your store runs Magento 2 One Step Checkout, you get finer drag-and-drop control over field positions:
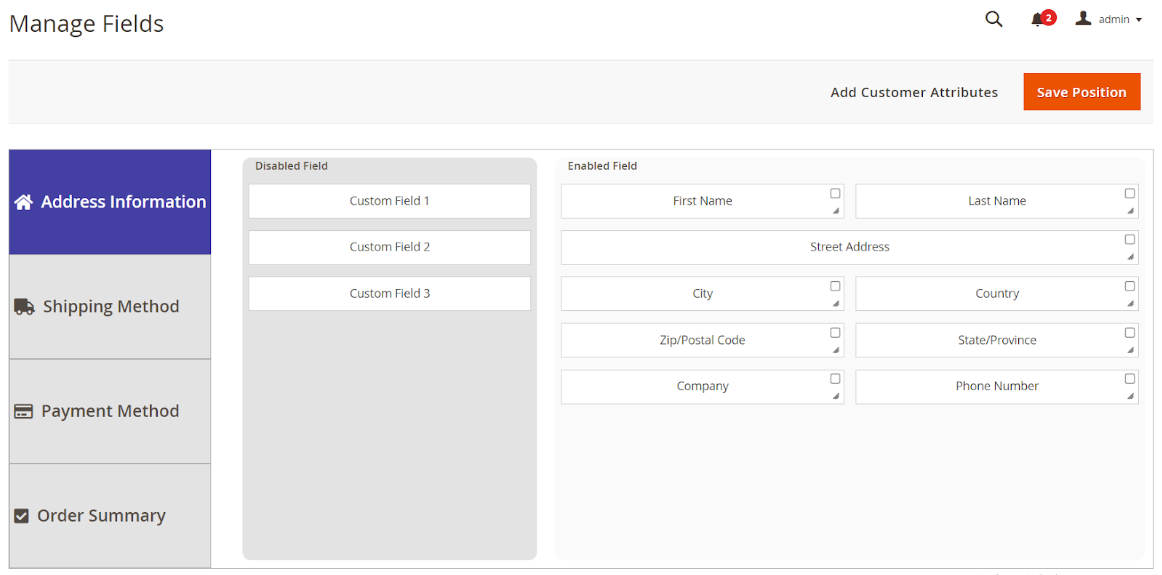
- Go to Stores > One Step Checkout > Manage Fields.
- Drag your new attribute into the Sorted Fields column, in the exact position you want.
💡 Tip: the Manage Fields matrix works seamlessly with both Customer Attributes and Order Attributes, letting you arrange all custom fields from a single dashboard.
Step 3: Frontend & Admin Verification
After saving the configuration, test the checkout process to make sure the field appears and works as expected.
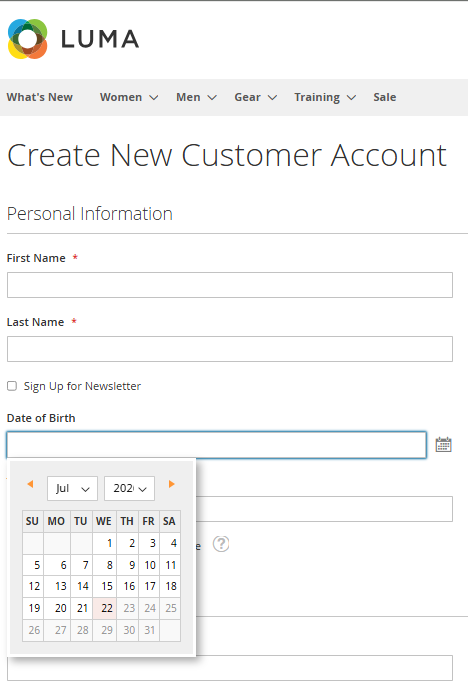
- Storefront Checkout: check the checkout page on the frontend to confirm your field renders correctly.
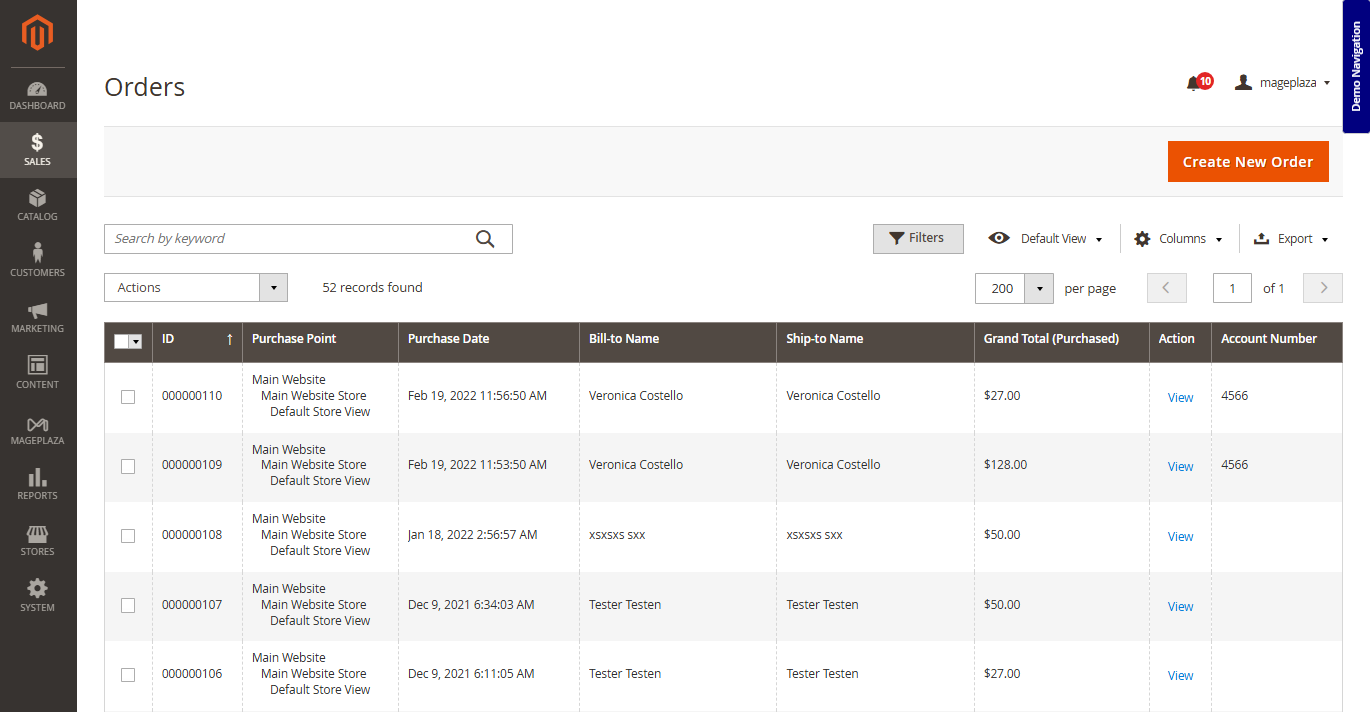
- Admin Checkout: if enabled, admins creating manual orders under Sales > Orders will see the field available during backend order creation.
- Visibility: Check that customer group and store view rules work correctly.
- Mobile: Make sure the custom field displays properly on smaller screens.
What If You Need to Collect Order-Specific Information?
Customer Attributes work best for information that belongs to the customer or their address and may be reused across purchases. But not every custom field needs to be saved this way.
For example, a customer may use the same address for multiple orders but choose a different delivery time, enter a new PO number, or leave different special instructions for each purchase. Since this information changes from one order to another, it should be associated with the individual transaction.
In these cases, Magento 2 Order Attributes is a better fit, allowing merchants to collect and manage information specific to each order.
💡 A simple way to choose:
Reusable customer or address information → Customer Attributes
Information that changes with each order → Order Attributes
FAQs
Can a regular Customer Attribute appear on Frontend Checkout?
No. Standard Customer Attributes can appear on Customer Account Create, Customer Account Edit, and Admin Checkout.
To display a custom field on the storefront checkout, create a Customer Attribute and enable Frontend Checkout under Show on Forms.
What input types do Customer Attributes support?
Mageplaza Customer Attributes supports various input formats, including text fields, text areas, dates, dropdowns, multiple selections, file uploads, and visual selection options.
Choose the input type that makes it easiest for customers to provide the required information.
Can I show an attribute only to specific customer groups?
Yes. You can control attribute visibility by customer group and store view, allowing specialized fields to appear only to relevant customers.
Do Customer Attributes work with One Step Checkout?
Yes. Customer Address Attributes can be arranged within Mageplaza One Step Checkout through Manage Fields, giving you more control over field placement.
Can one Customer Attribute depend on another?
Yes. You can create conditional relationships between attributes. For example, a Tax ID field could appear only when the customer selects a business-related option.
For more advanced configurations, see our guide on setting up dependent Customer Attributes in Magento 2.
Summary
Adding a Customer Attribute to Magento 2 checkout mainly comes down to choosing the right attribute type and display position. If the field needs to appear on Frontend Checkout, it should be created as a Customer Address Attribute and enabled for the appropriate form.
Beyond the technical setup, consider whether the information needs to be collected at checkout and how it will be used afterward. A clear purpose for each field helps keep customer data useful without making the checkout process unnecessarily complex.
Table of content

Jacker is the Chief Technology Officer (CTO) at Mageplaza, bringing over 10 years of experience in Magento, Shopify, and other eCommerce platforms. With deep technical expertise, he has led numerous successful projects, optimizing and scaling online stores for global brands. Beyond his work in eCommerce development, he is passionate about running and swimming.
Related Post

16 mins read
|
08-30-2026
5 mins read
|
07-30-2026
7 mins read
|
06-30-2026

How to Enable DebugView in GA4 for your Magento 2 store - Mageplaza
Step-by-step guide to enabling GA4 DebugView for Magento 2 merchants — verify your GA4 events are firing correctly before trusting your data.
8 mins read
|
06-09-2026
Table Rate Shipping in eCommerce: A Practical Guide
Master Magento 2 Table Rate Shipping. Learn how to configure an accurate, automated shipping matrix to optimize your checkout and boost sales.
10 mins read
|
06-02-2026
6 mins read
|
09-30-2026
16 mins read
|
08-30-2026
5 mins read
|
07-30-2026
7 mins read
|
06-30-2026
How to Enable DebugView in GA4 for your Magento 2 store - Mageplaza
Step-by-step guide to enabling GA4 DebugView for Magento 2 merchants — verify your GA4 events are firing correctly before trusting your data.
8 mins read
|
06-09-2026
Table Rate Shipping in eCommerce: A Practical Guide
Master Magento 2 Table Rate Shipping. Learn how to configure an accurate, automated shipping matrix to optimize your checkout and boost sales.
10 mins read
|
06-02-2026