Hyvä Theme is Now Open Source: What This Means for Magento Community - Mageplaza
Hyvä is now Open Source and free. Discover what changed, what remains commercial, how it impacts the Magento ecosystem, and how to maximize its full potential.

Gift cards have become one of the most popular choices during the holiday shopping season. According to BlackHawk, over 39% of holiday budgets are used for purchasing gift cards in 2025, making gift cards a simple yet powerful way to attract more buyers, boost loyalty, and keep sales flowing long after the holidays.
In this guide, learn about how to create gift vouchers, from a template, gift codes, and a gift card product to sell from your store using the Mageplaza Gift Card extension.
Holiday gift voucher can be varied in types to offer flexible benefits to customers while still following brand strategies:
Tips:
The holiday season is the perfect time to boost sales and attract new customers with digital and physical gift cards. In this guide, we’ll walk you through how to create and manage holiday gift vouchers in Magento 2 using the Mageplaza Gift Card extension.
First, start creating Magento 2 gift vouchers by designing a gift card template. A well-designed template helps your vouchers reflect your brand’s identity while capturing the festive spirit of the season.
You can design multiple templates for different occasions (like Birthday, Christmas, New Year, or Black Friday) and let customers choose their favorite style when purchasing. This not only enhances personalization but also increases the emotional value of each gift card.
Go to Mageplaza > Gift Card: Manage Templates
Click Create New Template button to create a new template.
Template Information
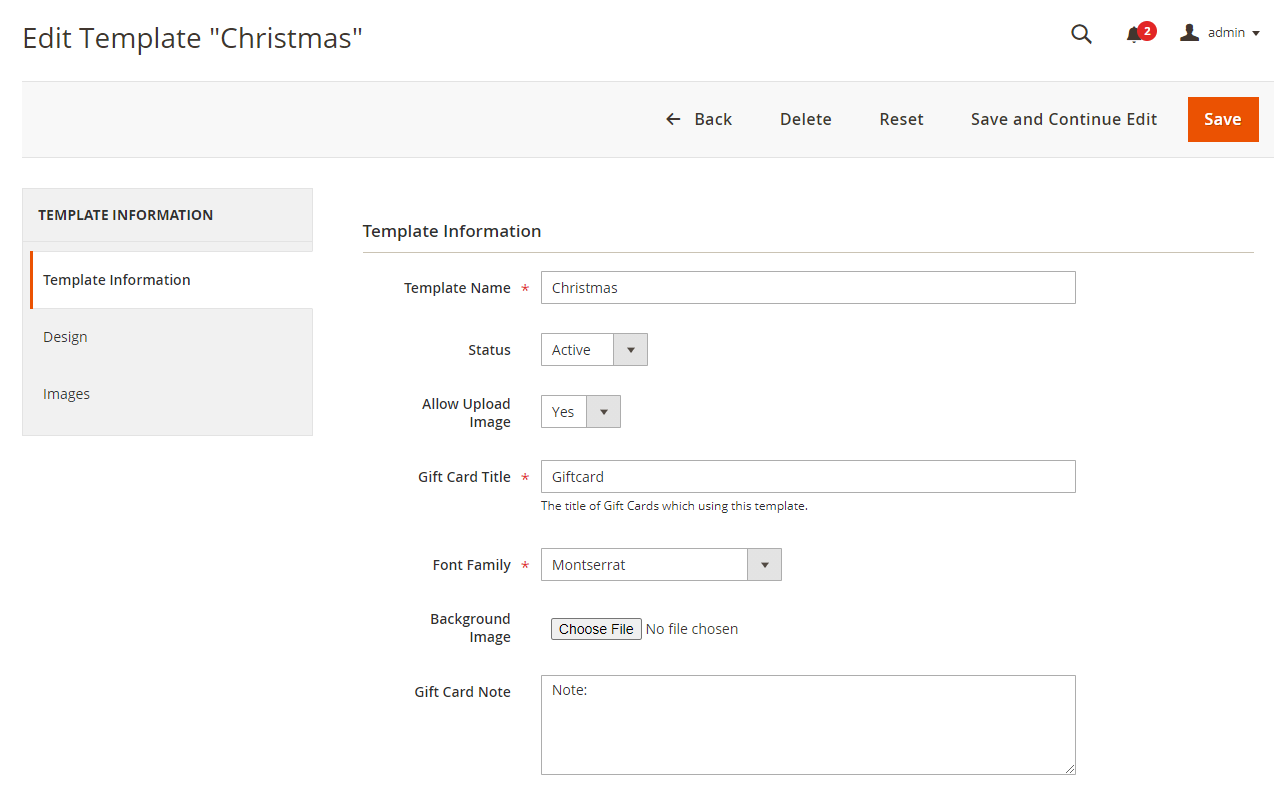
Template NameStatus field to “Active”Allow Upload Image: Allow customers to upload their gift card prints.Gift Card TitleFont Family with ready-made fontsBackground Image or leave it blank to use a white backgroundGift Card Note or use one from Gift Card Template’s configurationDesign
You have 2 options:
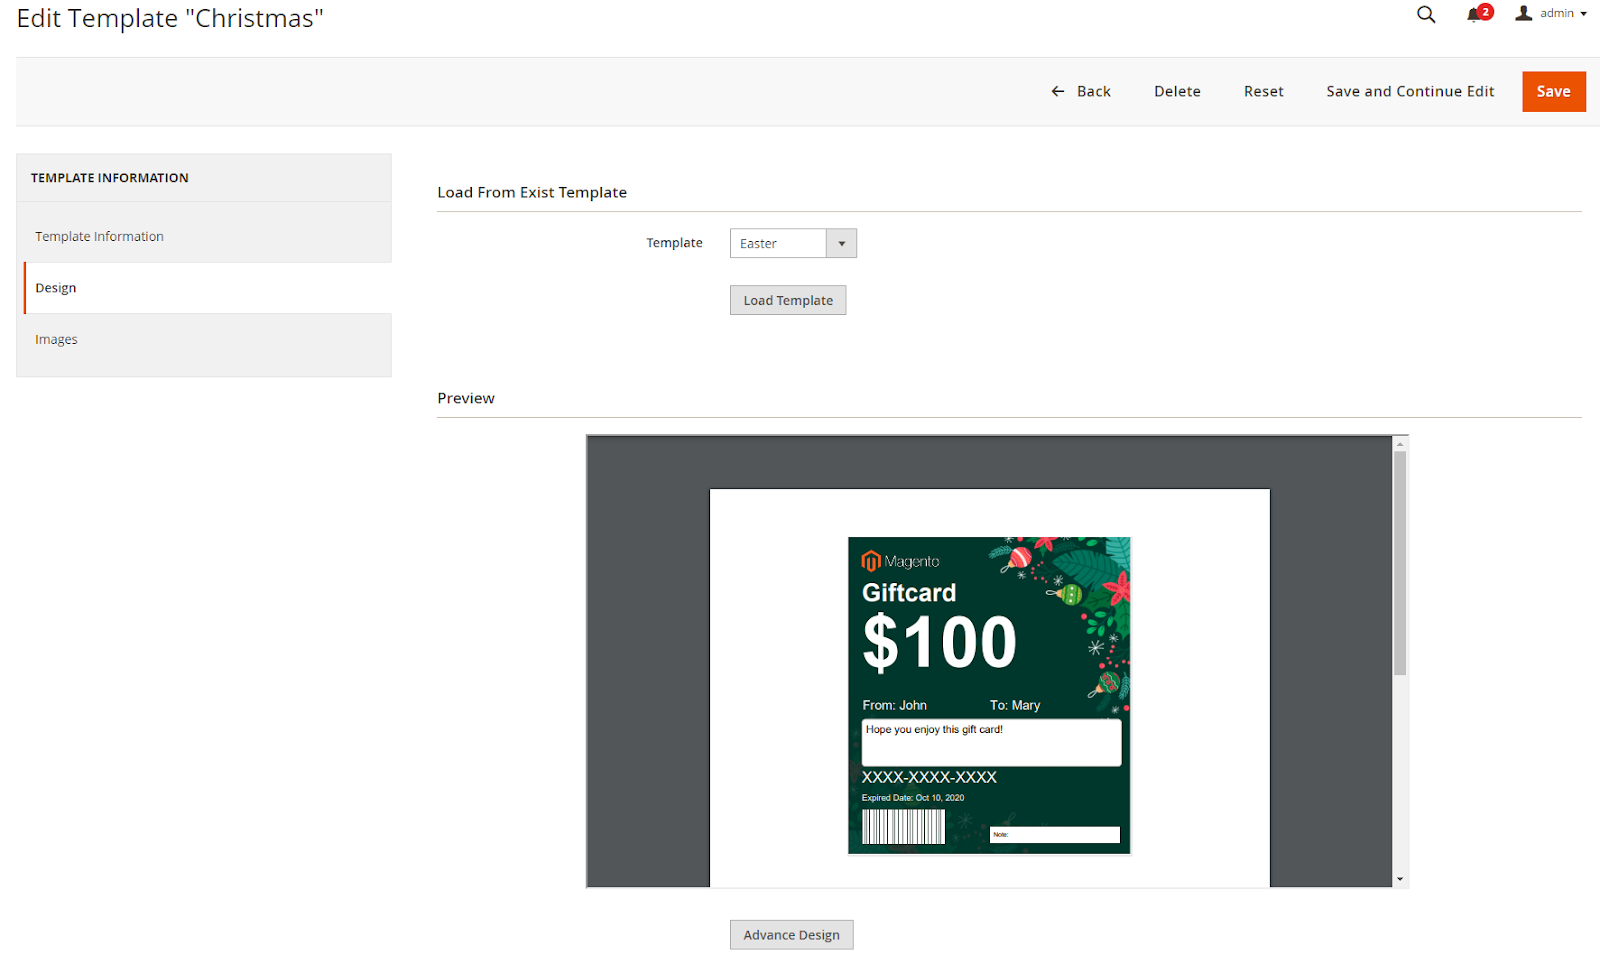

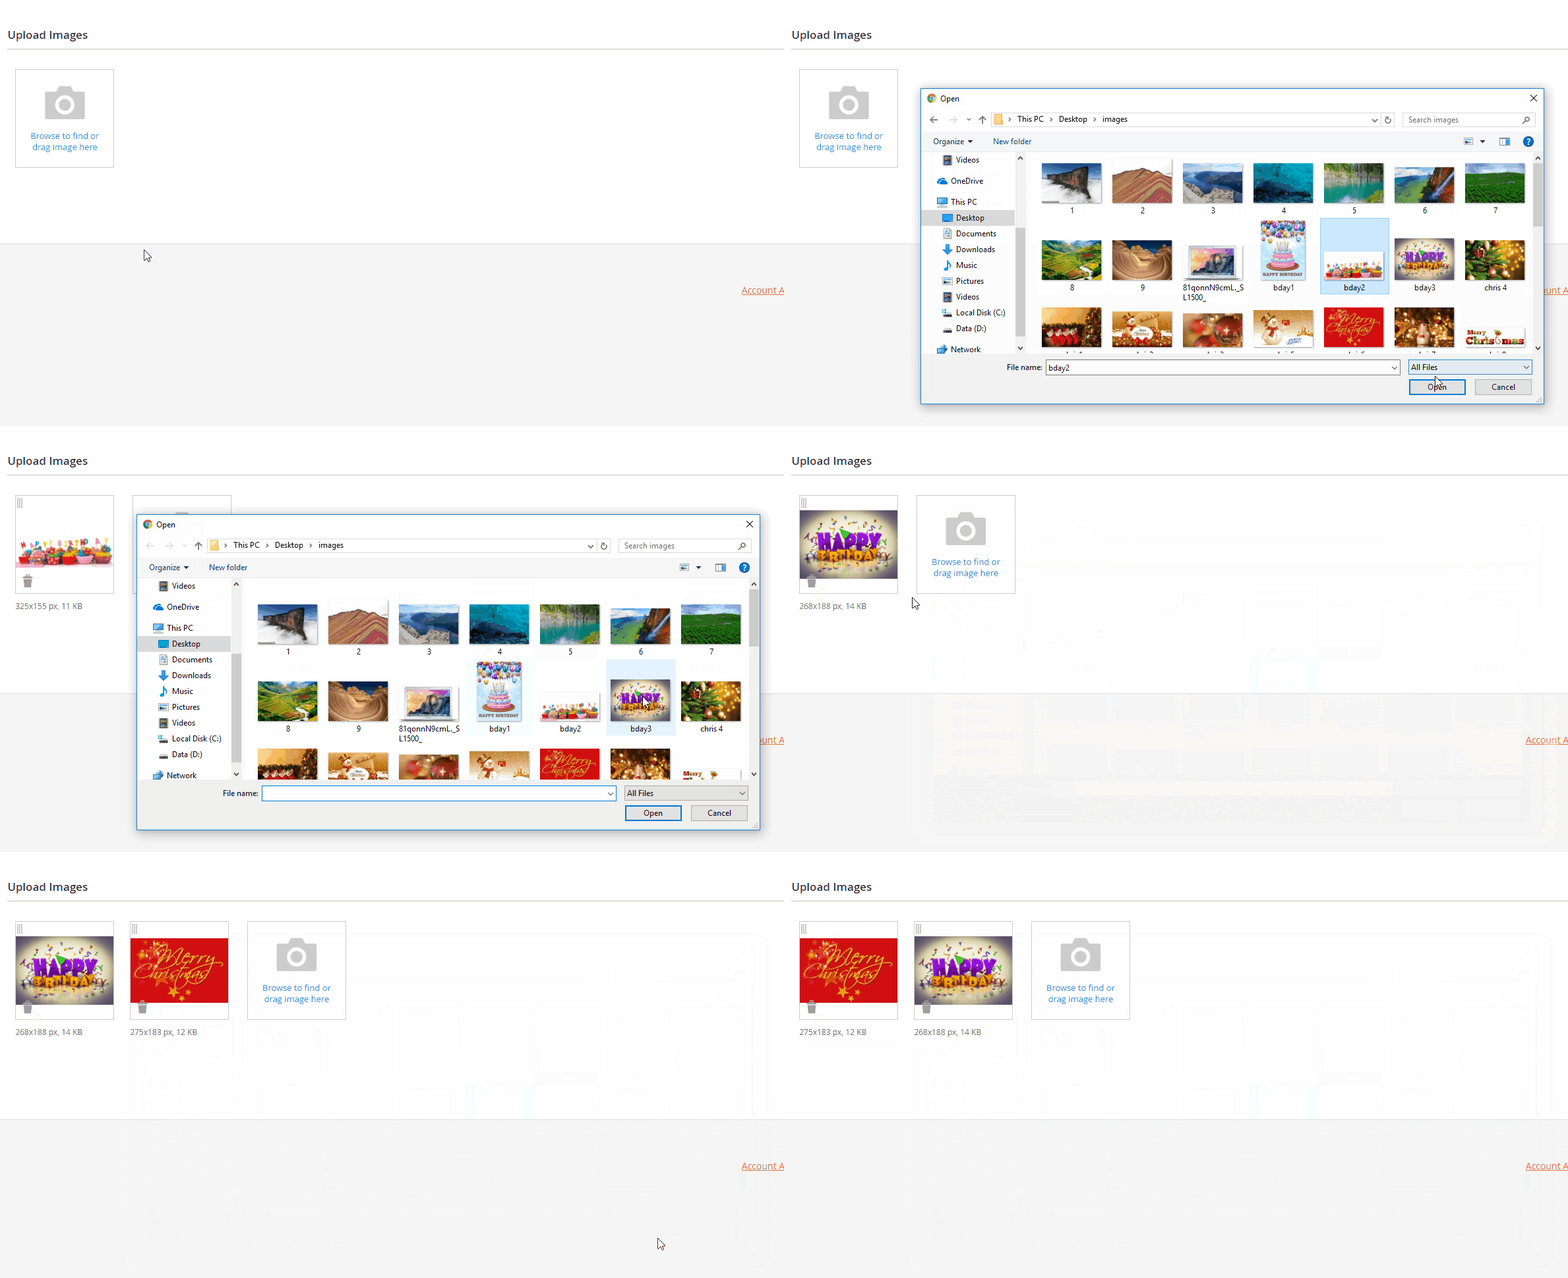
Tips:
Once your template is ready, the next step is to create gift codes, the unique identifiers customers will use to redeem their vouchers. Generating gift codes in advance makes it easier to manage promotions, automate delivery, and prevent duplication.
Go to Mageplaza > Gift Card: Manage Gift Code
Click Create New Gift Code

Gift Code Information

Code PatternBalance fieldStatus field
Is Redeemable: Choose Yes to let customers redeem gift codesStore fieldExpires At fieldCreated At section: Only visible when gift code was created. It includes date and time creation.Created From field: This entry is only visible to gift codes created from the Order that contains the Gift Card Product, including the Order ID and the name of the Gift Card Product.Gift Code Condition
Set up the cart condition to be able to apply new Gift Code created/edited

Next, follow this guide to configure gift cards delivery.
A Gift Code Pool in the Mageplaza Gift Card extension helps you group and manage multiple codes efficiently, especially during busy sales seasons like Christmas or Black Friday.
Each pool can represent a specific campaign or voucher type (for example, Holiday 2025, VIP Rewards, or Employee Gifts). By creating well-structured code pools, store owners can easily track performance, distribute codes in bulk, and reuse them across marketing, loyalty, or seasonal campaigns, saving time and maintaining full control over their Magento 2 gift card operations.
To create a gift code pool, go to Mageplaza > Gift Card: Manage Gift Code Pools, then click Create New Gift Code Pool

Gift Code Pool Information

Name field: A friendly note that you need to name the gift code pool to distinguish easily from other pools.Status field: Choose “Active” to enable the pool.Can Inherit field: Select “Yes” so that created gift codes will also be changed according to the new alternative of the Pool (except for the Status Attribute)Gift Card Information

Gift Code Condition
Gift Code PoolCan Inherit = Yes: All Gift Codes will have the same conditions as the Pool.
Generate Gift Cards
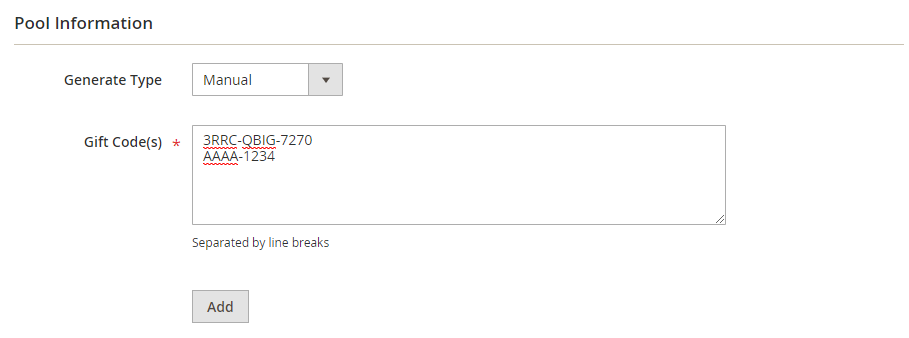
Select 1 in 3 Generate Types as follow:
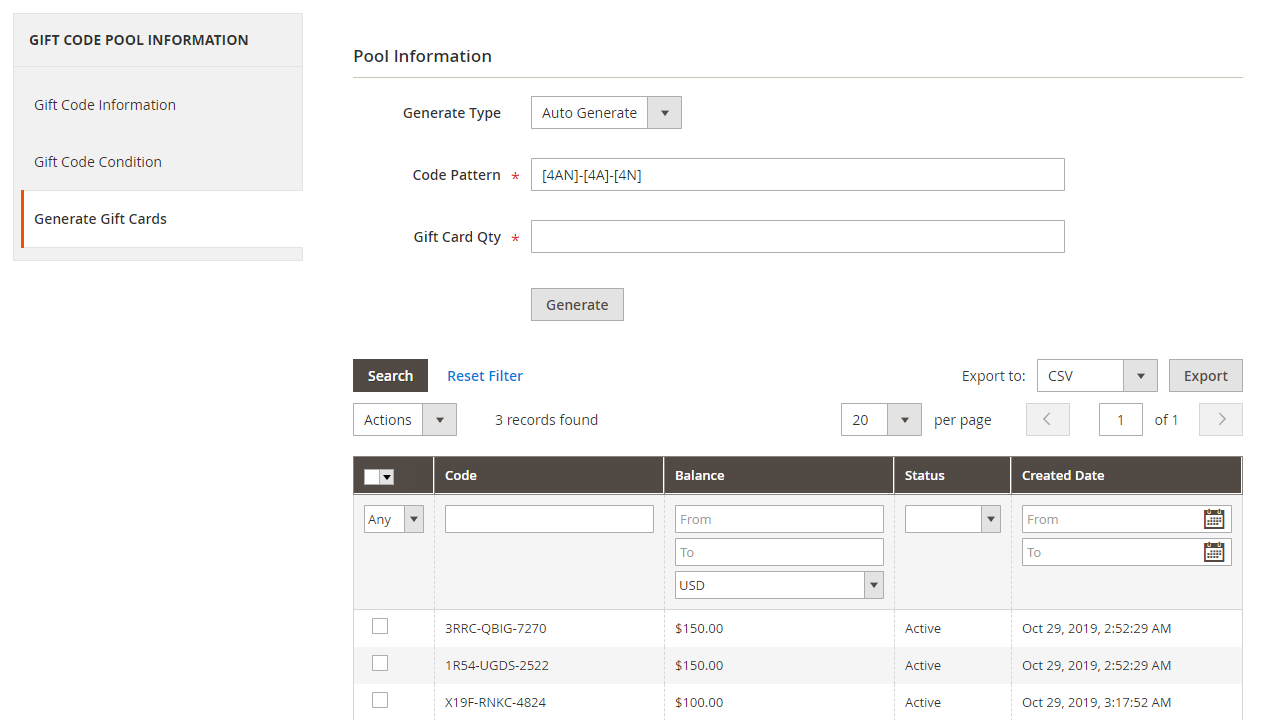
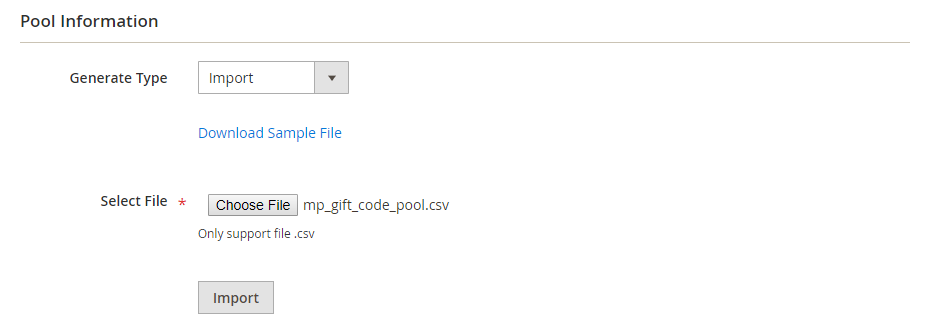
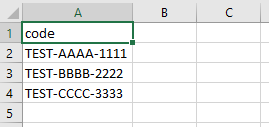
The file could look like this:
Read more: How to import & export gift codes
With the Mageplaza Gift Card extension, Magento 2 stores can easily create and sell gift card products just like any other item in their catalog. These digital or physical gift cards become powerful sales tools during the holiday season — allowing customers to share flexible, thoughtful gifts while driving new traffic and repeat purchases for your store.
To create a new Gift Card Product, go to Product > Catalog > Add New Product > Gift Card Product
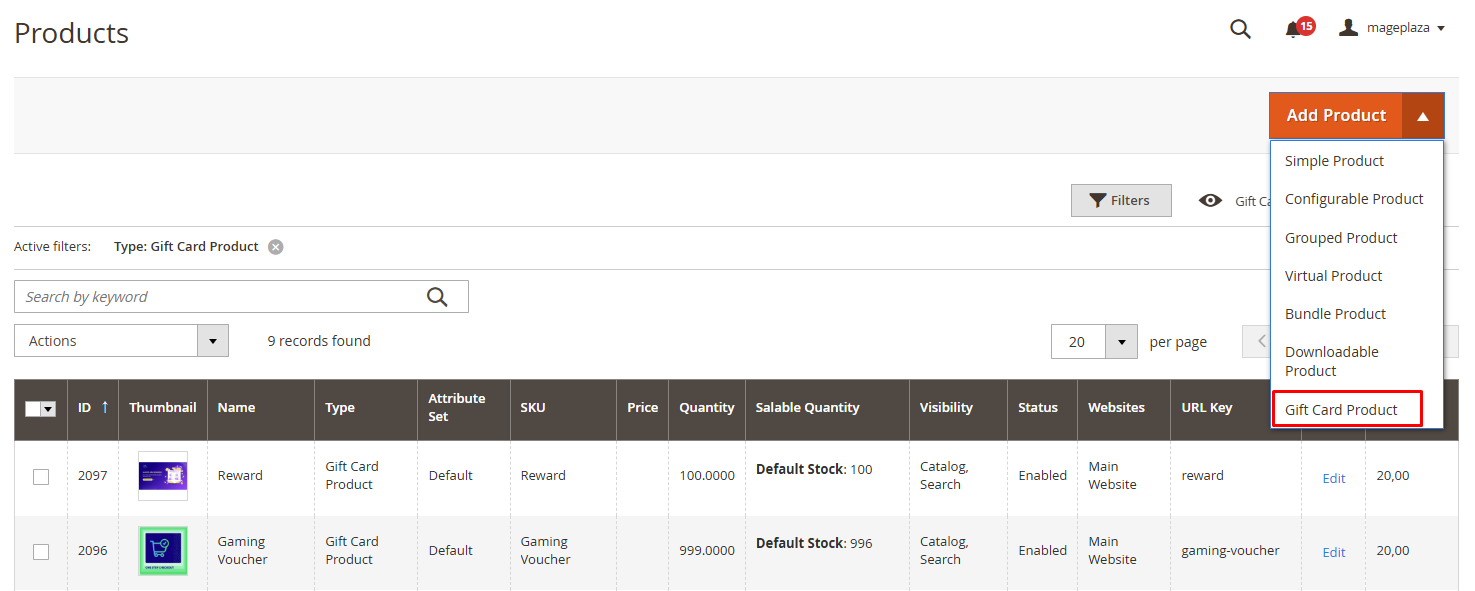
Enter basic information such as: Name, SKU, Qty, Applies to Customer Groups and Tax Class and select Category as Gift Card
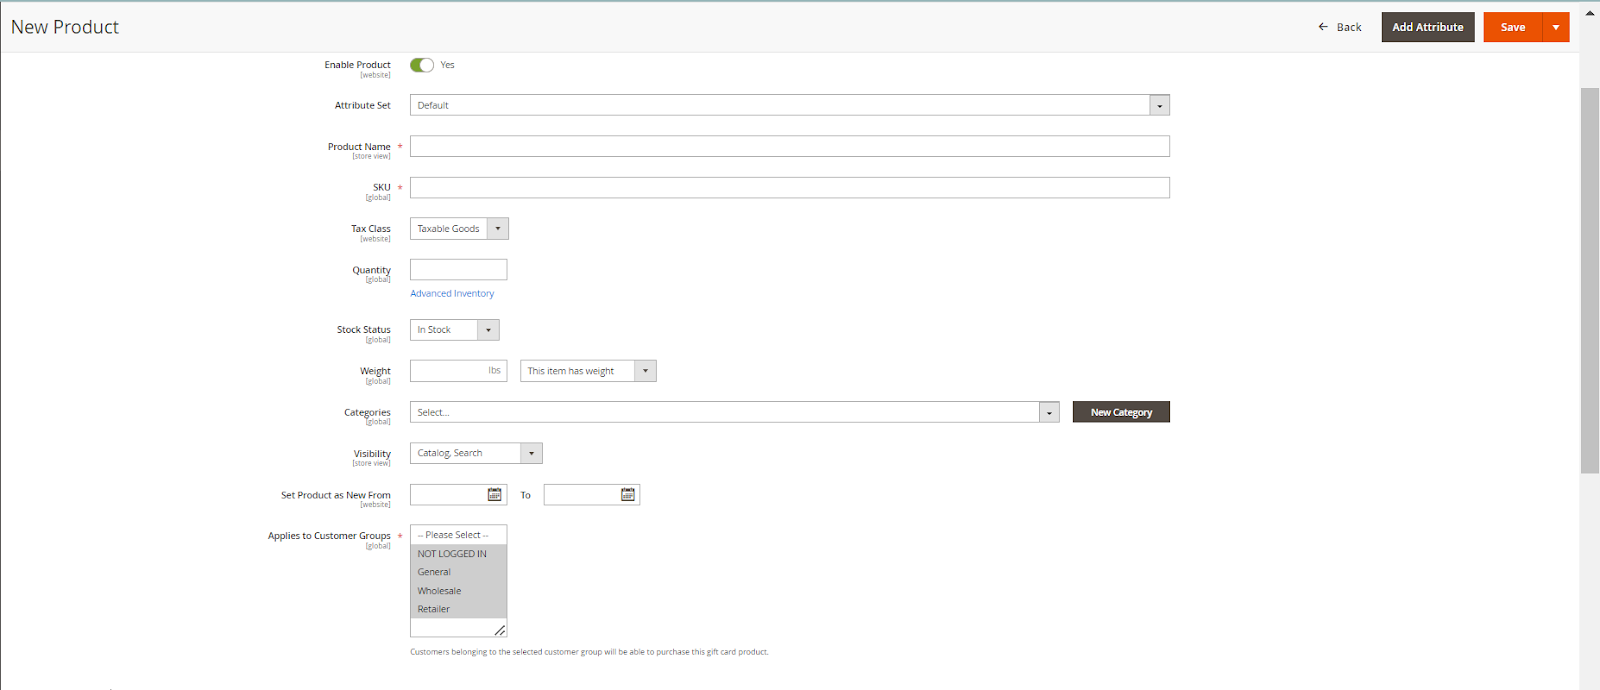
In the Gift Card Information:
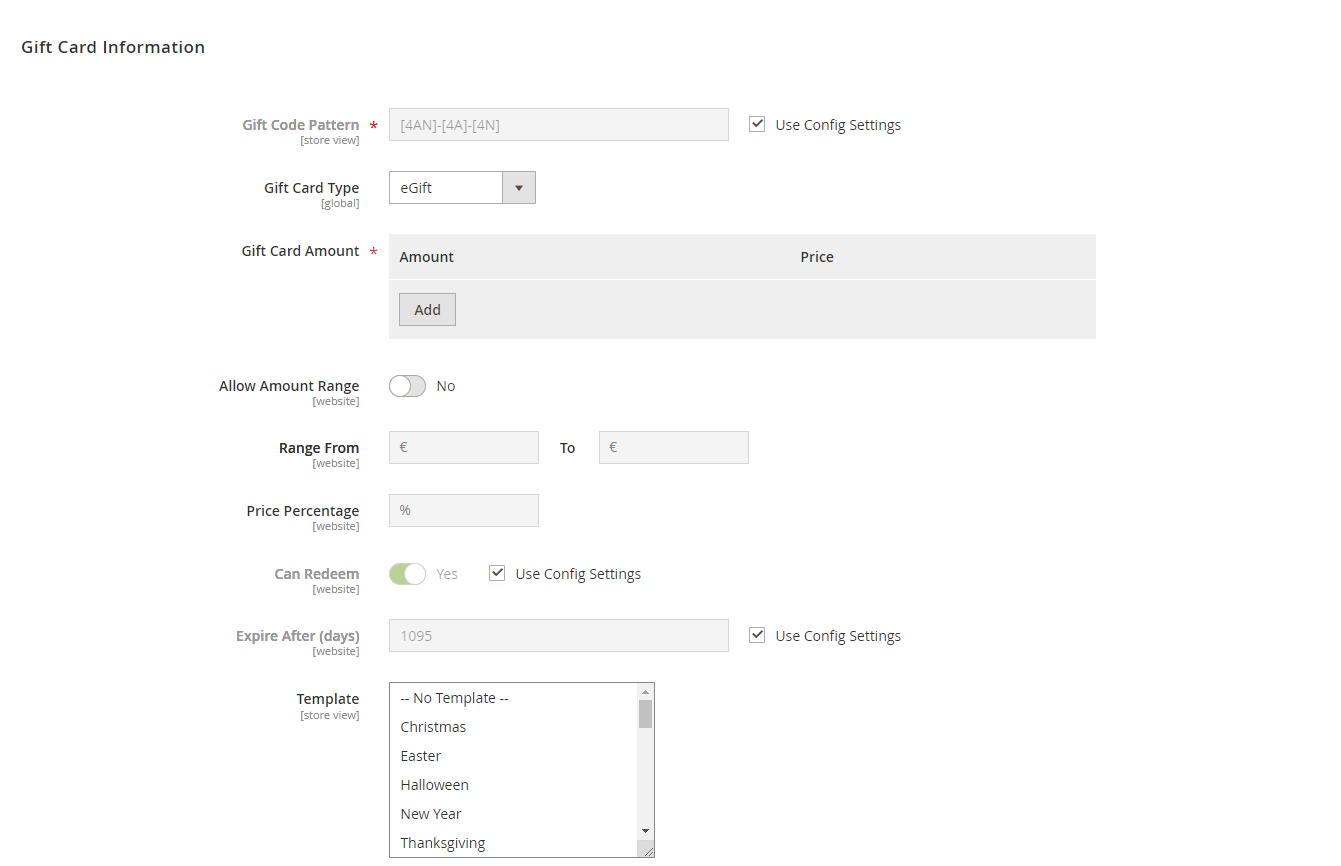
Gift Code Pattern for the productGift Card Type:
Gift Card Amount and Price of a gift card in this sectionAllow Amount Range and set up an amount range to let customers select the preferred amount, then decide a Price Percentage for that amount. If left blank, the default Price Percentage = 100%Can Redeem, Expire After Day & TemplateIn addition, the admin can set the condition to apply the gift card product in the Gift Card Condition tab and view reports of the product in the Gift Card Report tab.
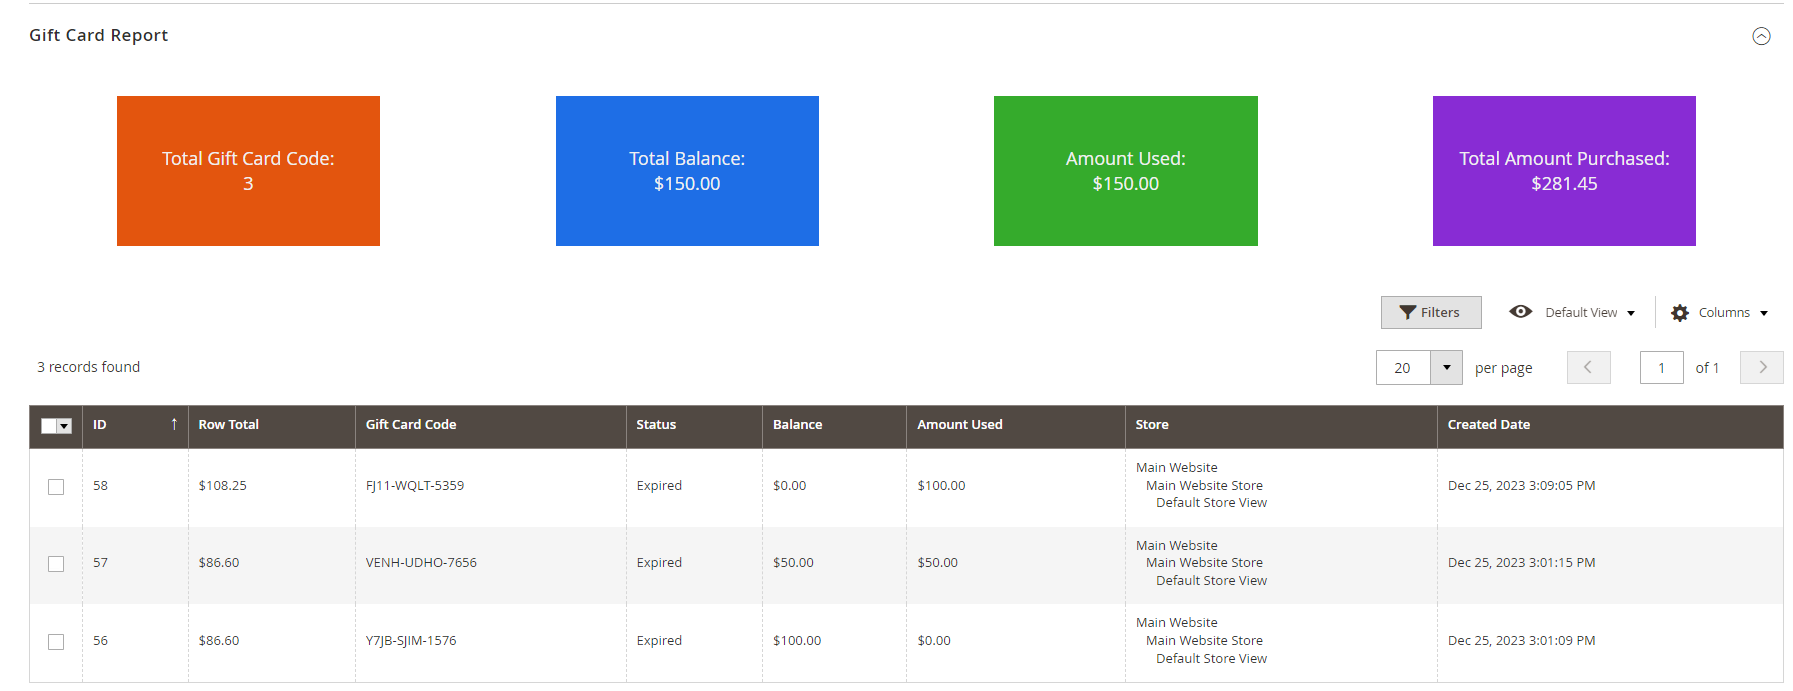
Once everything is set up in the backend, your created Magento 2 Gift Card products will appear beautifully on the storefront, giving customers a seamless and engaging buying experience.
In your store’s main menu or sidebar, you can feature a dedicated Gift Card Category, which is perfect for seasonal promotions like Holiday Gifts or Special Occasions.
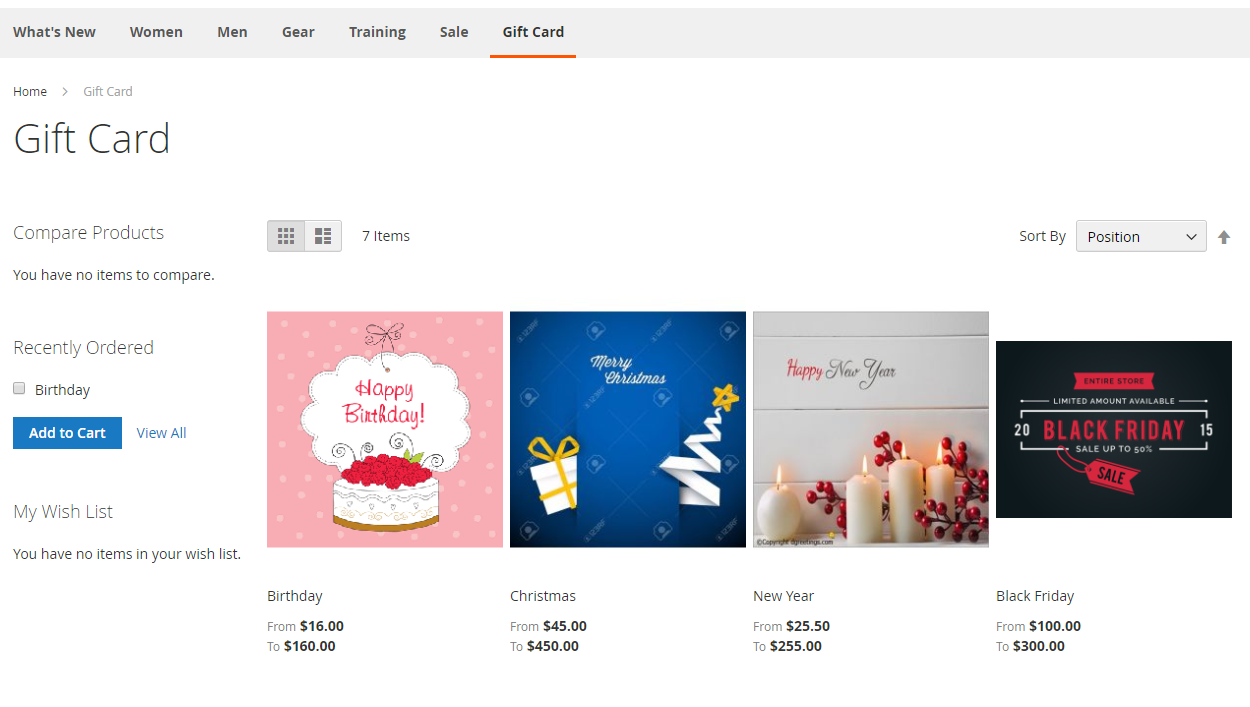
This category displays all available gift card products, each with its own design, value range, and delivery type (physical, virtual, or combined). Shoppers can easily browse through the different templates, compare options, and choose the one that fits their gifting needs.
When a customer clicks on a specific gift card, they’ll be directed to the Gift Card Product Page, which functions just like any other product in Magento 2, but with added personalization features.
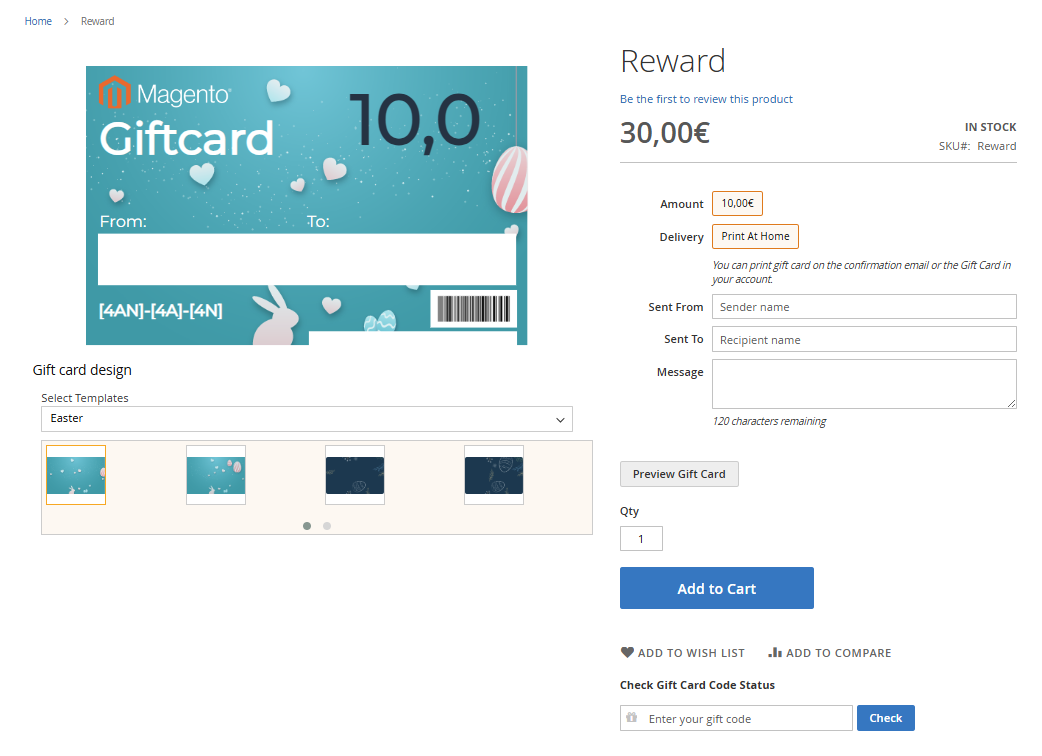
Here, buyers can:
Make gift vouchers a holiday sales powerhouse by creating gift card products in Magento 2. By using the Mageplaza Gift Card module, store owners can easily design templates, generate codes, and create both digital and physical vouchers that appeal to every type of customer.
Start early, optimize for the holidays, and turn simple gift cards into a lasting revenue stream for your Magento 2 store.