
15 Simple Steps for Magento 2 Performance Optimization (2024)
Vinh Jacker | 10-13-2016

The Most Popular Extension Builder for Magento 2
With a big catalog of 224+ extensions for your online store
Magento 2 Performance Optimization is one of the important steps to make your Magento 2 store for achieving success. In other words, faster page load times improve the user experience of the website, leading to increased website conversion rates and revenue along with greater customer satisfaction.
Numerous studies have proven the correlation between these factors. For example, Section.io found that an average page load time of 2 seconds (indicating a very fast page load) results in a low bounce rate of only 9.61%. However, the bounce rate increases slightly to 13.0% for those with an average page load time of 3 seconds.
Despite the recognition that website performance plays a vital role in the online shopping experience for customers, many Magento 2 retailers struggle to optimize their store’s. Don’t worry, Mageplaza will guide you through easy-to-follow steps to improve your Magento2 website’s performance, even for non-technical store owners.
Say Goodbye to Slow Page Loading
Get Website Performance Audit. Speed it up - earn more sales & customer satisfaction.

Related Post
- Integrate Progressive Web App in Magento 2
- Magento 2 image optimization
- Enable Merge CSS, JavaScript in Magento 2
How to Optimize Magento 2 Performance
As a normal eCommerce page, it takes more than 3s to load a product page. Do you think it is so annoying if your customers need to browse through five similar pages at your website? Of course, they will be never patient to wait for the delay. Please keep your eyes on this post and find the relevant method to speed up the site performance.
3 extensions by Mageplaza can help optimize Magento 2 store:
- Optimize Magento 2 Performance with SEO extension
- Optimize Checkout Process
- Improved Layered Navigation
Steps of Performance Optimization for Magento 2
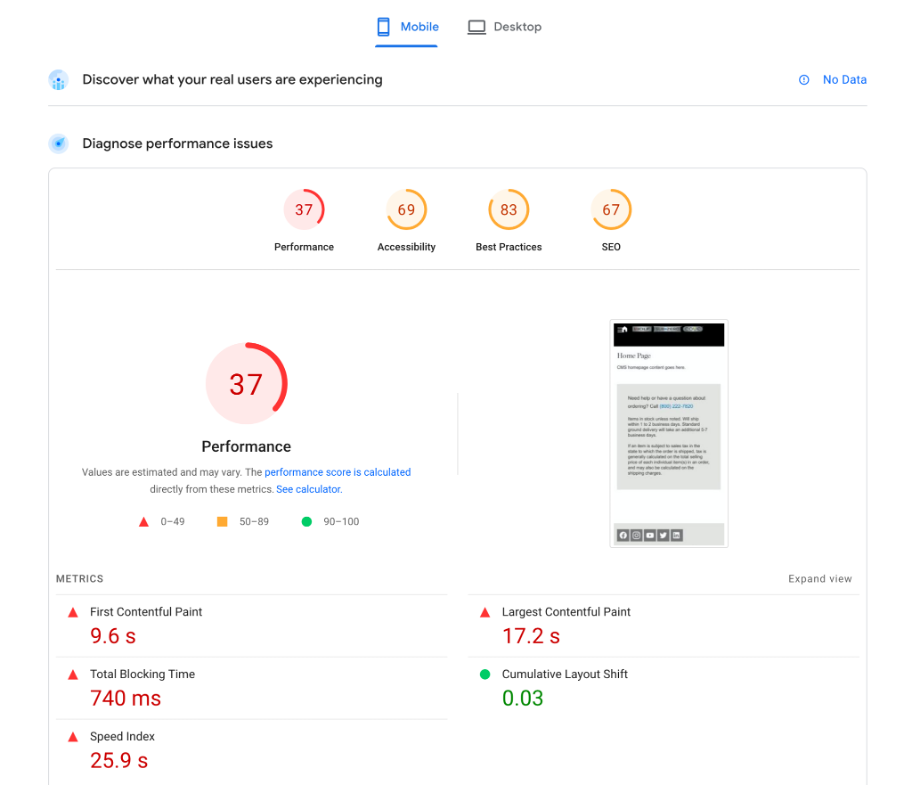
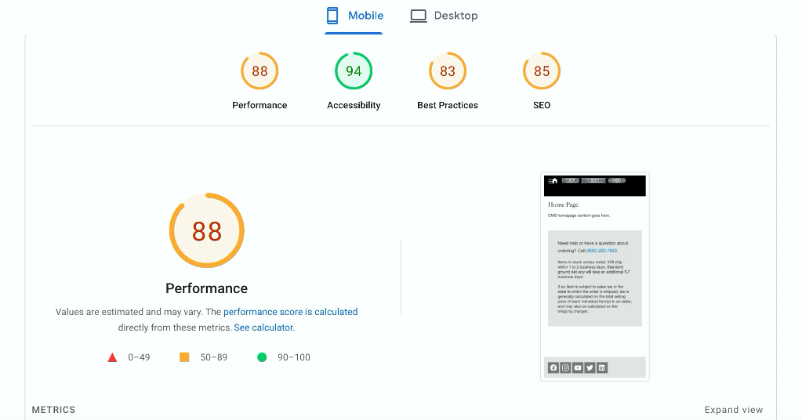
Firstly, let’s check score in Google PageSpeed Tools
Step 1: Enhance your Hosting Setup
Magento 2 is a platform with a wide range of features that requires significant resources. To ensure optimal performance and a pleasant user experience for your Magento store, you must optimize your hosting environment.
A checklist you can refer to when choosing a Magento hosting provider:
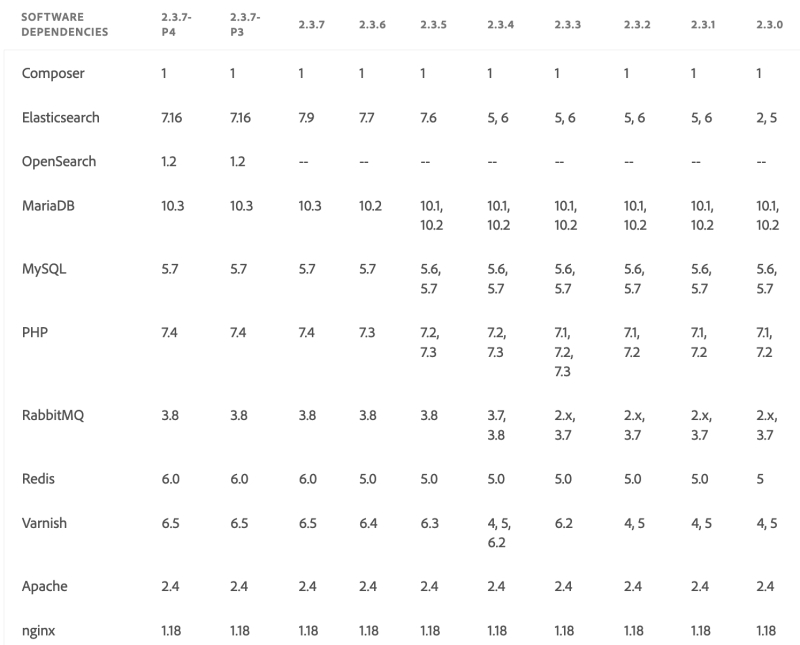
- Make sure the hosting provider is compatible with your Magento version/edition, including different criteria like PCI Compliance, MySQL 5.6 and higher, Apache 2.x/ NGINX/ Litespeed, and PHP 7.0.
- Make sure the server is up to date with the latest software, complies with PCI standards and guarantees a secure shopping experience for your customers.
- Choose a server location nearest your target audience for faster response times and improved user experience.
- Consider storage capacity based on your requirements and ensure regular server backups for data security.
- Prioritize robust security features such as firewalls, intrusion detection systems, malware scanning, and protection against DDoS attacks.
- Consider enterprise-grade security measures, including regular debugging, free SSL certificates, and 24/7 support for timely security assistance.
- Make sure the hosting provider has backups and a way to get your data back if something bad happens.
These are the minimum requirements you should demand from your hosting provider for your Magento 2 store. Avoid using free or excessively cheap hosting services, as they cannot guarantee the loading speed, user experience, and security of your eCommerce store.
If you are currently operating a Magento website and experiencing slow performance, the recommended solution is to enhance your hosting. However, use speed test tools like Google PageSpeed Insights or GTmetrix to identify the issues before upgrading. If your hosting is not the root cause of the slow performance on your Magento website, upgrading may be an expensive step that does not address the underlying problem.
Step 2: Update to the Latest Magento Version
New versions of Magento come with new features, improvements and bug fixes for available capabilities to optimize the user experience.
Therefore, the next step to accelerate and enhance the performance of your Magento website is to upgrade to the latest version of Magento. Especially if you are currently using Magento 1, don’t hesitate to migrate to Magento 2 because it offers many features that help you adapt to market trends and customer demands while also providing significantly better security.
If you feel unsure where to start when upgrading the Magento version for your eCommerce store, consult with our experienced Magento developers. They can provide a more precise migration process based on your specific requirements without taking weeks or even months, even for complex configurations and extensive customizations.
Step 3: Leverage a Content Delivery Network (CDN)
A content delivery network (CDN) consists of multiple servers worldwide. When visitors access your Magento 2 store, their browser checks nearby CDN servers for content. If available, it improves your store loading speed.
Some eCommerce stores should use CDN:
- Stores with a large customer base
- Stores serving customers from different regions or countries
- Stores with a large number of images, videos, or other media files
- Stores experiencing slow page loading times or inconsistent performance
How to set up CDN in Magento 2:
-
In your Admin Panel, navigate to
Stores > Settings > Configuration > General > Web. -
In the top left section, set the
Store Viewas required. -
Expand the
Base URLssection and follow these steps:
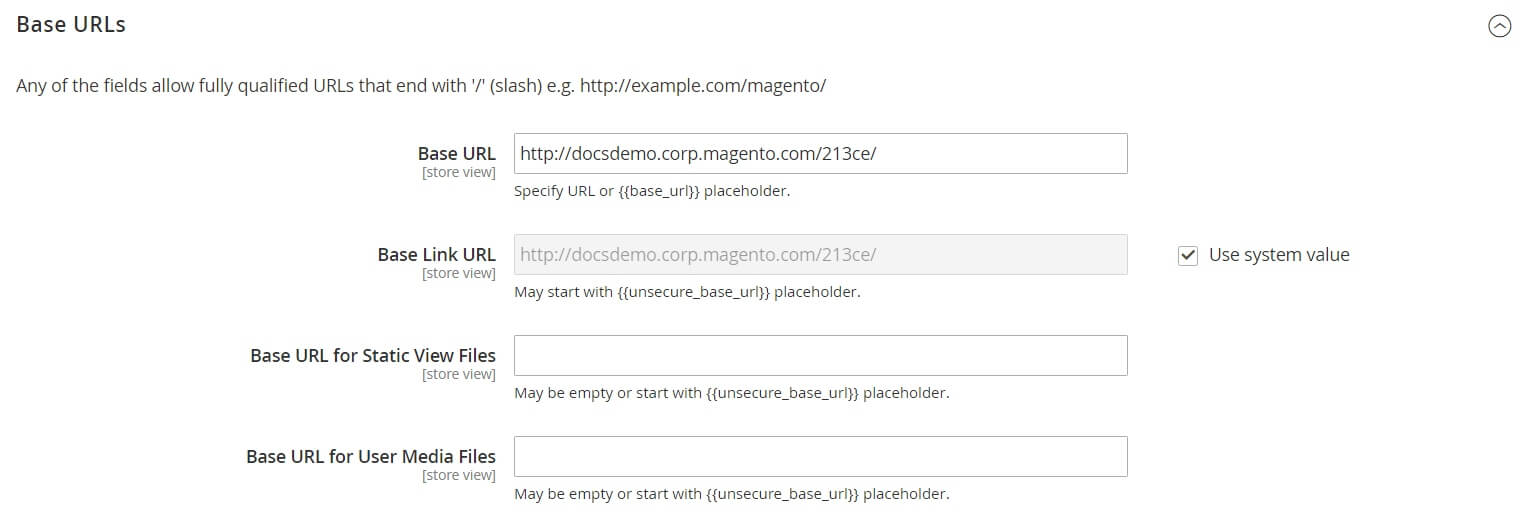
- Update the location URL on the CDN where static view files are stored as the
**Base URL for Static View Files**. - Update the URL of the CDN’s JavaScript files as the
**Base URL for User Media Files**. - You can leave both fields empty or use the placeholder:
{{unsecure_base_url}}
- Expand the
Base URLs (Secure)section and follow these steps:
.jpg)
- Update the location URL on the CDN where static view files are stored as the
**Secure Base URL for Static View Files**. - Update the URL of the JavaScript files on the CDN as the
**Secure Base URL for User Media Files**. - You can leave both fields unfilled or begin them with the placeholder:
{{unsecure_base_url}}
Some hosting providers will offer CDN services as well, but you can also choose your own CDN provider based on your needs and budget. Some highly rated popular options that you can consider are StackPath, Cloudflare, Fastly, and Amazon CloudFront.
Lear more about how to configure a CDN for your Magento 2.
Step 4: Remove unused data in Magento Datalog
Magento 2 stores product data in a place called Magento Datalog. However, for unused data like information on products that are no longer available or deleted product reviews, it’s necessary to delete them to free up disk space and speed up the loading time of product pages and search results.
Working with Magento stores’ databases can be complex, but there is a simple way to clean up your Magento Datalog.
In the Magento Admin Panel, go to System > Configuration > Advanced > System and expand MySQL Message Queue Cleanup. Set the values for all the attributes. After entering all the necessary information, click Save Config.
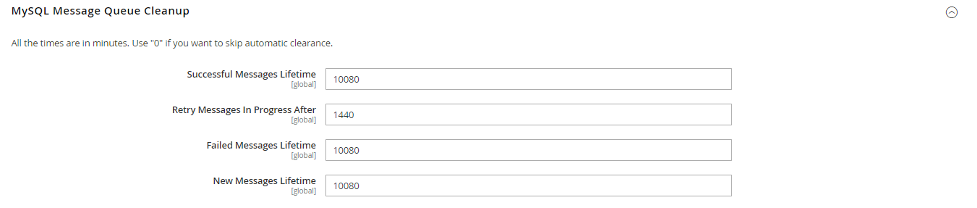
Note: In the screenshot, I have left the default values for all the attributes, but you can adjust them according to your clearance requirements.
Step 5: Switch to In-Memory Data Stores for Caching
In-memory data stores like Redis or Memcached have faster data retrieval than Magento’s default cache.
They also provide data backup capabilities for recovery in case of power outages or server restarts. Utilizing these in-memory data stores instead of storing files on the hard disk will significantly increase the data processing speed through the cache, saving valuable time for data retrieval from RAM.
Customers of eCommerce stores prefer to avoid waiting for page loading times, so optimizing data retrieval is essential to satisfy even the most demanding customers.
Redis is one effective performance caching solution that Adobe recommends for Magento 2 stores. You can configure them by following these steps:
-
Find your Redis configuration in the following files:
/etc/redis/redis.confor/etc/redis/<port>.conf -
Configure Redis default caching with this command:
bin/magento setup:config:set --cache-backend=redis --cache-backend-redis-server=127.0.0.1 --cache-backend-redis-db=0Important: If you use Redis for different types of caching, ensure each database has a unique number. It’s best to use 0 for the default caching database, 1 for the page-caching database, and 2 for the session storage database.
-
Configure Redis page caching with this command:
bin/magento setup:config:set --page-cache=redis --page-cache-redis-server=127.0.0.1 --page-cache-redis-db=1 -
Configure Redis for session storage with this command:
bin/magento setup:config:set --session-save=redis --session-save-redis-host=127.0.0.1 --session-save-redis-log-level=4 --session-save-redis-db=2
Step 6: Enable Varnish Caching
Enabling Varnish Cache is a practical step recommended by Adobe for Magento 2 performance optimization. Here’s a simple guide to configuring Varnish for Magento:
- Go to
Stores > Configuration > Advanced > System > Full Page Cache. From the Caching Application dropdown menu, select Varnish Cache as the preferred caching mechanism.
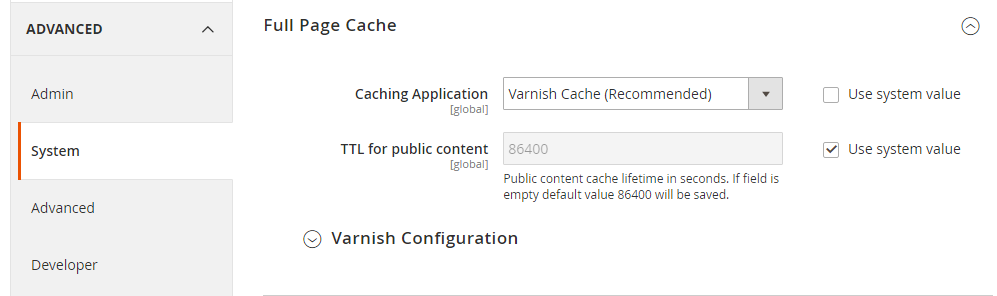
- Open the Varnish Configuration section and provide the required information.
- Next, navigate to the Varnish Configuration section and input the required information:
- Define the IP address or hostname authorized to clear the Varnish Cache in the
**Access list**. Enter your application’s domain name in this field. - Define the Backend Host. If left blank, the default option will be saved as localhost.
- Backend Port is the port of the Apache server.
- Define the Grace period to determine how long Varnish will serve outdated content in the event of backend unresponsiveness.
- Define the IP address or hostname authorized to clear the Varnish Cache in the
Finally, click the **Save Config** button if you have completed the necessary configurations.
Alternatively, using SSH, you can enable Magento 2 Varnish through the command line interface. If you prefer this method, please utilize the following commands:
bin/magento
config:set--scope=default--scope-code=0system/full_page_cache/caching_application 2
Step 7: Check Third-Party Extensions
Adobe Commerce third-party extensions can potentially cause various issues that can lead to performance degradation in your Magento store. Therefore, it is essential to keep your third-party extensions up-to-date with their latest versions or consider using alternative extensions if you discover any extensions causing increased load time.
It is recommended to download or purchase third-party extensions from a trusted source, such as the Commerce Marketplace, to ensure reliability.
In addition to the previously mentioned optimization steps for your Magento 2 store, it is crucial to examine the installed third-party modules. In case you have updated Magento to the latest version, some extensions may no longer be compatible and cease to function correctly. Remove unnecessary ones or update to a version compatible with your current Magento version to achieve the desired performance optimization.
Check all essential CMS pages, such as the homepage, categories, products, and checkout. If you disable a module and notice improved loading speed in your store, you have successfully resolved an additional issue negatively impacting Magento’s performance.
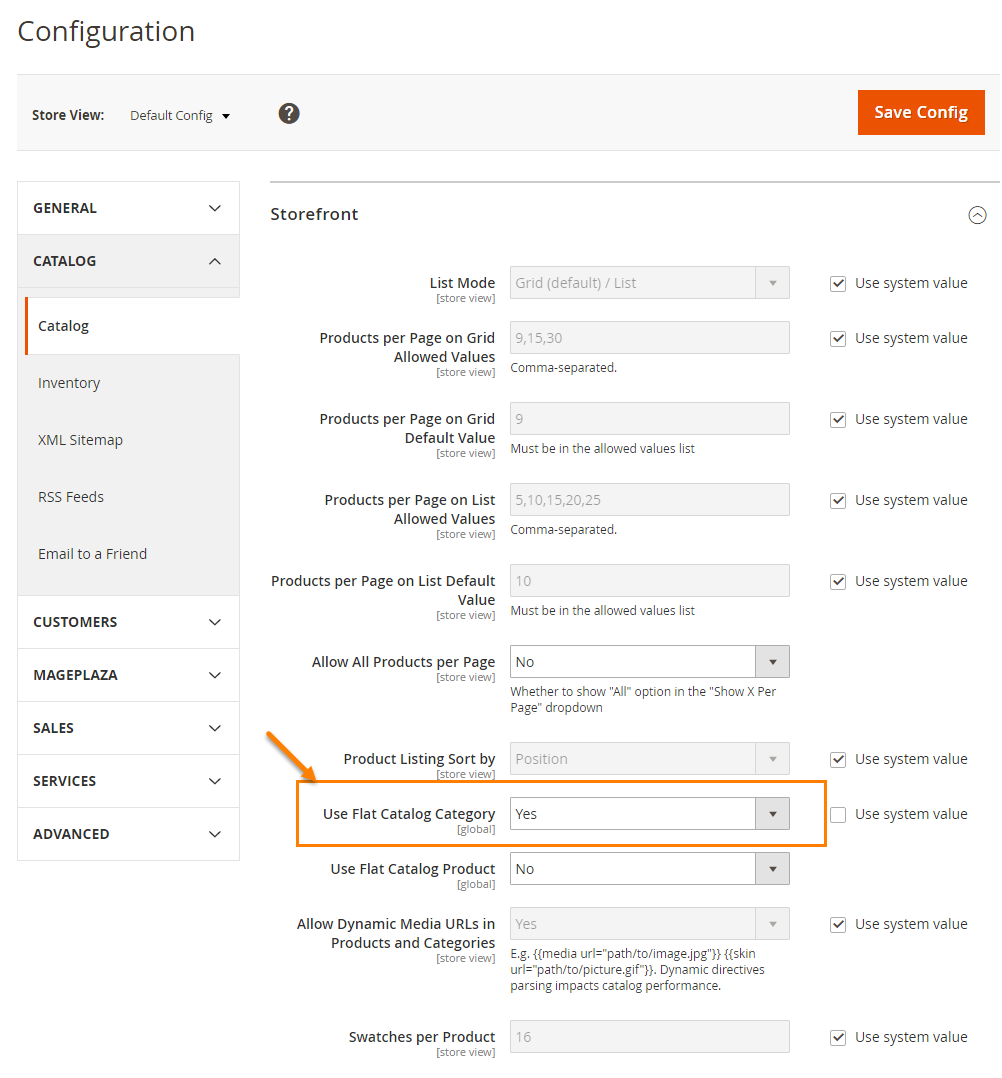
Step 8: Enable Flat Categories and Products
May be you know that one of the aspects having a great influence on the speed of Magento 2 performance is the ability of database loading. In the configuration, enable Flat Catalog to speed up that. Flat Catalog allows offloading the number of the database once there is any request for showing the product. At the same time, the MySQL query complexity will be reduced.
Go to backend, Stores > Configuration > Catalog > Catalog > Storefront, choose Yes in Use Flat Catalog Category field.
Step 9: Set Up Elasticsearch
Elasticsearch uses various factors to determine the relevance of search results, including search query terms, product descriptions, and product ratings. It also provides customers with fast and efficient full-text searching capabilities. Customers are more likely to purchase when they can easily and quickly find the products they are looking for.
From Magento 2.4.x, Elasticsearch is pre-enabled with default settings. However, for earlier versions, you can configure it by going to Stores > Settings > Configuration > Catalog > Catalog > Catalog Search, then Select Elasticsearch as the Search Engine and click on **Save Config**.
Step 10: Turn your Magento 2 Website to PWA
A progressive web app (PWA) is a type of web app based on popular web technologies such as HTML, JavaScript, and CSS, but with the functionality of a native mobile app. In brief, PWA provides an app-like experience to users.
When you convert your Magento 2 website into a PWA, the customer experience will significantly improve as pages load two to four times faster and even increase the conversion rate by 33%!
Many well-known brands like Lancome, Alibaba, Twitter Lite, Pinterest have already converted their websites into PWAs. So why not seize this trend and surpass your competitors?
Step 11: Enable Production Mode
First, check the current mode of your Magento by running the command:
bin/magento deploy:mode:show
The information about your Magento store’s current mode will be displayed after the **Current application mode** section, with 3 possible modes: default, developer, and production.
Among them, default and developer modes are for debugging. Avoid using default and developer modes on a live site. Instead, switch to production mode for performance optimization for Magento 2, including full-page caching and JavaScript bundling. It is a faster mode of Magento, approximately 20% - 30% faster than the developer mode.
To switch to production mode, use the following command:
bin/magento deploy:mode:set production
If you want to switch back to the other two modes, you can replace production in the above command with either default or developer.
Step 12: Change Index Mode to “Update on Schedule”
Magento indexers have 2 modes: Update on Save and Update on Schedule. The Update on Save mode instantly updates your catalog or data when changes are made, but it can cause delays and temporary unavailability of data for your Magento site.
To avoid this issue, change to Update on Schedule mode by using the following general command:
bin/magento indexer:set-mode {realtime|schedule} [indexer]
Choose the schedule option to configure the Update on Schedule indexer mode.
You can provide a list of indexers separated by spaces in indexer, or leave out this option to configure all indexers the same way.
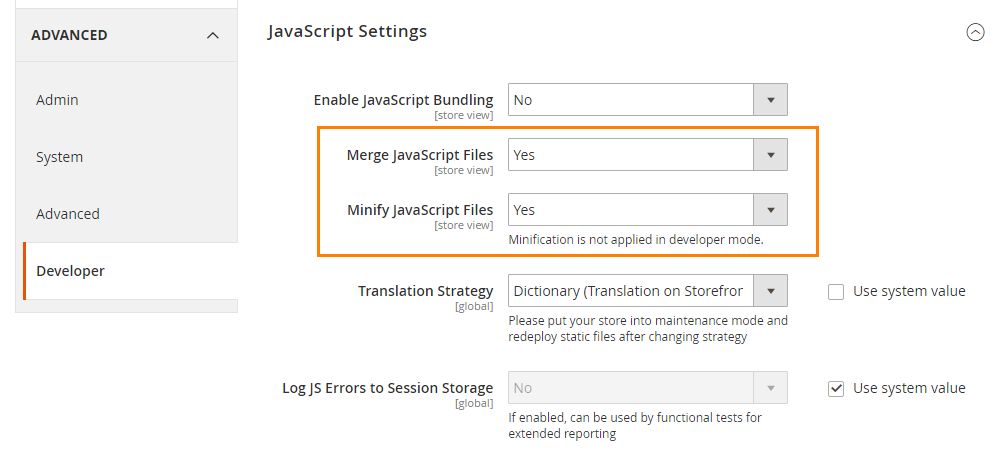
Step 13: Merge CSS and JS Files
The next step you need to follow is merging and minifying CSS and Javascript files, that means making the web page as light as possible for the fast loading. Please put Magento 2 into production mode.
./bin/magento deploy:mode:set production
Javascript File
- Go to backend,
Stores -> Configuration > Advanced > Developer > JavaScript Settings - Set
Merge JavaScript Filesto Yes - Set
Minify JavaScript Filesto Yes
CSS File
- Go to backend,
Stores > Configuration > Advanced > Developer > CSS Settings - Set
Merge CSS Filesto Yes - Set
Minify CSS Filesto Yes
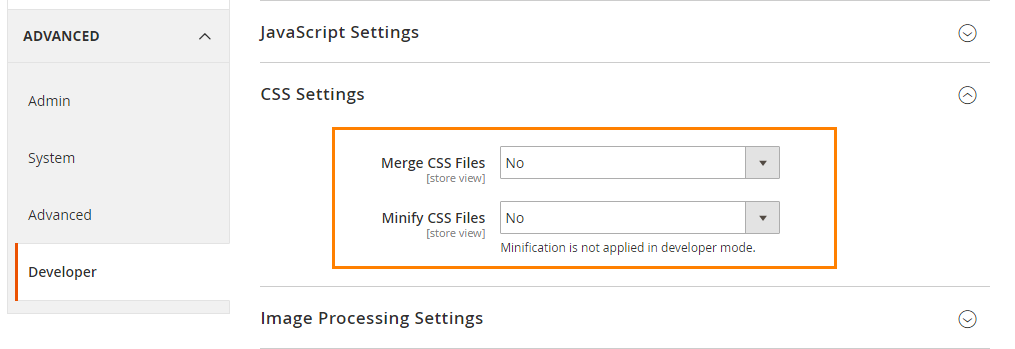
When complete, Save Config and flush cache to activate the change.
Step 14: Optimize your Image before Uploading
The image is a necessary factor to make your Magento 2 store’s performance more vivid. However, the image size that is too heavy to upload on your site is one of the crucial reason for the overload page. Thus, compressing image should be done before submitting any image. You can use JPEG format for Product images, and PNG or SVG for the layout as well as the logo.
Use Image Optimizer to compress your store’s images automatically.
Step 15: Enable Compression
Follow the resources to enable compression by Google’s offer.
Let’s change nginx compression directives from:
gzip_types: text/plain application/x-javascript text/javascript text/xml text/css image/x-icon image/bmp image/png image/gif; to gzip_types:;
Result after optimizing Magento 2 store
Performance Toolkit (Optional)
Installation
jMeter:
– go to http://jmeter.apache.org/download_jmeter.cgi and download jMeter in Binary section (pay you attention that Java 6 or later is required) – unzip archive
Plugins (only if you want to use additional reports (like graphs)):
– go to http://jmeter-plugins.org/downloads/all/ and download JMeterPlugins-Standard and JMeterPlugins-Extras
– unzip them to appropriate ext directory of your jMeter instance.
– additional reports can now be added via GUI.
Usage
Before running the jMeter tests for the first time, you will need to first use bin/magento setup:performance:generate-fixtures command to generate the test data.
Run via console
Scenario can accept parameters that are described bellow in format <parameter_name:default_value>:

<host:localhost> URL component 'host' of application being tested (URL or IP). Default is 'localhost'.

<base_path:/> Base path for tested site. Default is '/'.

<report_save_path:./> Path where reports will be saved. Reports will be saved in current working directory by default. Default is './'.

<ramp_period:300> Ramp period (seconds). Period the request will be distributed within. Default is '300'.

<orders:0> Number of orders in the period specified in the current allocation. If <orders> is specified, the <users> parameter will be recalculated. Default is '0'.

<users:100> Number of concurrent users. Recommended  amount is 100. Minimal amount is 10. Default is '100'.

<view_product_add_to_cart_percent:62/> Percentage of users that will only reach the add to cart stage. Default is '62'.

<view_catalog_percent:30/> Percentage of users that will only reach the view catalog stage. Default is '30'.

<guest_checkout_percent:4/> Percentage of users that will reach the <a href="https://www.mageplaza.com/blog/magento-2-guest-checkout.html" rel="dofollow noopener" target="_blank">guest checkout stage</a>. Default is '4'.

<customer_checkout_percent:4/> Percentage of users that will reach the (logged-in) customer checkout stage. Default is '4'.

<loops:1/> Number of loops to run. Default is '1'.

<admin_path:admin/> Admin backend path. Default is 'admin'.

<admin-user:admin/> Admin backend user. Default is 'admin'.

<admin-password:123123q/> Admin backend password. Default is '123123q'.

<think_time_deviation:1000> Deviation (ms) for "think time" emulation. Default is '1000'.

<think_time_delay_offset:2000> Constant delay offset (ms) for "think time" emulation. Default is '2000'.

Necessary parameters must be passed to [command line](https://www.mageplaza.com/devdocs/magento-2-command-line-interface-cli.html) with "J" prefix: "-J<parameter_name>=<parameter_value>"
Example:
> cd /directory_of_jMeter/bin/

> jmeter -n -t /path_to_benchmark_file/benchmark.jmx -Jhost=magento2.dev -Jbase_path=/ -Jusers=100 -Jramp_period=300 -Jreport_save_path=./
Run via GUI
-
Open jMeter/bin directory and run jmeter.bat
-
Click in menu File -> Open (Ctrl+O) and select file; or drag and drop benchmark.jmx file in opened GUI.
On the first tab ‘Test Toolkit’ you can change ‘User Defined variables’ like as <host>, <users>, <ramp_period>, <orders>, <report_save_path>.
For running script click “Start” (green arrow in the top menu).
Results of running (Report types)
After running via GUI you can see result of working in left panel. Choose the corresponding report.
After running script via console report will be generated in the path that has been specified in <report_save_path>.
Threads
jMeter script consists of five threads. Setup thread and four user threads.
Percentage ratio between threads is as follows:
Browsing, adding items to the cart and abandon cart (BrowsAddToCart suffix in reports) - 62%
Just browsing (BrowsAddToCart suffix in reports) - 30%
Browsing, adding items to cart and checkout it as guest (GuestChkt suffix in reports) - 4%
Browsing, adding items to cart and checkout as registered customer (CustomerChkt suffix in reports) - 4%
About reports:
Summary Report.
Report contains aggregated information about threads.
Report file name is {report_save_path}/summary-report.log
Details http://jmeter.apache.org/usermanual/component_reference.html#Summary_Report
Detailed URLs report.
Report contains information about URLs.
Pay your attention that URL is displayed only in generated report file (in GUI, URL is not displayed).
Report file name is {report_save_path}/detailed-urls-report.log (can be open as csv format).
Details http://jmeter.apache.org/usermanual/component_reference.html#View_Results_in_Table
About other types read on
http://jmeter.apache.org/usermanual/component_reference.html
Magento 2 Performance Optimization Service
If your company is searching for a professional service to cut down the performance time effectively, Mageplaza is happy help you! Our Magento 2 Speed & Performance Service is trusted by lots of clients all around the world. We make sure to achieve the following results:
- Google PageSpeed Insights Lab Data: reaching all Green scores on all pages
- Google PageSpeed Insights Audit: passing all
- Server response time: <300 miliseconds
- Backend server response time for cached pages: <300 miliseconds
- No delays even with 3x-5x traffic surge
- No break-in functionality and design
Conclusion
The poor performance of a Magento 2 website not only increases the customer bounce rate but also affects the search engine rankings of keywords. Therefore, don’t lose potential customers just because you haven’t optimized the speed of your Magento 2 store. Applying our 15 suggested steps above will significantly improve the performance of your Magento 2 website, making customers satisfied for effectively increasing conversion rates.
If you need comprehensive Magento 2 performance optimization services, don’t hesitate to contact our Mageplaza team for free consultations and additional benefits!
Table of content

With over a decade of experience crafting innovative tech solutions for ecommerce businesses built on Magento, Jacker is the mastermind behind our secure and well-functioned extensions. With his expertise in building user-friendly interfaces and robust back-end systems, Mageplaza was able to deliver exceptional Magento solutions and services for over 122K+ customers around the world.
Related Post

Top 10 advantages of PHP over other languages
Join us to learn what the PHP programming language is and advantages Of PHP in practical applications!
14 mins read
|
07-25-2024
Shopify Vs Wix Vs Woocommerce: Which Platform Is The Best For You?
Shopify vs Wix vs WooCommerce: compare pricing, ease of use, features, scalability, integrations, and support to boost your online store. Discover the best ecommerce platform
14 mins read
|
07-25-2024
Mobile Web Development: A Comprehensive Guide for 2024 and Beyond
Your guide to mobile web development. Learn why it's vital, discover best practices, and leverage the latest technologies to drive business growth.
19 mins read
|
07-25-2024
Frontend Web Development: The Ultimate Guide for You
What is frontend web development and why is it crucial for your business? Learn the basics, benefits & key technologies in this guide to understand about the frontend.
14 mins read
|
07-25-2024
Website Support & Maintenance Services

Make sure your store is not only in good shape but also thriving with a professional team yet at an affordable price.