


1 min read
|
07-30-2026
How To Create Table Using Magento Database Schema
Vinh Jacker
|
03-17-2025


In Magento 2, the db_schema.xml file is used to define the database schema for custom modules or extensions. It specifies the structure of database tables, columns, indexes, and other related elements. To understand how it works and how to use it, we will break it down into 4 smaller steps. Let’s dive in!
Step 1: Create the db_schema.xml file
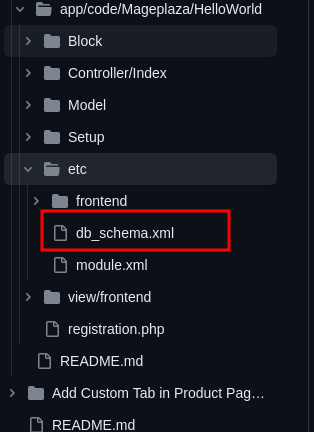
The first step in creating a table with Magento Database Schema is to create a schema file.
In your module’s directory, create a folder named etc if it doesn’t already exist. Inside the etc folder, create a file named db_schema.xml.
Step 2: Define the database structure
Open the db_schema.xml file and define the structure of your database tables, columns, and constraints. You can use XML tags to define tables, columns, data types, lengths, and constraints. Here’s an example:
<?xml version="1.0"?>

<schema xmlns:xsi="http://www.w3.org/2001/XMLSchema-instance" xsi:noNamespaceSchemaLocation="urn:magento:framework:Setup/Declaration/Schema/etc/schema.xsd">
    <table name="mageplaza_helloworld_post" resource="default" engine="innodb" comment="Post Table">
        <column xsi:type="smallint" name="post_id" padding="6" unsigned="false" nullable="false" identity="true" comment="Post ID"/>
        <column xsi:type="varchar" name="name" nullable="false" length="255" comment="Post Name"/>
        <column xsi:type="varchar" name="url_key" nullable="false" length="255" comment="Post URL Key"/>
        <column xsi:type="text" name="post_content" nullable="false" comment="Post Post Content"/>
        <column xsi:type="varchar" name="tags" nullable="false" length="255" comment="Post Tags"/>
        <column xsi:type="int" name="status" nullable="false" comment="Post Status"/>
        <column xsi:type="varchar" name="featured_image" nullable="false" length="255" comment="Post Featured Image'"/>
        <column xsi:type="timestamp" name="created_at" nullable="false" default="CURRENT_TIMESTAMP" comment="Created At"/>
        <column xsi:type="timestamp" name="updated_at" nullable="false" default="CURRENT_TIMESTAMP" comment="Updated At"/>
        <constraint xsi:type="primary" referenceId="PRIMARY">
            <column name="post_id"/>
        </constraint>
        <index referenceId="MAGEPLAZA_HELLOWORLD_POST_FT_INDEX" indexType="fulltext">
            <column name="name"/>
            <column name="url_key"/>
            <column name="post_content"/>
            <column name="tags"/>
            <column name="featured_image"/>
        </index>
    </table>
</schema>
Understanding the elements:
- The <table> tag represents a database table
-
defines a column within a table -
specifies a constraint like a primary key or foreign key - The
tag is the root element of the db_schema.xml file
The column subnode defines a column in a table. Each column requires its own declaration.
A column can have the following attributes:
ATTRIBUTE DESCRIPTION xsi:type Specifies the column type. Must be one of the following: blob (includes blob, mediumblob, longblob) boolean date datetime decimal float int (includes smallint, bigint, tinyint) json real (includes decimal, float, double, real) smallint text (includes text, mediumtext, longtext) timestamp varbinary varchar default Initializes the column with the specified default value. The default value should have the same datatype defined in xsi:type. disabled Disables or deletes the declared table, column, constraint, or index. identity Indicates whether a column is auto-incremented length Specifies the length of a column. Can be used for char, varchar, and varbinary types. nullable Indicates whether column can be nullable. onCreate This is a DDL trigger that allows you to move data from an existing column to a newly created column. This trigger works only when a column is created. padding The size of an integer column. precision The number of allowed digits in a real data type. scale The number of digits after the decimal in a real data type. unsigned For numeric data types, specify whether the column can contain positive and negative values or only positive values.
| ATTRIBUTE | DESCRIPTION |
|---|---|
| xsi:type | Specifies the column type. Must be one of the following: - blob (includes blob, mediumblob, longblob) - boolean - date - datetime - decimal - float - int (includes smallint, bigint, tinyint) - json - real (includes decimal, float, double, real) - smallint - text (includes text, mediumtext, longtext) - timestamp - varbinary - varchar |
| default | Initializes the column with the specified default value. The default value should have the same datatype defined in xsi:type. |
| disabled | Disables or deletes the declared table, column, constraint, or index. |
| identity | Indicates whether a column is auto-incremented |
| length | Specifies the length of a column. Can be used for char, varchar, and varbinary types. |
| nullable | Indicates whether column can be nullable. |
| onCreate | This is a DDL trigger that allows you to move data from an existing column to a newly created column. This trigger works only when a column is created. |
| padding | The size of an integer column. |
| precision | The number of allowed digits in a real data type. |
| scale | The number of digits after the decimal in a real data type. |
| unsigned | For numeric data types, specify whether the column can contain positive and negative values or only positive values. |
Step 3: Declare the schema version
In your module’s etc/module.xml file, declare the version of your module’s schema using the
<?xml version="1.0"?>
<config xmlns:xsi="http://www.w3.org/2001/XMLSchema-instance"
        xsi:noNamespaceSchemaLocation="urn:magento:framework:Module/etc/module.xsd">
    <module name="Mageplaza_HelloWorld" setup_version="1.0.1">
    </module>
</config>
Step 4: Apply the schema changes
After creating or modifying the db_schema.xml file, run the Magento setup upgrade command to apply the changes to the database. From the command line in your Magento installation directory, run:
php bin/magento setup:upgrade
Magento will read the db_schema.xml file and make the necessary changes to the database structure.
The db_schema.xml file provides a declarative approach to managing the database schema in Magento 2. By defining the structure in XML, Magento can handle the installation, upgrade, and removal of the database elements automatically. It ensures consistency and simplifies the management of database changes in Magento modules or extensions.
Special points to remember
Here are a few more points to further understand the workings and usage of the db_schema.xml file in Magento 2:
-
Data Types and Attributes: When defining columns in the
db_schema.xmlfile, you can specify various data types and attributes. Some commonly used data types include int, varchar, text, datetime, and decimal. You can also specify attributes such as nullable, length, default, and comment for each column. -
Constraints: In addition to defining columns, you can specify constraints such as primary keys, unique keys, and foreign keys using the
tag. Constraints help enforce data integrity and relationships between tables. -
Multiple Tables: You can define multiple tables within the
db_schema.xmlfile by adding additional <table> tags. Each table can have its own set of columns and constraints. -
Whitelist Generation: After creating or modifying the
db_schema.xmlfile, you need to generate a whitelist file that includes the schema information. This step ensures that the schema changes are recognized by Magento. To generate the whitelist file, run the following command from the command line:
php bin/magento setup:db-declaration:generate-whitelist --module-name=Mageplaza_HelloWord
This command creates a db_schema_whitelist.json file in the etc directory of your module.
Wrap up
Hope that our blog has given you a clear understanding of how to create a schema file to make a new database table in Magento 2. Just follow it step-by-step and you will succeed. If you have any questions, don’t hesitate to contact us.
Table of content

Jacker is the Chief Technology Officer (CTO) at Mageplaza, bringing over 10 years of experience in Magento, Shopify, and other eCommerce platforms. With deep technical expertise, he has led numerous successful projects, optimizing and scaling online stores for global brands. Beyond his work in eCommerce development, he is passionate about running and swimming.
Related Post

7 mins read
|
06-30-2026

How to Enable DebugView in GA4 for your Magento 2 store - Mageplaza
Step-by-step guide to enabling GA4 DebugView for Magento 2 merchants — verify your GA4 events are firing correctly before trusting your data.
8 mins read
|
06-09-2026

Table Rate Shipping in eCommerce: A Practical Guide
Master Magento 2 Table Rate Shipping. Learn how to configure an accurate, automated shipping matrix to optimize your checkout and boost sales.
10 mins read
|
06-02-2026
3 mins read
|
05-30-2026

Google Analytics Ecommerce Reports for Magento Merchants: What to track & Tips
A practical guide to GA4 ecommerce reports for Magento merchants, covering what to track, how to read each report, and specific tips to turn data into revenue decisions.
18 mins read
|
05-20-2026
1 min read
|
07-30-2026
7 mins read
|
06-30-2026
How to Enable DebugView in GA4 for your Magento 2 store - Mageplaza
Step-by-step guide to enabling GA4 DebugView for Magento 2 merchants — verify your GA4 events are firing correctly before trusting your data.
8 mins read
|
06-09-2026
Table Rate Shipping in eCommerce: A Practical Guide
Master Magento 2 Table Rate Shipping. Learn how to configure an accurate, automated shipping matrix to optimize your checkout and boost sales.
10 mins read
|
06-02-2026
3 mins read
|
05-30-2026
Google Analytics Ecommerce Reports for Magento Merchants: What to track & Tips
A practical guide to GA4 ecommerce reports for Magento merchants, covering what to track, how to read each report, and specific tips to turn data into revenue decisions.
18 mins read
|
05-20-2026