


5 mins read
|
07-30-2026
Magento 2: Adding Google Tag Manager Script and Beyond
Vinh Jacker
|
03-17-2025

What is GTM?
Basically, to track a website’s activity, store owners need to add a special code. Moreover, each tracking event requires an individual piece of code so it’s quite complicated to manage all of them.
Google Tag Manager (GTM) is the solution for this issue. It’s a system that simplifies website tracking by allowing users to manage snippets of tags (aka tracking code) through a user-friendly web panel. With GTM, merchants can easily add, edit, and manage third-party tags like AdWords Conversion Tracking, Google Analytics 4, Re-marketing, Facebook, etc.
All the work can be completed quickly without heavily modifying your website code. Instead, store admins can manage all tags in one place - the GTM admin panel. Therefore, it’s not a surprise to say GTM is indeed a user-friendly, powerful, and must-have tool for every Magento merchant. In fact, there are 32,983,087 websites using Google Tag Manager.
Keep in mind these main elements that Google Tag Manager works with:
- Tags: pieces of code run in your page structure (mostly JS code)
- Triggers: tell where & when to execute tracking tags
- Variable: stores information that is used by triggers & tags
Prerequisites for Adding Google Tag Manager Script to Magento 2
#1 Google Tag Manager Account
The first and foremost requirement is that you need to have a GTM account in order to create a container for your store website. The container is the place to store all of your tracking tags and scripts.
If you don’t have an account, don’t worry. We will provide detailed instructions in the next part.
#2 Magento 2 Store Access
Next, check whether you have access to the store’s admin panel to make necessary changes.
#3 Basic Understanding of HTML/CSS (Optional)
While not too essential, having a basic understanding of HTML/CSS can be helpful for placing the GTM snippet in the correct location (if not using an extension).
#4 Magento 2 Extension (Recommended)
There are several Magento 2 extensions available that simplify the process of adding GTM to your store. These extensions can automate tasks like placing the GTM snippet and managing configurations.
Initial GTM account setup
Create an account
In this part, we will guide you on how to create a GTM account and container step-by-step. If you already got one, just skip this step.
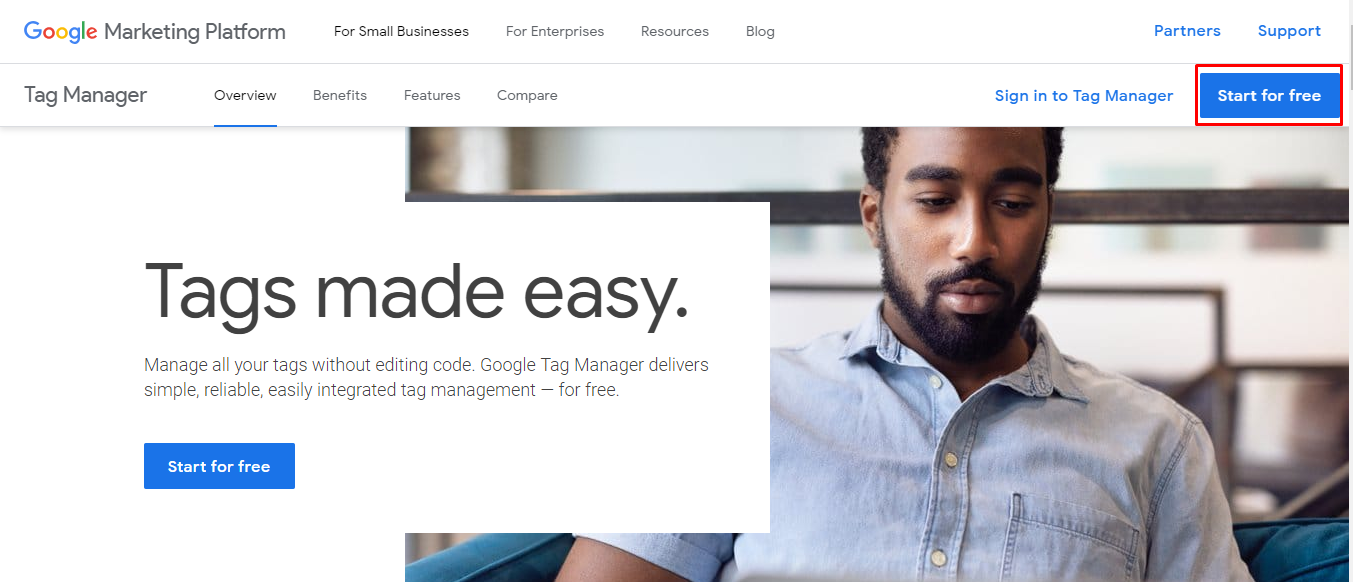
Go to Google Tag Manager website and click Start for free to create a new account
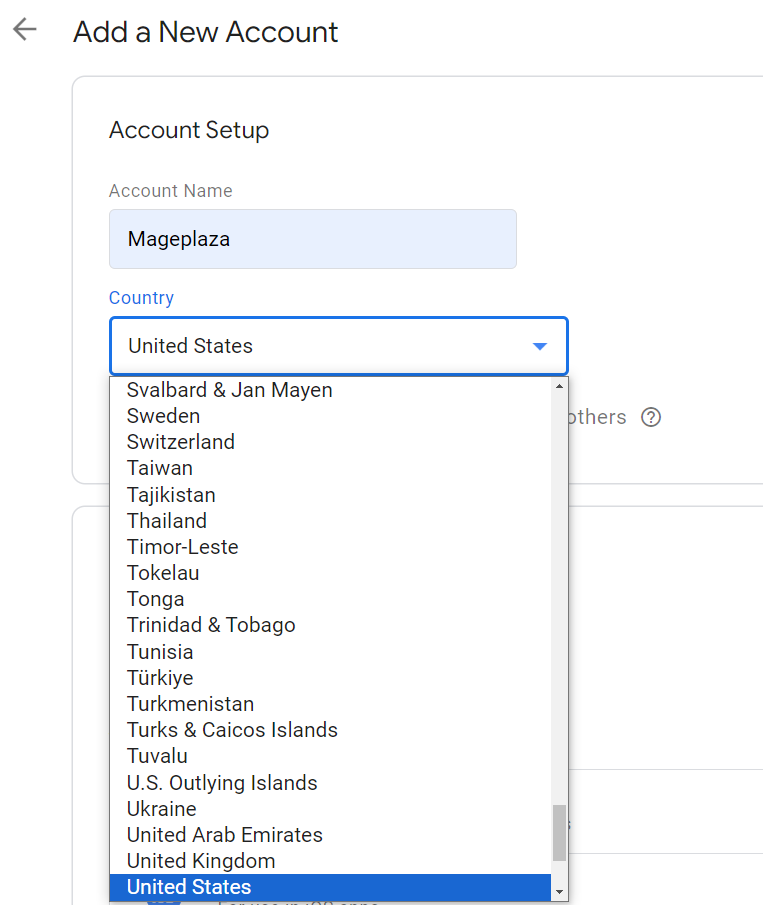
Then, fill in the required information as follows:
Account Setup
- Account Name: Enter your company name
- Country: Choose the nation where your company operates
- Share data anonymously with Google and others (Optional): If you select this option, it will enable benchmarking by sharing your data anonymously. Google will remove all identifiable info about your site, combine the data with other anonymous websites, and then report overall trends in the evaluation service.
Container Setup
- Container name: Provide your website link
- Target platform: Since you’re running a Magento 2 website, choose Web
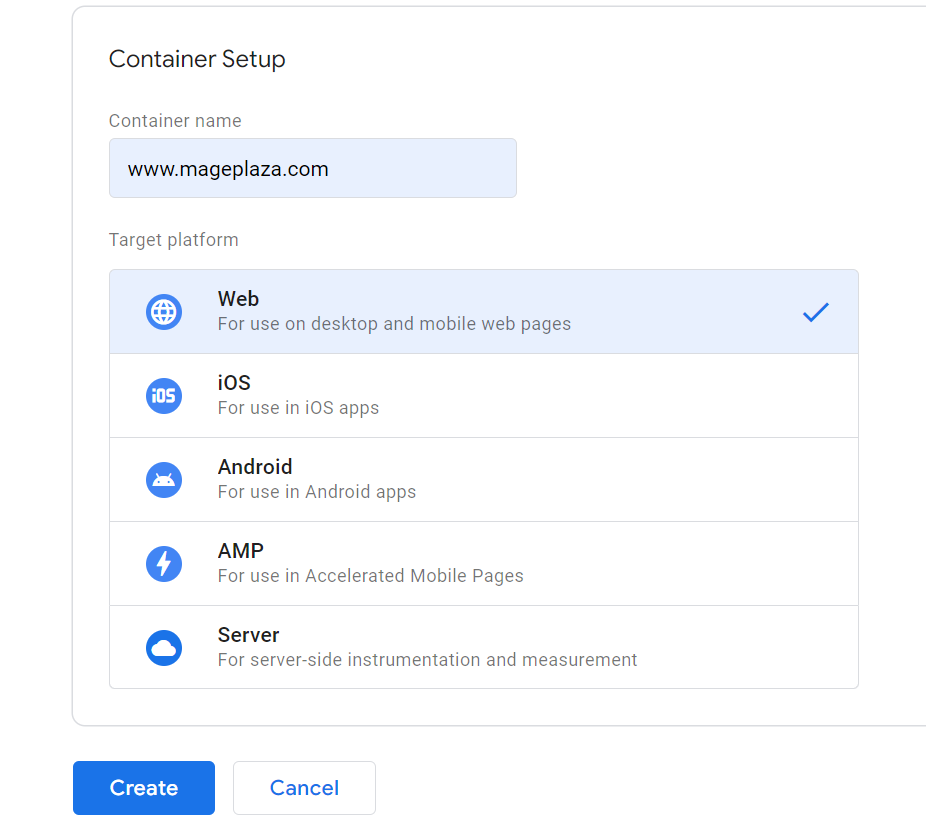
Finally, click the Create button and agree to the Terms of Service.
In case you have more than one site, just create another container by repeating the step above.
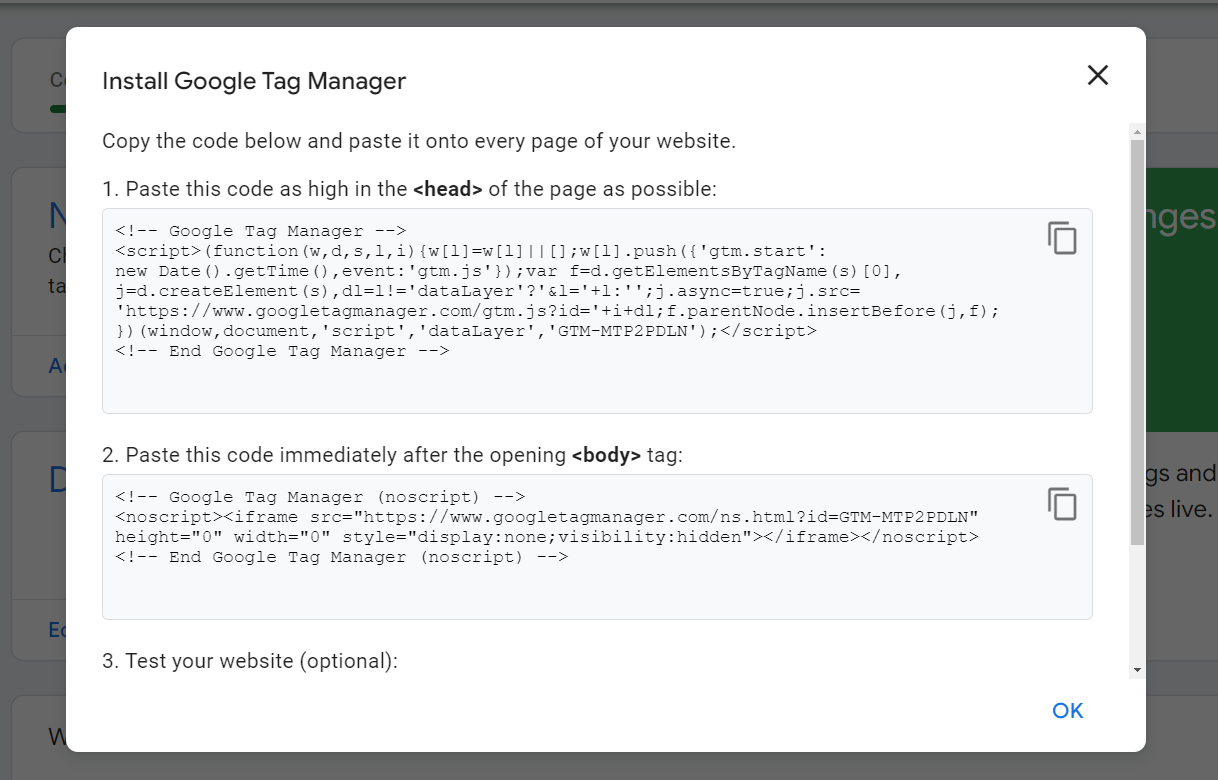
Copy the snippet of the GTM install code
Now, click on the ID number here:

Then, a code generated by Google Tag Manager will appear, copy and paste it into each page of your store site.
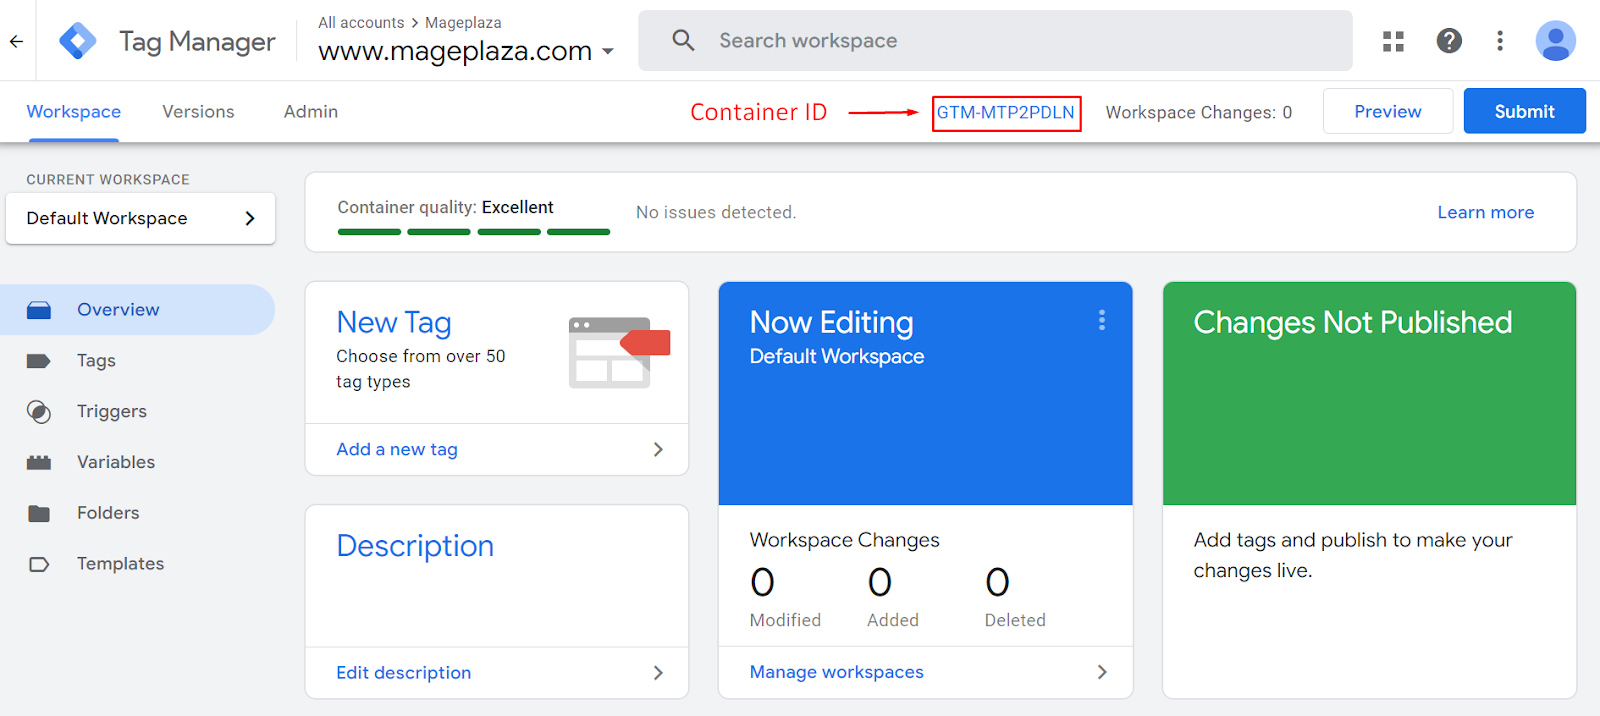
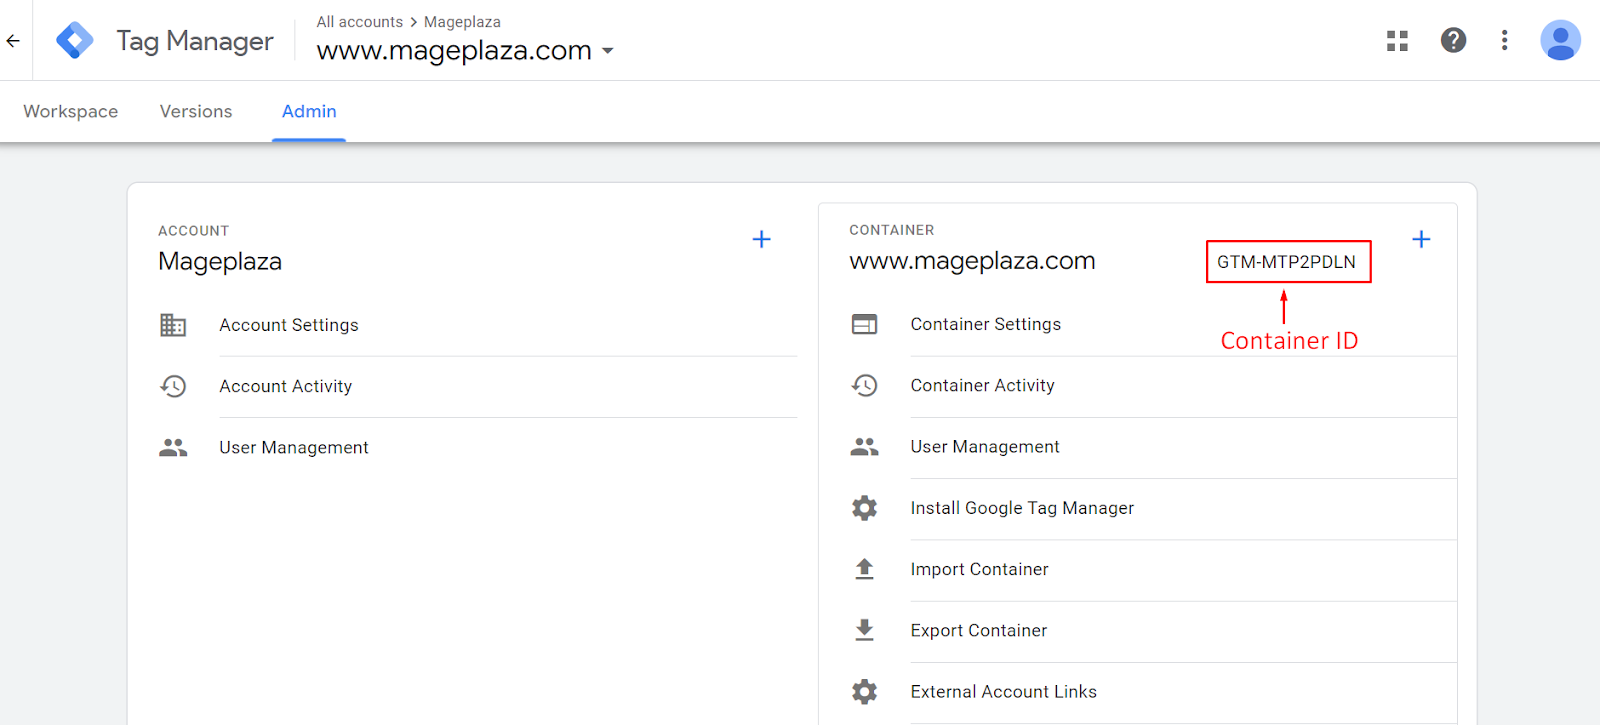
Get the Container ID
At this point, there are 2 places that display the container ID. The first one is right where you need to get the code above.
The second one is in the Admin tab, next to the container name (your website link)
Step-by-step guide to adding GTM script to Magento 2 (Using Mageplaza extension)
To add the GTM script to Magento 2, there are 2 options: do it programmatically or use a third-party extension. Frankly, the first one is quite complicated and it requires the admins a solid understanding of code, so it’s not really a good choice. Instead, you should use the Magento 2 Google Tag Manager (GTM) extension - a much simpler system.
Let’s learn more about how to configure this module to add GTM to your Magento 2 store!
Navigate to Stores > Configuration > Mageplaza Extensions > Google Tag Manager
In the General section, select Yes in the
Advanced Configuration
This section allows you to set how Google Tag Manager can track the data
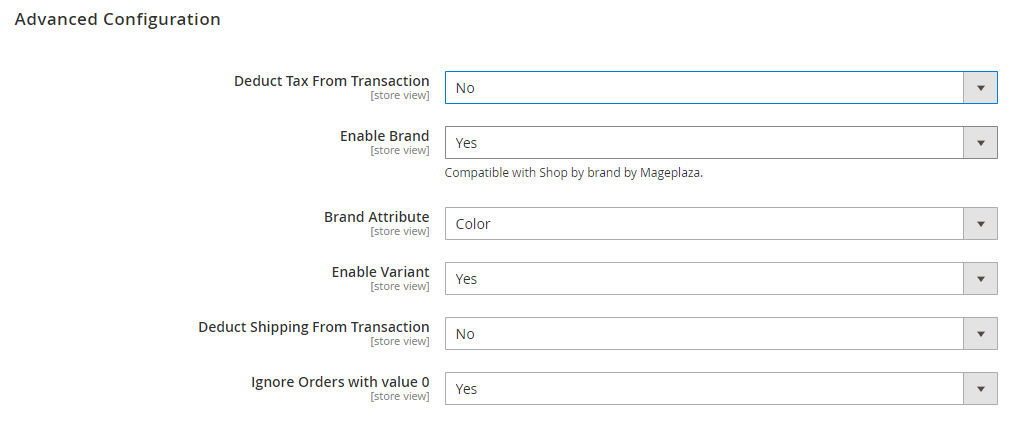
- Deduct Tax From Transaction: Choose Yes if you want to deduct tax from the Grand Total
- Enable Brand: Choose Yes to take the value based on brands
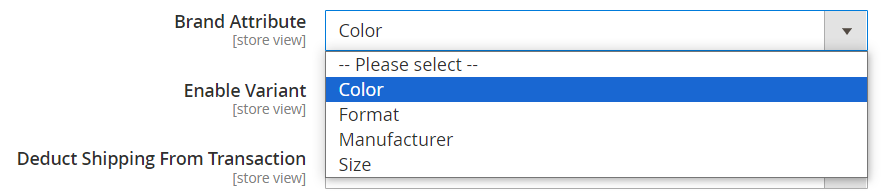
- Brand Attribute: Choose among the provided attributes: color, format, manufacturer, and size. The brand will be set according to the selected attribute.
- Enable Variant: Select Yes to show the Variant field

- Deduct Shipping From Transaction: Select Yes to deduct Shipping from transaction
- Ignore Orders with value 0: Select Yes to exclude orders with the value of 0
Google Tag Manager
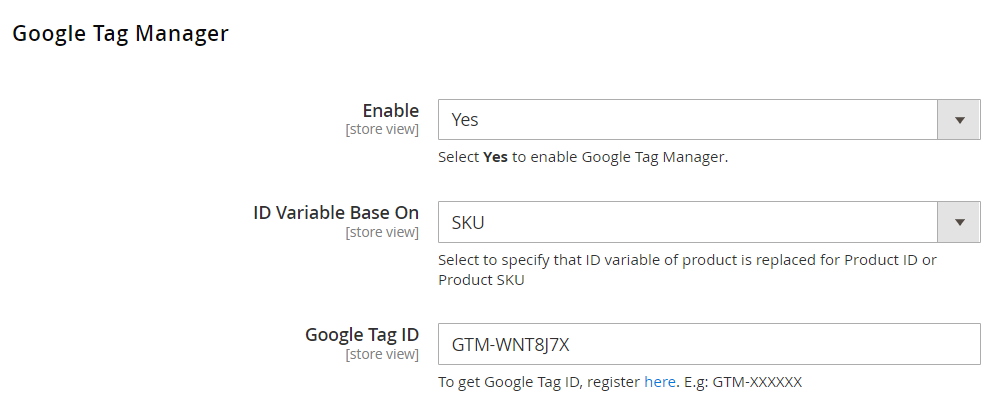
- Enable: Chose Yes to activate Google Tag Manager
- ID Variable Base On: Display the ID value of the product according to the product ID or SKU
- Google Tag ID: Enter the container ID you got earlier to update
Google Analytics 4
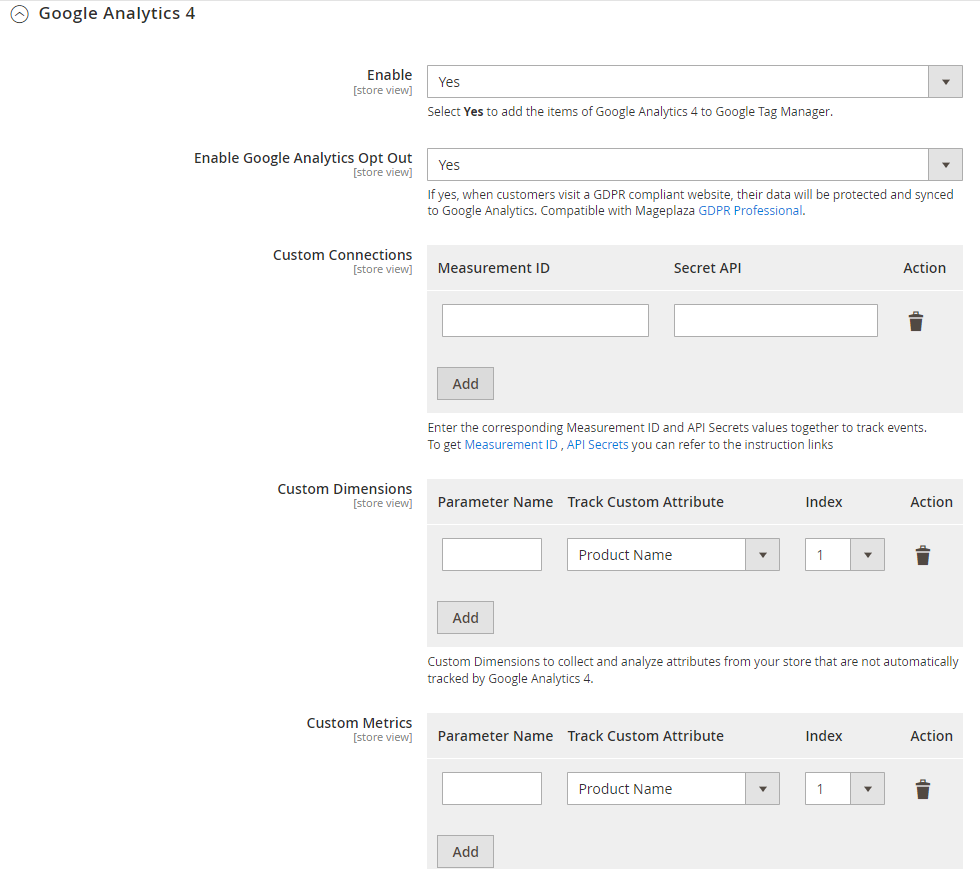
- Enable: Select Yes to add items of GA4 to Google Tag Manager.
- Enable Google Analytics Opt Out: If Yes, when customers visit GDPR-compliant websites, their data will be secured and synced to Google Analytics.
-
Custom Connection: Provide the corresponding Measurement ID & API Secrets values to track events
- How to get Measurement ID: Go to GA website > Admin settings > Data collection and modification > Data streams > click on the symbol >. Now, you will see the Measurement ID.
- How to get API Secrets: Scroll down and click on Measurement Protocol API secrets > click Create to make a new API secret if you haven’t got any
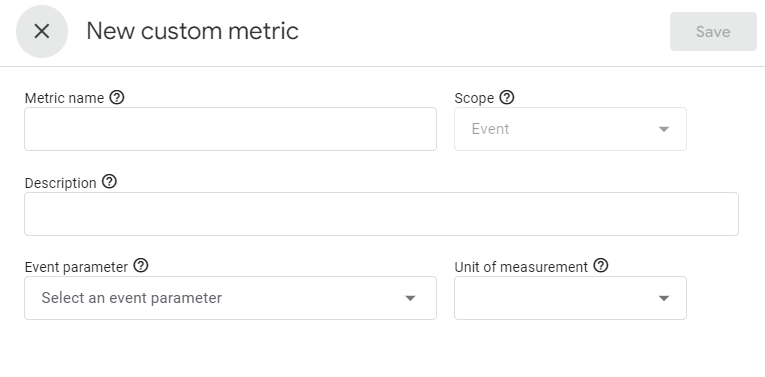
- Custom Dimensions: Provide these pieces of information: Parameter Name (Event parameter), Track Custom Attribute (select the attribute you want to track, and Index (priority). To create a Custom Dimension, go to Custom definitions > click** Create custom dimension** and fill out the required fields, including Dimension name, Scope, Description, and Event parameter.
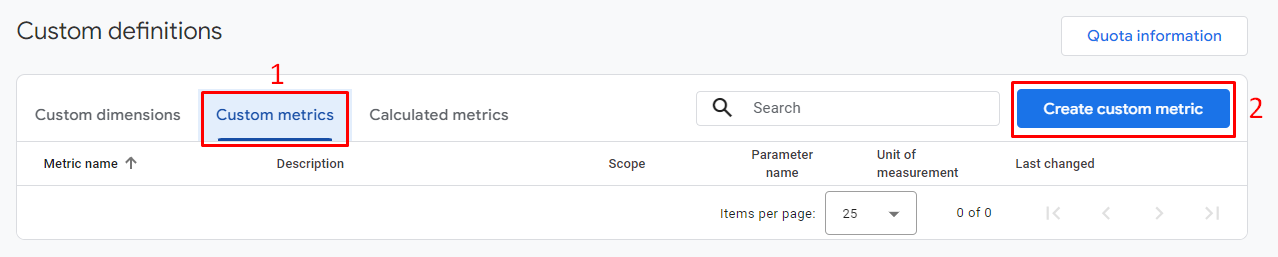
- Custom Metrics: Similar to Custom Dimensions. To create a Custom Metric, click on Custom metrics tab > press the Create custom metric button > enter the necessary fields.
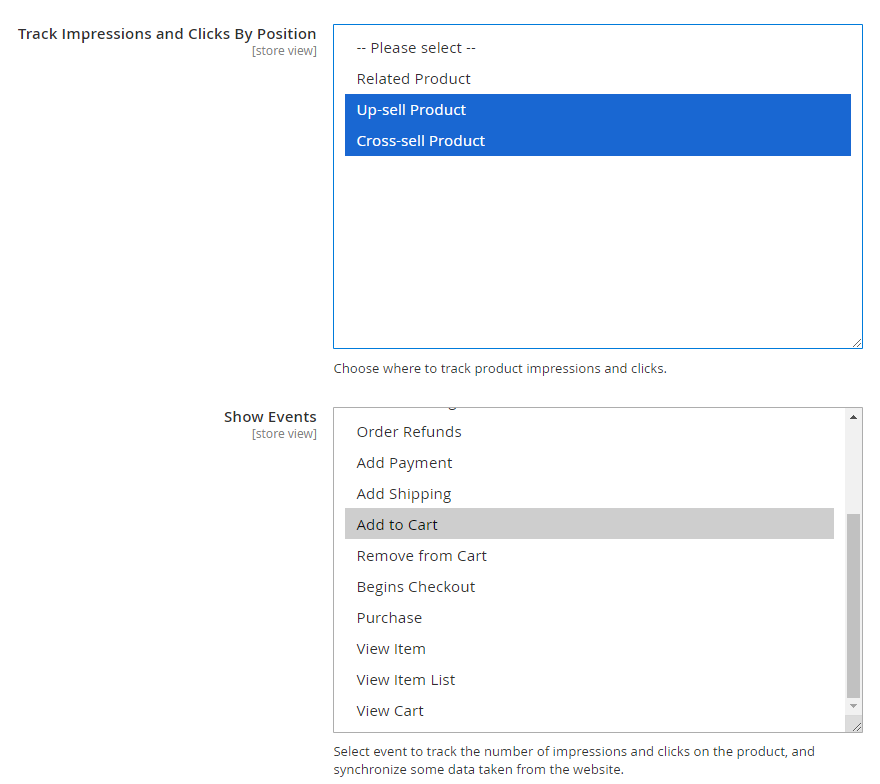
- Track Impressions and Clicks By Position: Choose where to track product impressions and clicks: related/ upsell/ cross-sell product (multiple selections are available)
- Show Events: Choose one or multiple events to track the number of impressions & clicks on the product.
Google Analytics eCommerce
Note: Since July 1, 2023, GA4 has officially replaced GA. Therefore, GA no longer tracks data after that day, only keeping older metrics, so this section is no longer essential. You can just skip it.
Facebook Pixel
![]()
- Enabled: Choose Yes to activate Facebook Pixel
- ID Variable Base On: Select SKU or ID
- Facebook Pixel ID: To get this ID, go to Facebook Business > Event Manager > Data Source > Setting, then copy the ID below Owner
- Enable Advanced Matching: If Yes, the system will add Tracking Add to Wishlist and Advanced Matching Parameters for Facebook Pixel
Google Adwords Conversion Tracking
Click on the link given for a comprehensive guide on how to configure Adwords Conversion Tracking
![]()
Create Tags, Triggers, Variables
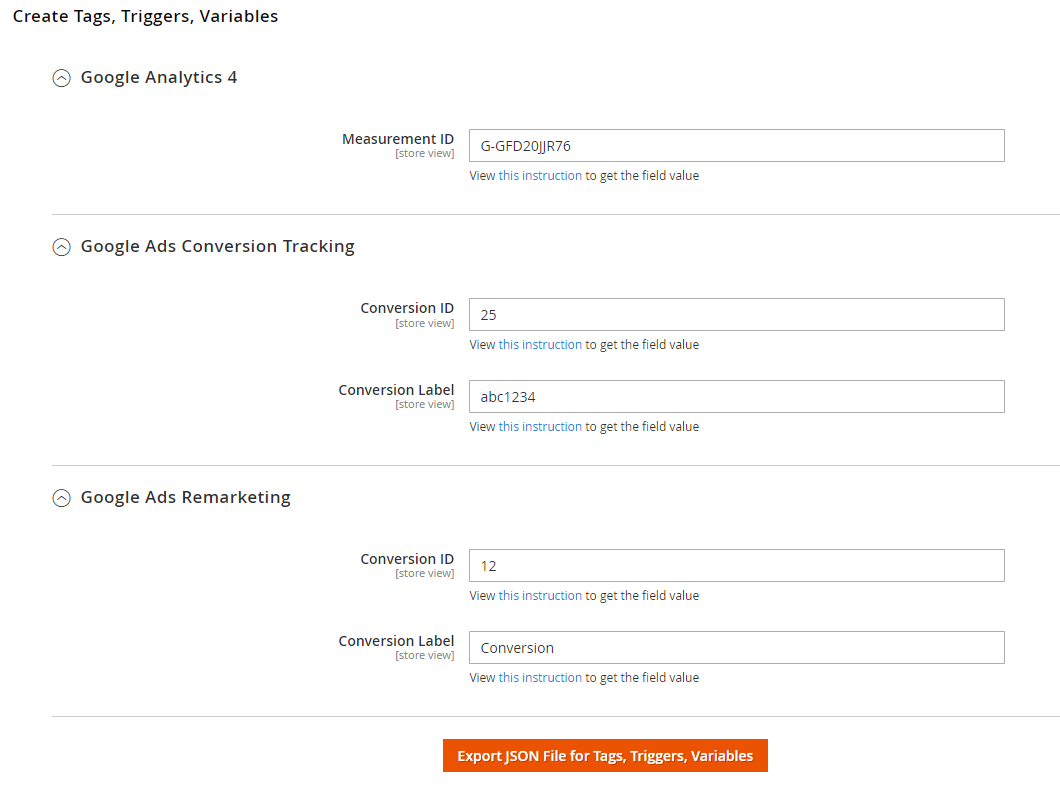
Google Analytics 4
Measurement ID: Enter the GA4 measurement ID as we have guided above
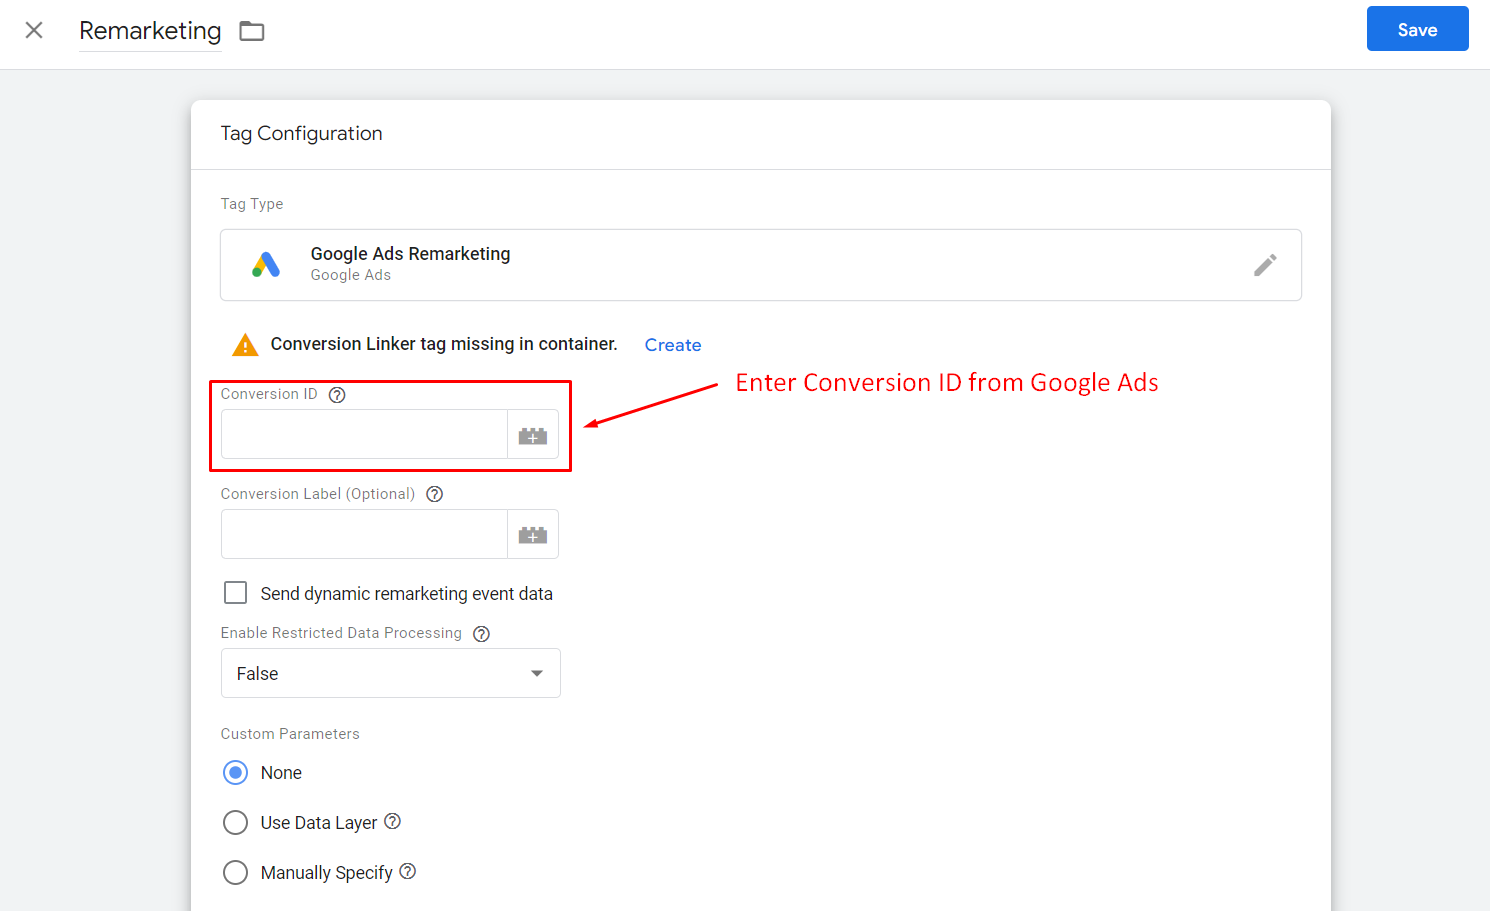
Google Ads Conversion Tracking & Google Ads Remarketing
For these two sections, please enter the Conversion ID and Conversion Label. To get them, go to Google Ads > Tools and settings > Measurement > Conversions > select the name of a conversion you want to use from the list of Conversion action > expand Tag setup tab > choose Use Google Tag Manager > copy the Conversion ID & Conversion Label.
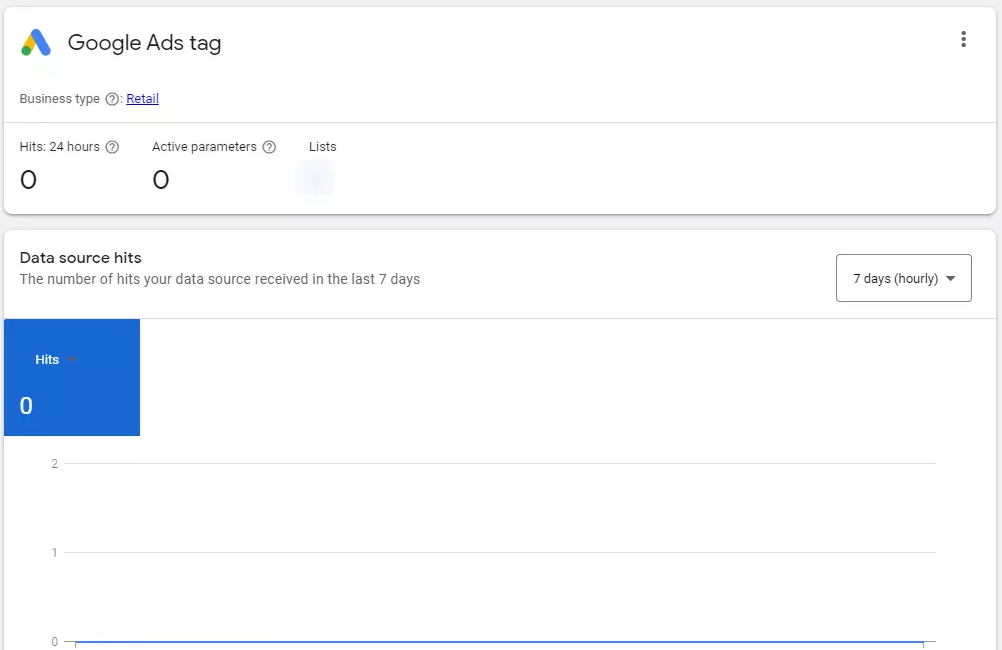
How to verify the GTM setup
To check whether the GTM was successfully added to your store, we suggest 2 simple methods.
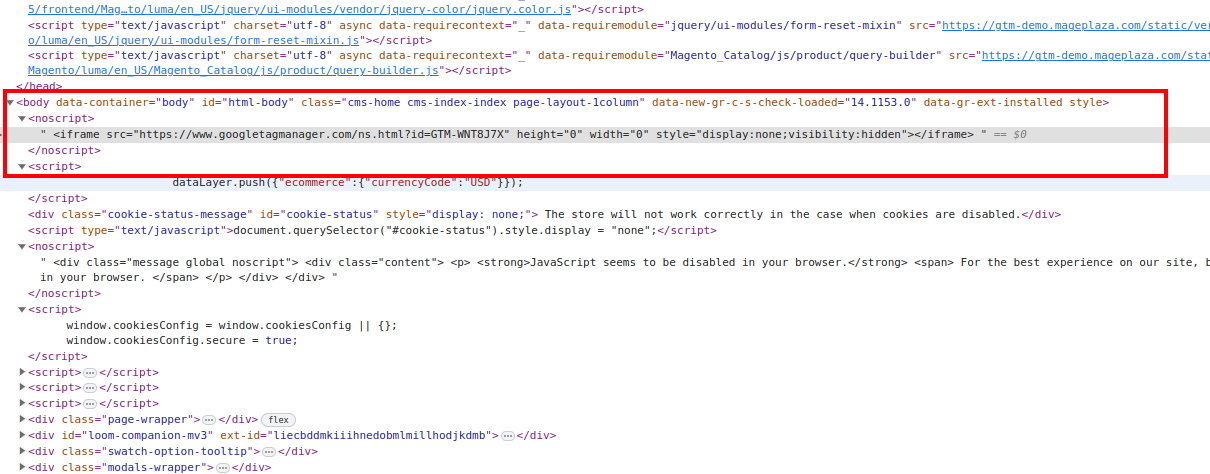
Method 1: View source code
Open the home page of your store, then press CTRL + U to view the source code. Next, press CTRL + F to find GTM. If you find the word gtm in the code like this image below, that means it’s added to your site.
- In the head tag
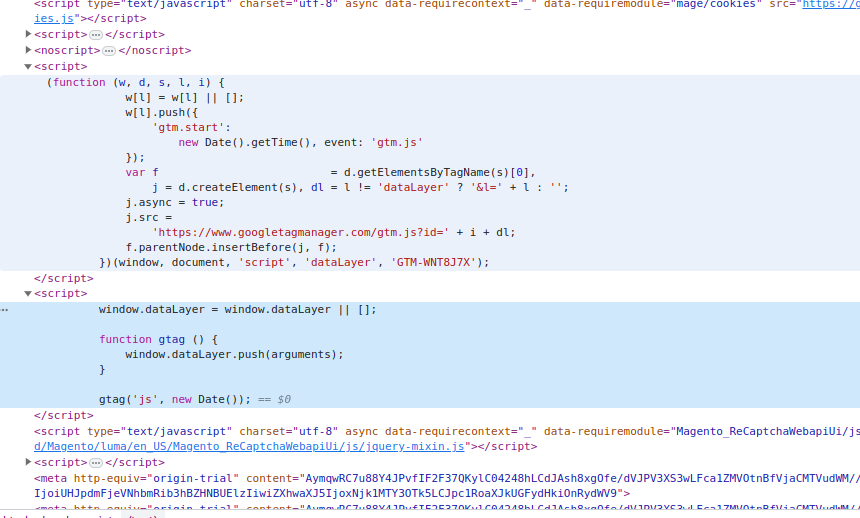
- In the body tag
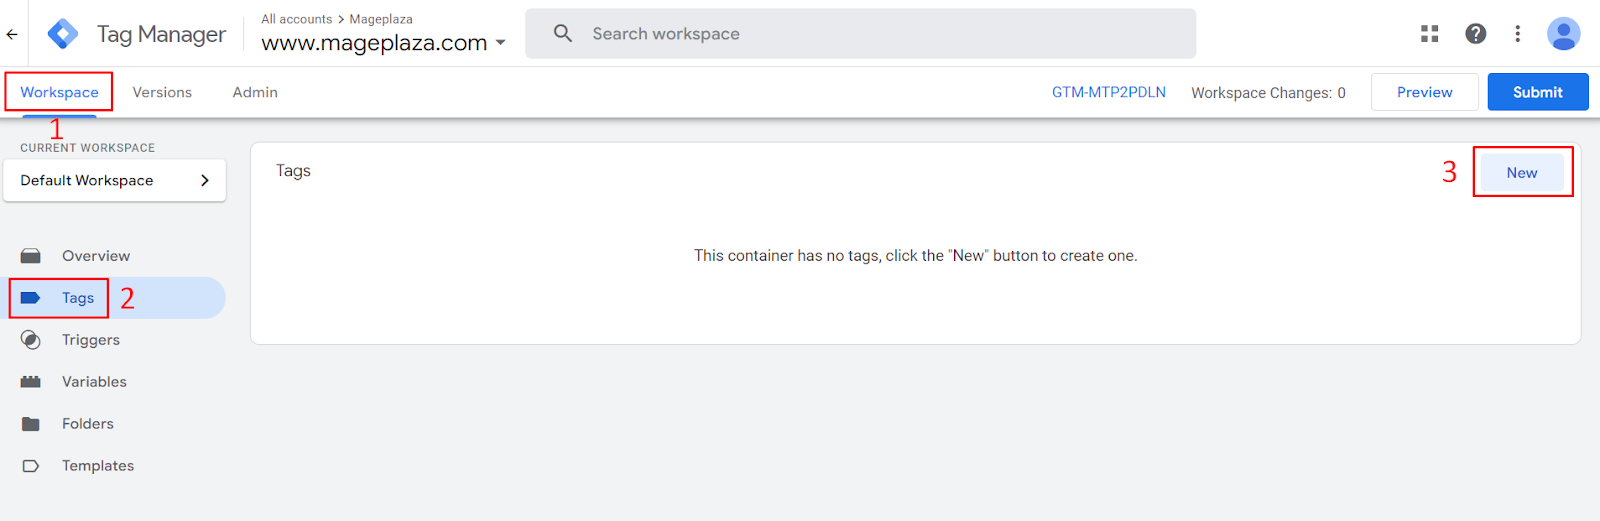
Method 2: Preview in GTM
The second way is using Google Tag Manager. Login to your account, navigate to Workspace tab, and click on the Preview button on top right.
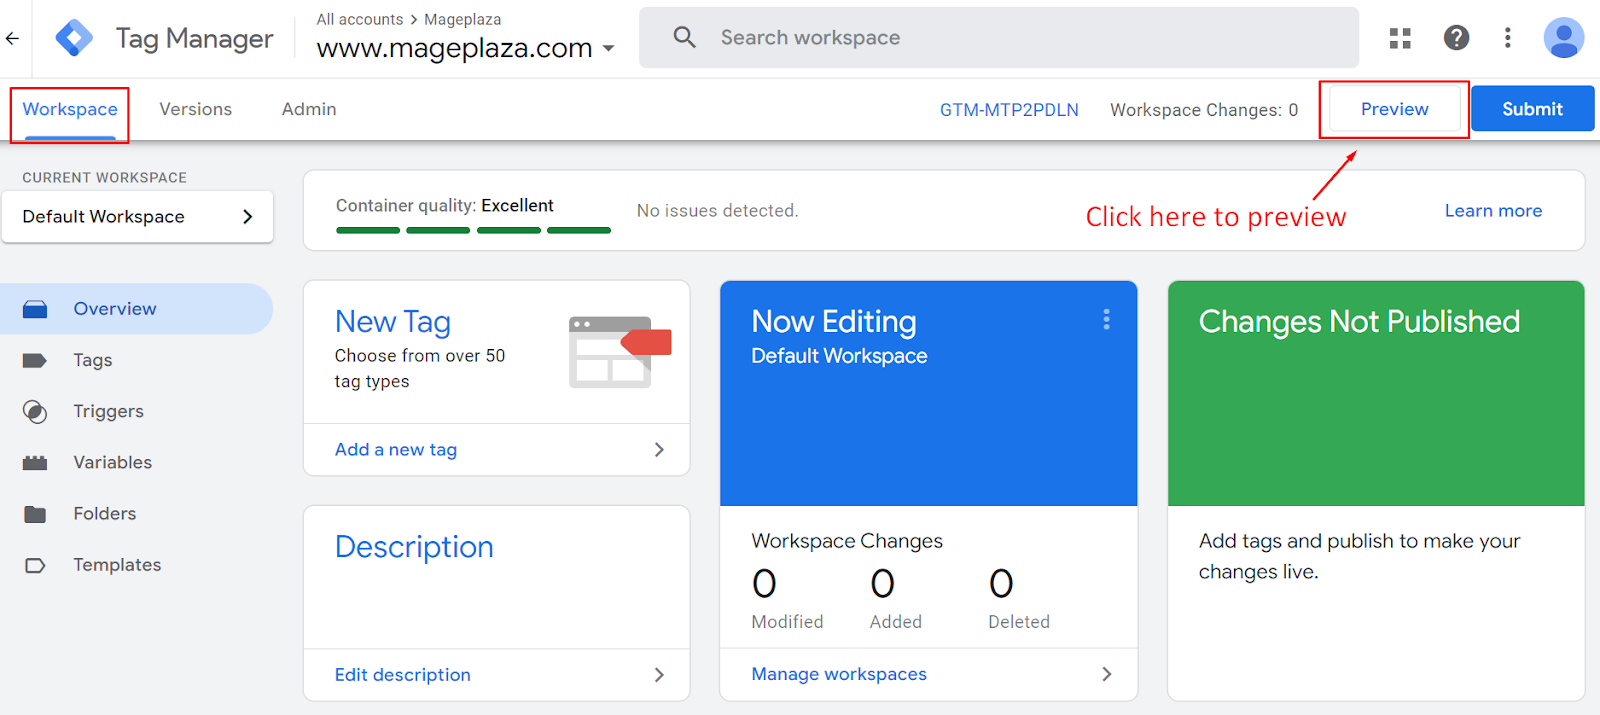
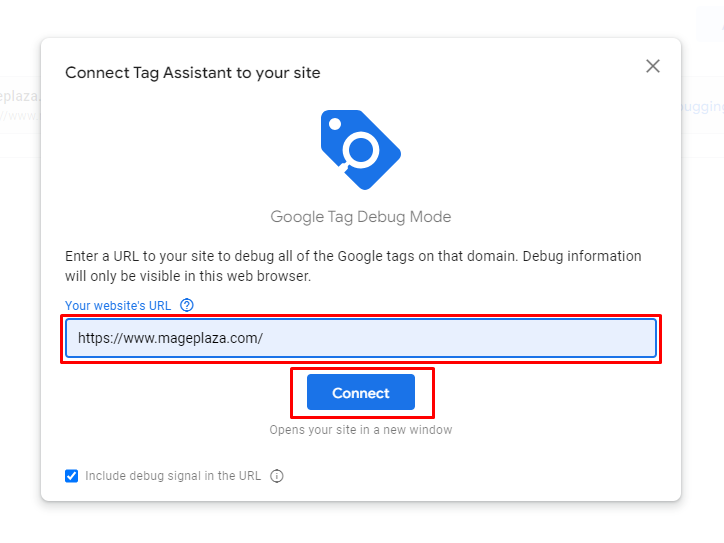
Then, a popup will appear asking for your site URL. Provide your home page link and click Connect.
If GTM was added, it will show a summary of your Tag Manager. Here’s how it should look like:
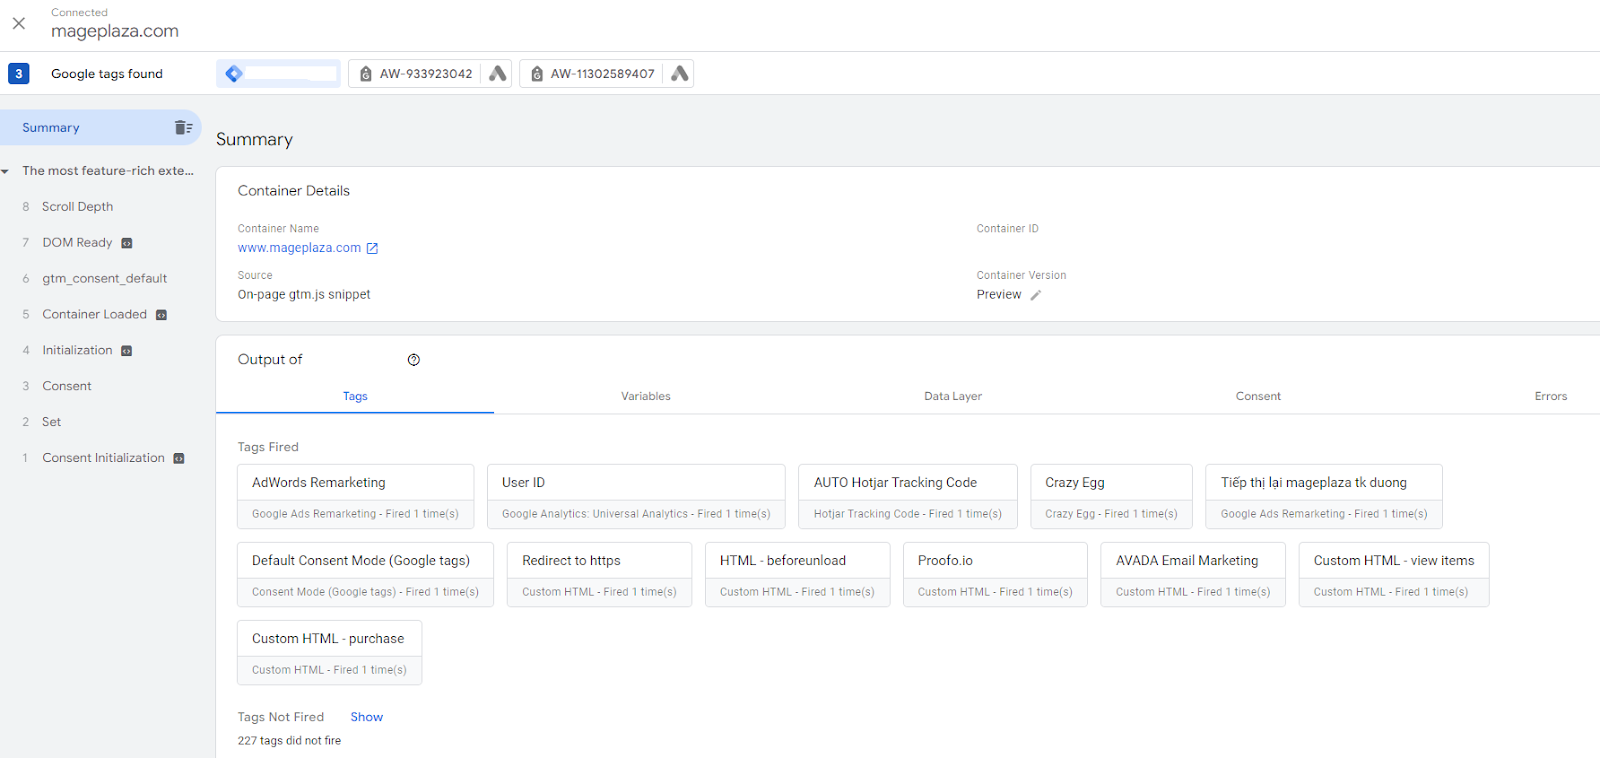
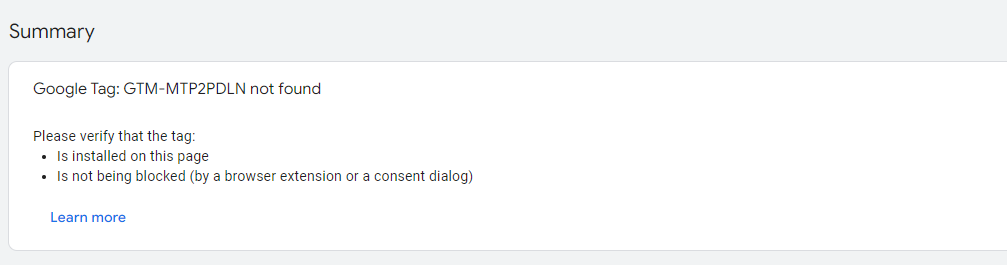
If it hasn’t been added, you will see a notification saying Google Tag not found like this:
Advanced Configuration
Setting up advanced tracking
There are various types of tracking with GTM. However, in this blog, we will focus on 2 main events that most marketers are using: Click on button & Track scroll
#1: Click on button
This event allows merchants to track their customers clicking on a specific button. Conversion buttons, such as Add to Cart, Checkout, Instal, and so on, play a crucial role in driving desired actions on websites. By effectively tracking and analyzing these interactions, businesses can gain valuable insights into user behavior, optimize their marketing strategies, and ultimately boost conversions.
So, how to create a Click on button event?
Step 1: Navigate to the Google Tag Manager > Workspace > Tags > click New to add a new tag
Step 2: Tag configuration
- Choose Google Analytics > Google Analytics: GA4 Event
-
Provide necessary information and settings:
- Measurement ID: Paste your GA4 measurement ID here
- Event Name: Name your event
- Other sections like: Event parameters, User properties, More settings, Advanced settings are optional. Depending on your strategies, you can set them up as you want.
Step 3: Triggering
- Click on the + icon to add a new trigger
- Name the trigger
- Choose the trigger type as Click: All Elements
-
Set the condition that allows this trigger to fire on by choosing Some Clicks
- Variable: Select Click classes
- Action: Select contains and add the content to the class in the box next to it. To get the class content, please go to the store page that you want to track a button on (for example: the Add to cart button on the Mageplaza SEO extension page) > click the right mouse button on the Add to cart button > choose Inspect > then, copy the content in the class
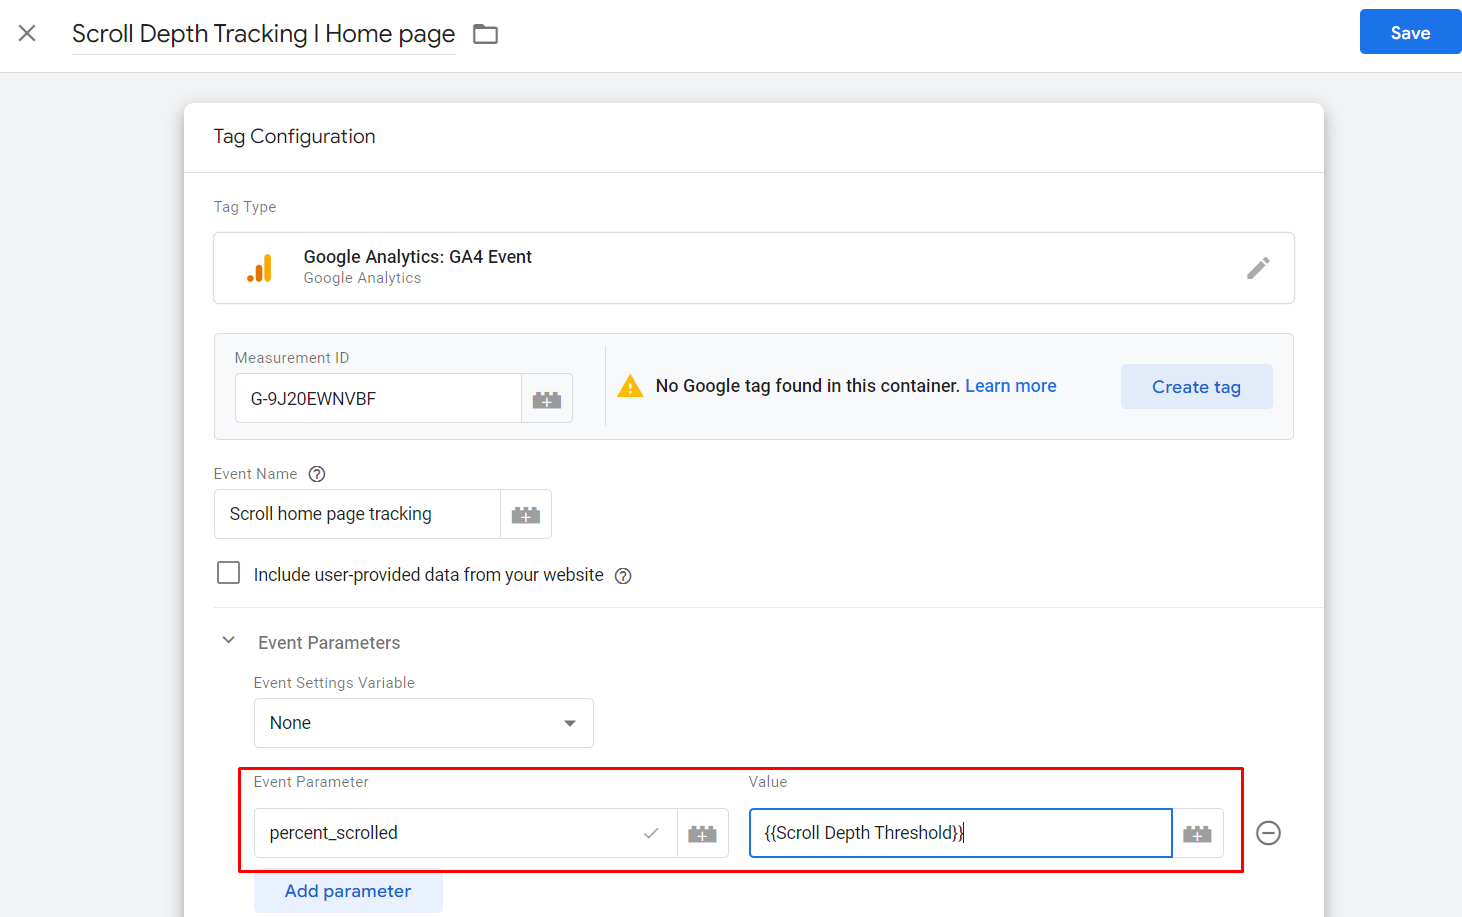
#2: Track scroll
Creating a scroll tracking event is pretty similar to Click on Button, but there are a few differences you need to keep in mind.
Tag configuration
You need to add an event parameter. There are 2 fields required:
- Event parameter: Enter percent_scrolled
- Value: Enter **
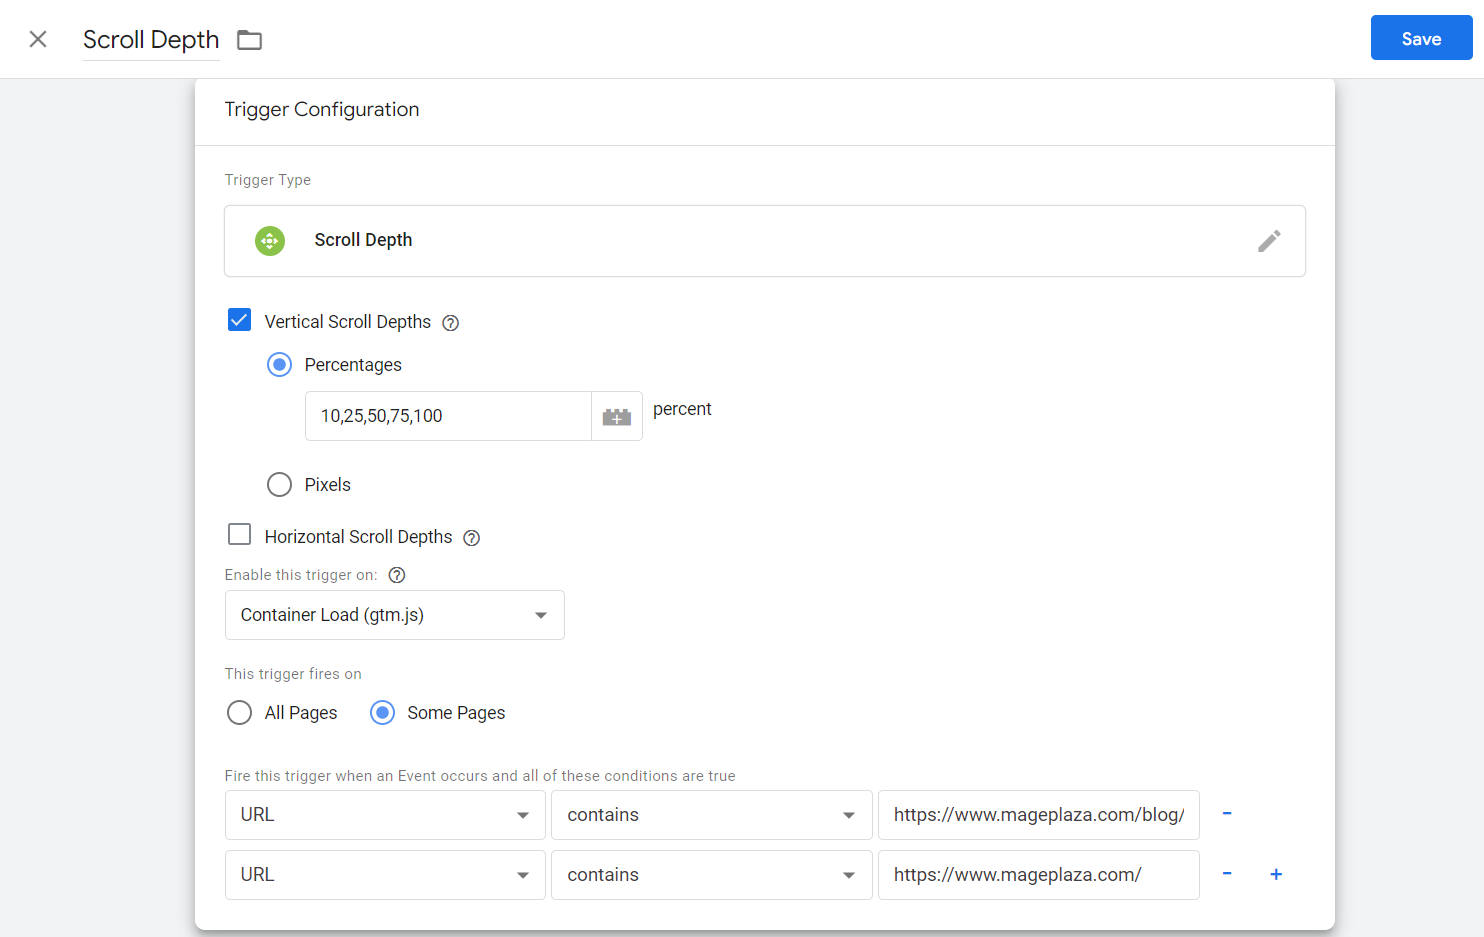
Triggering
- Choose Scroll Depth for trigger type
- Then, select Vertical Scroll Depths (this is suitable for most websites that users need to scroll down)
- Enter the percentage milestone as your favor (ex: 10, 25, 50, 75, 100)
- Set to enable this trigger on Container Load (gtm.js)
-
Choose this trigger is fire on All Pages or just Some Pages. If you want to apply this tracking on 1 or a few pages, go with Some Pages option. Then, fill out the required information for setting event conditions:
- Variable: Select URL
- Action: Choose contains and provide the link of the page you want to track scroll depth. If there are several pages, just click the plus symbol (+) to add a new condition.
Don’t forget to press Save when you’re done!
Special note: If your website is on the list of GDPR countries, make sure it is compliant with GDPR. Also, it would be more convenient for your visitors if you add consent settings in the Tag Configuration section like below:
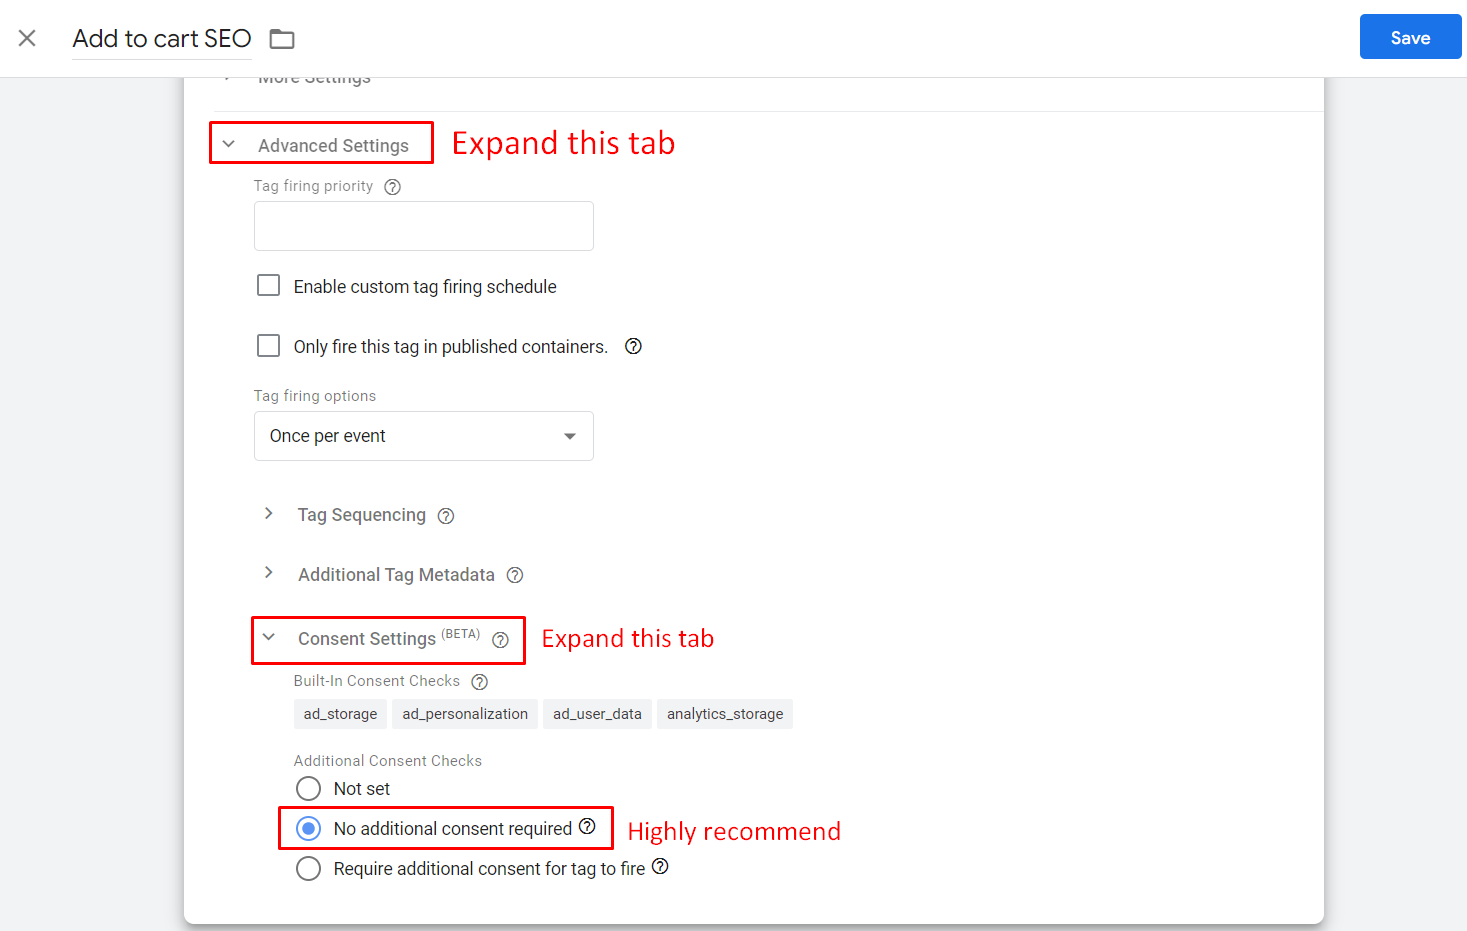
It’s okay to choose Require additional consent for tag to fire but you’ll have to add each required consent, so it’s gonna take a lot of time and might frustrate customers cause they have to answer many consent agreements.
After creating an event, bet that you would want to know if it’s successfully added to GTM or not. Here’s how to make sure it’s firing.
Go to the Workspace tab, and click on the Preview button.
Next, provide Tag Assistant your site URL and click Connect.
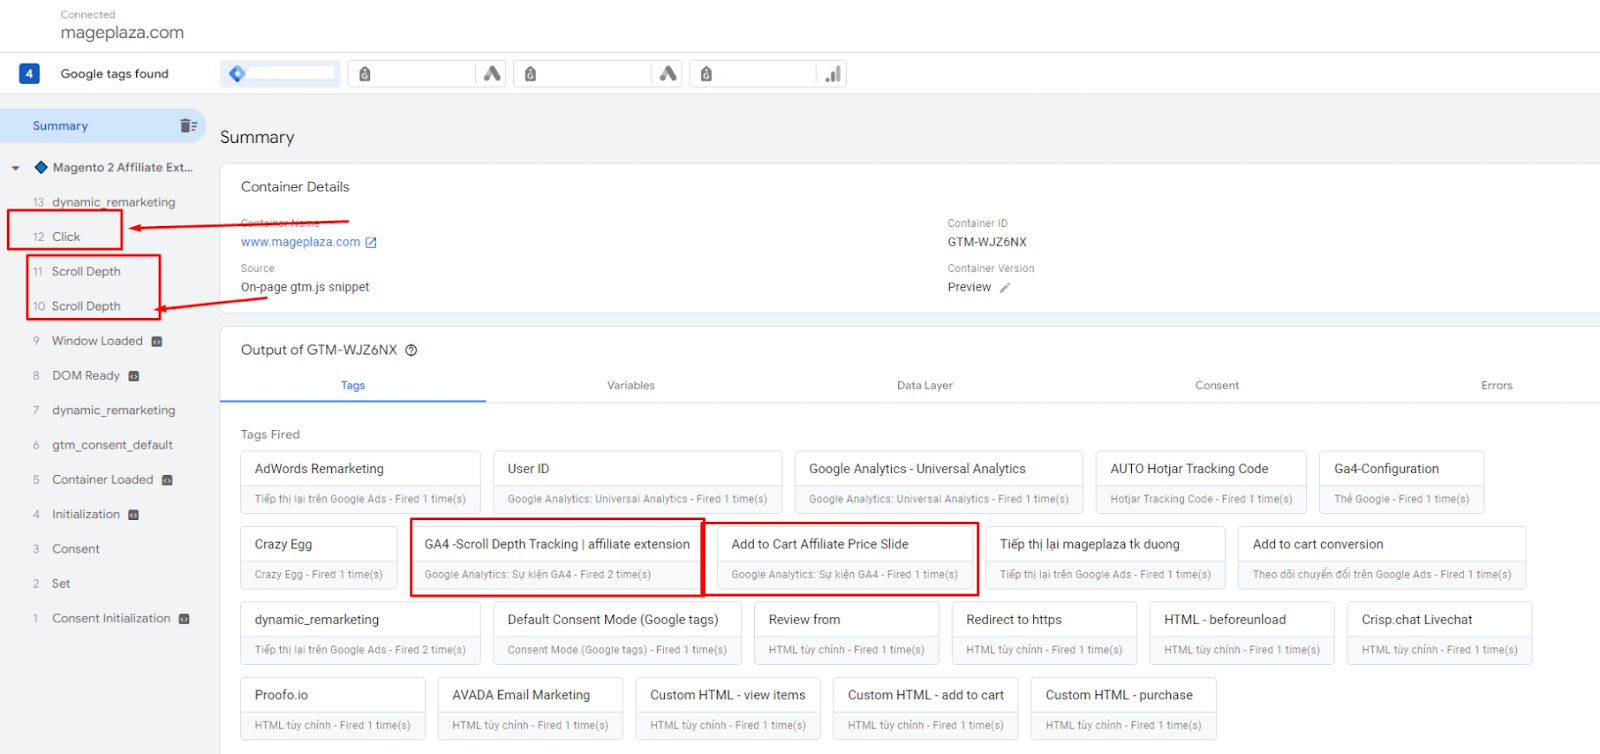
At this point, you should see your Tag Manager summary. If your event was added, it should appear in the list on the left and the Tag Fired section. For example, I’m looking for Scroll Depth tracking and Add to Cart events.
Special note: If your website is complying with GDPR (meaning that you have to turn on the consent mode for all events), you should double-check to make sure if you have created proper events.
- Correct settings
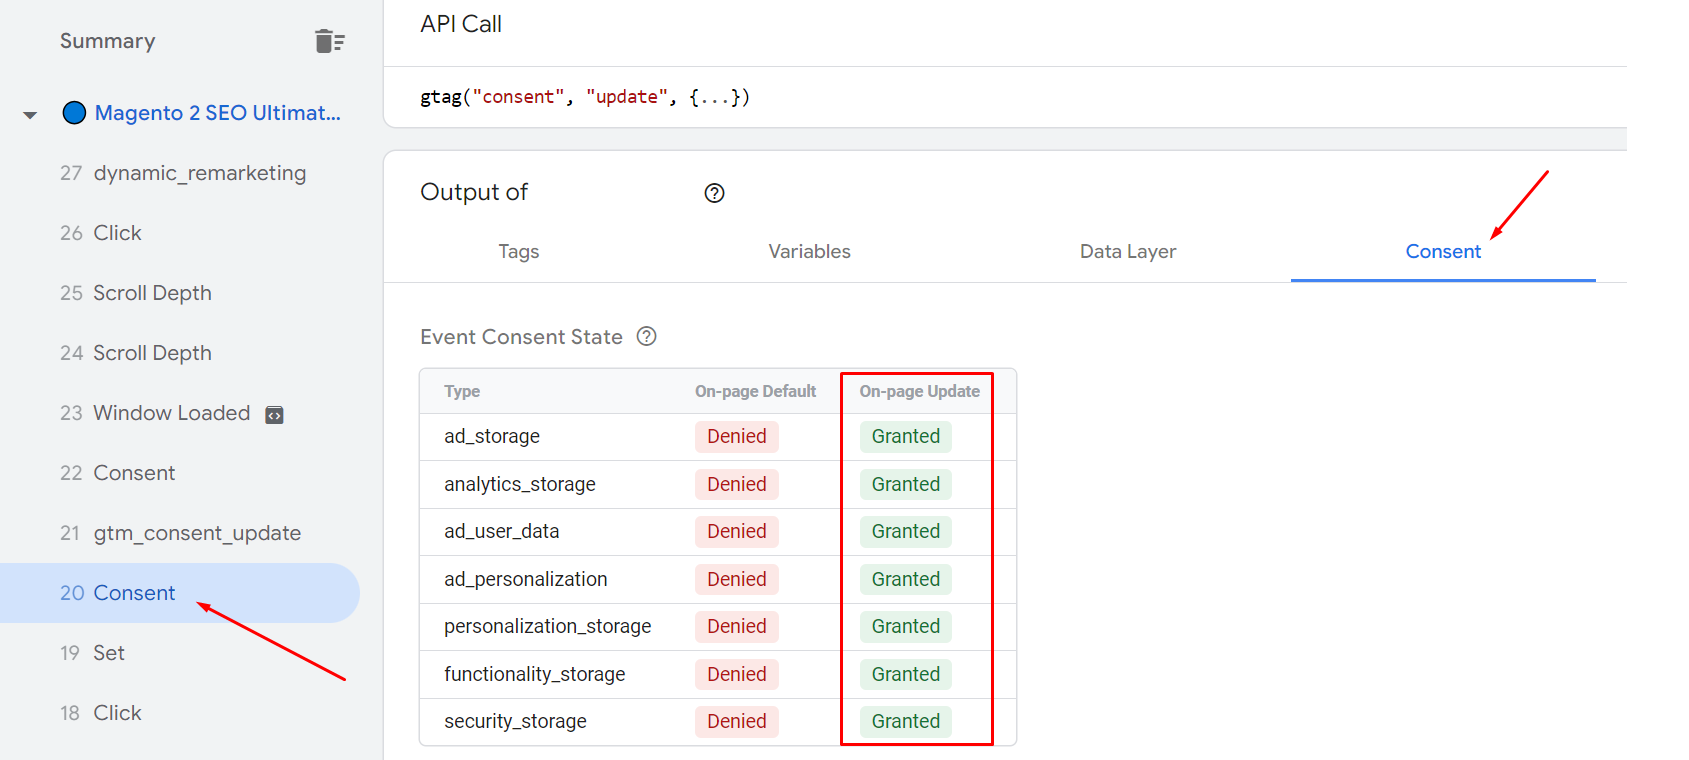
- Incorrect settings

Using GTM for marketing optimization like remarketing
GTM allows users to create dynamic remarketing ads that show personalized content based on customer behavior. For example:
- If a shopper viewed a blue T-shirt, the ad will display to him/her an ad featuring that exact shirt.
- If a customer abandoned his/her cart, then show an ad reminding them to finish the order.
Here’s how to set up remarketing.
Step 1: Create a dynamic remarketing tag in Google Ads
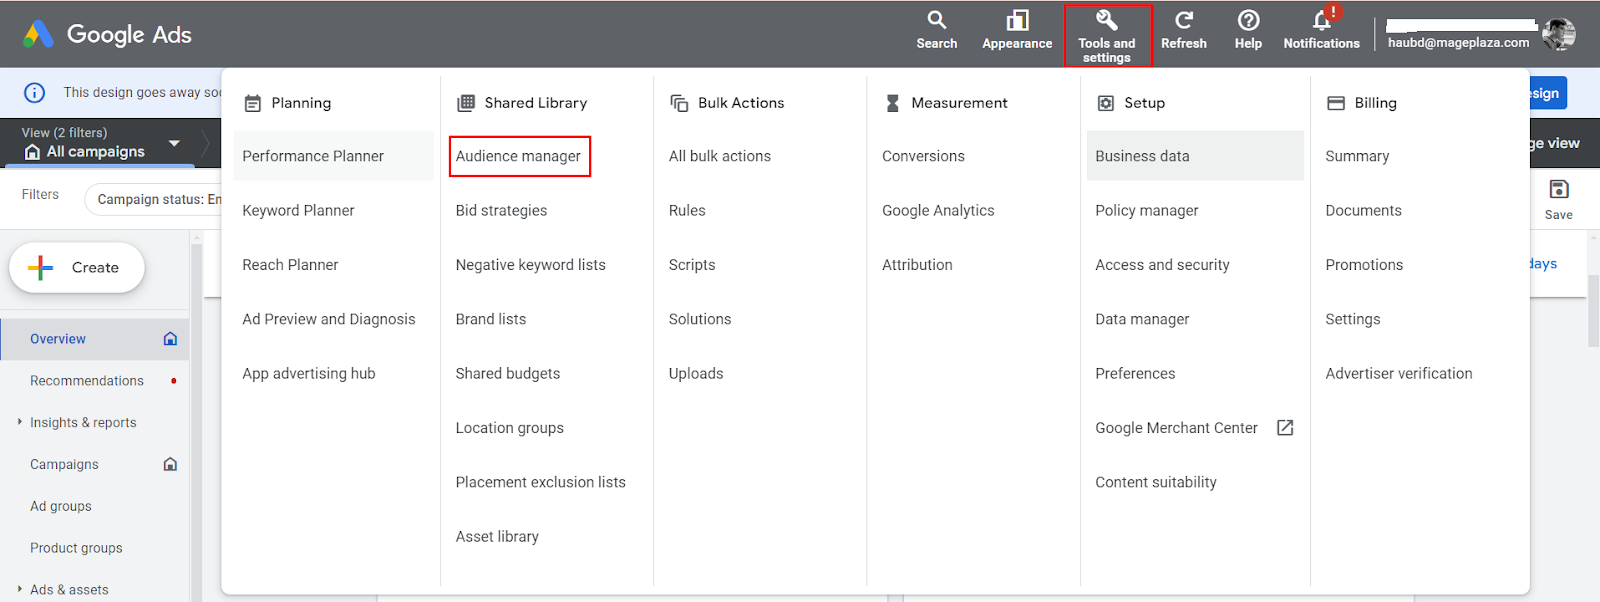
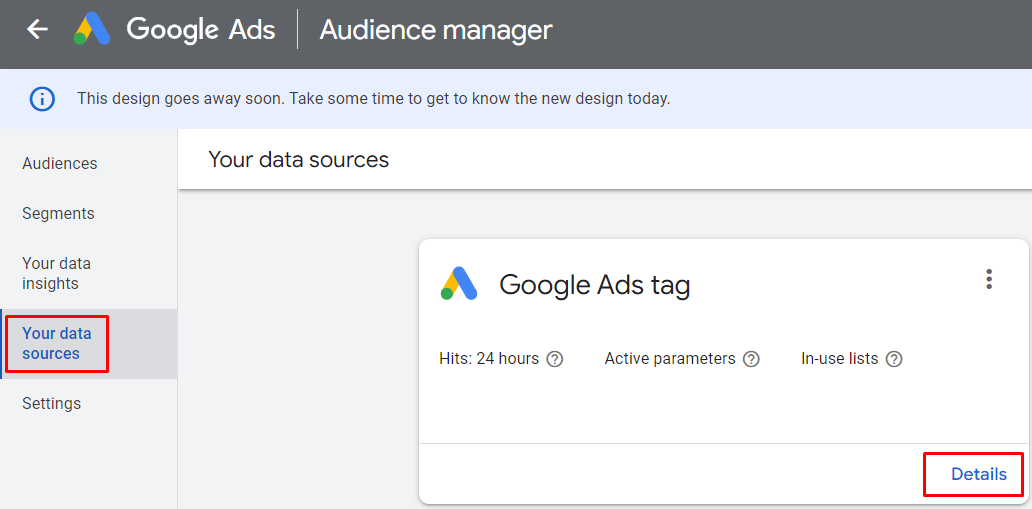
Go to Google Ads > Tools and settings > Audience manager
Your data sources > Google Ads tag > Details
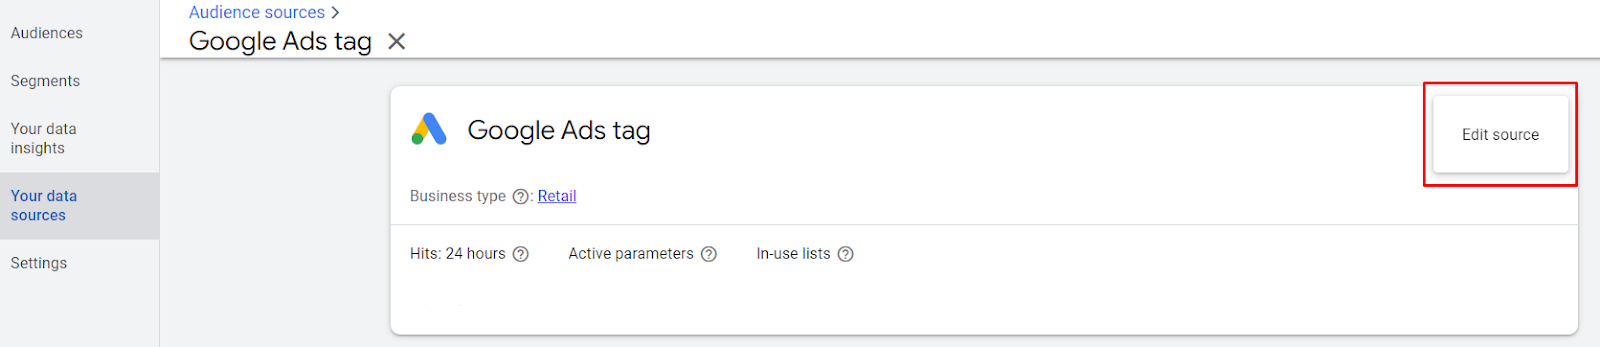
Then, click Edit source
In case yours a new account, it will show up like the image below, choose Set up tag

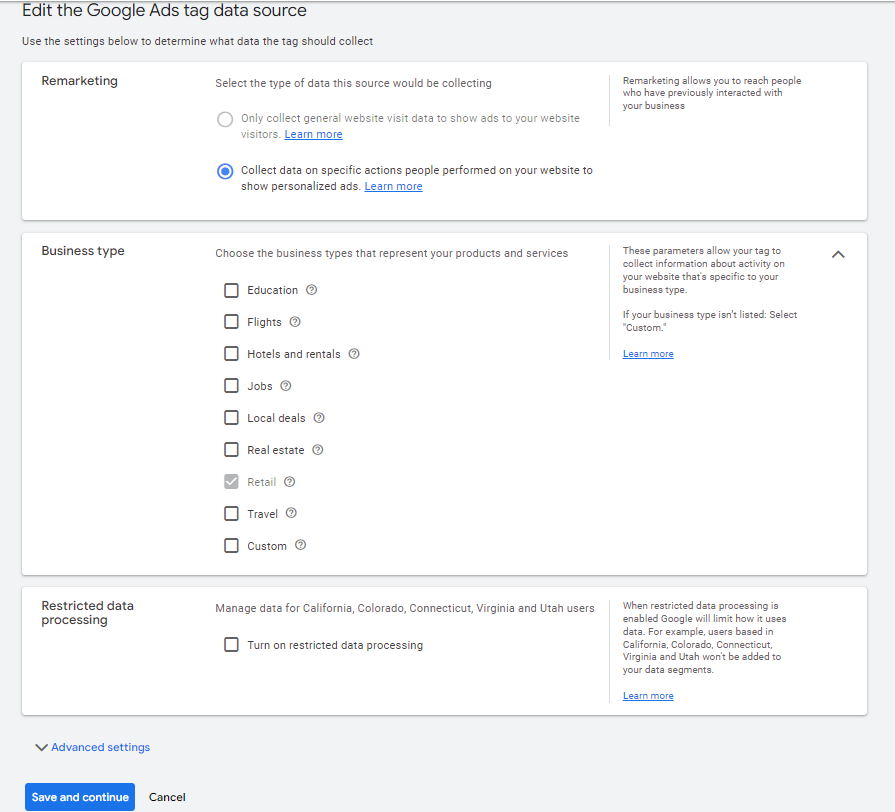
Now, Google Ads will allow you to edit the data course. Fill them out according to your business plan then press Save and continue.
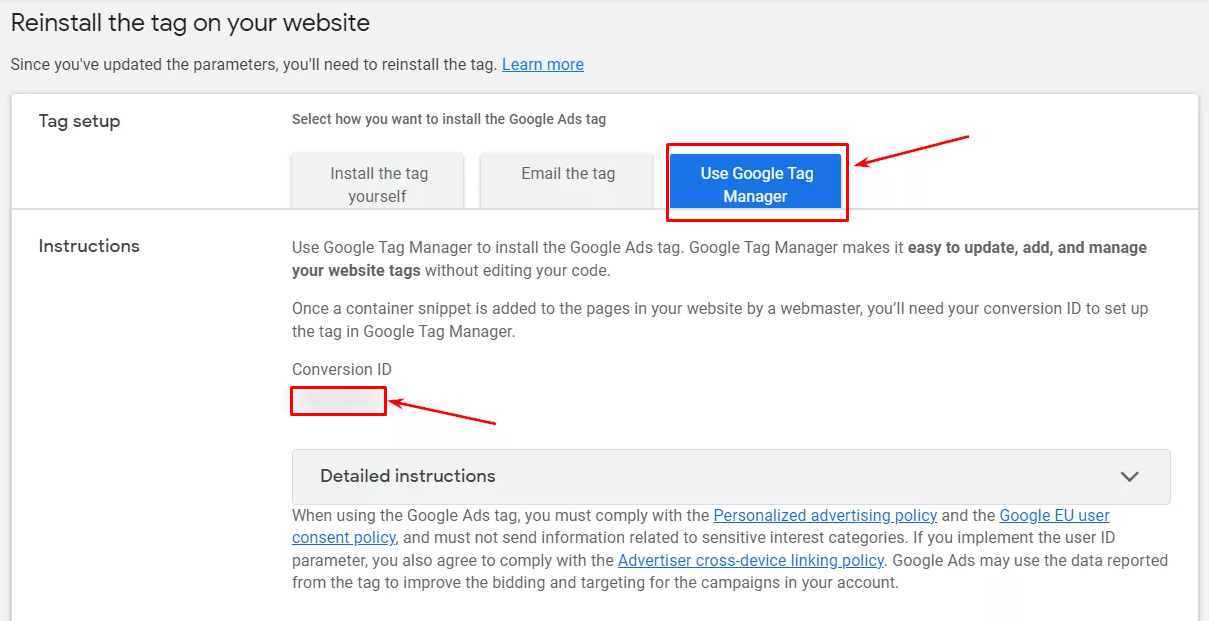
Then, you’ll be directed to the next step: Google Ads tag reinstallation. Here, you can choose among 3 options to reinstall the tag:
- Set the tag manually
- Send the tag by email to your developer
- Use Google Tag Manager
Choose Use Google Tag Manager. Remember the Conversion ID shown down below.
And that’s it. Press the Continue button to take you straight to the final step: Tag report. Since you have just finished setting, it will be brand new and haven’t got any data yet.
Step 2: Set up a dynamic remarketing tag in Google Tag Manager
Go to Google Tag Manager > Tags > New > Name the tag
Click Tag configuration > In the tag type, click Google Ads > choose Google Ads Remarketing > add the Conversion ID you copied from step 1.
Next steps are quite similar to setting up tag configuration and trigger as we have instructed before. You can freely configure the Remarketing tag based on your business strategies.
Common mistakes and their solutions
1. Not Using the Preview Mode
This simple but underrated feature can actually help users avoid unexpected errors. Many people don’t test & preview their tags before publishing them, causing lots of trouble later.
Solution: Always double check by using the preview mode in order to test your tags before letting them go live. This mode will help you in debugging any problems in real-time.
2. Incorrect Trigger Setup
Another common issue that most GTM users are facing is tags not firing. This is usually because its root is a misconfigured trigger.
Solution: Make sure you have set the trigger conditions correctly. Ensure you set the right conditions for your triggers. In case you’re confused, check Google’s documentation about triggers for more information. Additionally, you can employ error notifications in GTM.
3. Not Updating the Container
Some marketers waste a lot of time troubleshooting but then realize their containers weren’t even updated. Old containers will miss the latest features and fixes.
Solution: We suggest updating your GTM container regularly. You may also consider integrating version control methods.
4. Add Too Many Tags
Too much does not always mean positive. And too many tags can slow down your site speed. Of course GTM is an effective tool in optimizing speed loading, but there might be some tags you don’t need. The fewer tags on your site, the faster it loads.
Solution: The best way is to review regularly and reduce unnecessary tags.
5. Use Hardcoding Tags
Some believe using hardcoding tags and GTM together can improve redundancy, but it’s not. In fact, this combination can actually cause data discrepancies.
Solution: Consider using GTM as your central hub. Eliminate all other hardcoding tags if they are not important.
6. Ignore Built-in Variables
GTM offers a host of built-in variables. Ignoring them means reinventing the wheel. There are already various built-in variables in GTM. Ignoring them and creating new ones can be time-consuming.
Solution: Before generating new custom variables, you should check the available options first. The one you needed might already exist and you can add it with just a few simple clicks rather than setting up everything from scratch.
7. Forget To Set User Permissions
This lack of carefulness may lead to a much bigger problem. Imagine, if you don’t set user permissions, and an intern with low experience can accidentally remove very crucial tags.
Solution: Carefully assign user roles and their permissions. Only allow the company’s senior leaders high access levels.
8. Underestimate Mobile Users
Today’s modern world is about convenience. Most customers are shopping on mobile devices so if you’re not focusing on mobile users, it would be a pity.
Solution: Guarantee that your tags are optimized for both desktop and mobile devices.
Wrap up
Google Tag Manager is definitely a must-have tool for marketers. It’s a game-changer, allowing you to effortlessly manage all your website’s tags in one place. Say goodbye to the cumbersome task of adding lengthy code snippets and hello to a streamlined process that won’t slow down your site’s loading speed.
If you have any questions about setting GTM, feel free to contact us!
Table of content

Jacker is the Chief Technology Officer (CTO) at Mageplaza, bringing over 10 years of experience in Magento, Shopify, and other eCommerce platforms. With deep technical expertise, he has led numerous successful projects, optimizing and scaling online stores for global brands. Beyond his work in eCommerce development, he is passionate about running and swimming.
Related Post

7 mins read
|
06-30-2026

How to Enable DebugView in GA4 for your Magento 2 store - Mageplaza
Step-by-step guide to enabling GA4 DebugView for Magento 2 merchants — verify your GA4 events are firing correctly before trusting your data.
8 mins read
|
06-09-2026

Table Rate Shipping in eCommerce: A Practical Guide
Master Magento 2 Table Rate Shipping. Learn how to configure an accurate, automated shipping matrix to optimize your checkout and boost sales.
10 mins read
|
06-02-2026
3 mins read
|
05-30-2026

Google Analytics Ecommerce Reports for Magento Merchants: What to track & Tips
A practical guide to GA4 ecommerce reports for Magento merchants, covering what to track, how to read each report, and specific tips to turn data into revenue decisions.
18 mins read
|
05-20-2026
5 mins read
|
07-30-2026
7 mins read
|
06-30-2026
How to Enable DebugView in GA4 for your Magento 2 store - Mageplaza
Step-by-step guide to enabling GA4 DebugView for Magento 2 merchants — verify your GA4 events are firing correctly before trusting your data.
8 mins read
|
06-09-2026
Table Rate Shipping in eCommerce: A Practical Guide
Master Magento 2 Table Rate Shipping. Learn how to configure an accurate, automated shipping matrix to optimize your checkout and boost sales.
10 mins read
|
06-02-2026
3 mins read
|
05-30-2026
Google Analytics Ecommerce Reports for Magento Merchants: What to track & Tips
A practical guide to GA4 ecommerce reports for Magento merchants, covering what to track, how to read each report, and specific tips to turn data into revenue decisions.
18 mins read
|
05-20-2026