

5 mins read
|
06-30-2026
How to Create Magento 2 Related Products Rules
Vinh Jacker
|
03-17-2025

In this article, we will learn how to create Magento 2 related products rules - an effective way to boost sales for online businesses. Related Products Rules allow you to display a selection of items to your consumers as related products. This innovation not only improves the shopping experience for customers by cutting down on searching time but also helps stores provide a dynamic display of targeted merchandising. Let’s check our step-by-step guide on creating Related Products Rules in Magento 2.
5 Easy Steps to Create Magento 2 Related Products Rules
Let’s see how to create related product rules in Magento 2 with just 5 simple steps.
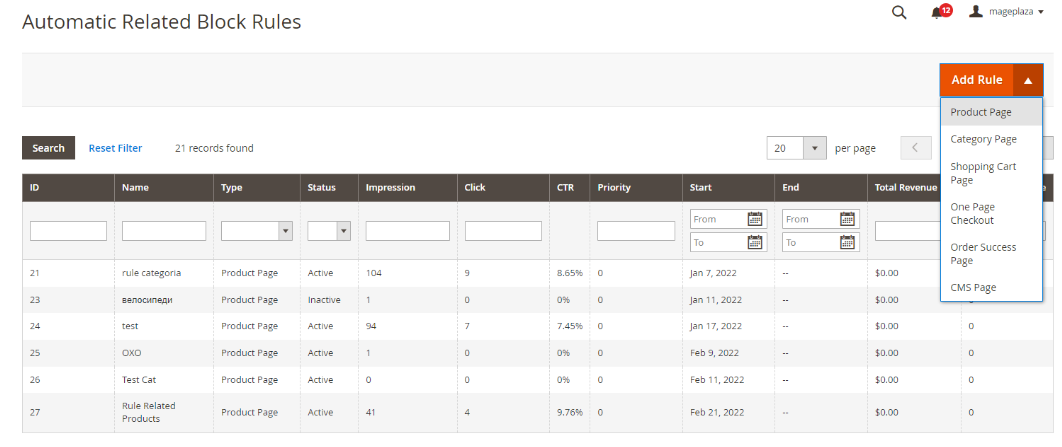
Step 1: Access the Related Block Rules
Navigate to Marketing > Automatic Related Products > Manage Rules. In the Add Rule section, select Product Page.
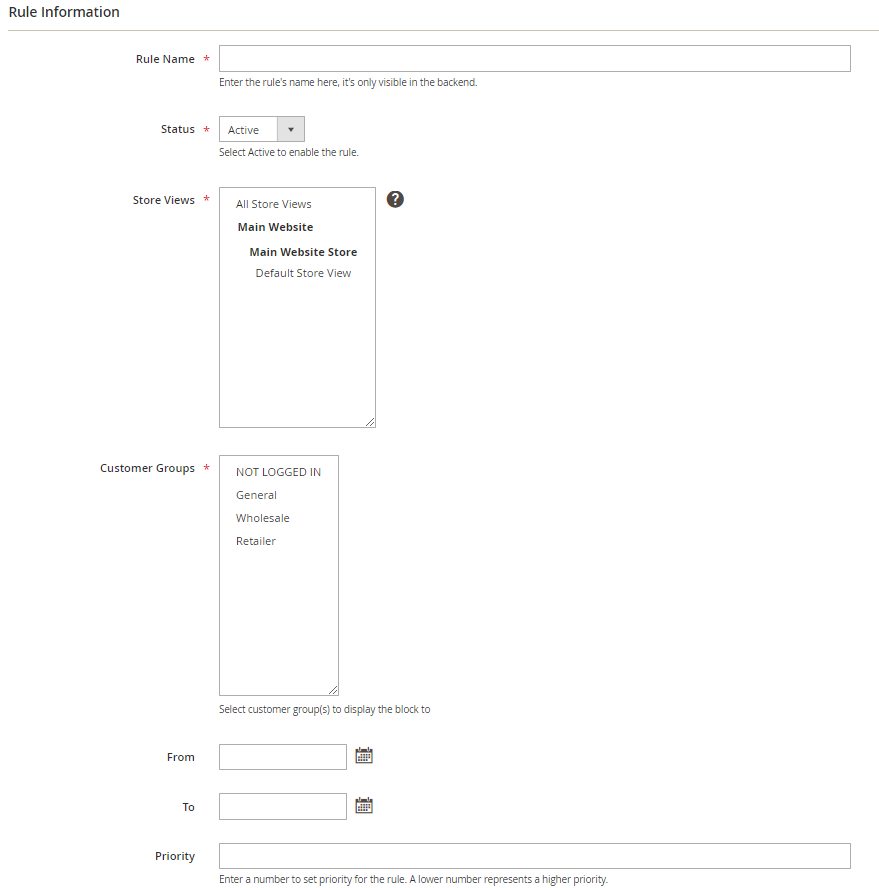
Step 2: Fill out General Rule Information
- Rule Name: Provide a name for the rule. The rule name will be visible to administrators on the Manage Rules Page grid. This field is mandatory, so the system will announce an error message if it’s empty.
- Status: Select “Active” to enable the rule.
- Store Views: Choose the store view where you want to apply the rule. Multiple selection is available.
- Customer Groups: Select the customer group(s) where apply the rule. You can select different customer groups as well.
- From: Specify the starting date for the rule to be applied on the Product Page.
- To: Specify the ending date for the rule to be applied on the Product Page.
- Priority: Assign a number to establish the priority of the rule. The lower the number, the higher the priority.
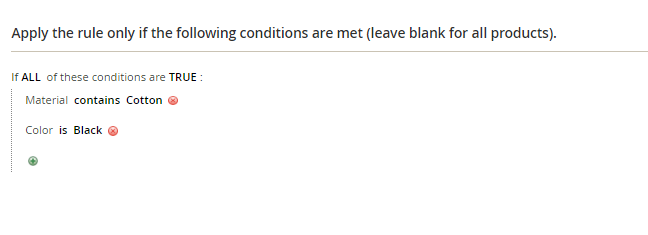
Step 3: Set What Products to Display
At this point, you need to specify which items should appear in the Magento-related products block. The criteria are only based on product features such as size, color, material, and any custom attribute.
Step 4: Select the Displayed Products.
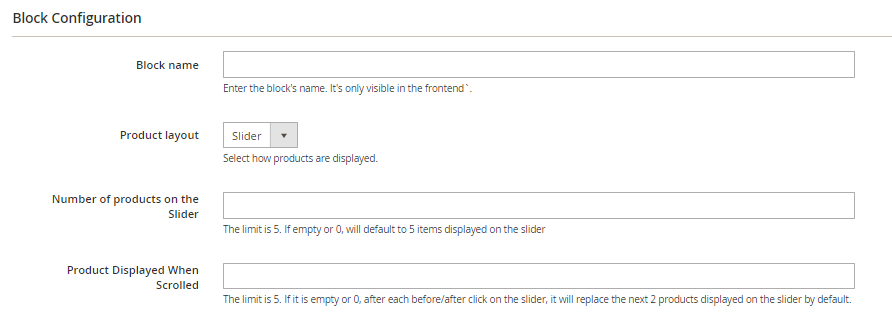
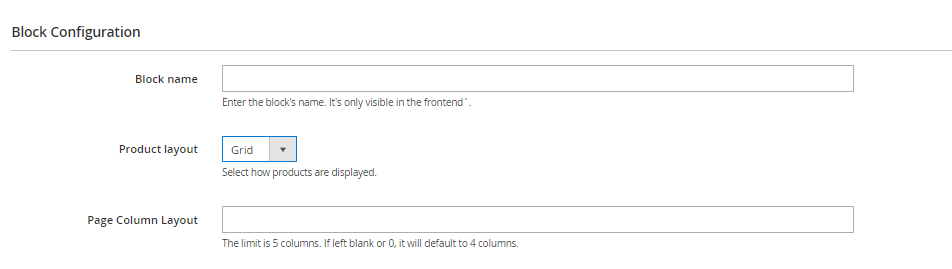
- Block name: Enter the block’s name, which is only visible in the frontend
- Product Layout: There are two modes for choosing how products are displayed
- Slider: Show products in slider form
- Product amount on the Slider: Type in the number of products you want to show on the slider. The limit is 5. If empty or 0, 5 items will automatically be displayed on the slider.
- Product Displayed When Scrolled: Enter the number of items to display each time the slider moves. The limit is 5. If empty or 0, after each before/after clicking on the slider, it will replace the following 2 products displayed on the slider.
- Slider: Show products in slider form
Grid: Show products in grid form
- Page Column Layout: Type in the number of products you want to show in the grid. The limit is 5. If empty or 0, 4 items will be displayed.
- Display mode:
- Display Style: There are 2 Display Styles that you can select:
- Ajax Display: ARP block is loaded after loading pages. This block will take some time to display in the frontend, which is suitable for page loading speed.
- Block Display: ARP block will always be simultaneously loaded when loading pages and instantly display after loading the page. This option is beneficial for SEO improvement.
- Display Style: There are 2 Display Styles that you can select:
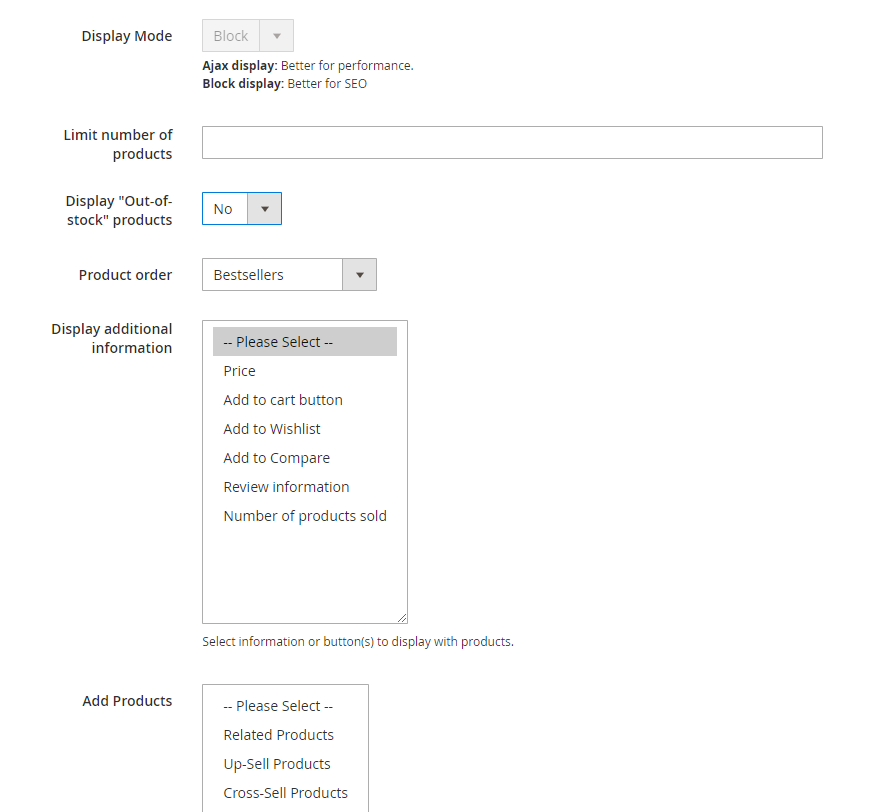
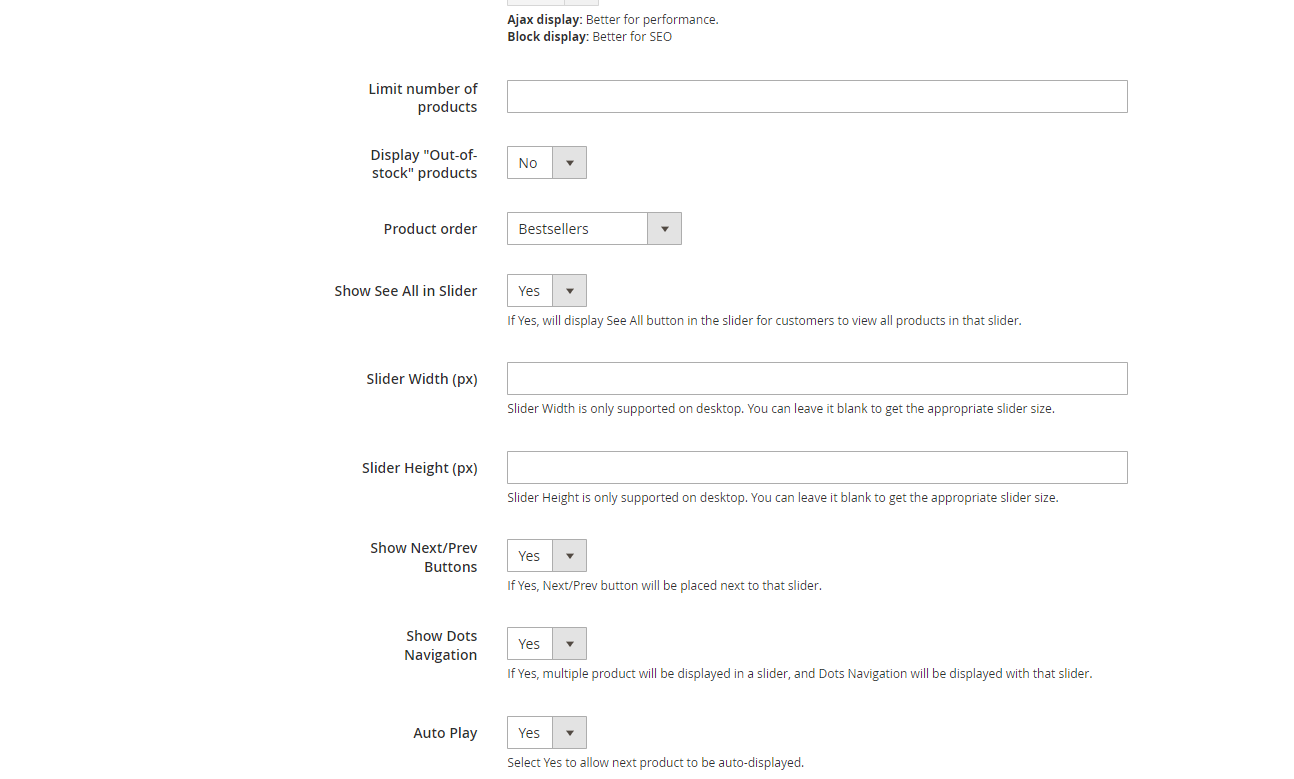
- Limit number of products:
- Limit the product amount to be shown in Block
- In case you leave it blank or set 0, the system will display all products in the Product List
-
Display “Out-of-stock” products: select “No” to not display Out-of-Stock products in the Auto Related Product block.
- Product order: choose how to sort products in the block
- Bestseller: more purchased products will be displayed first.
- Lowest Price: products displayed based on low to high price
- Highest Price: products displayed based on high to low price
- Newest: newer products added will be displayed first
- Random: products are selected randomly from the Product List
- Most Viewed: products visited the most will be displayed.
- Note: Enable Reports to allow counting product views, which will be used as data for this Most Viewed block.
- Product Name A-Z: sort products in the ARP block based on Name from A-Z.
-
Show See All in Slider: Select Yes to display the See All button next to the slider to allow viewing all Automatic Related Product block products.
-
Slider Width (px): Enter px to the Slider Width field, and the slider width will be changed according to the entered value. Note: You should set the appropriate Slider Width to ensure the displayed products in the slider are not affected.
-
Slider Height (px): Enter px to the Slider Height field, and the slider height will be changed according to the entered value. Note: You should set the appropriate Slider Height to ensure the displayed products in the slider are not affected.
-
Show Next/Prev Buttons: Select Yes to display the Next/Prev buttons in the slider.
-
Show Dots Navigation: Select Yes to display dots navigation in the slider.
-
Auto Play: Select Yes to display the next product automatically in the slider.
-
Auto Time-Out: Select the time to display the next product in the slider automatically.
- Display additional information: choose additional information or/and buttons displayed under products in the block:
- Price
- Review Information
- Add to Cart
- Add to Wishlist
- Add to Compare buttons
- Add Product:
- Choose an available related type of products to set for the block (Related Products, Up-sell Products, Cross-sell Products)
- Each product page can have different related product blocks, which are set on the product set by the admin
- How to configure Related, Up-sell, and Cross-sell Product documents can be found here
Do not Display Products in Remove products that have been added to the cart or in the Wishlist from the ARP block.
Product to meet Condition
- Setting:
- Choose products to be displayed in the ARP block. Only product pages that match the setup conditions, the new rule will be displayed
- You can add or remove conditions by clicking on + or x
- You can change the true/false of the condition by clicking the bold text
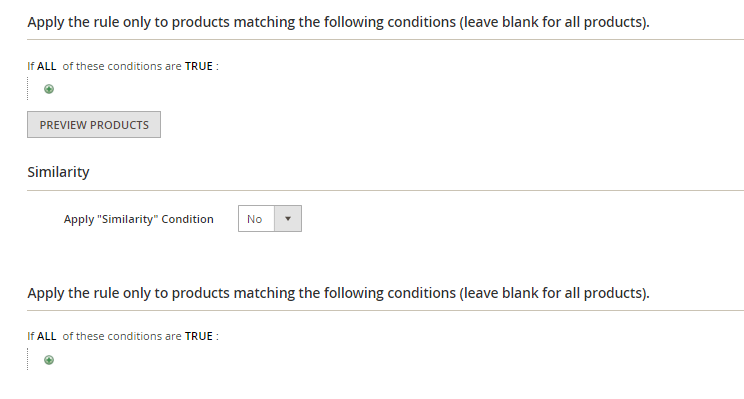
- Preview Products: You will get a Product List after saving conditions. Click to Preview Products to see products that meet conditions. They will be presented in Block.
- Apply “Similarity” Condition = Yes: Allow showing products with product attributes similar to the product on the current product page. Product attributes are selected via conditions. Similarity is available only on product pages.
Step 5: Display Related Products
This is where you specify the block where the Product Page is located
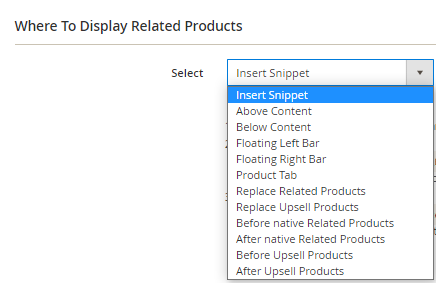
- Above Content: Auto Related Product block displayed above the Content of the Product Page
- Below Content: Auto Related Product block displayed under the Content of the Product Page.
- Floating Left Bar: Auto Related Product block displayed under the left of Product Page Content.
- Floating Right Bar: Auto Related Product block displayed under the right of Product Page Content.
- Product Tab: Show the Related Product block in the Native tab on the Product page.
- Replace Related Products: The new block will replace Magento’s default Related Product Block.
- Replace Upsell Products: The auto Related Product block will replace the default Upsell Product Block by Magento.
- Before native Related products: Auto Related Product block displays above the Magento’s Related Product block.
- After native Related products: Auto Related Product block displays below the Magento’s Related Product block.
- Before Upsell Products: Auto Related Product block displays above Magento’s Related Product Block.
- After Upsell Products: Auto Related Product block displays below the Magento’s Related Product Block.
- Insert Snippet: Auto Related Product block will be displayed according to Widget, Page, and Template after deploying the following command.
Top Reasons Why You Should Use Magento 2 Automatic Related Products Rules Extension
Let’s discover the advantages of using the Magento 2 Related Products Rules module.
-
Save time and Effort: Eliminate time-consuming manual setup by automating the process for cross-selling, upselling, and related products in Magento 2. In addition, from the customer’s perspective, it’s also an excellent tool to save time by not having to look for similar products while shopping.
-
Increase Store Revenue: Automatically suggest hot items to customers, encouraging them to make additional purchases and ultimately increasing your store’s revenue.
-
Meet your Goals - Set Rule Priorities: Easily create multiple rules and adjust their priorities based on your current objectives, allowing you to adjust your strategies and achieve specific goals as needed.
-
Improved Cross-Selling: Automatic Related Products Rules Extensions allow you to set up rules based on various criteria such as product attributes, categories, or customer behavior. This enables you to intelligently suggest related products, increasing the chances of cross-selling and boosting average order values.
-
Reduce Cart Abandonment: By recommending relevant products, e-commerce stores enhance customers’ overall shopping experience, ultimately reducing cart abandonment instances. This approach helps to capture customer interest and encourage additional purchases by offering complementary or related items that align with their preferences and needs.
-
Collect Data to Improve Sale Strategy: By analyzing relevant statistics and customer shopping behavior, you can adapt your sales strategy to effectively target customer preferences and optimize conversions, resulting in improved sales performance.
-
Dynamic Content Updates: The extension enables your related product recommendations to dynamically update based on real-time data and changes in your product catalog. This ensures that your recommendations stay relevant and aligned with the latest additions or modifications to your product range.
Conclusion
We hope that this instruction has answered the question you’ve been wondering: How to create Magento 2 Related Products Rules?
Magento 2 Automatic Related Products extension is an efficient tool for online business owners to boost revenue as it suggests more suitable items while their customers are shopping. We hope that it is now clear to configure Magento 2 Related Product Rules with the above steps. Please check out our full User Guide for more details, or contact us if you have any questions.
Table of content

Jacker is the Chief Technology Officer (CTO) at Mageplaza, bringing over 10 years of experience in Magento, Shopify, and other eCommerce platforms. With deep technical expertise, he has led numerous successful projects, optimizing and scaling online stores for global brands. Beyond his work in eCommerce development, he is passionate about running and swimming.
Related Post


How to Enable DebugView in GA4 for your Magento 2 store - Mageplaza
Step-by-step guide to enabling GA4 DebugView for Magento 2 merchants — verify your GA4 events are firing correctly before trusting your data.
8 mins read
|
06-09-2026

Table Rate Shipping in eCommerce: A Practical Guide
Master Magento 2 Table Rate Shipping. Learn how to configure an accurate, automated shipping matrix to optimize your checkout and boost sales.
10 mins read
|
06-02-2026
3 mins read
|
05-30-2026

Google Analytics Ecommerce Reports for Magento Merchants: What to track & Tips
A practical guide to GA4 ecommerce reports for Magento merchants, covering what to track, how to read each report, and specific tips to turn data into revenue decisions.
18 mins read
|
05-20-2026

5 Ways to Hide Products on Shopify (2026 Guide)
Explore the best 5 ways to hide products on Shopify. Learn how to manage visibility, protect pricing, and create a tailored shopping experience for buyers.
18 mins read
|
05-16-2026
5 mins read
|
06-30-2026
How to Enable DebugView in GA4 for your Magento 2 store - Mageplaza
Step-by-step guide to enabling GA4 DebugView for Magento 2 merchants — verify your GA4 events are firing correctly before trusting your data.
8 mins read
|
06-09-2026
Table Rate Shipping in eCommerce: A Practical Guide
Master Magento 2 Table Rate Shipping. Learn how to configure an accurate, automated shipping matrix to optimize your checkout and boost sales.
10 mins read
|
06-02-2026
3 mins read
|
05-30-2026
Google Analytics Ecommerce Reports for Magento Merchants: What to track & Tips
A practical guide to GA4 ecommerce reports for Magento merchants, covering what to track, how to read each report, and specific tips to turn data into revenue decisions.
18 mins read
|
05-20-2026
5 Ways to Hide Products on Shopify (2026 Guide)
Explore the best 5 ways to hide products on Shopify. Learn how to manage visibility, protect pricing, and create a tailored shopping experience for buyers.
18 mins read
|
05-16-2026