


7 mins read
|
06-30-2026
Store Locator Configuration in Magento 2: A How-to Guide
Vinh Jacker
|
03-17-2025

Many people find it complicated to locate the nearest store and get the accurate direction to that store. To help them solve this problem, Store Locator for Magento 2 was released.
Magento 2 Store Locator extension takes advantage of the development of Google Maps and GPS, which allows users to quickly locate any destination in the world, no matter how long the address is.
Besides, users could also view the destination like they are there. As a result, customers could find the nearest shop location and get directions in the blink of an eye. Moreover, with the fully responsive feature, they can freely process on various devices such as computers, tablets, or mobiles.
So, how to configure Store Locator on your Magento 2 store? This guide will help you with that! Read on to find out more!
Why should you choose the Store Locator extension?
Besides helping customers to find the store location and get the direction easier, this extension also offers other superb benefits.
-
Grow sites’ traffic. Once you have added a store locator to your website, it means that your customers have to visit your site before finding out the related stores. It, as a result, would help the traffics to your main website increase significantly.
-
Increase search rankings. When using Store Locator, the local search rankings of your store would be improved thanks to the local content. And when your ranking increases, more customers will know about your store, which will help you reach more potential local customers quickly.
-
Significant cost and time savings. Magento 2 Store Locator extension would provide the full information about your store location, including contact points and operating hours. Your customers can get the essential store attributes quickly and easily. You could save a significant amount of time and money on making calls to instruct customers.
-
Improve the experience of users. If you could shorten the process by which customers find the related location, you could help them quicken their purchases, making them feel satisfied and impressed with your website.
Store Locator configuration in Magento 2
In order to add a store locator to your online store, you should consider Magento 2 Store Locator by Mageplaza. When installing this module, you can add custom maps and store details quickly. As a result, your customers will find it easy to navigate your physical stores.
This section will guide you on Store Locator configuration in your Magento 2 store.
1. Store Locator Configuration
1.1. General Store Locator configuration
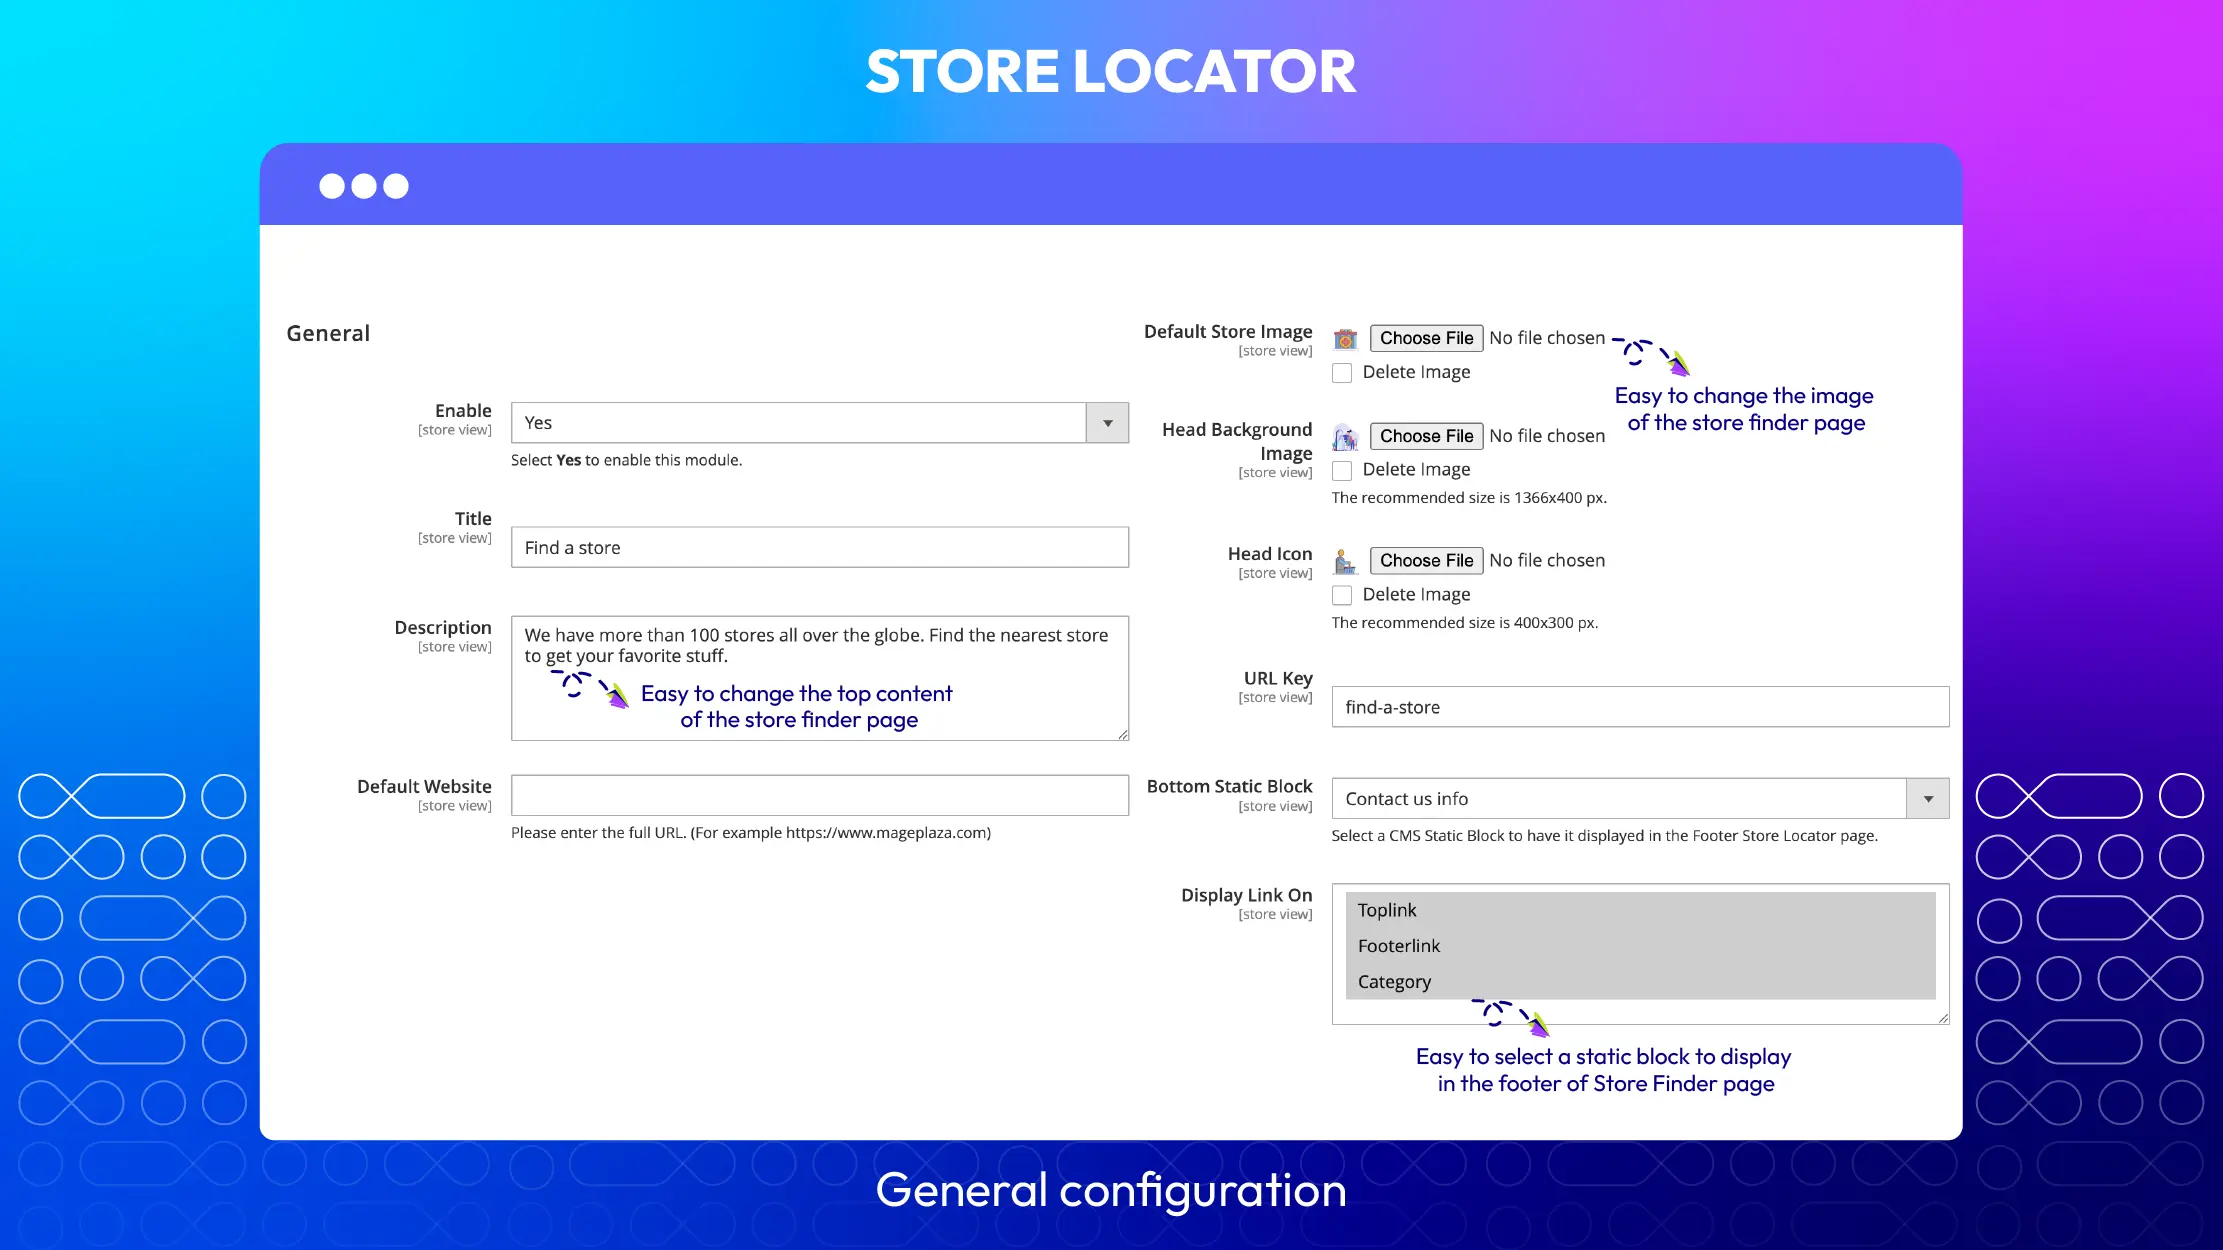
- Enable. Choose Yes to enable this module.
- Title. Enter the title of the page. If you leave this title blank, the default is “Find a store”
- Description. Enter the page description.
- Default website. Enter your full URL. For stores with multiple branches, you can quickly synchronize the website with this field.
- Head background image. Upload the background for the head block.
- Head icon. Upload an icon for the head block.
- URL key. Enter the link to access the page. If you leave this field blank, the default is find-a-store.
- Bottom static block. Select a CMS static block to have it displayed on the Footer Store Locator page.
- Display link on. Select where the link can be displayed on the frontend.
1.2. Map settings
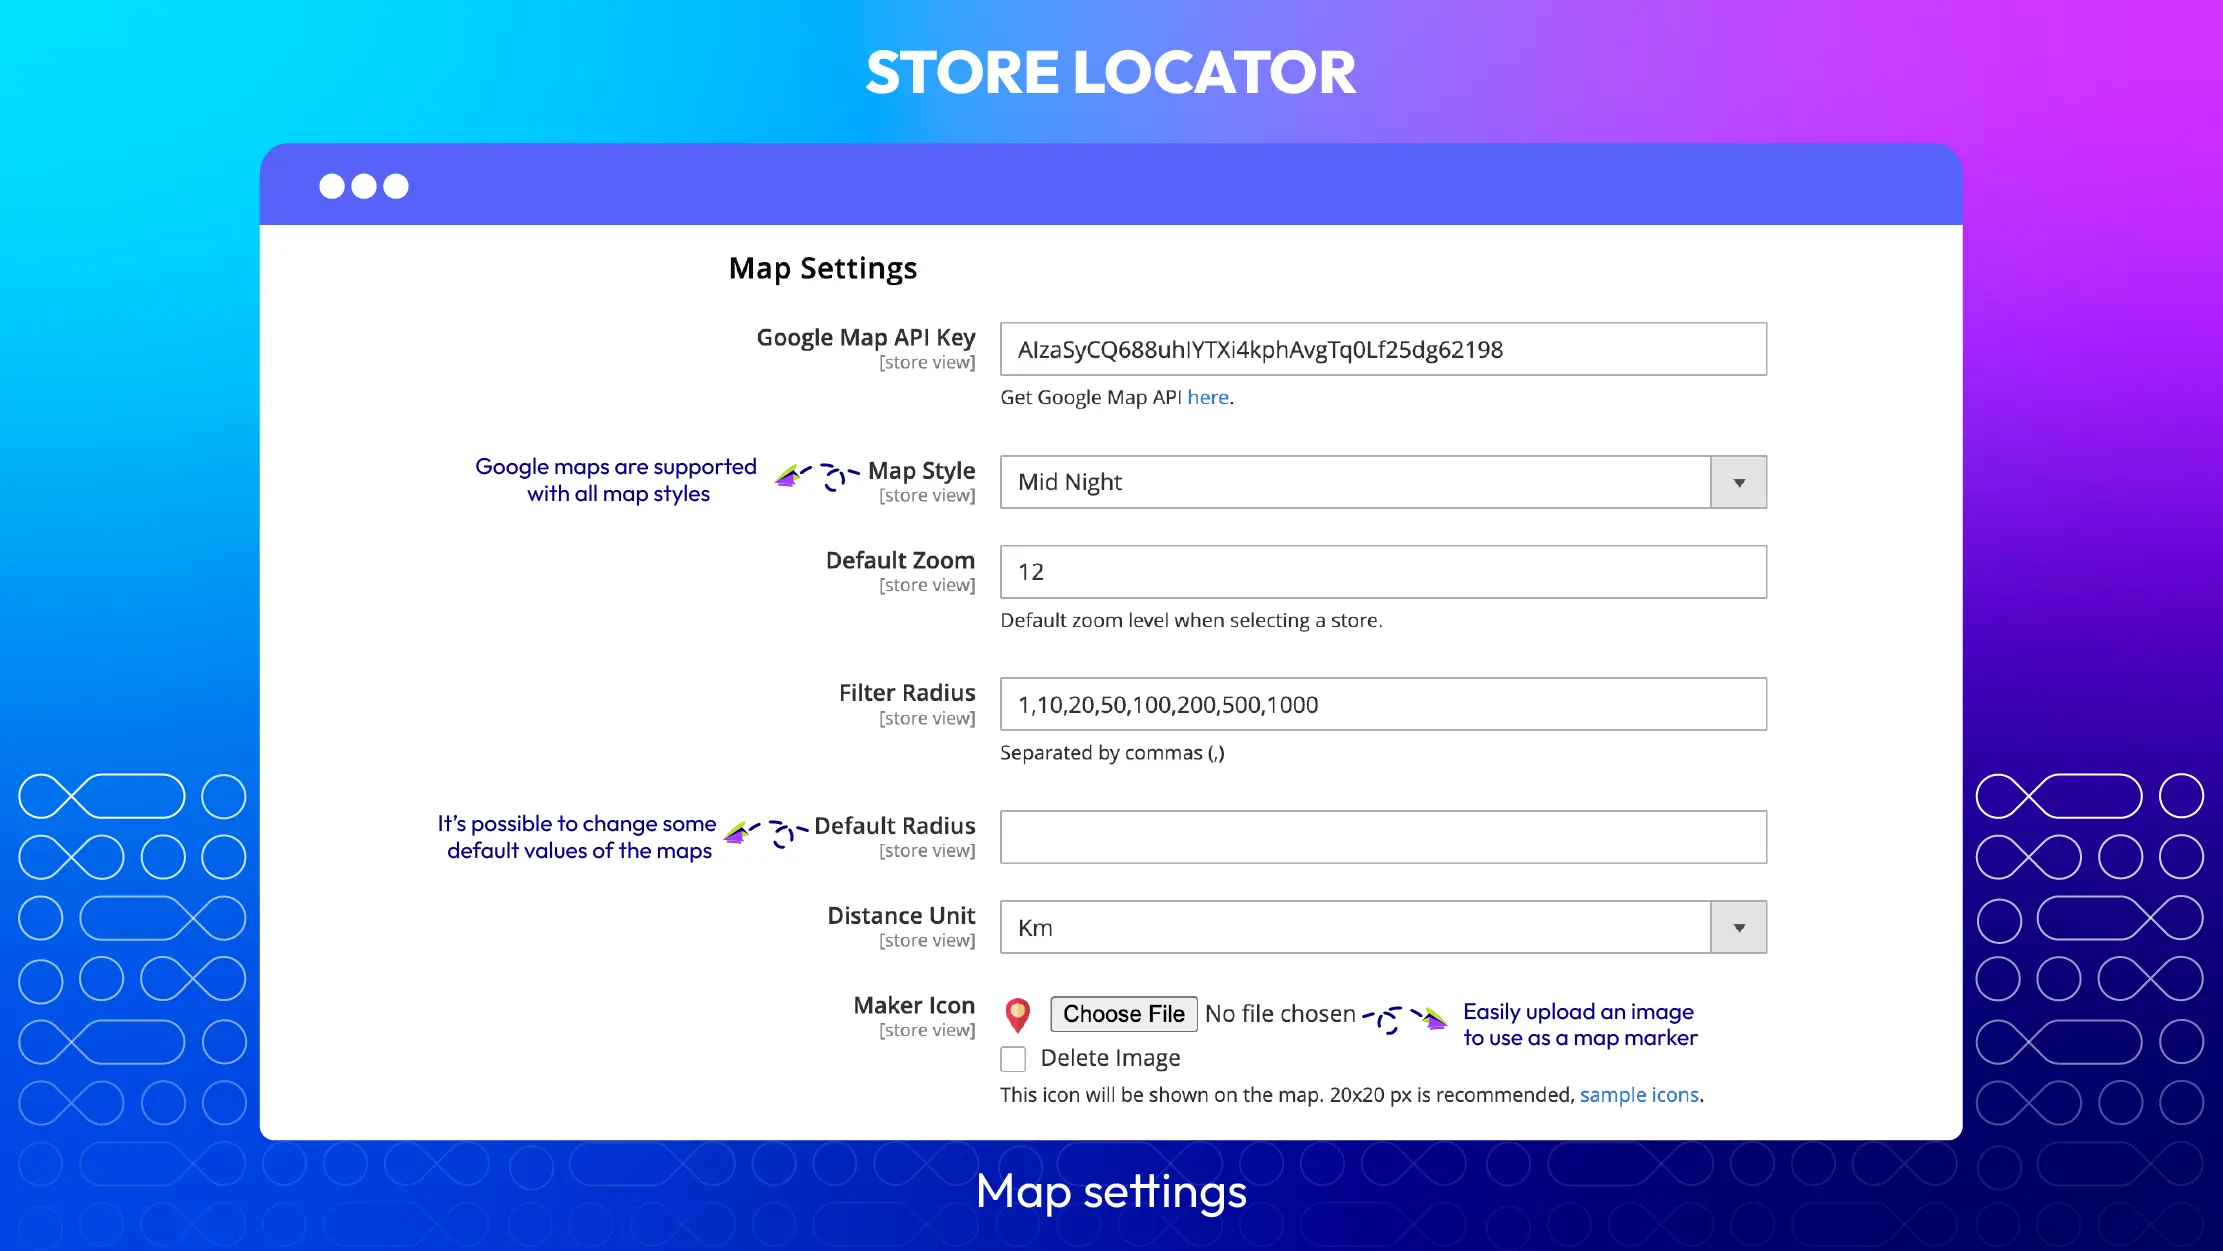
- Google Map API Key. You need to fill in this field so that Google Maps can obtain the coordinates of the locations you’ve added.
- Map styles. There are 4 most popular styles for you to choose from.
- Default zoom. Set the default zoom level when selecting a store. We recommend a zoom level of 12.
- Filter radius. Install the search radius store from the customer location that they use.
- Default radius. Set the default search radius store from the customer location. When customers access your store locator page, the map will filter the nearest store in this radius.
- Distance unit. Choose the unit distance as mile or kilometer.
- Marker icon. Select the icon representing the store location on the map.
1.3. Store time default
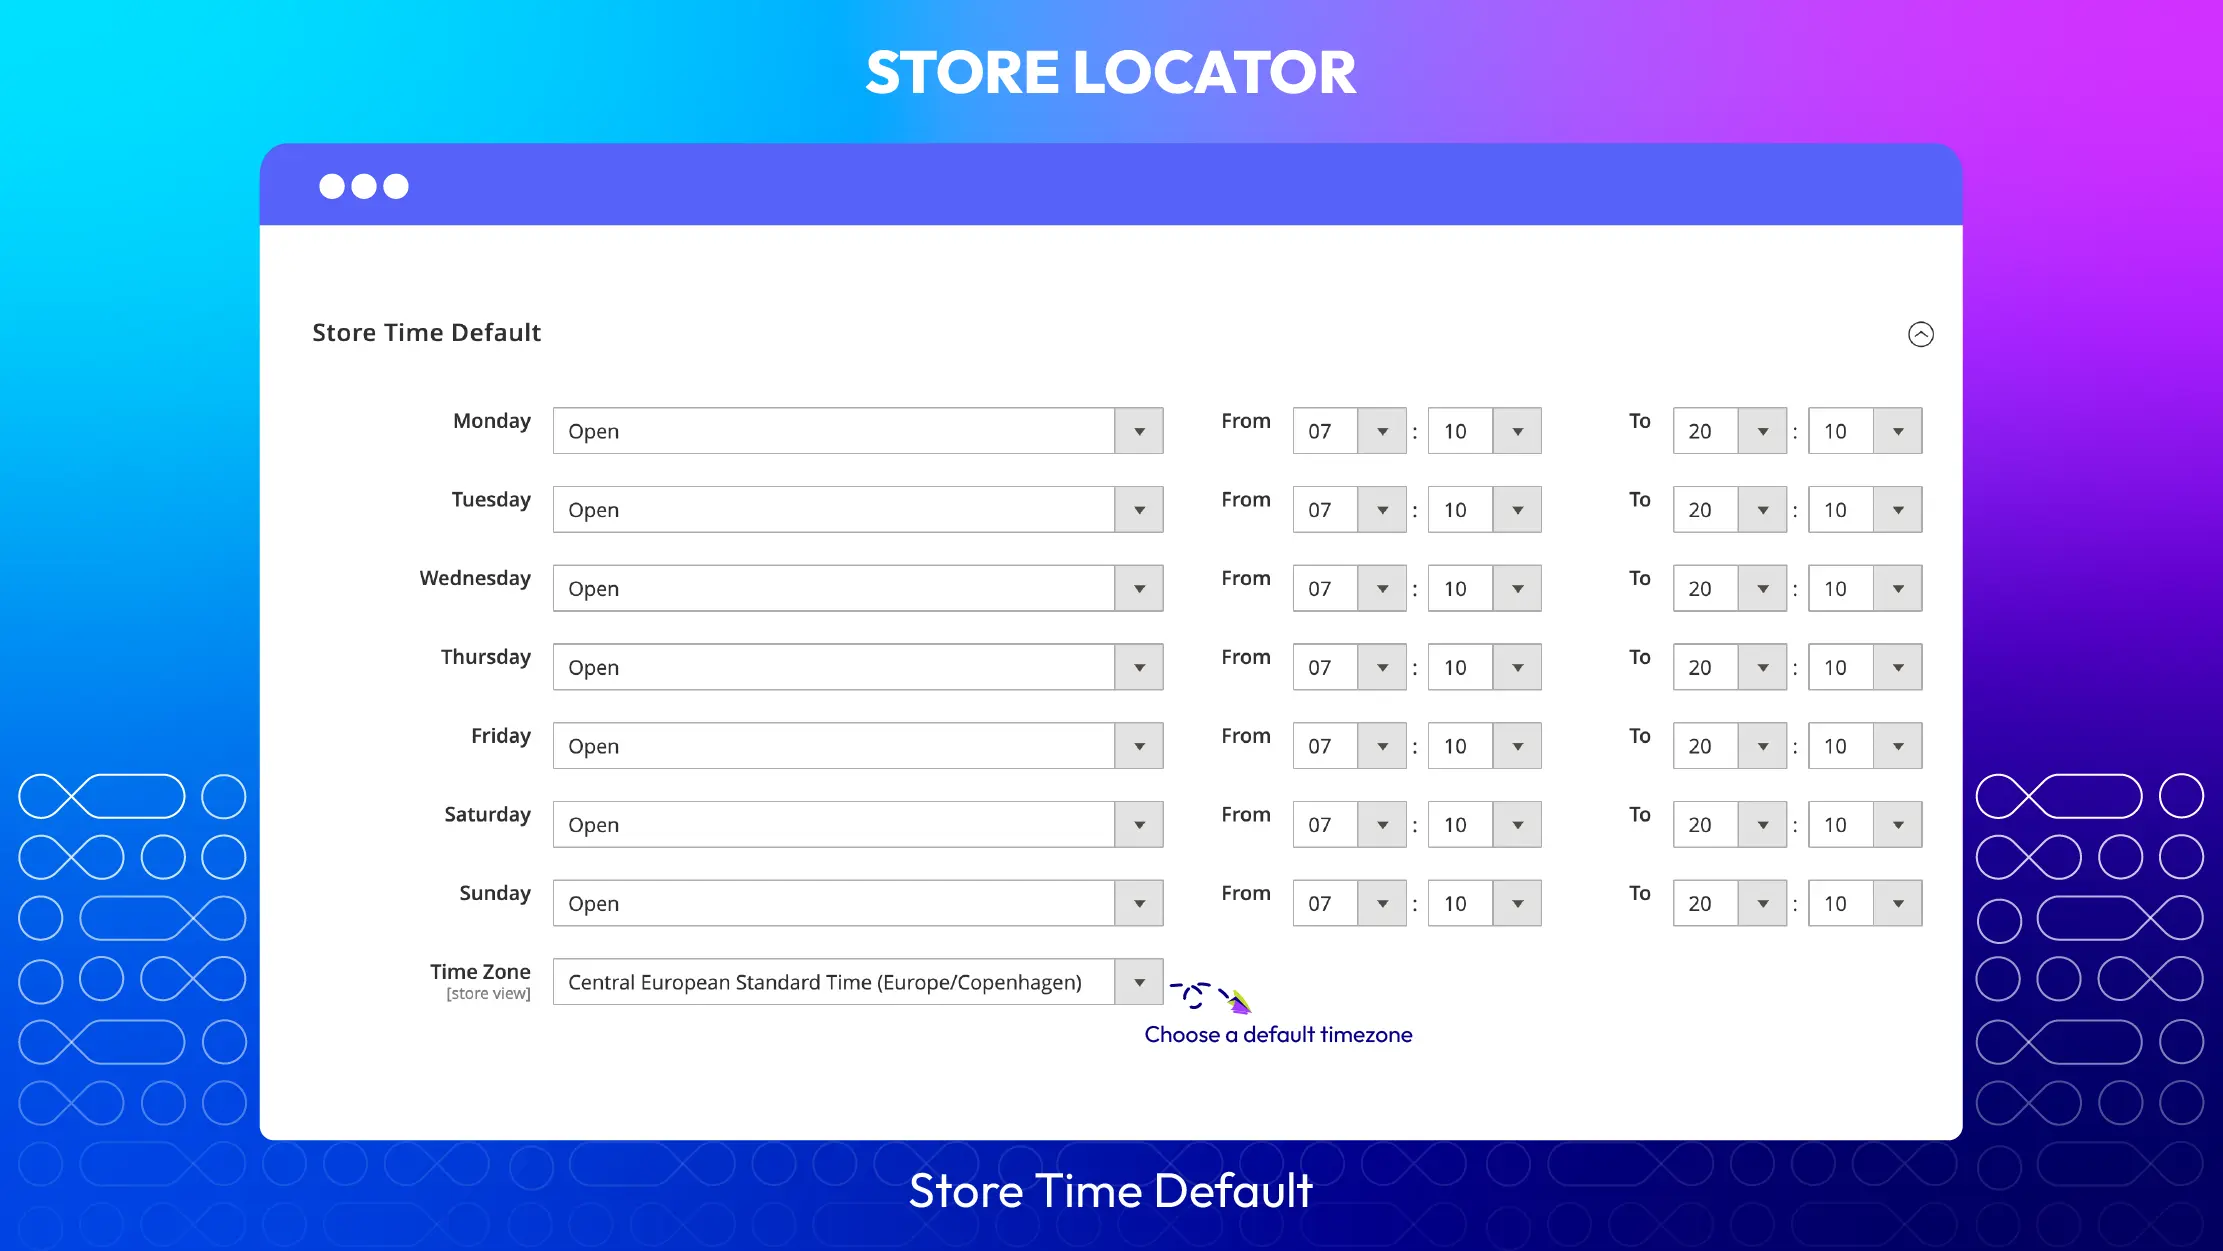
You can set the opening time and timezone for your store in this section. Configuring this will help customers see the essential information on the store locator page.
2. Manage locations
It’s quite easy to add a new location. You just need to complete a few fields right below.

- Name: The name entered here is displayed in both the backend and the frontend
- Visibility: Select Yes to display the store location on the frontend.
- Description: Record a short description for the store locator page.
- URL Key: Enter the link to access the location. If left blank, after you Save, based on the Name field, a URL key will automatically create (unless the name is a hieroglyphic as Russian, Japanese, Korean, Chinese, etc.)
- Store View: Store Location is only available in the selected Store View
- Sort Order: Stipulate the display order of the Store Location on the Frontend. 0 is the highest position.
You can create and manage all store locations via a grid. In this grid, you can capture the basics of Store Location such as ID, Name, Visibility, Store View, City, Zip Code, Country, Sort Order, Create Date, and Action.
In the Actions dialog, admins can execute the following actions:
- Delete: Admins need to tick the location to delete, then select Delete in the Actions (upper left of the grid) to delete. A confirmation dialog will appear; select OK to continue deleting.
- Change Visibility: Admins need to tick Store Location to change the status, then select Change Visibility > Yes/No in the Actions dialog (top left of the grid) to change. A confirmation dialog will appear; select OK to confirm the change.
- Edit: Modify the location.
In addition, admins can filter, change store view, hide/show columns, export grid, or edit inline.
Best features of the Store Locator extension
Integrate Google Maps with Magento 2 stores
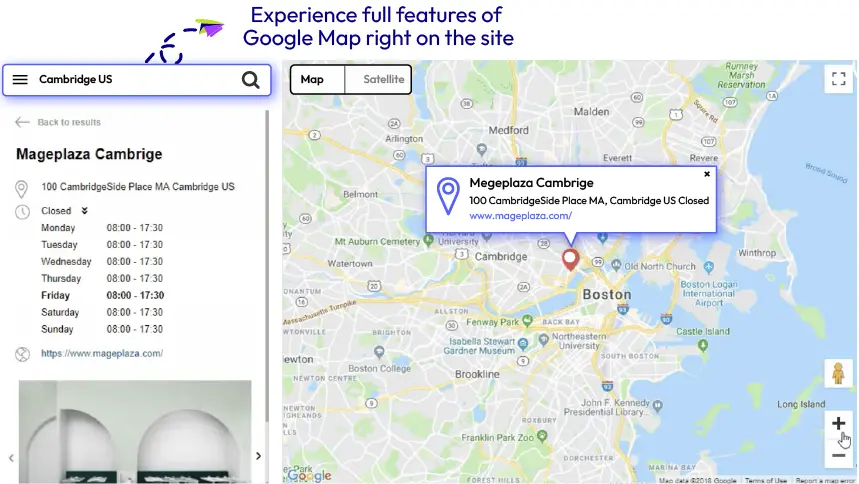
This feature allows customers to approach store locations easily. They could also experience all features of Google Maps on your website. The recommendations will be shown to customers when typing letters in the Address box. Besides, they could locate themselves, and the extension will display the nearest addresses.
The ability to preview, display, and edit the shop’s coordinates
With Store Locator for Magento 2 by Mageplaza, you can display the correct latitude and longitude of your store by converting the filled store address to GPS coordinates. Besides, if you want to relocate your store location, you can edit its coordinates and place an icon that would mark the correct position on Google Maps. Also, you could preview all the changes you have made from the admin backend before applying these changes.
Show store information and images through slides
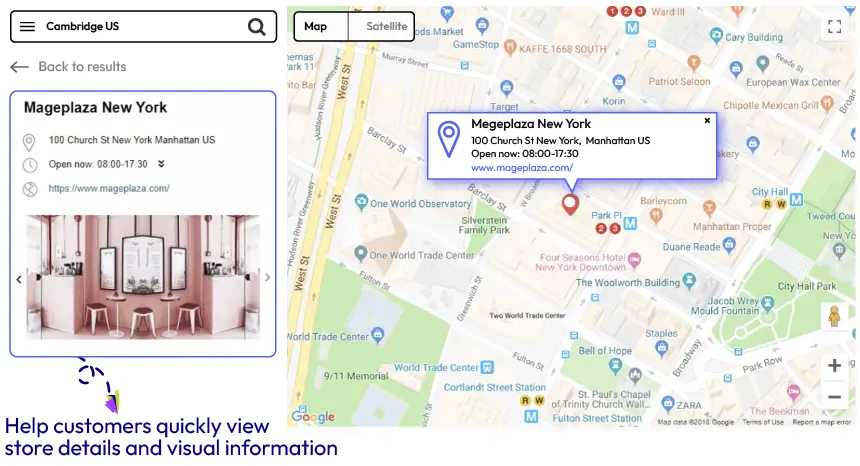
The main store attributes, such as an address, opening time, phone number, website address, or description, would be shown next to the map and on the marker icon. This feature helps customers view the necessary information about particular stores and find the nearest brick-and-mortar store quicker and much easier. Besides, this module does support you in adding store image sliders directly on the map page, which would enhance customer experience.
The design of the map can be customizable
In addition to the default style of Google Maps; this extension also provides 4 more favorable designs. You can also add more popular and trendy map styles to your site. The zoom function of the default map can be set to match the content block. Furthermore, you can customize background images and head icons easily to create an attractive match between the map and marker icon styles, which could create a visual appeal to customers.
Filtering store locations
This function allows admins and customers to identify how many store locations are available. It is created based on the radius around the current position of a customer. Customers can now find out the nearest store location to visit, which would quicken their buying process thanks to this filter.
Auto-display the working hours and holidays of a store
With this feature, the store’s status can be changed automatically based on the periods of time. For example, during working hours, the status will be Open, and on the contrary, the store will be put on Close when the store close. In addition, you, as the store admin, could configure the holidays and special days of several stores simultaneously.
Apply SEO locally
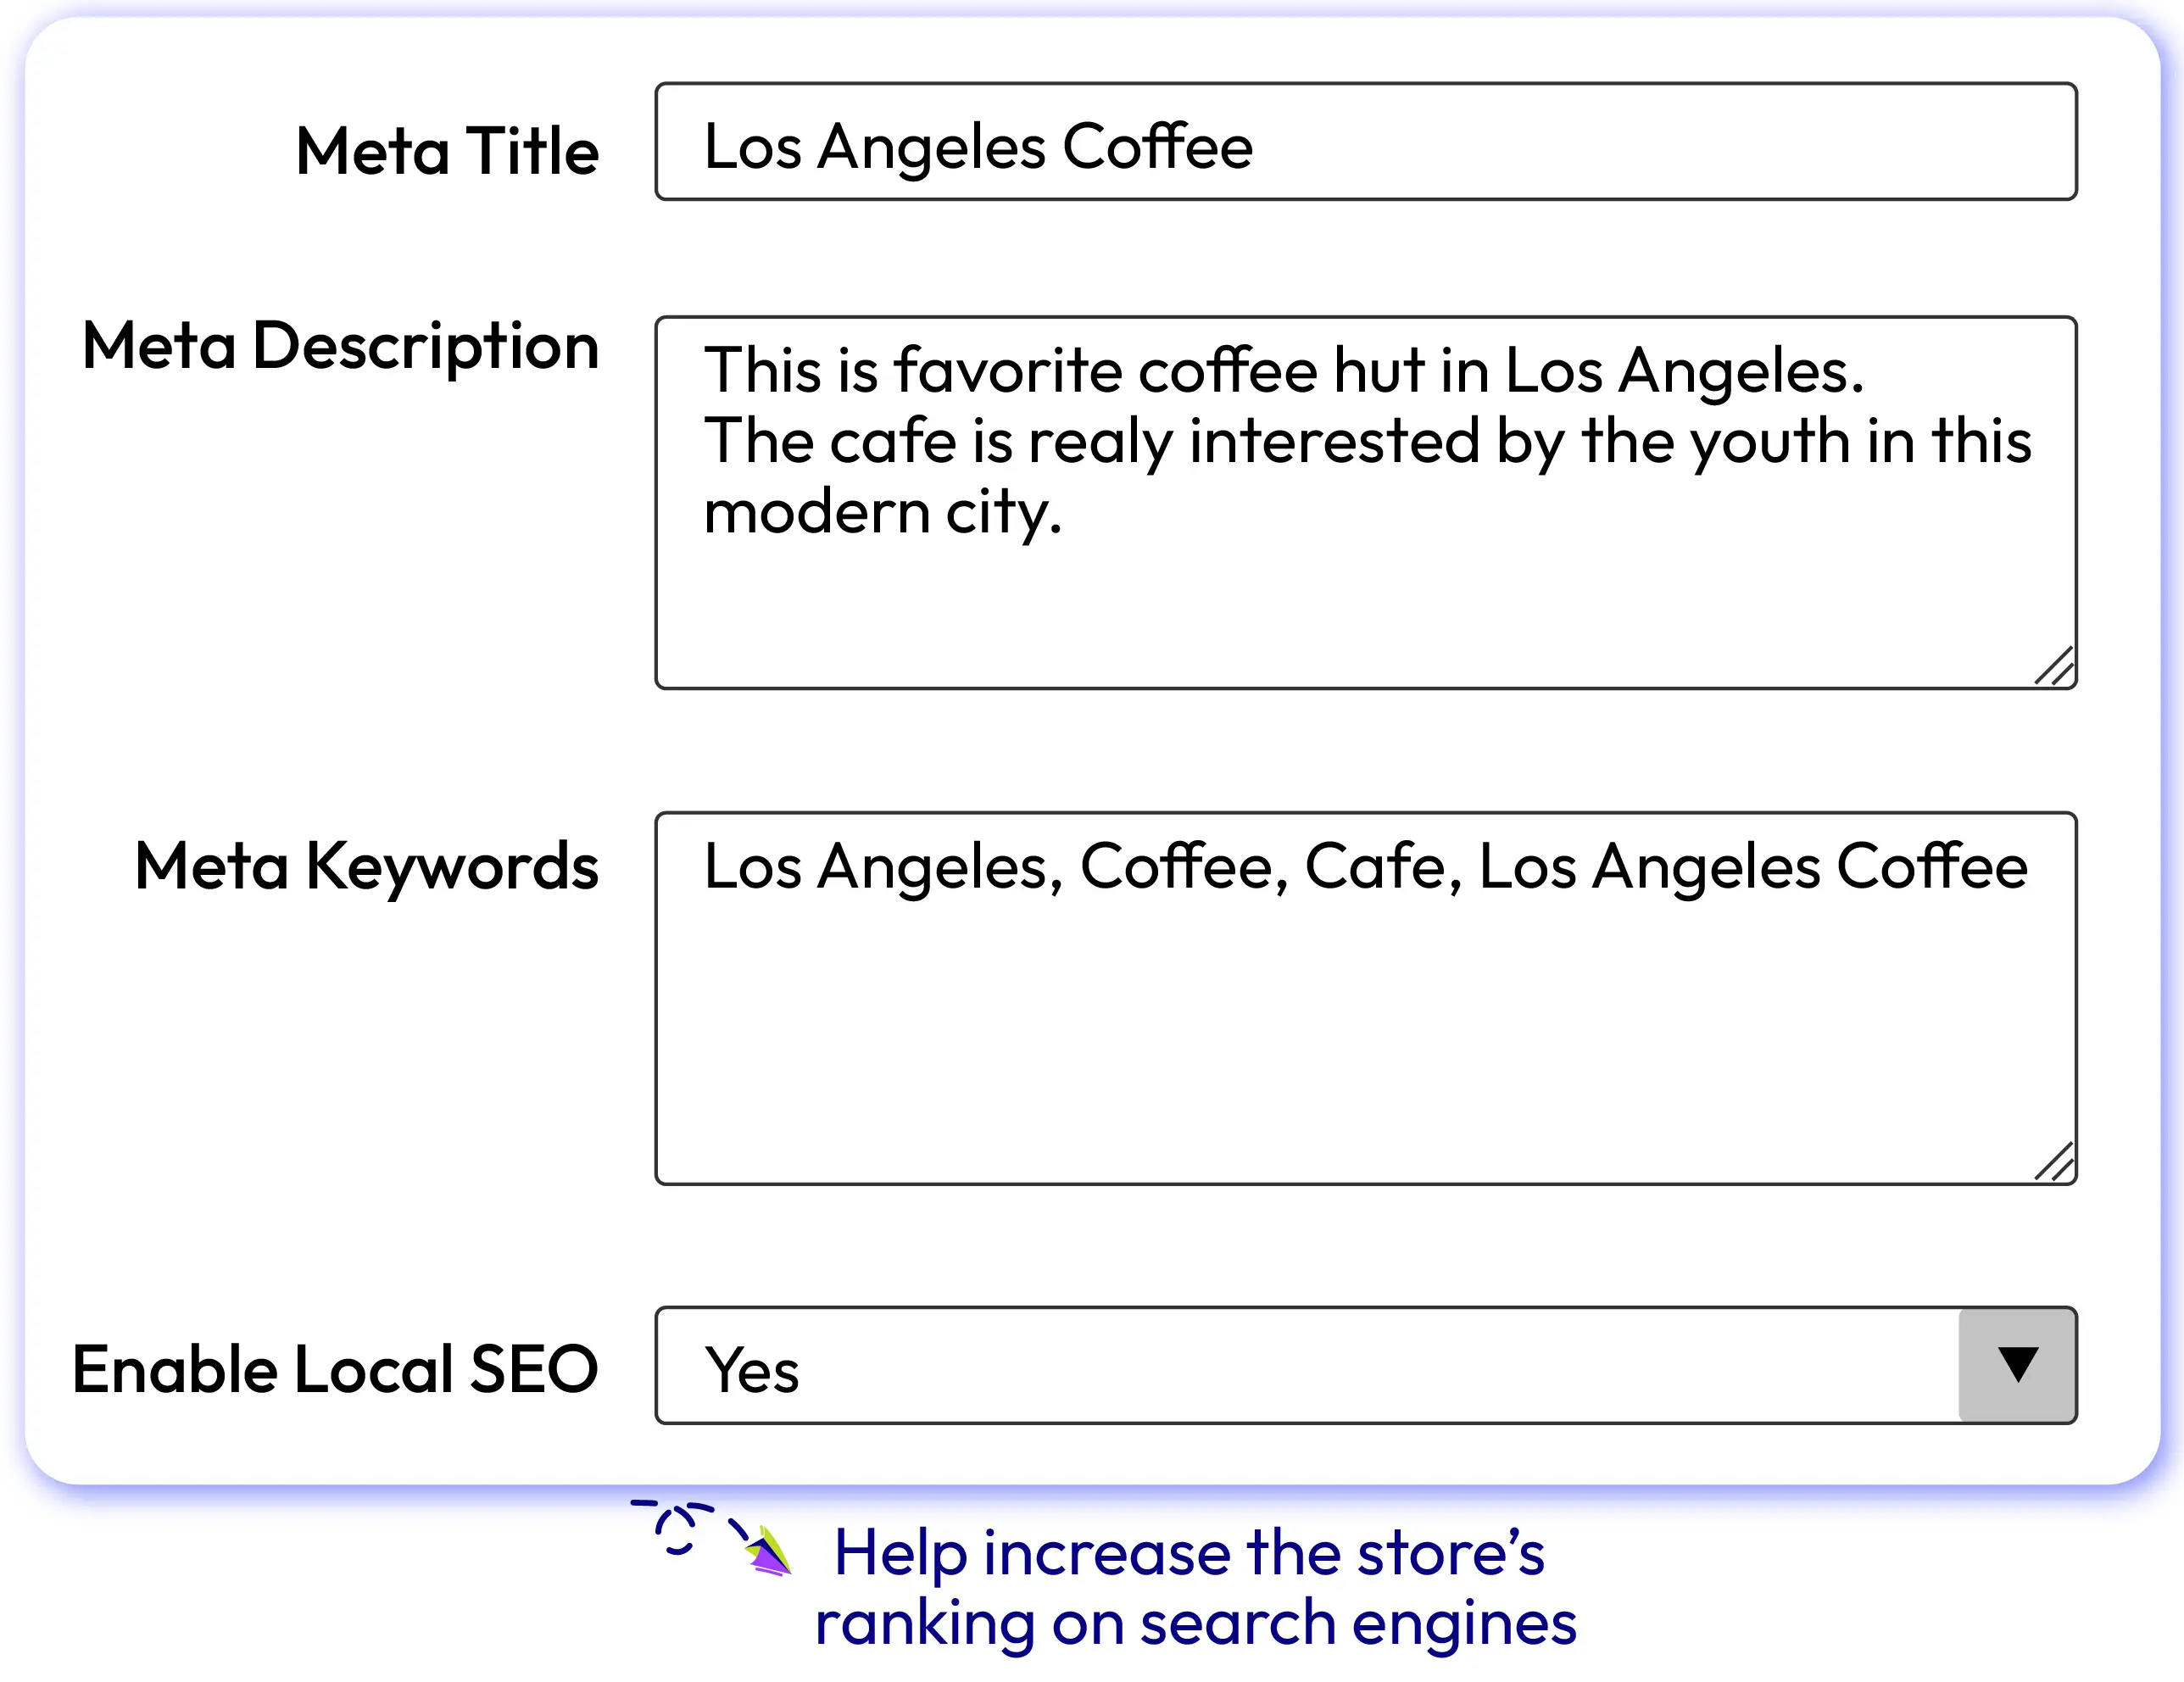
This function could help promote the products of your stores to various local customers right when they are looking for those items. Using the Store Locator extension for Magento 2, you can integrate keywords, especially the local ones, into your content to better your SEO performance and increase the rankings of your stores on search engines such as Google or Bing.
Conclusion
Magento 2 Store Locator extension by Mageplaza is an excellent solution to show your physical stores. By showing offline stores on your website, you can increase foot traffic and sales significantly.
Table of content

Jacker is the Chief Technology Officer (CTO) at Mageplaza, bringing over 10 years of experience in Magento, Shopify, and other eCommerce platforms. With deep technical expertise, he has led numerous successful projects, optimizing and scaling online stores for global brands. Beyond his work in eCommerce development, he is passionate about running and swimming.
Related Post


How to Enable DebugView in GA4 for your Magento 2 store - Mageplaza
Step-by-step guide to enabling GA4 DebugView for Magento 2 merchants — verify your GA4 events are firing correctly before trusting your data.
8 mins read
|
06-09-2026

Table Rate Shipping in eCommerce: A Practical Guide
Master Magento 2 Table Rate Shipping. Learn how to configure an accurate, automated shipping matrix to optimize your checkout and boost sales.
10 mins read
|
06-02-2026
3 mins read
|
05-30-2026

Google Analytics Ecommerce Reports for Magento Merchants: What to track & Tips
A practical guide to GA4 ecommerce reports for Magento merchants, covering what to track, how to read each report, and specific tips to turn data into revenue decisions.
18 mins read
|
05-20-2026

5 Ways to Hide Products on Shopify (2026 Guide)
Explore the best 5 ways to hide products on Shopify. Learn how to manage visibility, protect pricing, and create a tailored shopping experience for buyers.
18 mins read
|
05-16-2026
7 mins read
|
06-30-2026
How to Enable DebugView in GA4 for your Magento 2 store - Mageplaza
Step-by-step guide to enabling GA4 DebugView for Magento 2 merchants — verify your GA4 events are firing correctly before trusting your data.
8 mins read
|
06-09-2026
Table Rate Shipping in eCommerce: A Practical Guide
Master Magento 2 Table Rate Shipping. Learn how to configure an accurate, automated shipping matrix to optimize your checkout and boost sales.
10 mins read
|
06-02-2026
3 mins read
|
05-30-2026
Google Analytics Ecommerce Reports for Magento Merchants: What to track & Tips
A practical guide to GA4 ecommerce reports for Magento merchants, covering what to track, how to read each report, and specific tips to turn data into revenue decisions.
18 mins read
|
05-20-2026
5 Ways to Hide Products on Shopify (2026 Guide)
Explore the best 5 ways to hide products on Shopify. Learn how to manage visibility, protect pricing, and create a tailored shopping experience for buyers.
18 mins read
|
05-16-2026