


7 mins read
|
06-30-2026
How to integrate Xero with Magento 2 via Zapier
Vinh Jacker
|
03-17-2025

Free 1:1 consultation with Magento experts
Real-time sync to prevent errors & downtime
11+ years of expertise to maximize efficiency
Free 2-month support after the project
Learn more

Now there are thousands of different computational softwares. So how to choose the best accounting software for your business? We suggest Xero accounting software. Integrate this solution for your store to experience great features today!
In this article, I will show you how to integrate Xero with Magento 2.
What is Xero?
Xero is a small business accounting software established in 2006. This solution can be accessed from any device that is connected to the internet. Xero integrates with over 500 applications and tons of powerful features. This enables businesses to view cash flows, transactions, and account details from any location. Bank transactions are entered and encrypted automatically. Xero’s online invoice feature helps track expenses, keep bills and improve relationships with suppliers.
Furthermore, Xero is a user-friendly and easy-to-use solution. That is why Xero is highly rated by professionals and ranked first among hundreds of different accounting softwares.
How to integrate Xero with Magento 2
Method 1: Use APIs to Integrate Magento Xero
An API, or Application Programming Interface, serves as a software mediator between two applications, enabling the retrieval, addition, deletion, and synchronization of data. This system eliminates the need for developers to manually code interactions, ensuring swift and reliable two-way communications.
Developers can employ the Magento API to seamlessly integrate invoices and payment transactions with Xero. One approach involves obtaining the Magento API, extracting and generating data, and aligning it with the Xero API to replicate individual transaction details. This streamlines the duplication of Magento (Adobe Commerce) invoices and their alignment with the Xero Dashboard.
While the API integration approach is intricate and time-consuming, we are here to explore simpler alternatives. A straightforward method for Magento Xero Integration is elaborated in the following section.
Method 2: Use In-App Marketplace Integrations to Integrate Magento Xero
Seamlessly managing Magento (Adobe Commerce) and Xero is simplified through Magento Marketplace Integrations. The marketplace offers a diverse selection of third-party Xero Integrations, including those from Adobe Bronze Solution Partners.
One of them is Zapier, an online tool designed to facilitate the seamless connection of various web applications, enabling the transfer of data and automating processes. It achieves this by automatically integrating and synchronizing actions across a wide range of apps and software used within your company. This automation allows for the automatic execution of recurring processes, streamlining workflows and enhancing efficiency.
4 Steps to Integrate Xero via Zapier
- Step 1: Sign up the Zapier account
- Step 2: Sign up the Xero account
- Step 3: Integrate Magento 2.x
- Step 4: Integrate Xero for your Magento 2 store via Zapier
Step 1: Sign up the Zapier account
- Signup Zapier here
Step 2: Sign up the Xero account
- Signup Xero here
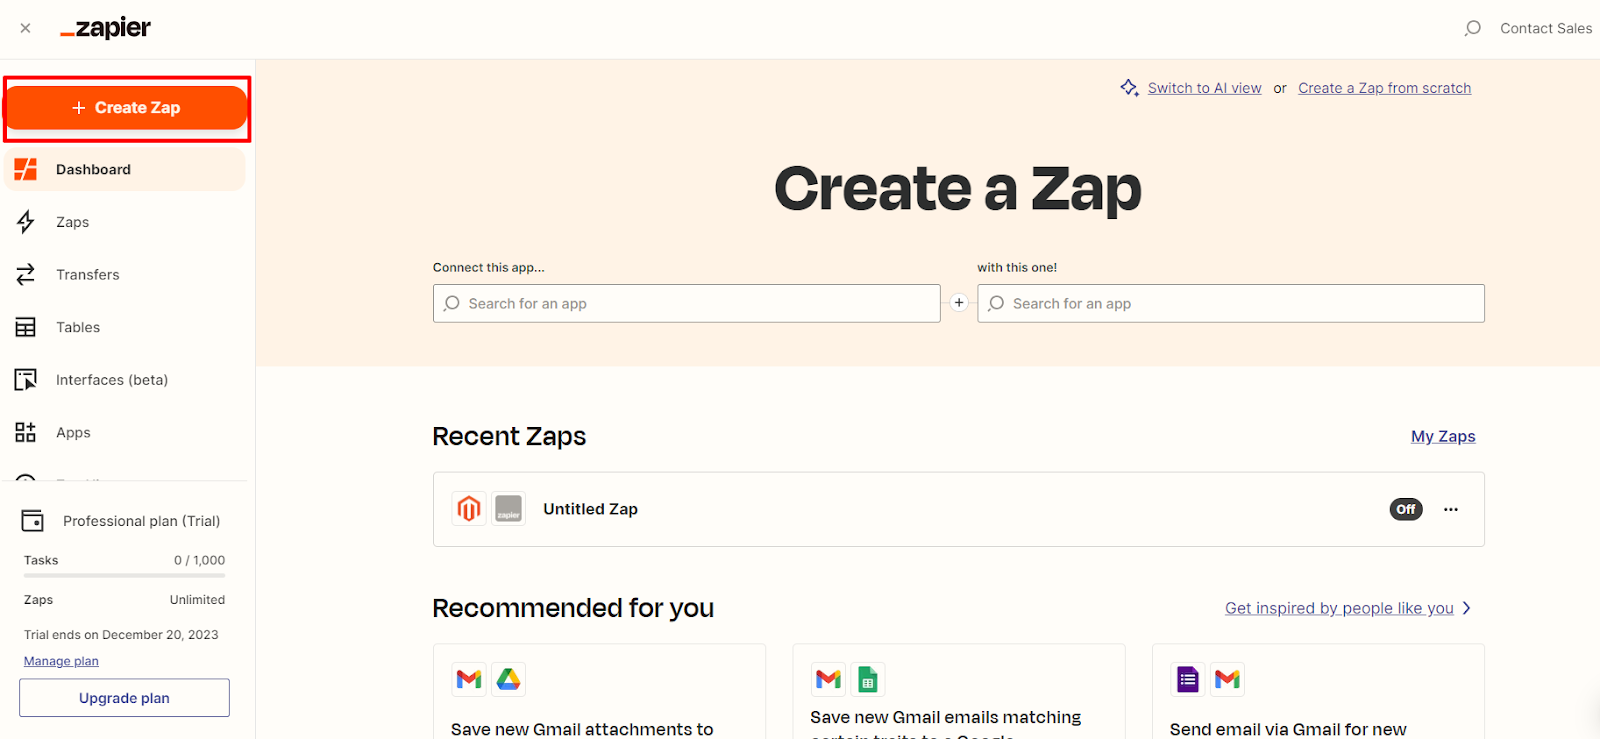
After logging into Zapier, choose Make a Zap to start Magento 2 Xero integration.
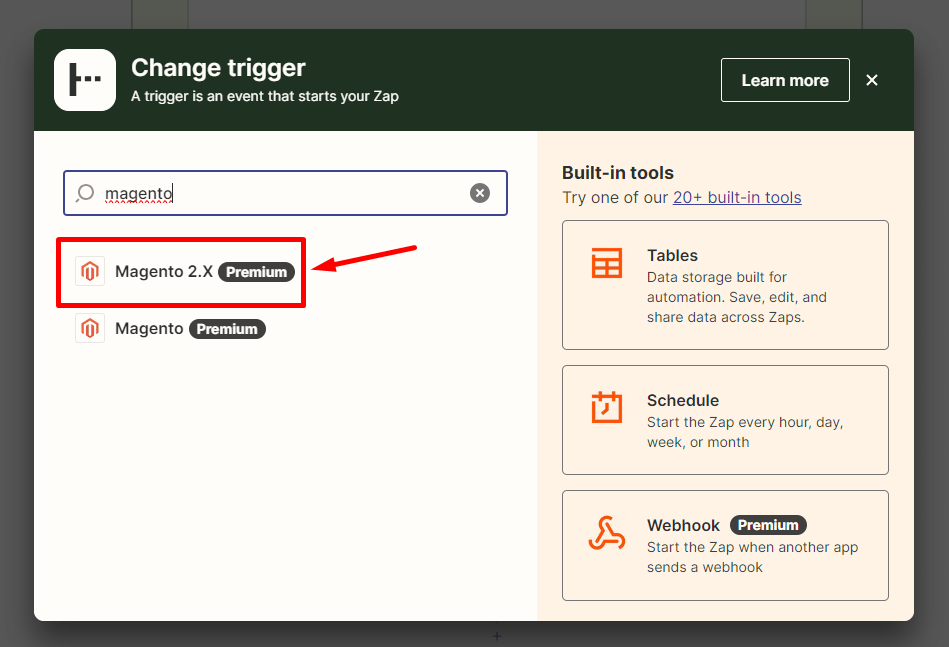
Step 3: Integrate Magento 2.x
- In this step, choose
Magento 2.xso that Zapier can get all data from your store.
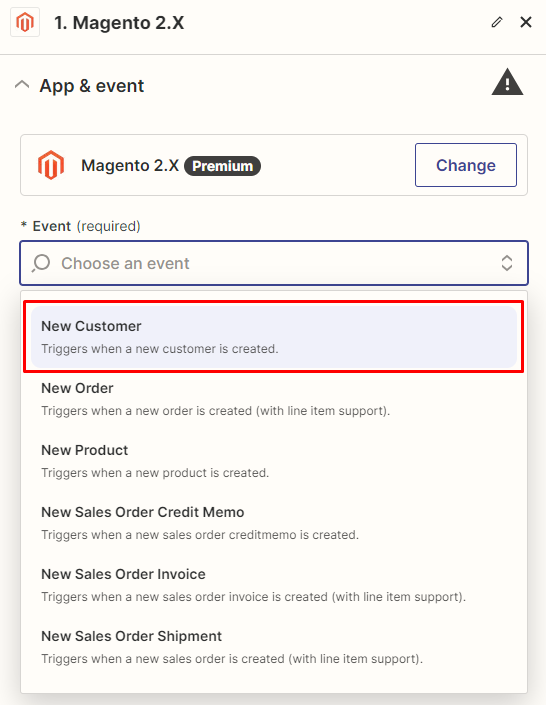
- Then, choose
New Customerinselect Magento 2.x Triggerfield and click oncontinue.
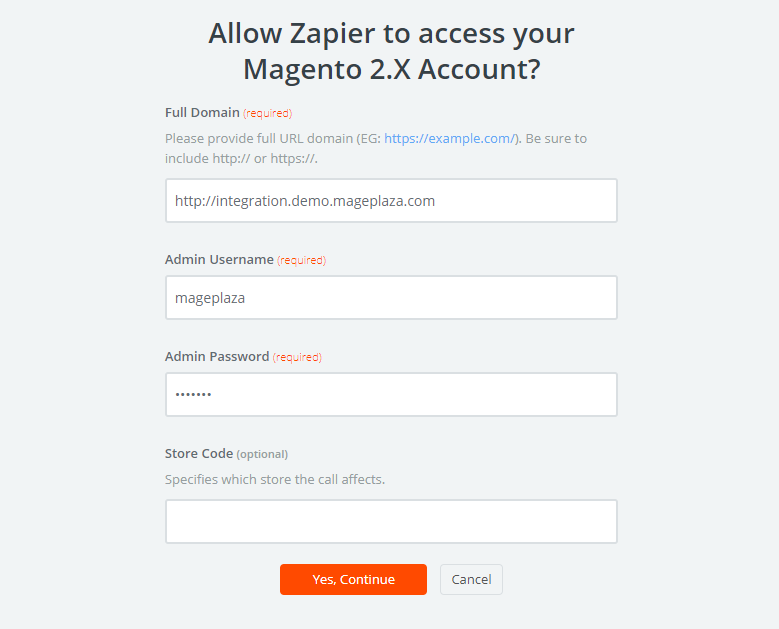
- After that, you need to
connect an Accountinselect Magento 2.x accountfield. In this step, please enter full domain, admin username and admin password of your Magento 2 store as the following image:
- After generating your Magento 2.x account, the screen will display as an image below. Then, choose
Save + Continue.
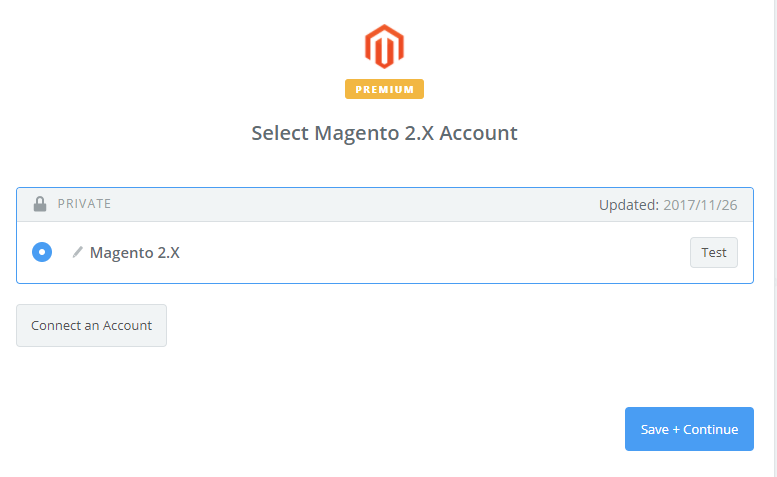
- Great! You have just tested Magento 2.x successfully. Please continue doing the next step.

Step 4: Integrate Xero
- In
Choose an Action Appfield, chooseXeroand click onContinue.

- Then, you have to choose one of the options in drop-down list of
Select Xero Actionfield according to your need. After choosing, click oncontinue

-
Next, you need to
select Xero account. Please click onConnect an Account. -
Now, your screen will display as an image below:
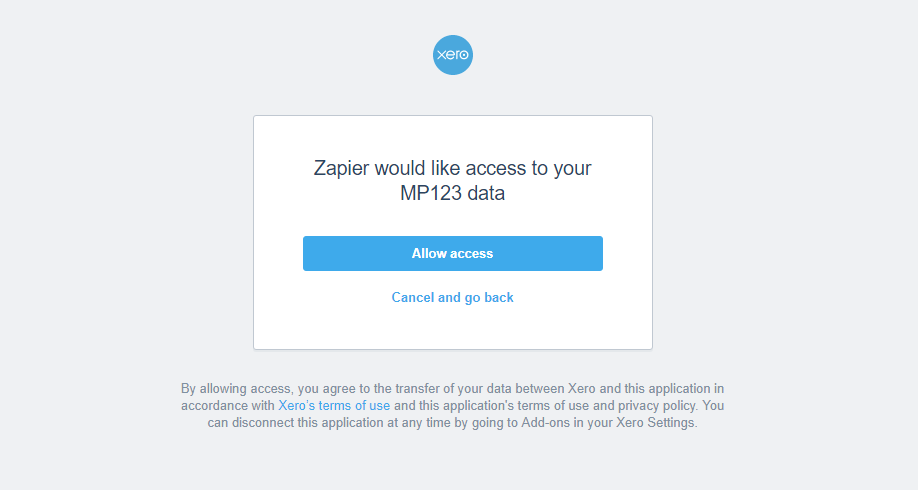
- Click on
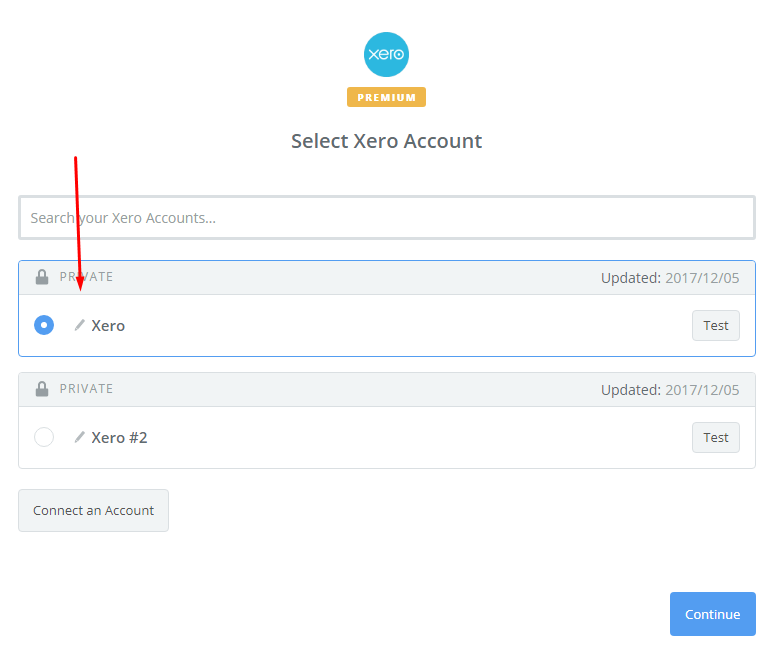
Allow accessbox so that Zapier can access your Xero account. Here is the result after you have connected the Xero account. Please choose Xero and click onContinue.
- Next, you have to
set up Xero Contact. Now, please enter all required fields on page, then choose continue box.
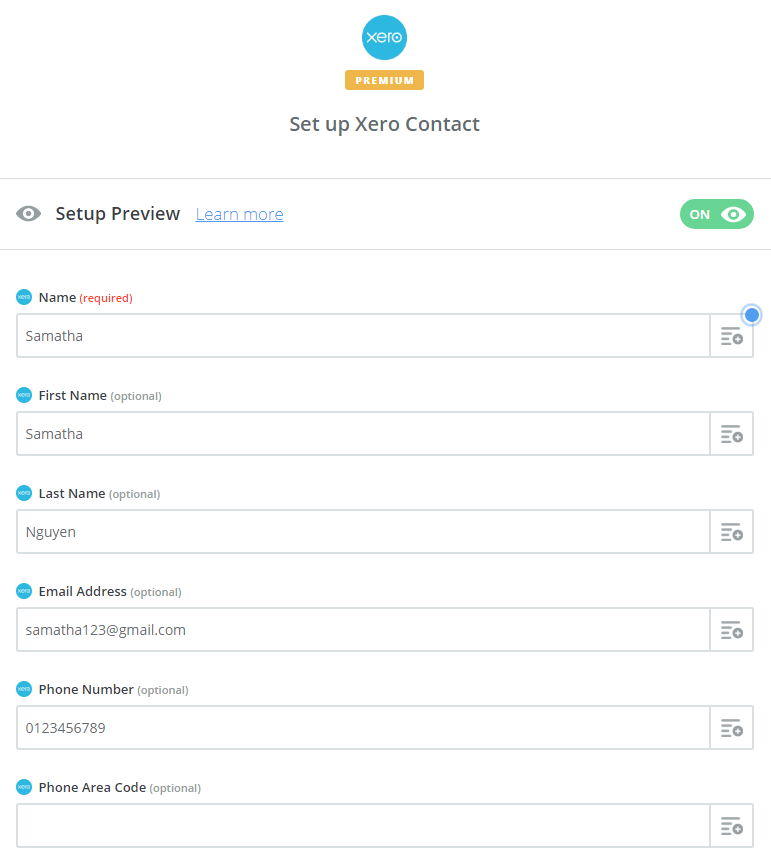
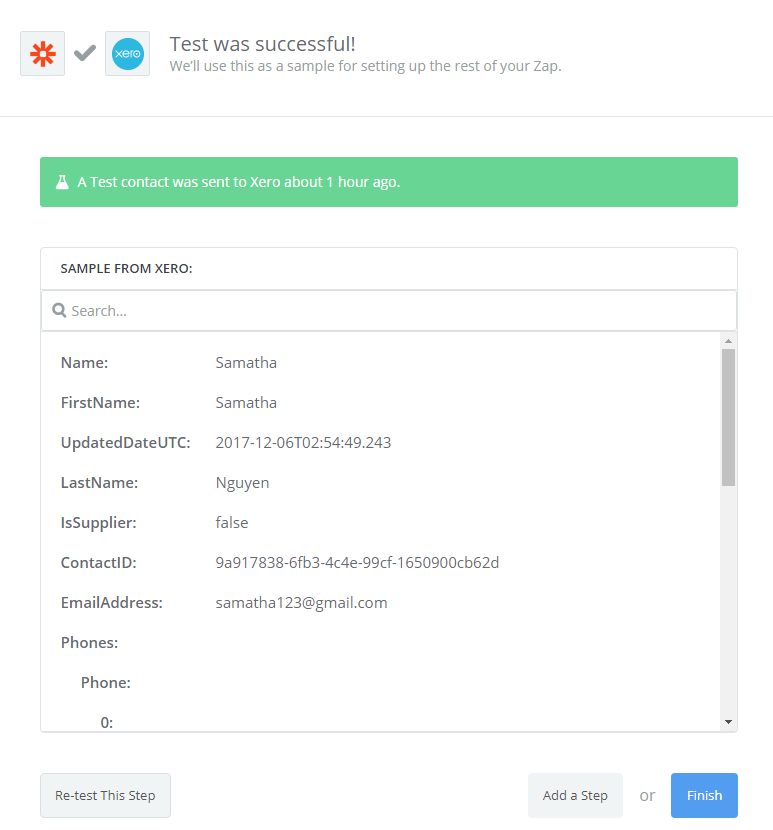
- Wow, you have tested
Xerosuccessfully. Finally, chooseFinishand set the name of your zap to complete.
- From now on, your Zap is working and it will auto-check for your Magento 2.x new customer.
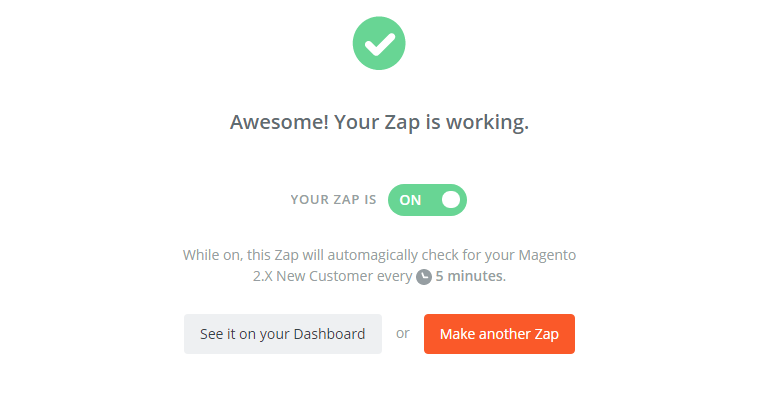
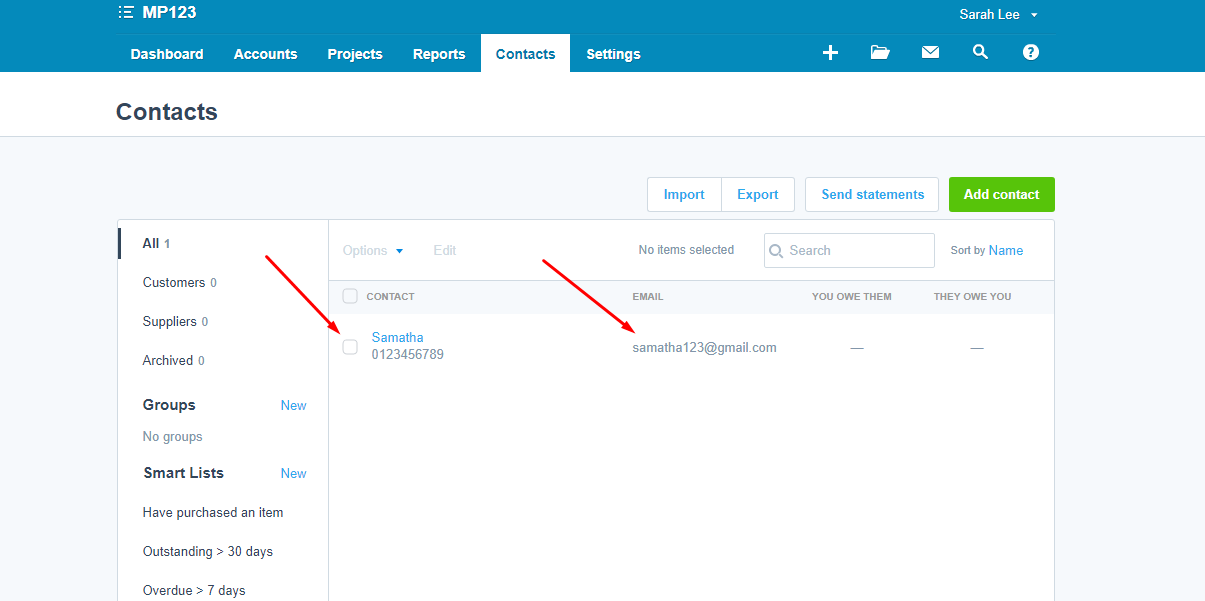
- After all, you have just done Magento 2 Xero integration to your store.
- Try it with your Magento 2 store now and good luck!
Get Seamless Magento Integration Today!
Table of content

Jacker is the Chief Technology Officer (CTO) at Mageplaza, bringing over 10 years of experience in Magento, Shopify, and other eCommerce platforms. With deep technical expertise, he has led numerous successful projects, optimizing and scaling online stores for global brands. Beyond his work in eCommerce development, he is passionate about running and swimming.
Related Post


How to Enable DebugView in GA4 for your Magento 2 store - Mageplaza
Step-by-step guide to enabling GA4 DebugView for Magento 2 merchants — verify your GA4 events are firing correctly before trusting your data.
8 mins read
|
06-09-2026

Table Rate Shipping in eCommerce: A Practical Guide
Master Magento 2 Table Rate Shipping. Learn how to configure an accurate, automated shipping matrix to optimize your checkout and boost sales.
10 mins read
|
06-02-2026
3 mins read
|
05-30-2026

Google Analytics Ecommerce Reports for Magento Merchants: What to track & Tips
A practical guide to GA4 ecommerce reports for Magento merchants, covering what to track, how to read each report, and specific tips to turn data into revenue decisions.
18 mins read
|
05-20-2026

5 Ways to Hide Products on Shopify (2026 Guide)
Explore the best 5 ways to hide products on Shopify. Learn how to manage visibility, protect pricing, and create a tailored shopping experience for buyers.
18 mins read
|
05-16-2026
7 mins read
|
06-30-2026
How to Enable DebugView in GA4 for your Magento 2 store - Mageplaza
Step-by-step guide to enabling GA4 DebugView for Magento 2 merchants — verify your GA4 events are firing correctly before trusting your data.
8 mins read
|
06-09-2026
Table Rate Shipping in eCommerce: A Practical Guide
Master Magento 2 Table Rate Shipping. Learn how to configure an accurate, automated shipping matrix to optimize your checkout and boost sales.
10 mins read
|
06-02-2026
3 mins read
|
05-30-2026
Google Analytics Ecommerce Reports for Magento Merchants: What to track & Tips
A practical guide to GA4 ecommerce reports for Magento merchants, covering what to track, how to read each report, and specific tips to turn data into revenue decisions.
18 mins read
|
05-20-2026
5 Ways to Hide Products on Shopify (2026 Guide)
Explore the best 5 ways to hide products on Shopify. Learn how to manage visibility, protect pricing, and create a tailored shopping experience for buyers.
18 mins read
|
05-16-2026