How to Set Up Shipping Rates on Shopify [Quick & Easy]
![How to Set Up Shipping Rates on Shopify [Quick & Easy] - Mageplaza](https://cdn2.mageplaza.com/media/blog/set-up-shipping-rates-on-shopify/cover.png)
Having a beautiful online store is only half the battle. The other half? Getting your products to your customers quickly and affordably. That’s where custom shipping rates come in! By setting up shipping rates in your Shopify store, you can offer your customers a variety of shipping options that fit their needs and budget. This not only improves customer satisfaction, but it can also help you increase sales.
In this comprehensive guide, we’ll walk you through everything you need to know about setting up custom shipping rates in your Shopify store, from adding shipping locations to creating shipping zones and rates. With clear instructions and helpful screenshots, you’ll be a shipping expert in no time!
Add Shipping Locations: Plotting Your Shipping Territory
Before you can set up shipping rates, you need to define where you’ll be shipping your amazing products. If you want your clients’ products delivered quickly and efficiently, you need to be sure your shipping address is correct and current.
According to your Shopify plan , you are allowed the various location access as highlighted below.
- Starter: 3 shipping locations.
- Basic: 4 shipping locations
- Shopify plan: 5 shipping locations
- Advanced plan: 8 shipping locations
- Shopify Plus: 20 shipping locations
How to Add Location on Shopify Shipping
- Step 1: Log in to your Shopify admin: Go to your Shopify admin dashboard.
- Step 2: Navigate to Settings: Click on Settings in the bottom left corner.
- Step 3: Select Locations: In the Settings menu, select Locations.
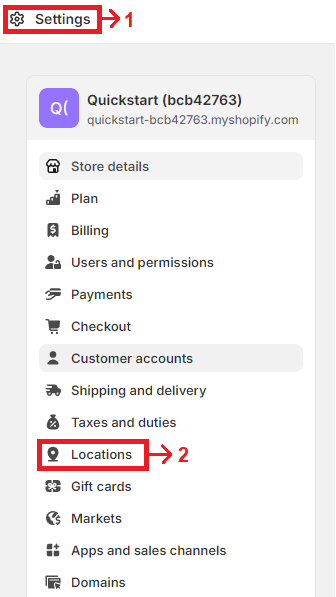
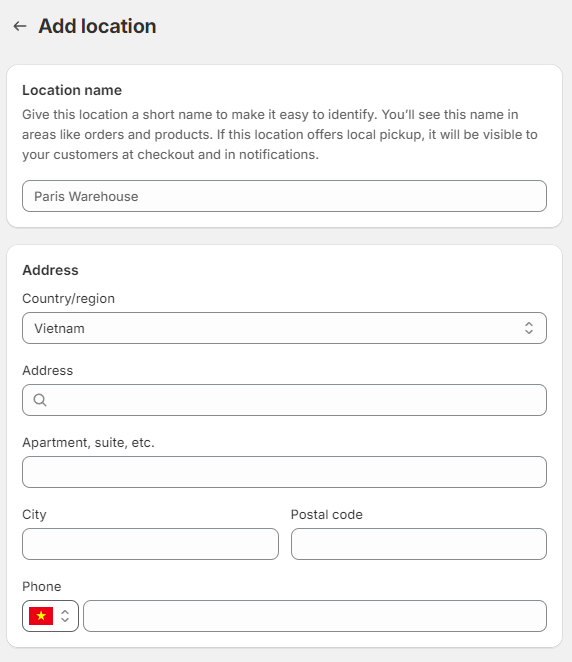
- Step 4: Add a Location: Click on Add location and fill in the required details.
- Step 5: Save: Once you’ve filled in all the details, click Save.
By adding multiple locations, you can manage inventory and shipping more efficiently.
Create Shopify Shipping Profiles: Organizing Your Shipping Strategies
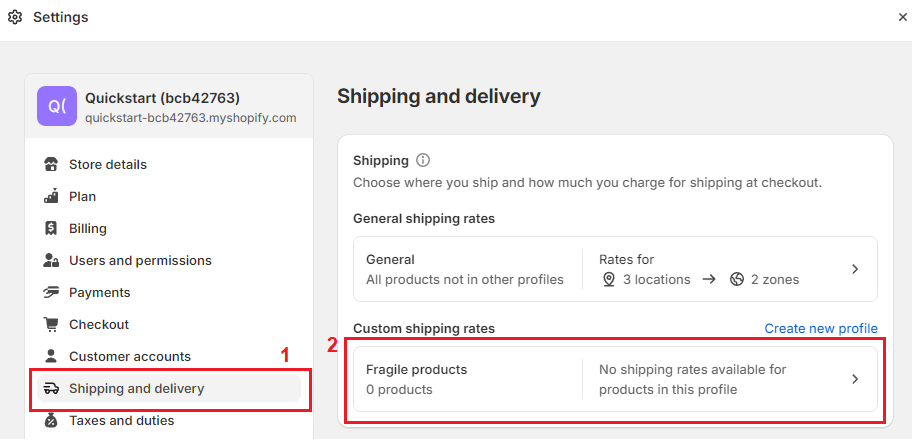
Shipping profiles allow you to set different shipping rates based on specific products or locations. By creating shipping profiles, you may simplify the shipping procedure and give your consumers an easy-to-shop experience.
It’s not necessary to create a Shipping profile if you prefer Shopify’s default shipping rates. Without any additional effort, you may easily adjust the General shipping rates.
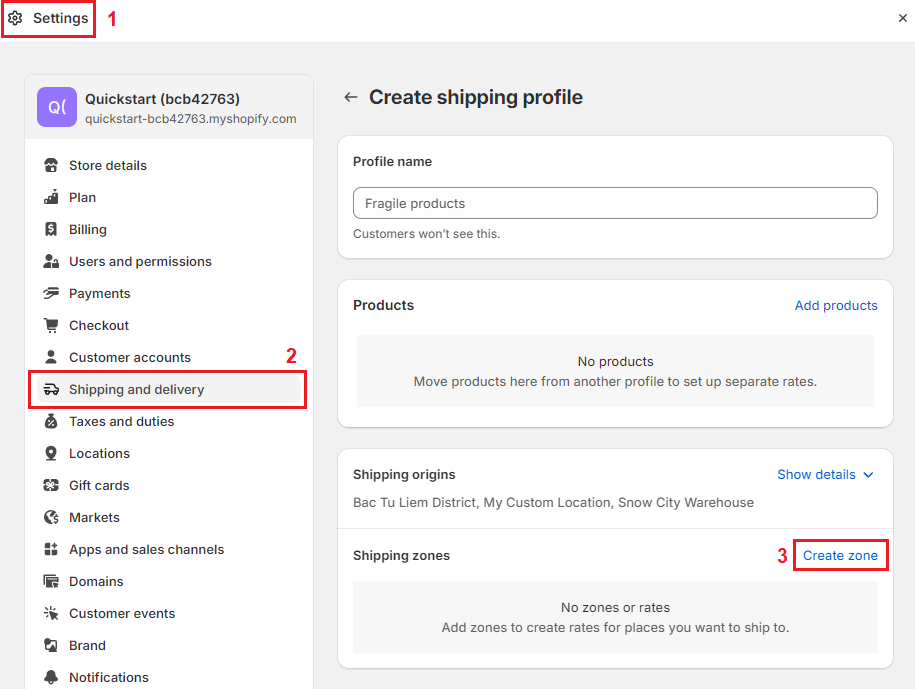
Here’s how to create a Shopify shipping profile
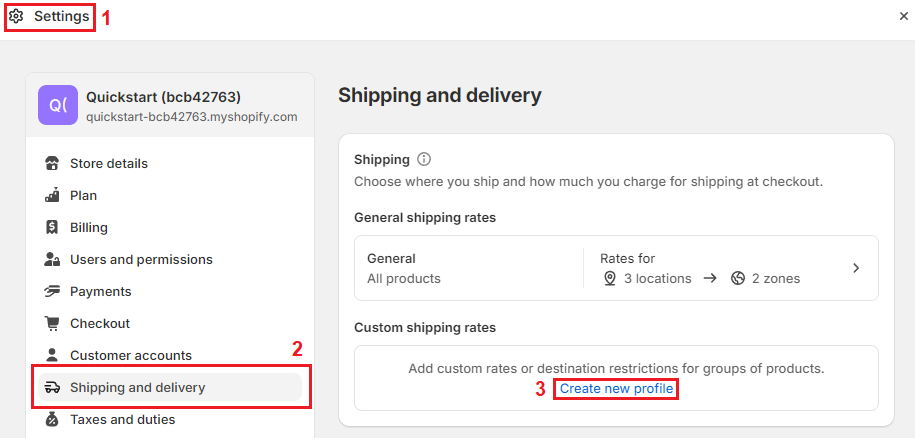
- Step 1: Go to Settings: From your Shopify admin, go to Settings and select Shipping and delivery.
- Step 2: Create New Profile: Click on Create new profile under Custom shipping rates
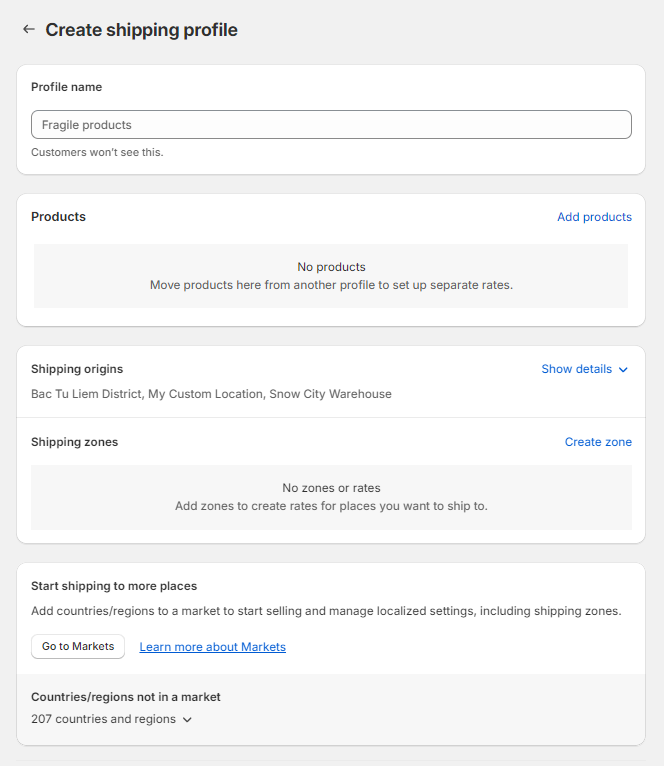
- Step 3: Complete all the fields in order to create a new shipping profile.
- Step 4: Save: After setting up your shipping zones and rates, click Save.
Congratulations! You’ve created a new shipping profile! Now, let’s move on to defining shipping zones within these profiles.
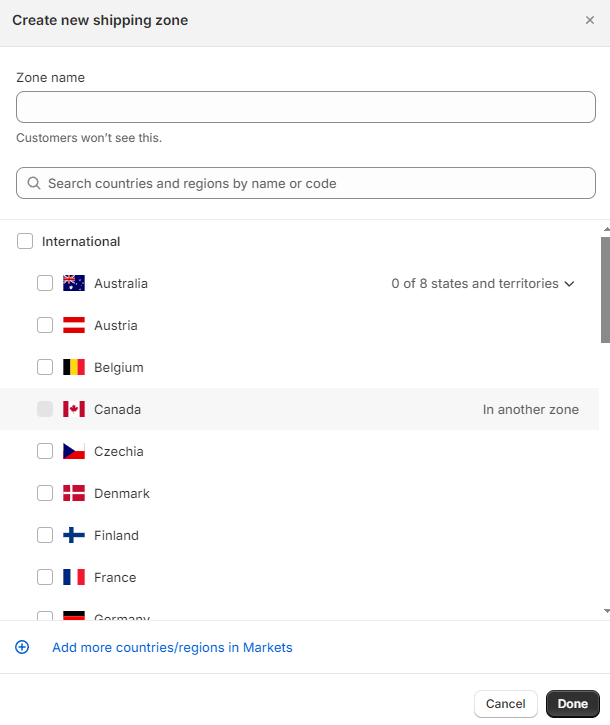
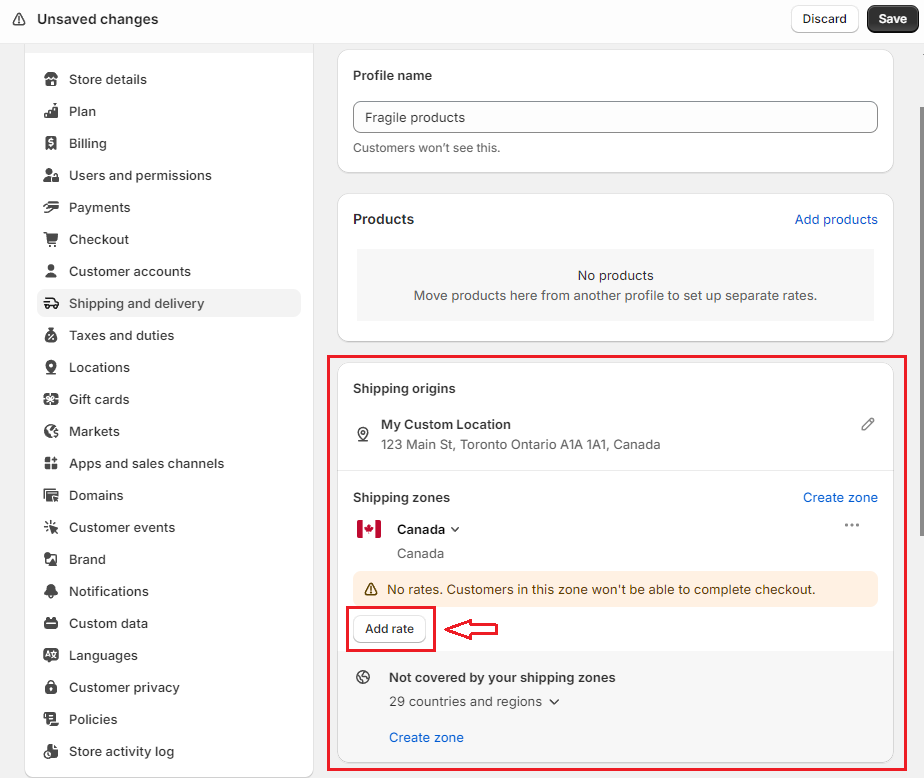
Create Shopify Shipping Zones: Grouping Your Shipping Destinations
Shipping zones help you group your shipping locations into manageable categories for efficient rate setting. Suppose you have an online store in the United States and you want to create a shipping region for all countries in Europe. You can set up a fixed shipping fee for all customers in this region, regardless of whether they are in France, Germany, Spain, or Italy. This allows you to offer different shipping options based on a customer’s location.
Steps to Create Shipping Zone Shopify
- Step 1: Follow the same steps you would take to create a new shipping profile. Choose Create zone in the Shipping zone field.
-
Step 2: Name the Zone such as “North America”, “Domestic” or “International.”
-
Step 3: Pick out the countries or regions you want to add.
- Step 4: Add shipping rates for your desired zone.
- Step 5: Once you’ve selected the desired locations, click Done to save your shipping zone.
You can create multiple shipping zones within a single profile. This allows you to offer targeted shipping rates for specific regions.
Create Shopify Shipping Rates
Now comes the exciting part: defining your actual shipping rates! Shopify offers two main options: flat rates and calculated rates.
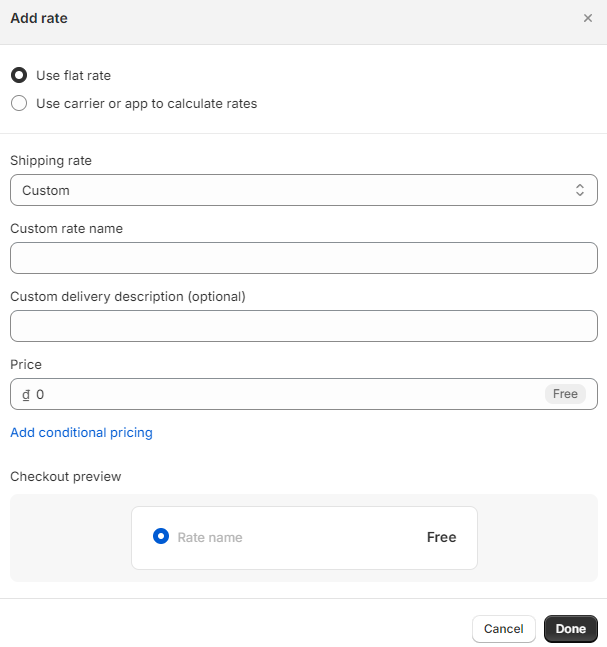
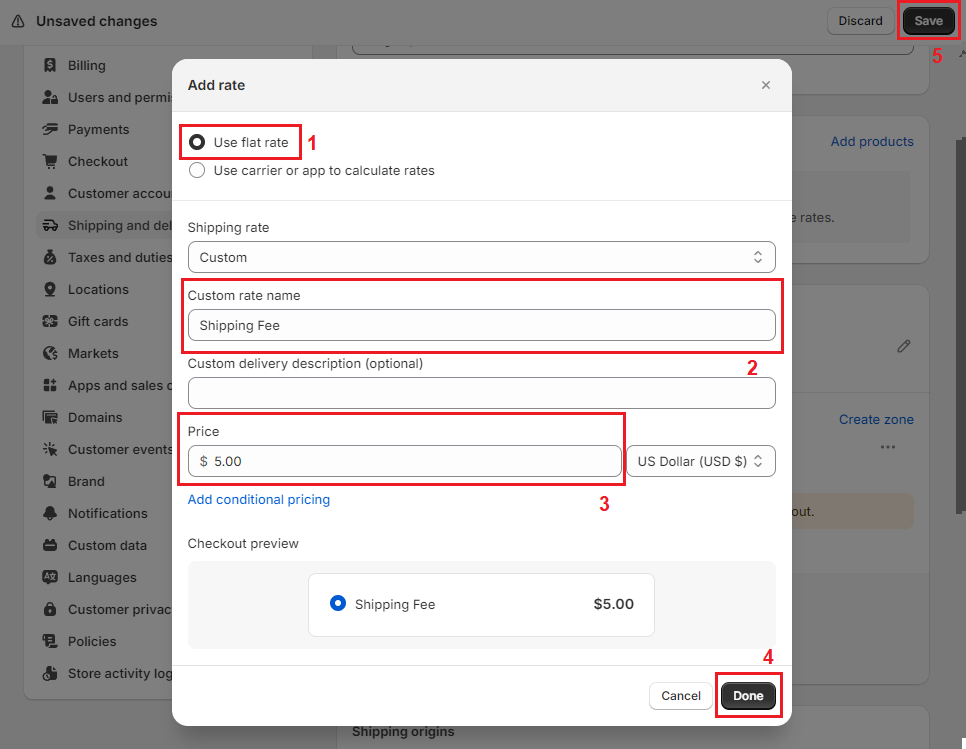
Flat Shopify Shipping Rates: Simple and Straightforward
Flat Shopify Shipping Rates are a specific amount that customers pay for shipping at checkout. These rates can be applied to any order within a specific shipping zone, or they can be set for orders that fall within a certain weight or price range.
For instance, if you have a shipping zone for Asia, you might establish a flat rate of $15. Additionally, for orders exceeding $300, you could offer a reduced flat rate of $10. Alternatively, if you’re using weight-based rates, you could set a flat shipping rate of $20 for orders weighing less than 10 kg and a flat rate of $30 for orders weighing more than 10 kg.
This approach simplifies the shipping fee process and provides a transparent fee structure for customers.
How to Set Up Flat Shipping Rates in Shopify
- Step 1: Navigate to your Shipping profiles as described previously.
- Step 2: Click on the profile you want to edit.
- Step 3: Select the Shipping zone where you want to apply the flat rate.
- Step 4: Click Add rate next to the chosen zone. Enter the name and amount for the rate.
Optional: Conditions (Advanced) You can add weight-based or price-based conditions to restrict this flat rate to specific order values or weights. For most basic flat rate scenarios, you can leave this section blank.
- Step 5: Click Done and Save your new flat shipping rate.
Calculated Shopify Shipping Rates: More Flexible, More Complex
Calculated rates consider the weight and/or price of an order to determine the shipping cost. This is a good option for heavier products or when you want to offer more accurate shipping costs to your customers. However, setting up calculated shipping rates can involve more steps and potentially require third-party carrier integrations.
Depending on your store’s Shopify subscription plan and the order you’re shipping, you might be eligible for discounted shipping rates from Shopify Shipping carriers. With the Shopify Shipping Calculator, you can compute and see your reduced Shopify Shipping prices.
For example, the maximum discount available by carrier for 2022 is up to 88.5% for USPS Domestic shipping, up to 69.81% for UPS Domestic shipping, up to 76% for DHL International shipping, and up to 64% for Canada Post International shipping.
How to Set Up Shopify’s Calculated Shipping Rates
- Step 1: Follow step 1-4 as above to access your shipping profiles and add rates.
- Step 5: Use Carrier or App to Calculate Rates: Shopify offers options to connect with shipping carriers or third-party apps to calculate rates based on weight, dimensions, and destination. The specific steps and configuration will vary depending on your chosen method.
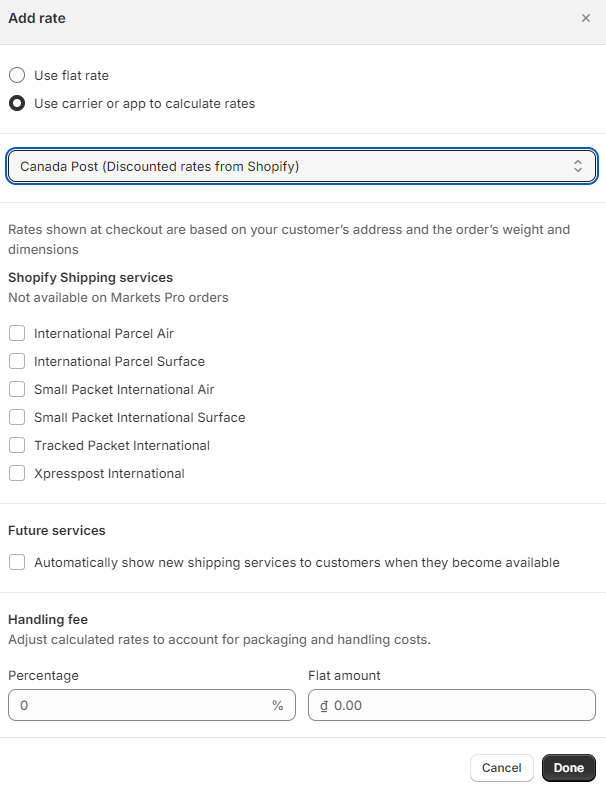
Always double-check your settings to ensure they’re accurate and reflect your shipping policies correctly.
Set Up a Free Custom Shipping Rate on Shopify at Checkout: Sweetening the Deal
Free Custom Shopify Shipping Rate is a shipping strategy where you offer free shipping to your customers under certain conditions. This can be based on factors such as the total order value, the weight of the order, the customer’s location, or the type of products in the order.
For example, you might offer free shipping on all orders over $150 or free shipping for specific products like T-shirts. Offering free shipping can be a powerful method of mitigating (or even eliminating) cart abandonment and can give you a competitive edge.
-
Step 1-4: Repeat step 1-4 as above to access your shipping profiles and add rates.
-
Step 5: Give your custom rate a clear and enticing name, such as “Free Shipping” or “Discounted Expedited Shipping.”
-
Step 6: Price: Enter “0.00” to create a free shipping rate.
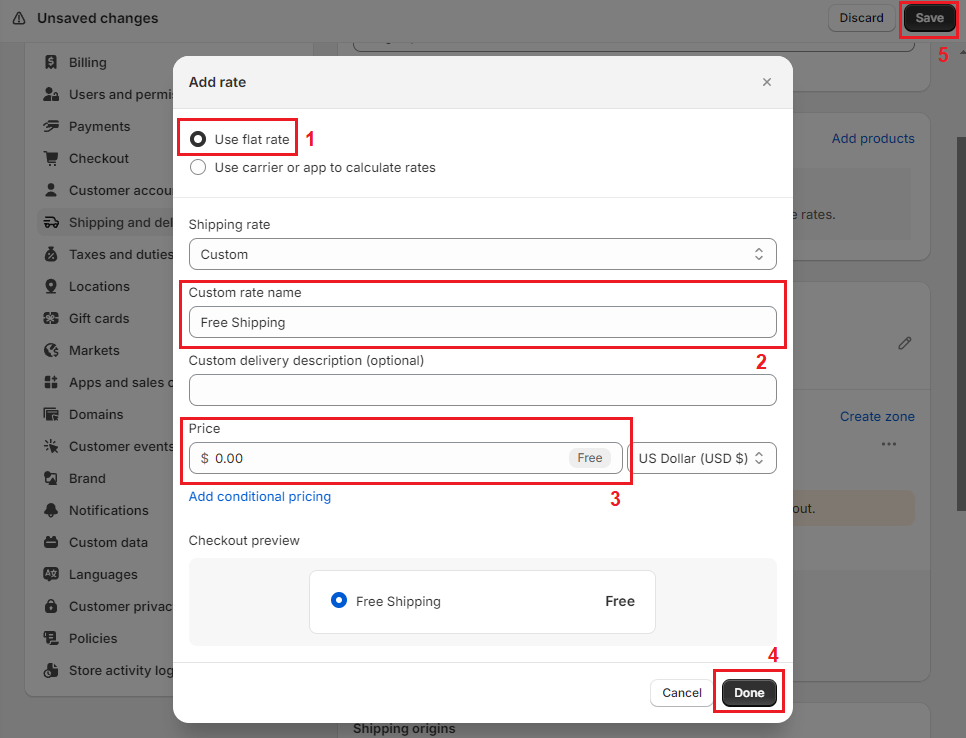
- Step 7: Click Done and Save your custom shipping rate. By setting up a free or discounted shipping rate with specific conditions, you can encourage customers to spend more to qualify for the offer and ultimately boost your sales.
Advanced Shipping with Apps: Expanding Your Horizons
For complex shipping needs, Shopify offers a vast selection of apps in their app store that can handle intricate calculations and integrate with various shipping carriers. These apps can provide functionalities like:
- Real-time shipping rate quotes: Offer customers accurate shipping costs based on their location and order details at checkout.
- International shipping rules: Manage complex international shipping regulations and customs requirements.
- Discounted shipping based on carrier accounts: Leverage negotiated rates with carriers to offer competitive shipping options.
- Table rate shipping: Set up custom shipping rates based on weight, dimensions, or destination combinations.
Discover more: Best Shopify Free Shipping Apps for Your Shopify Store
FAQ
Q: Can I offer different shipping rates for the same product?
A: Yes! By creating multiple shipping profiles, you can assign different shipping rates to specific products or collections.
Q: What happens if a customer’s shipping location doesn’t fall into any of my zones?
A: If a customer’s shipping location doesn’t fall into any of your shipping zones on Shopify, they won’t be able to order products from your store. This is due to the fact that orders can only be placed when the desired shipping destination lies within one of your active shipping zones and markets. As such, it’s crucial to ensure that your shipping zones are comprehensive and include all potential customer locations.
Q: Can we provide shipping discounts to specific customer groups?
A: Yes, it is possible to set up special shipping rates for specific customer groups in your Shopify store. Using customer tags or other conditions, shipping rates can be created to offer comparatively low prices or specific advantages to certain customer groups.
Q: Can I change my shipping rates after I’ve published them?
A: Absolutely! You can edit or delete your shipping rates at any time in your Shopify admin panel. However, keep in mind that changes might affect ongoing orders, so it’s best to communicate any adjustments clearly to your customers.
Q: Can I test my custom shipping rates on Shopify to make sure they function properly?
A: Yes, you can test your custom shipping rates on Shopify. During the creation of shipping rates, a preview feature is available, enabling you to see precisely what your customers will see at checkout. This feature provides you with the opportunity to verify the functionality of your shipping rates prior to their activation.
Conclusion
Understanding these essential factors and following the procedures provided in this tutorial will help you set up custom shipping rates in your Shopify store and provide your customers with a seamless and efficient shipping experience.

Summer is the CMO and Digital Commerce Solution Expert with 10+ years of experience. She specializes in Magento, Shopify, ERP, CRM, AI, and Blockchain, delivering strategic solutions that transform businesses. With a deep understanding of digital commerce, she helps brands scale and stay ahead in a competitive market.
Related Post

Review 74 Mageplaza extension updates from April 2025, highlighting Magento 2.4.8 compatibility, Hyvä theme support, and enhanced functionalities.

Social Media Marketing: Your Ultimate Guide to Skyrocketing Engagement - Mageplaza
Discover a step-by-step framework for effective social media marketing. Learn how to optimize content, run ads, track KPIs, and future-proof your strategy across all major platforms.
The Ultimate Guide to Managing Your E-Commerce Website for Maximum Sales - Mageplaza
Discover simple tips to manage your eCommerce website, boost sales, and grow your online business effortlessly. Learn now!

SWOT Analysis: The Ultimate Tool for Business Growth - Mageplaza
Learn how to use SWOT analysis to identify strengths, weaknesses, opportunities, and threats. Build smarter strategies and drive business growth effectively.
Review 74 Mageplaza extension updates from April 2025, highlighting Magento 2.4.8 compatibility, Hyvä theme support, and enhanced functionalities.
Social Media Marketing: Your Ultimate Guide to Skyrocketing Engagement - Mageplaza
Discover a step-by-step framework for effective social media marketing. Learn how to optimize content, run ads, track KPIs, and future-proof your strategy across all major platforms.
The Ultimate Guide to Managing Your E-Commerce Website for Maximum Sales - Mageplaza
Discover simple tips to manage your eCommerce website, boost sales, and grow your online business effortlessly. Learn now!
SWOT Analysis: The Ultimate Tool for Business Growth - Mageplaza
Learn how to use SWOT analysis to identify strengths, weaknesses, opportunities, and threats. Build smarter strategies and drive business growth effectively.
& Maintenance Services
Make sure your store is not only in good shape but also thriving with a professional team yet at an affordable price.
Get Started