How to add products to Shopify stores: Guide for beginners
Summer Nguyen | 05-10-2024
Do you want to start an online business on Shopify? But are you struggling to know where and how to start? Creating a store and adding products is the first step you need to take. Do not worry! Shopify makes this easier and more convenient than ever. Let’s learn how to add products to Shopify stores so you can start selling online today!
Upon successfully creating a product page, customers gain access to vital information about your product, including its name, description, and available quantity. Simultaneously, you gain the ability to efficiently manage your products based on quantity and classification. Don’t hesitate any longer—let’s dive into the process of adding products to Shopify.
How to add products to Shopify mannually: 7 simple steps
Step 1: Logging in to your Shopify account
- Open Shopify’s home page (https://www.shopify.com/).
- Click the “Log in” option.
- Fill in your store address, email, and login password.

Tip: You can select “Remember me” to save time logging in next time, but should not be used on a shared computer to ensure information security.
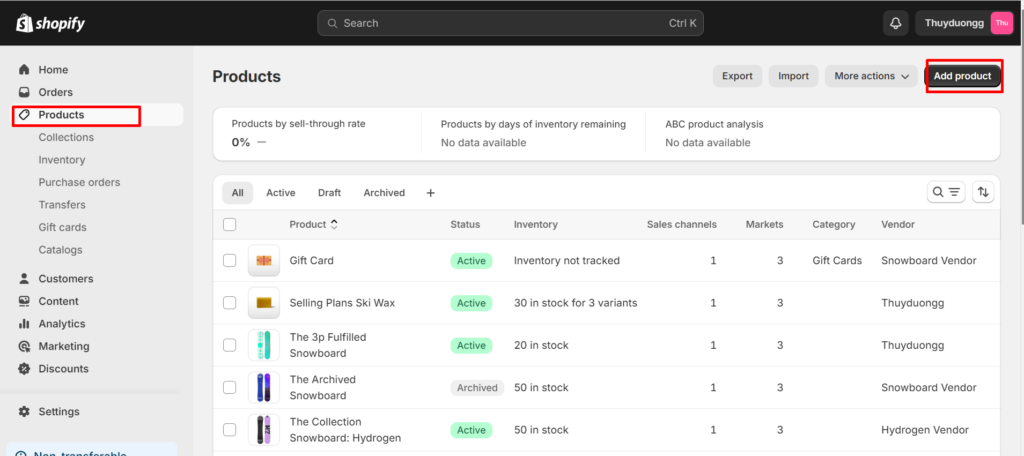
- Find the Products tab under Search on your Shopify account.
- Click on this tab and you will get options like “Add a product” or “Import products”.
- Click Add a product to access the product page.
Step 2: Adding product details
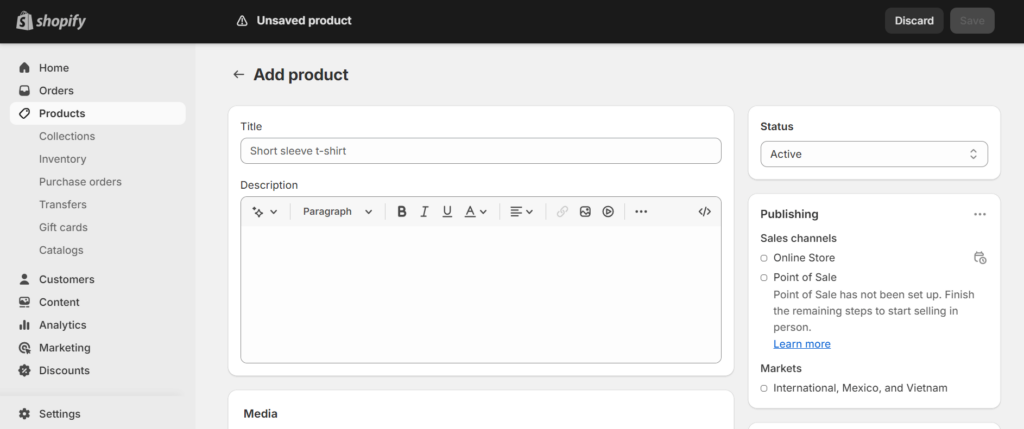
Next, start adding information to your product pages. You should fill in information such as:
- Product Title
- Description
- Product Type
- Vendor
Product Title
The product title is the name you give your product. For example, if you’re selling a dress, you might name it “A white bow prom dress.” So, now I will give you some tips to name your product:
- You should keep the title short and clear.
This will help customers easily understand it without feeling confused, for example, don’t name your dress “outstanding elegant dress for a party”.
- The product titles need to be consistent on each page.
If you follow the “color + pattern + product” formula on one title, you should do the same on every other product page. For example, if you name the dress you sell “White Bow Party Dress,” you should also name the shirt you sell “Black Plaid Shirt.”
Description
This is an important part of the product page. The product description is where customers will pay the most attention. This is because it provides potential customers with essential information about the product, such as its features, benefits, and specifications.
So, let’s learn to write an attractive description:
- Writing in detail and attractively.
A well-written product description not only informs customers about the product but also engages and persuades them to buy it. For example, if you’re selling a dress, the description might be: “Beautiful blue plaid dress, perfect for weddings. It’s soft, comfy, and perfect for weddings. The top fits nicely, and the bottom flows elegantly. You can adjust the straps for the perfect fit.”
- Writing down detailed measurements and materials of the dress so customers can consider it better.
Note: For search engine optimization (SEO), write your own description, do not copy it from other sites.
Product Type
This part is simpler than the above parts. You simply enter a noun or term to classify your products into a specific category.
For example, if you open a clothing store, you will have categories for pants, shirts, and dresses.
Vendor
If you sell products you make yourself, put your brand name here. But if you’re selling someone else’s product, clearly state that manufacturer or vendor.
For example: If you were selling Zara dresses, you would put “Zara” in the Vendor section.
Step 3: Inventory, Price, and Extra Information

After completing the main product information, you need to update the remaining details. In the Inventory and Variants section of Shopify, you need to fill in information including product SKU, price, shipping options, and weight.
Price
You need to update the prices of all the products in your store because all customers want to know the price before considering a purchase. You don’t need to add a currency symbol to this field because Shopify General settings will automatically recognize the currency you use.
Pro tips: decide your price carefully. If the price is too high, customers will consider it when making a decision. But don’t sell your products at too low a price because your profits will be reduced.
SKU
This is where you enter your Stock Keeping Unit. This is a unique identifier for each product in your store. You can find this number on the manufacturer’s website or from the supplier. If you can’t find it, do a Google search to see if you can find more information from other store owners.
Shipping options:
Next, let the customer know how you will deliver the product to them. In this section, you can select or deselect the Charge Taxes box or the Requires Shipping box. For example, if you sell downloadable products or services that don’t require shipping, you can deselect both of these options.
Weight:
The weight of the product may not matter much, but it greatly affects shipping and delivery costs. If you don’t know the exact weight, you can estimate, but it’s better to give a larger number.
Once you’ve filled in your weight information, you can use the variations and inventory management sections to compare prices, import barcodes from manufacturers, and unlock shipping options. You can also set up inventory policies and add more options for product colors and sizes.
Step 4: Adding product images
Once you’ve filled in all the necessary info for your product, you can add images to give customers more info about the product they’re interested in. Adding lots of relevant images can help customers understand the product better.
Besides, following these tips can help you attract more customers:
- Name your images with consistent formatting, and make sure you separate each word with a hyphen. This will help you easily find images and improve your SEO ranking.
- Try to include multiple images of the product on each page, use different angles, or even showcase different color options if available.
- Make sure each image is high quality and clear, and do not forget to check that you have permission to use any images you access.
Step 5: Add tags and collection details
Once you have your images ready, the next step is to add your products to specific collections or areas of your website. On Shopify, a Collection is similar to a category.
Using the Add to Collection button, you can place your product page in whatever category it belongs to. This could be adding dresses to a “clothing” collection, for example.
To help customers find your products faster and easier, you can add tags to your products. To add a tag to a product, select the product name and select Organization in the Shopify admin panel.
You can add tags for your products here and use commas to separate different words. Tap Save when you’re done.
Besides, Shopify shop owners can also utilize tags to make automated collections. From your admin, go to the Collections tab and add a description or title for your collection. In the Type section, click Automated and select the conditions your product needs to meet to belong to that collection.
For example, for a product to automatically enter the “clothing” collection, it may need to include tags like “shirt” or “dress.”
Step 6: Edit your Search Engine Listing
On Shopify, the system automatically generates meta descriptions and page titles to support your search engine presence. However, these automatic pieces of information are generated from the details you added on the Product Details screen.
Often, you will need to change your Meta Description and Page Title information separately to optimize your SEO. Your page title and meta description both need to contain valuable keywords related to your product. Following these steps to edit your Search Engine Listing:
- Click the Product Details page to edit information.
- Navigate to the Search engine listing preview.
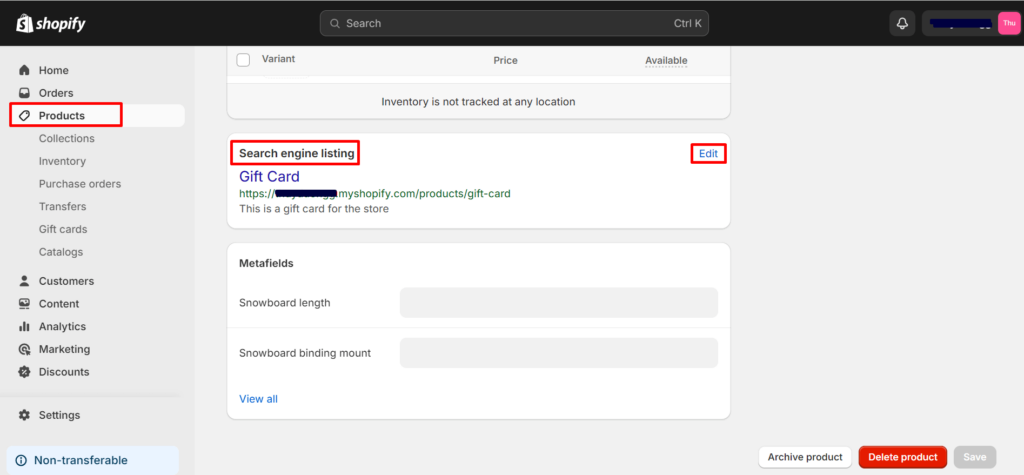
- Click “Edit website SEO.”
This will appear in Google search results. Add up to 55 characters to your title. You can also enter a description for the listing on the search engine.
Make sure you add the right keywords to help customers find you here. Meta descriptions have a limit of 320 characters.
- In the URL and path section, edit your website address.
It may be worthwhile to change any random numbers on your URL with keywords related to the product page. Remember that your URL cannot contain any spaces. Path works with Shopify theme designs.
- When you’re finished, click Save.
Step 7: Publishing Your Product Page
When everything is completed, double-check the details on your product page and do a quick review before hitting the Save Product button in the bottom right corner of the screen. Once Saved, you can scroll to the top of the page to preview your product page.
Click the link that says “View on your website” to make sure everything looks good.
If you notice any issues, you can edit the product page by clicking back on the specific product page. Remember, although you can change your product information at any time, this may affect how products are grouped in your reports, so be careful with factors such as tags and collections.
You can go to the Shopify admin and enter the Products button to edit a page if needed. Click on the product name you want to change and edit the corresponding details, then press Save.
4 other methods to add products to Shopify stores
Duplicate your product
If you sell through multiple channels or want to add similar products from a shipping provider, you can save time by duplicating existing items in your listings. When you duplicate a product, you can add options and copy one or more details such as image, SKU code, inventory quantity, and barcode.
If you just want to add an option to one of the products you are offering, try adding a variable instead. By default, copied products will be hidden across all your channels and apps.
This product will not be published until you make changes available to it. You can also make the copy available on similar channels. To make a copy:
- Click Products, then All Products in your Shopify admin homepage.
- Click the name of the product you want to duplicate in the Shopify app.
- Select the Duplicate check box.
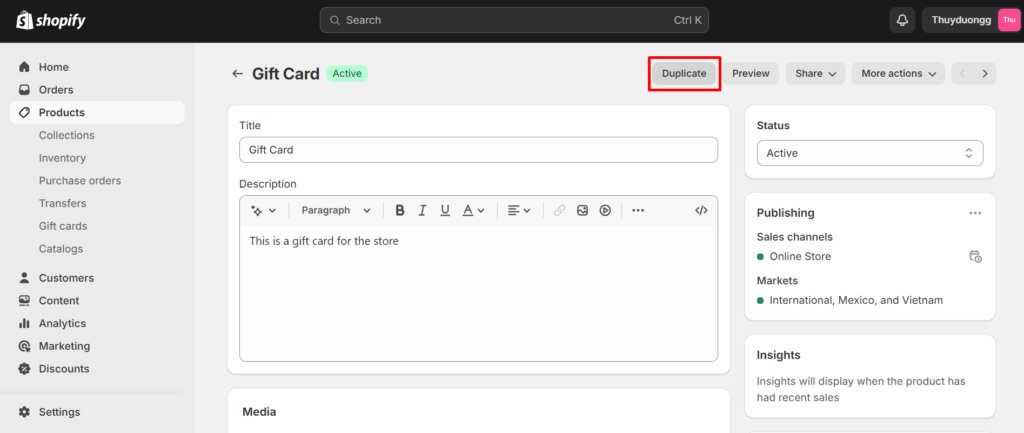
- Enter a name that is different from the existing product.
- Click Duplicate again.
- Modify product details.
You can also update the product’s availability so that it is accessible on the same channels as the original product. Remember that copied products are not the same as product variations.
Scan items with the Shopify app
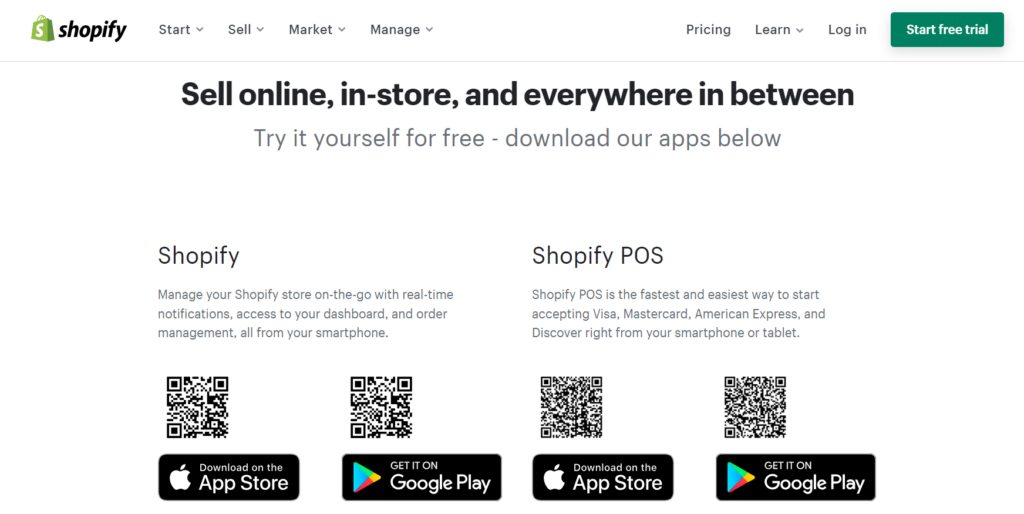
You can add products to your Shopify store by scanning the barcode on your phone. Follow these steps:
- Start by opening the Shopify app on your phone.
- Tap on the “Products” option in the app.
- Look for the “Inventory Scanner” icon and tap on it.
- Point your phone’s camera at the product’s barcode and scan it.
- Tap the “Add” button and choose the product you want to edit from the list.
- If the product already has a barcode, you can select “Replace Barcode.”
- Finally, press the “Save” button twice to save the changes you’ve made.
Leverage CSV file
When you need to move from another platform or update lots of products, CSV file is a good option. It helps you save time when you need to update or add many products at once, helping you quickly improve and grow your store’s selection.
You can follow these steps to import products into your Shopify store using a CSV file:
- Go to your Shopify admin dashboard on your computer.
- Click on the “Products” section to start the process.
- Click on “Import” to begin importing products.
- Choose “Add file” and upload the CSV file with your product information.
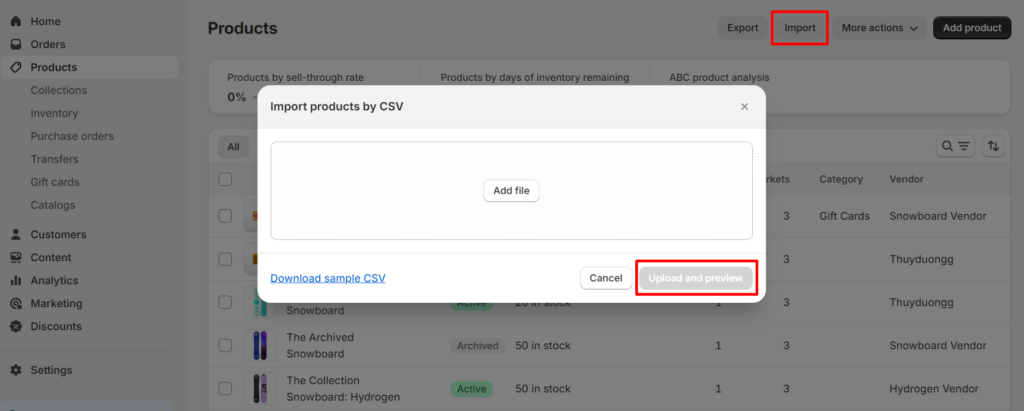
- Decide whether to list the products on all sales channels or just your online store.
- Overwrite Existing Products: If needed, select the option to overwrite existing products with the same product code.
- Proceed to upload the CSV file and wait for the import process to finish.
- Review the details and click “Import products” to complete the process of importing products into your Shopify store.
Use Shopify POS
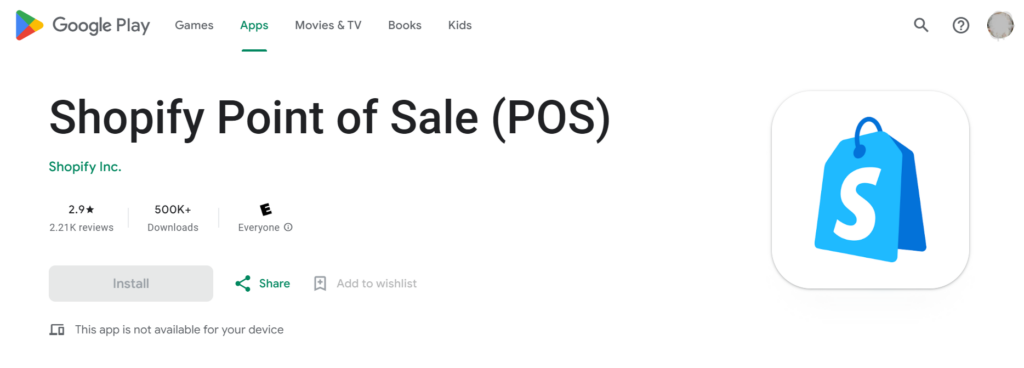
You can control everything from your laptop, iPad, or iPhone, even if you’re not at the store with Shopify Point of Sale (POS)! It’s perfect for keeping track of orders and business activity across different locations. Shopify POS is especially helpful if you have multiple stores. It’s the easiest way to stay organized and run your store smoothly.
Especially when you have multiple points of sale, using Shopify POS becomes successful. This is the most organized and convenient management method to help you run your store effectively.
- Open the Shopify POS app on your device, like your laptop, iPad, or iPhone.
- Select the “Products” section in the Shopify POS interface.
- Click the “Add product” button.
- Enter details about the new product, including name, description, price, and image.
- After filling in all information, click “Save” to complete the process of adding new products.
Note: Make sure you check your local laws and determine that using Shopify POS is legal in your location before you start using it.
How to delete products on Shopify
We have discussed how to upload photos and product information to your Shopify stores in detailed steps. However, both beginners and experienced alike will come to a point when they need to remove products from their stores and shipping services.
Shopify enables you to delete products that are no longer accessible for delivery or manual collection. You can remove items individually or use a bulk action. But remember, removing an item from Shopify clears the inventory forever.
Products cannot be restored. For any reason, if you would like not to display a product, you have the option of hiding the product and then reusing it later.
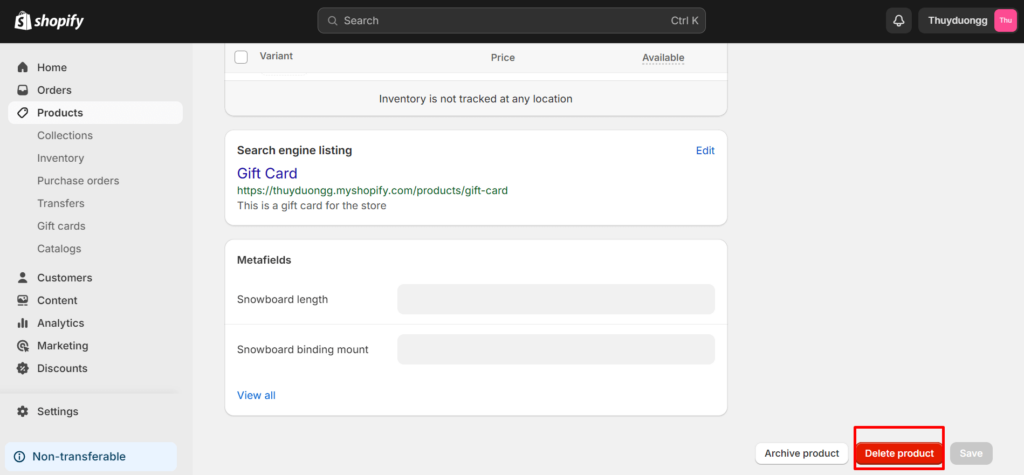
To delete a product, you need to:
- Go to your Shopify admin homepage and click Products, then All Products.
- Locate the specific product you wish to eliminate and access its details page.
- Click Delete product and confirm.
Conclusion
So you’ve learned how to add products to Shopify stores. Besides, we have also provided you with a way to clone products and delete them if necessary. Hopefully, the above information will help you in the process of starting to sell on Shopify.

Summer is the CMO and Digital Commerce Solution Expert with 10+ years of experience. She specializes in Magento, Shopify, ERP, CRM, AI, and Blockchain, delivering strategic solutions that transform businesses. With a deep understanding of digital commerce, she helps brands scale and stay ahead in a competitive market.
Related Post

Review 74 Mageplaza extension updates from April 2025, highlighting Magento 2.4.8 compatibility, Hyvä theme support, and enhanced functionalities.

Social Media Marketing: Your Ultimate Guide to Skyrocketing Engagement - Mageplaza
Discover a step-by-step framework for effective social media marketing. Learn how to optimize content, run ads, track KPIs, and future-proof your strategy across all major platforms.
The Ultimate Guide to Managing Your E-Commerce Website for Maximum Sales - Mageplaza
Discover simple tips to manage your eCommerce website, boost sales, and grow your online business effortlessly. Learn now!
SWOT Analysis: The Ultimate Tool for Business Growth - Mageplaza
Learn how to use SWOT analysis to identify strengths, weaknesses, opportunities, and threats. Build smarter strategies and drive business growth effectively.
Review 74 Mageplaza extension updates from April 2025, highlighting Magento 2.4.8 compatibility, Hyvä theme support, and enhanced functionalities.
Social Media Marketing: Your Ultimate Guide to Skyrocketing Engagement - Mageplaza
Discover a step-by-step framework for effective social media marketing. Learn how to optimize content, run ads, track KPIs, and future-proof your strategy across all major platforms.
The Ultimate Guide to Managing Your E-Commerce Website for Maximum Sales - Mageplaza
Discover simple tips to manage your eCommerce website, boost sales, and grow your online business effortlessly. Learn now!
SWOT Analysis: The Ultimate Tool for Business Growth - Mageplaza
Learn how to use SWOT analysis to identify strengths, weaknesses, opportunities, and threats. Build smarter strategies and drive business growth effectively.
& Maintenance Services
Make sure your store is not only in good shape but also thriving with a professional team yet at an affordable price.
Get Started