Google Optimize Shopify Integration: Step-by-step Guideline in 5 Minutes
Summer Nguyen | 05-29-2024
In the dynamic e-commerce environment, each moment holds significance for the prosperity of your Shopify store. Embedding Google Optimize into the platform isn’t merely an alternative; it’s a way to refine user experience, elevate conversion rates, and enhance overall effectiveness.
Table of Contents
Benefits of integrating Google Optimize to your Shopify store
This integration exceeds mere technological connection; it represents a strategic maneuver yielding numerous tangible advantages:
- A/B Testing: Google Optimize empowers you to experiment with variations on your Shopify site, enabling precise determination of which alterations yield optimal outcomes in conversions and user engagement.
- Personalization: Leveraging Google Optimize’s personalization features, you can curate distinct experiences tailored to each customer, spanning geographic location to device preference, thereby fostering heightened interaction and conversion rates.
- Data-driven Insights: By analyzing test outcomes within Google Optimize, informed decisions grounded in accurate data can be made, facilitating continual improvement of your website and marketing strategies.
- Enhanced Conversion Rates: Fine-tuning your website via Google Optimize yields augmented conversion rates, thus fortifying business performance.
- Enhanced User Experience: Through frequent testing and refinement, user experience optimization ensues, engendering heightened customer satisfaction and loyalty.
- Cost-effectiveness: With the complimentary version of Google Optimize, you can economize on website optimization expenditures while attaining desired outcomes.
- Seamless Integration with Google Analytics: Integration with Google Analytics furnishes comprehensive insights into user behavior, facilitating measurement of optimization impact on pivotal business metrics.
In summation, integrating Google Optimize into your Shopify store transcends mere procedural compliance; it includes a smart scheme fostering excellent online shopping experiences, heightened business performance, and increased customer satisfaction.
Overview and Key Features of Google Optimize
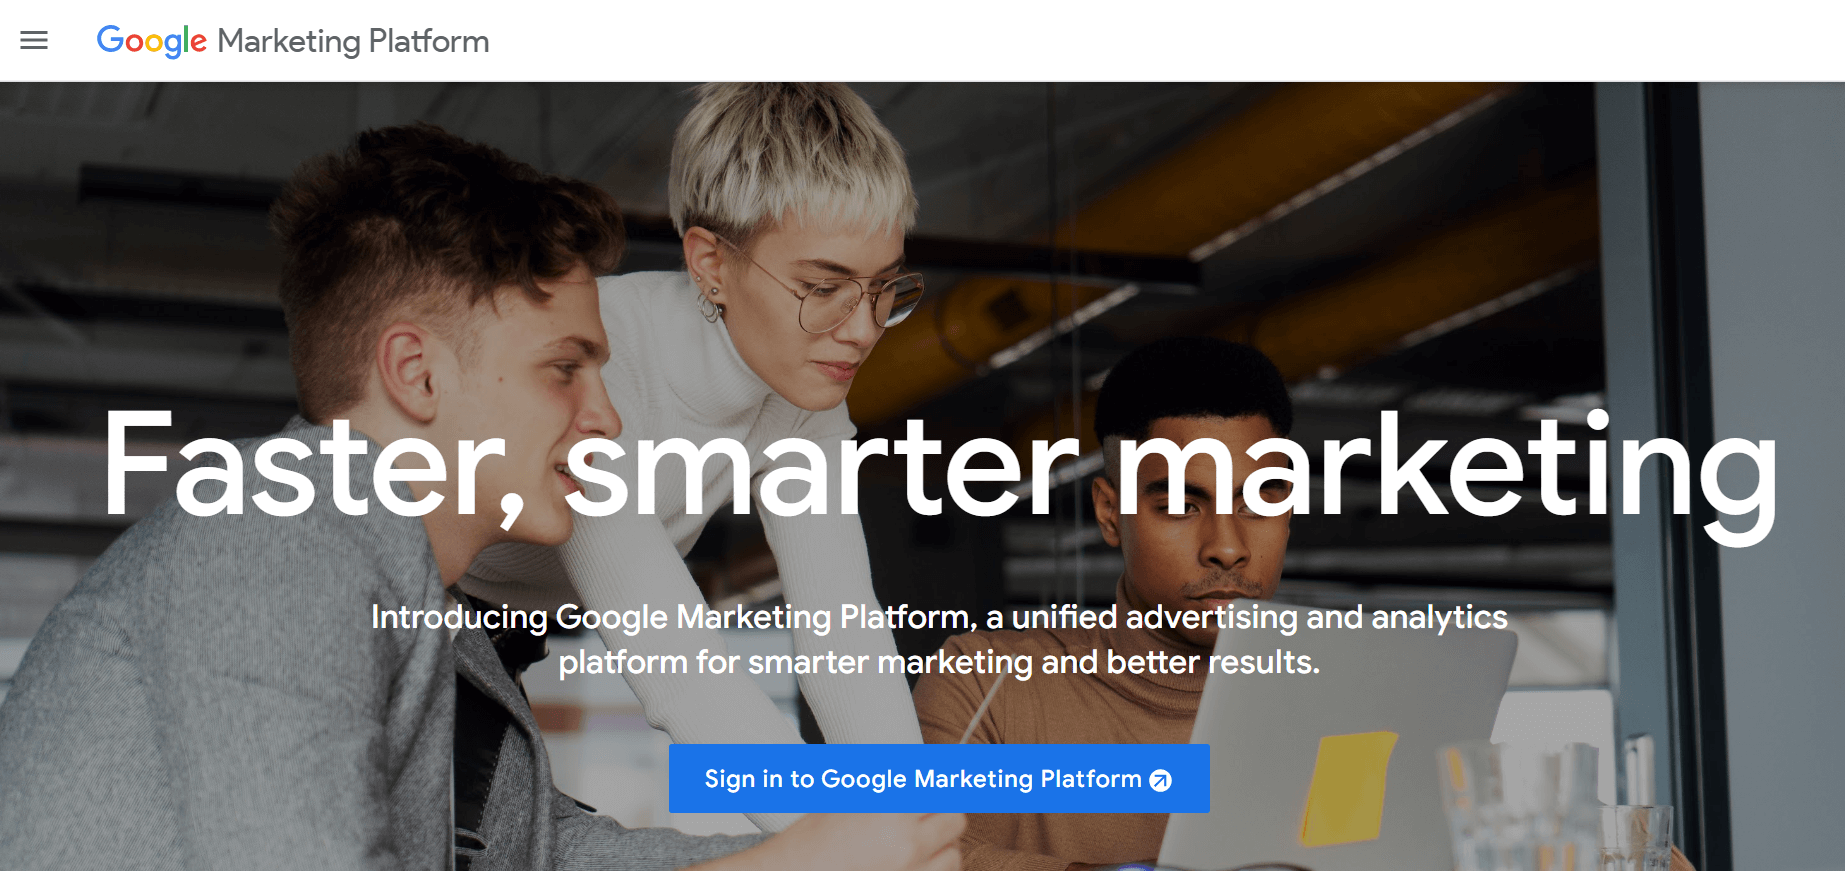
By tapping into its integration with Google Analytics, this tool provides users with straight visualizations of website data, empowering them to make informed decisions regarding user experience enhancements.
Since its beginning in 2012, Google Optimize has steadily emerged as the go-to solution for website optimization across businesses of all scales. Below are some of its standout features:
- Google Optimize Visual Editor: This user-friendly tool offers a seamless editing experience, allowing users to make necessary adjustments to their web pages without delving into code. Optimized for all devices, the visual editor encourages effortless page design, accessible anytime and anywhere. Additionally, developers enjoy the flexibility to edit HTML and CSS files, ensuring customization options to meet diverse needs.
- Ease of Use: Getting started with Google Optimize is a breeze. Upon creating your Optimize Account, you can immediately begin testing your website. For instance, setting up a Google Optimize Shopify Integration is a straightforward process, enabling users to kickstart their first A/B test within minutes. Clear and concise instructions provided by Google streamline the optimization process, making website enhancement accessible to all.
- Testing Capabilities: Google Optimize offers a comprehensive suite of testing options, encompassing A/B Testing, Multivariate Testing, and Redirect Testing, catering to various scenarios. Users can effortlessly allocate visitor percentages to view different page variants and seamlessly deploy the preferred version based on experiment results.
- Seamless Integrations: Google Optimize seamlessly integrates with Google Analytics and Google Ads, empowering businesses to delve deeper into customer behavior and deliver personalized experiences. Leveraging clear and customer-centric reports from Google Analytics facilitates educated decision-making, while customizable reports encourage a deeper understanding of customer preferences.
- Optimize 360: Designed for enterprises with expanding needs, Google Optimize 360 appears as the ultimate testing platform. Upgrading to Optimize 360 unlocks enhanced abilities, including a higher number of Multivariate Test Combinations, Custom Audience Targeting, Professional Support Service, and enhanced scalability.
For additional details on features and functionalities, visit the Official Google Optimize Website.
How to set up Google Optimize Shopify Integration
The method discussed below will guide you in the process of building a basic Google Optimize Shopify Integration.
Phase 1: Create an Account to initiate Google Optimize Shopify Integration
Phase 2: Link Google Optimize Shopify using Theme Files
Phase 3: Set Up a Test for your Website
Phase 1: Create an Account to initiate Google Optimize Shopify Integration
Step 1: Sign in to your Google Optimize Account or Create a New Account for Free if you haven’t already done so, to kickstart the Google Optimize Shopify Integration.
Step 2: Click on the “Create Account” button and assign a descriptive name to your Website Testing Project.
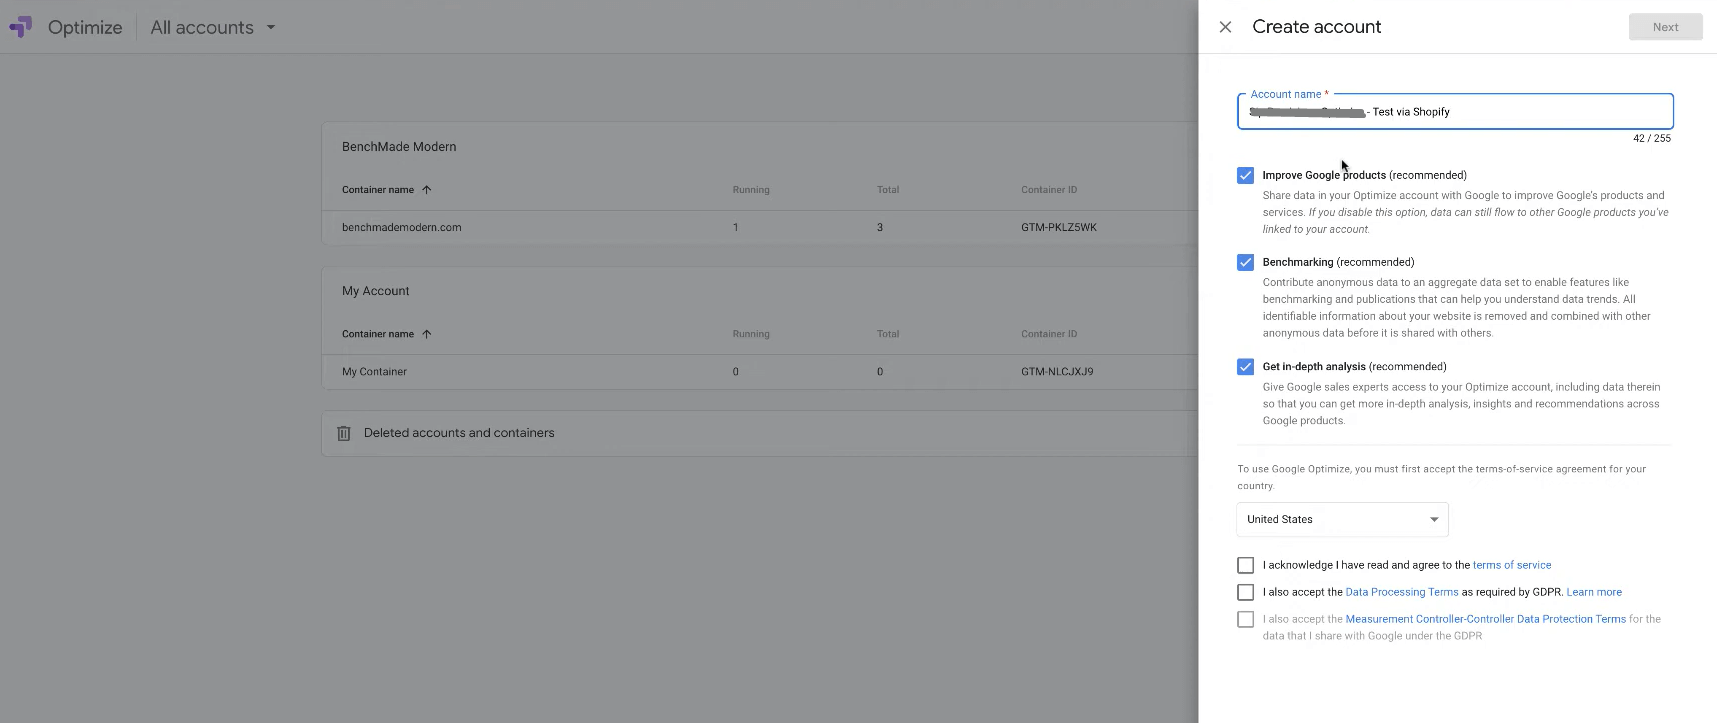
Step 3: Familiarize yourself with the Terms and Conditions for Data Sharing, select your Country, and proceed by clicking on the “Next” button located in the top right corner.
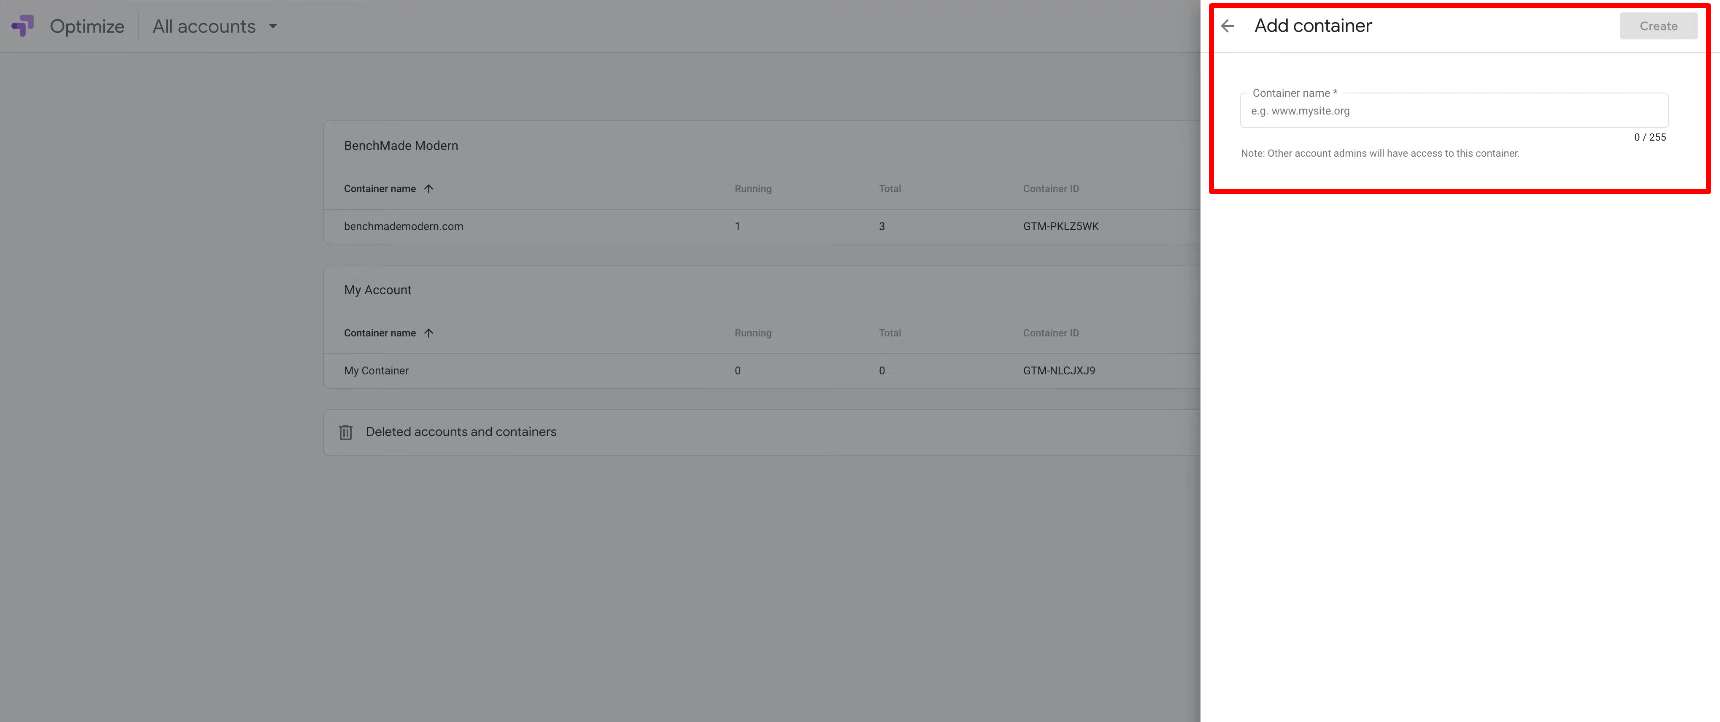
Step 4: An “Add Container” Dialog Box will appear. Simply copy your desired Website URL and paste it into the provided box. Then, initiate the integration process by clicking on the “Create” Button.
Phase 2: Link Google Optimize Shopify using Theme Files
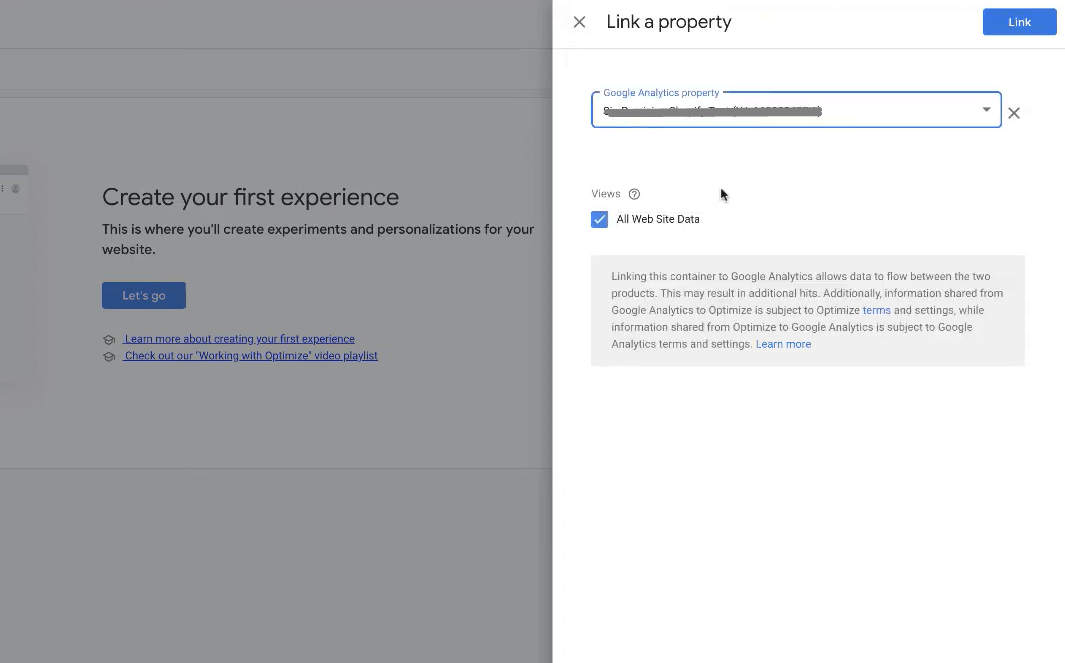
Step 1: Begin by accessing the Link to Google Analytics drop-down menu situated on the right side of your screen. Select the Link Property option.

Step 2: In the ensuing “Link a Property” drop-down menu, opt for the Analytics option corresponding to your Shopify project. Ensure that the UA Id matches the one in your Shopify Account. Tick the box for All Website Data and proceed by clicking the Link Button.
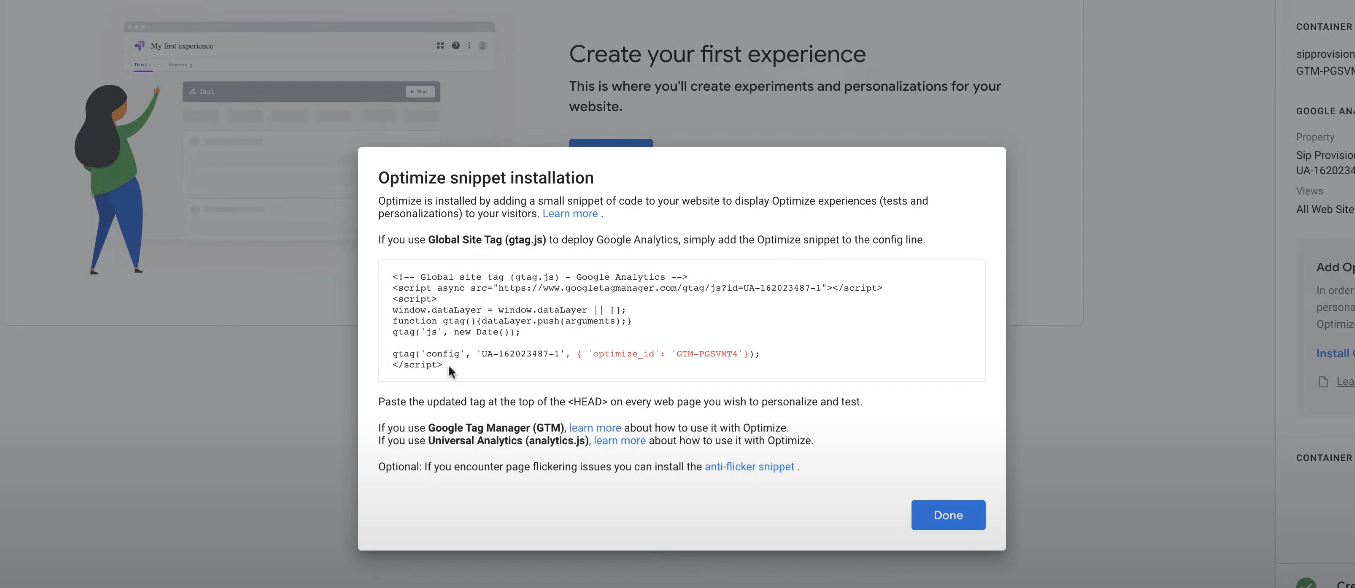
Step 3: A dialog box labeled “Add an Optimize Snippet to your Site” will emerge. Click on the Get Snippet option.
Step 4: A window containing the Optimize Snippet Code will display. Click on the Anti-Flicker Snippet option. This action will open a new tab revealing the code for the Anti-Flicker Snippet. This additional snippet is particularly beneficial during the setup of the Google Optimize Shopify Integration, addressing scenarios where the webpage flickers between the two variants being tested.
Step 5: Open another tab in your web browser and log in to your Shopify Account. Navigate to the Online Store option located on the left side menu, then select Themes.
Step 6: Click on the Actions Option and choose Edit Code from the drop-down menu. Utilize the search box to locate the theme.liquid file and paste the copied Code from the Anti-Flicker Snippet, followed by the Google Optimize Snippet, below the </b> tag. Ensure to replace “CONTAINER ID” in the Anti-Flicker snippet code with your actual Optimize ID.</p>

Step 7: Save your changes by clicking the Save button positioned on the top right corner of your screen. Upon completion, a message “Asset Saved” will appear, confirming that all adjustments for the Google Optimize Shopify Integration have been successfully saved.
Phase 3: Set Up a Test for your Website
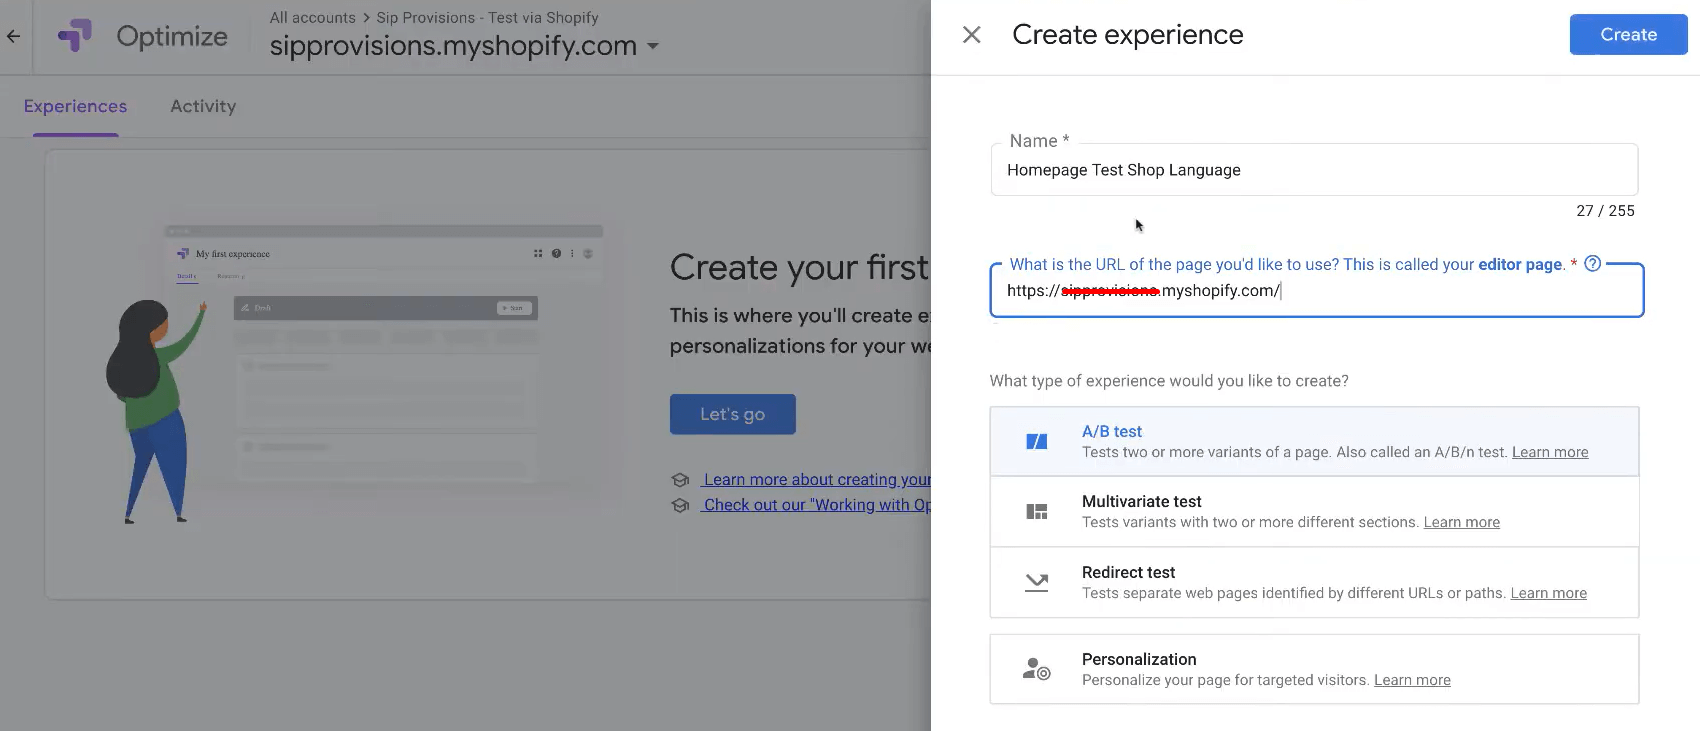
Step 1: Navigate to your Google Optimize Tab and hit the Let’s Go button to initiate testing your Website through the Google Optimize Shopify Integration.
Step 2: Input the Name of your test and the URL of the specific web page you wish to test. Select the preferred Test type and proceed by clicking the Create Button. In this example, A/B testing is selected.
Step 3: Next, press the Add Variant button and provide a descriptive name for the new version of the page. Click Done to save your changes.
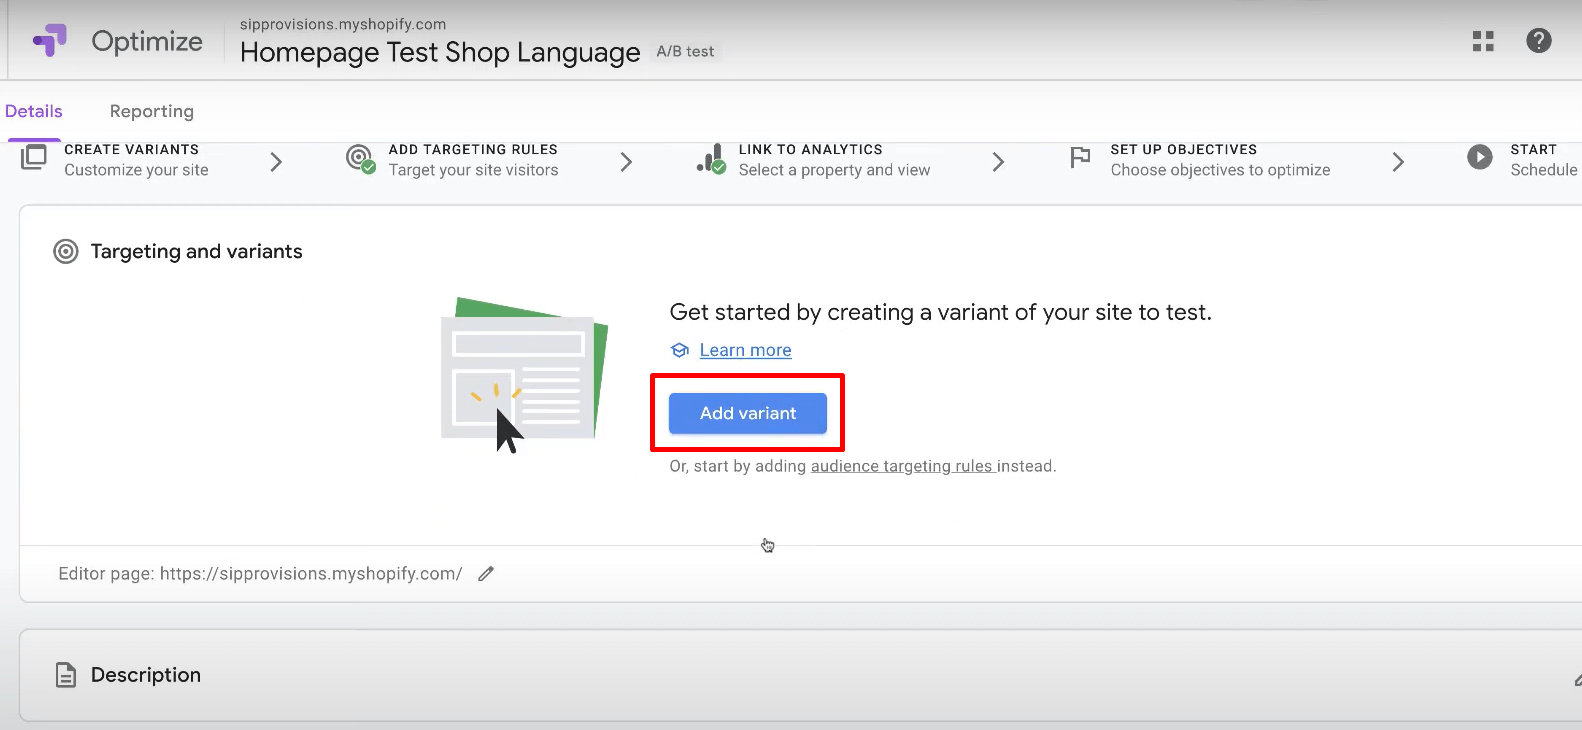
Step 4: Utilize the Edit button to make any necessary adjustments for the new version using the Optimize Visual Editor.
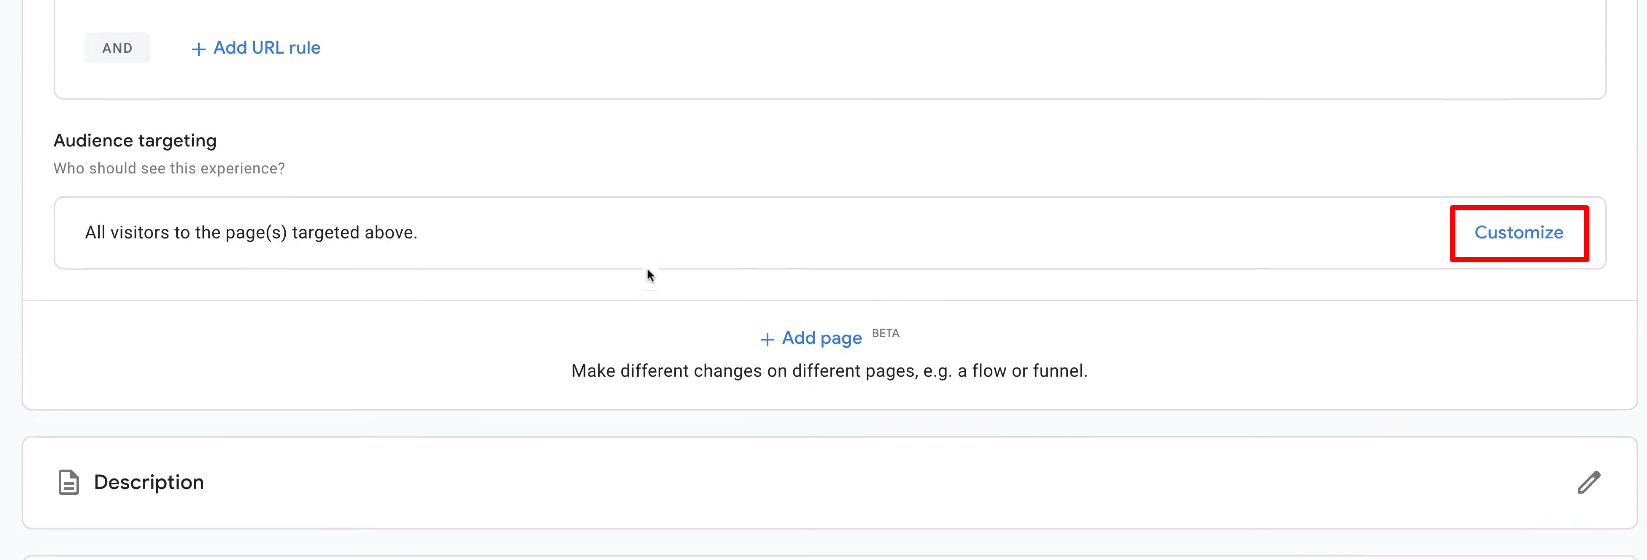
Step 5: Scroll down to the Audience Targeting Section and click on the Customize button to select the business metrics you wish to track in the Google Analytics Reports.
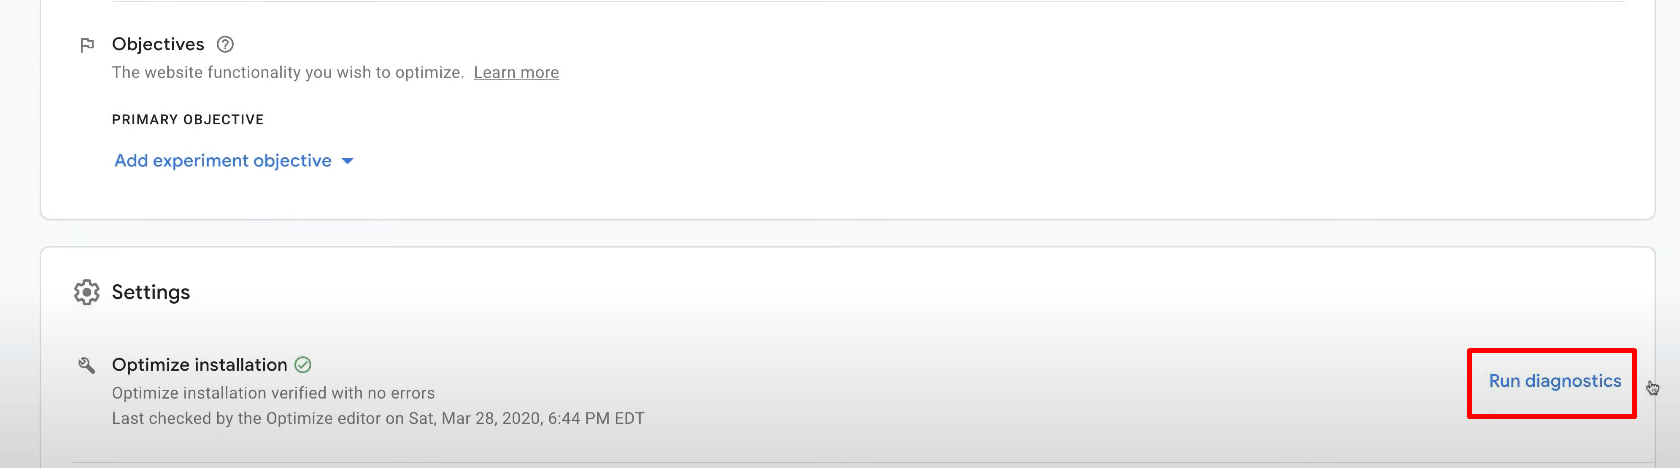
Step 6: To confirm the proper functioning of the Google Optimize Shopify Integration, click on the Run Diagnostics button under the Settings section. Upon completion, a message indicating successful Google Optimize Shopify Integration will appear.
Best practices for using Google Optimize to A/B test

Choose a clear and measurable goal
Before starting an A/B testing, it’s important to set clear goals and determine how you measure success. A reasonable goal should be specific, relevant, and suitable to your business goals. For example, your aim might be to grow your newsletter subscribers, lower bounce rates, or elevate the average order value. Further, you must select a metric that effectively measures your goal, be it modifications, sessions, or revenue. Google Optimize enables this process by allowing you to choose a goal from your existing Google Analytics goals or establish a new one.
Examples of Clear and Measurable Goals
- Increase Newsletter Subscriptions: Aim to grow the number of subscribers by 20% in the next three months. Measure this by tracking the number of new sign-ups.
- Reduce Bounce Rates: Target a 10% reduction in bounce rates over the next quarter. Measure this using the bounce rate percentage from your analytics tool.
- Elevate Average Order Value: Aim to increase the average order value by 15% in the next six months. Measure this by tracking the average amount spent per transaction.
Identify your target audience
Now, it’s time to identify the audience for your A/B test. You can clarify your audience using various criteria, including location, device, behavior, or custom sizes. For instance, you may opt to test a different headline for mobile users, a distinct offer for returning visitors, or an alternative layout for high-value customers. Google Optimize empowers you to establish your own audience rules or utilize predefined ones.
Examples of Target Audience Segmentation
- Mobile Users: If you notice that a significant portion of your traffic comes from mobile devices, you might want to test a mobile-optimized version of your landing page to see if it improves conversion rates.
- Returning Visitors: Targeting users who have previously visited your site with a special offer or tailored content can help in increasing their likelihood of conversion.
- High-Value Customers: If you can identify users who tend to make larger purchases, you might test premium features or exclusive deals to see if they respond positively.
Create your variants
Following audience selection, you’ll create the diverse versions of your page slated for testing. Leveraging the Google Optimize visual editor, you can tweak page elements like text, images, colors, or buttons. Alternatively, the code editor enables the addition of custom HTML, CSS, or JavaScript. For instance, you might test a condensed form, an enlarged call-to-action, or an alternate testimonial. Google Optimize accommodates up to 16 variants per experiment, offering ample scope for exploration.
Set up your experiment
Once your goal, audience, and variants are set, it’s time to configure your experiment in Google Optimize. Assign a name to your investigation, choose its type (A/B test, multivariate test, or redirect test), and specify the page to test. Additionally, allocate a weight to each variant, determining its frequency of display to visitors. You may opt for an even split of traffic between variants (50/50) or favor one variant over another (70/30), with Google Optimize offering manual or automatic adjustment of weights based on performance.
Launch and monitor your experiment
Later, launch and oversee your experiment within Google Optimize. Ensure its proper execution, addressing any errors or discrepancies that arise. Monitor the experiment’s progress and outcomes using Google Optimize reports and the dashboard. Gauge each variant’s performance relative to your goal, ascertain confidence levels in the results, and determine the optimal duration for running the experiment. Google Optimize permits you to pause, resume, or conclude your experiment as needed, affording flexibility throughout the testing process.
Conclusion
To wrap up, including Google Optimize into your Shopify store can revolutionize your online business. By following the simple steps outlined in this guide, you can swiftly tap into the potential of research, data-driven insights, and tailored experiences to make substantial enhancements in user engagement and conversion rates. With Google Optimize readily available, you possess the tools necessary to stay ahead of the competition and consistently refine your Shopify store for optimal impact. Begin integrating Google Optimize today and unleash the full potential of your online business.

Summer is the CMO and Digital Commerce Solution Expert with 10+ years of experience. She specializes in Magento, Shopify, ERP, CRM, AI, and Blockchain, delivering strategic solutions that transform businesses. With a deep understanding of digital commerce, she helps brands scale and stay ahead in a competitive market.
Related Post

Review 74 Mageplaza extension updates from April 2025, highlighting Magento 2.4.8 compatibility, Hyvä theme support, and enhanced functionalities.

Social Media Marketing: Your Ultimate Guide to Skyrocketing Engagement - Mageplaza
Discover a step-by-step framework for effective social media marketing. Learn how to optimize content, run ads, track KPIs, and future-proof your strategy across all major platforms.
The Ultimate Guide to Managing Your E-Commerce Website for Maximum Sales - Mageplaza
Discover simple tips to manage your eCommerce website, boost sales, and grow your online business effortlessly. Learn now!
SWOT Analysis: The Ultimate Tool for Business Growth - Mageplaza
Learn how to use SWOT analysis to identify strengths, weaknesses, opportunities, and threats. Build smarter strategies and drive business growth effectively.
Review 74 Mageplaza extension updates from April 2025, highlighting Magento 2.4.8 compatibility, Hyvä theme support, and enhanced functionalities.
Social Media Marketing: Your Ultimate Guide to Skyrocketing Engagement - Mageplaza
Discover a step-by-step framework for effective social media marketing. Learn how to optimize content, run ads, track KPIs, and future-proof your strategy across all major platforms.
The Ultimate Guide to Managing Your E-Commerce Website for Maximum Sales - Mageplaza
Discover simple tips to manage your eCommerce website, boost sales, and grow your online business effortlessly. Learn now!
SWOT Analysis: The Ultimate Tool for Business Growth - Mageplaza
Learn how to use SWOT analysis to identify strengths, weaknesses, opportunities, and threats. Build smarter strategies and drive business growth effectively.
& Maintenance Services
Make sure your store is not only in good shape but also thriving with a professional team yet at an affordable price.
Get Started