Optimize Store Management With Ultimate Shopify Tags Guide

Creating a successful Shopify store depends greatly on effective tag management. Tags serve as crucial identifiers that organize and categorize products, helping customers find what they need quickly.
In our comprehensive guide, we delve into the strategic use of tags to optimize your Shopify store’s navigation and search functionalities. Setting up a well-organized tagging system can improve the user experience, raise the conversion rate, and bring in more sales in the long run.
We’ll explore best practices for creating and managing tags, discuss how to use them effectively across different product categories and highlight tools and apps that streamline tag management on Shopify. Keep reading as we show how tags can turn your Shopify store into a sales and customer-friendly powerhouse.
Get To Know Shopify Tags
Shopify tags are the labels that organize Shopify data like products, customers, and orders. These tags streamline backend operations and enhance customer experience by enabling more precise searches. While you can manually assign tags, automation tools can automate this process and help your productivity increase significantly.
For instance, a tool can automatically assign a “VIP” tag to customers who usually spend a lot on your store.
Custom tags can be created across all relevant sections of your store. For example, tagging a customer as “VIP” allows you to further categorize them with additional tags, like “retargeting.” This flexibility enables targeted marketing efforts, such as creating campaigns to re-engage VIP customers who haven’t made recent purchases on your site.
6 Types of Shopify Tags You Should Know
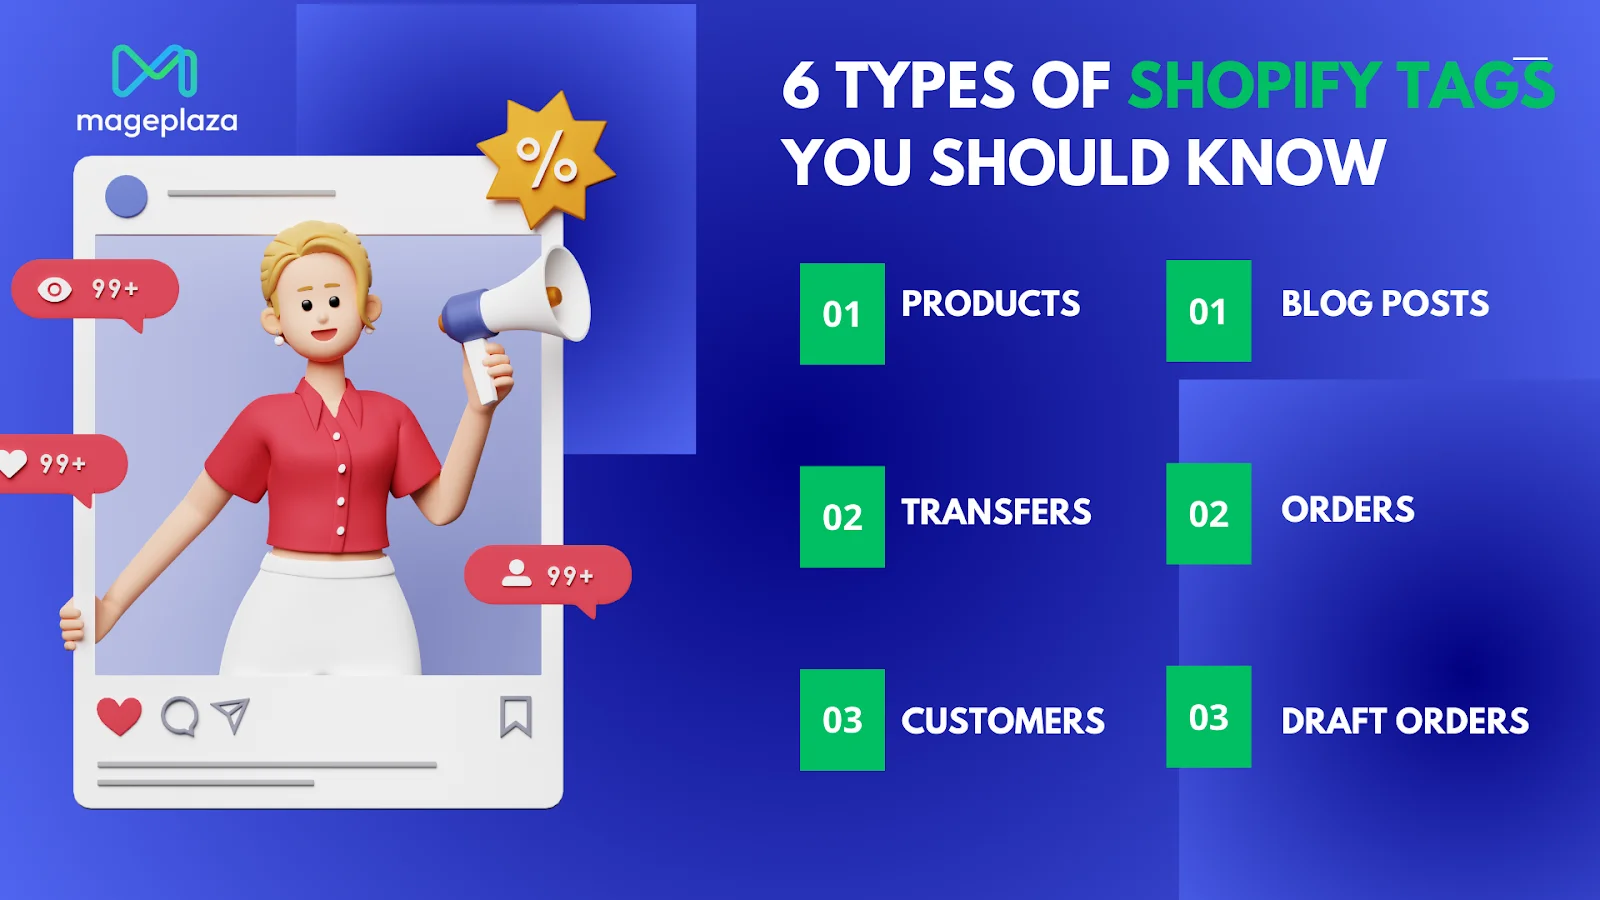
There are essential tools for organizing and managing various aspects of your online store. Imagine them like folders on your computer desktop—helping you categorize and find items quickly as your store grows.
- 1. Products: Shopify product tags are applied to specific products, helping categorize them based on attributes like season, price range, or material. These tags streamline product management and enhance navigation for customers browsing your store.
- 2. Transfers: Transfer tags track inventory movements between locations, ideal for businesses with multiple storefronts. Tags like “urgent” on transfers help monitor and prioritize stock movements efficiently.
- 3. Customers: Customer tags segment your clientele based on behaviors or demographics such as order frequency, loyalty status, or location. These tags enable personalized marketing strategies and improve customer engagement.
- 4. Blog Posts: Blog post tags organize your content into categories like “announcements,” “tutorials,” or “news,” making it easier for readers to find relevant information. Tags like “evergreen” and publication year help manage and update content effectively.
- 5. Orders: Order tags streamline fulfillment operations by categorizing orders based on statuses like “fragile,” “back-ordered,” or “delayed shipments.” This categorization helps prioritize and manage orders efficiently.
- 6. Draft Orders: Similar to orders, draft order tags categorize pending transactions. They are useful for managing pre-orders or campaign-specific orders, ensuring clarity and organization during the sales process.
Knowing these Shopify tags and understanding how to use them correctly can make your e-commerce activities much more organized and efficient.
How to manage Shopify tags on Shopify?
1: Add tags on Shopify
To create a new Shopify tag, you should follow these steps:
- Go to the Shopify product, transfer, customer, blog post, order, or draft order page you want to tag.
- Enter an item’s details page. Enter the label name to add a new tag or select from available options in “Tags“.
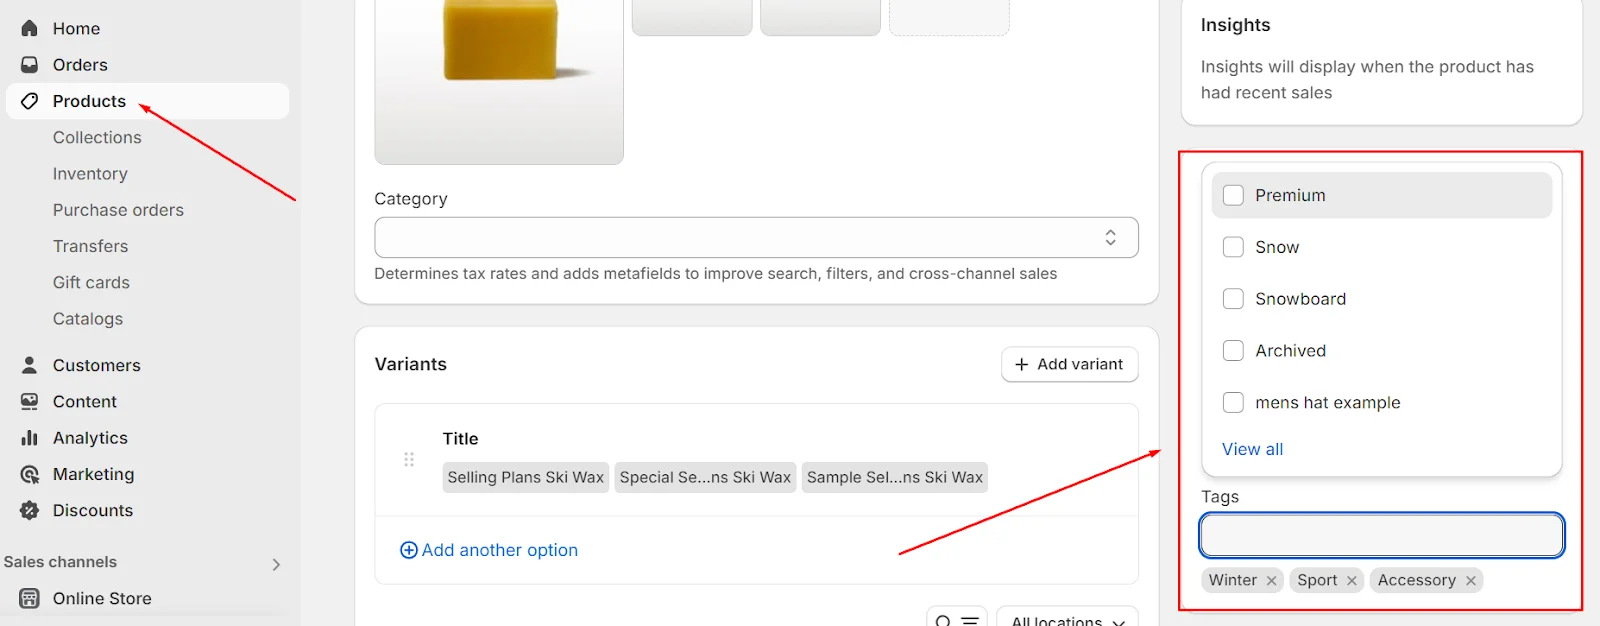
Product example
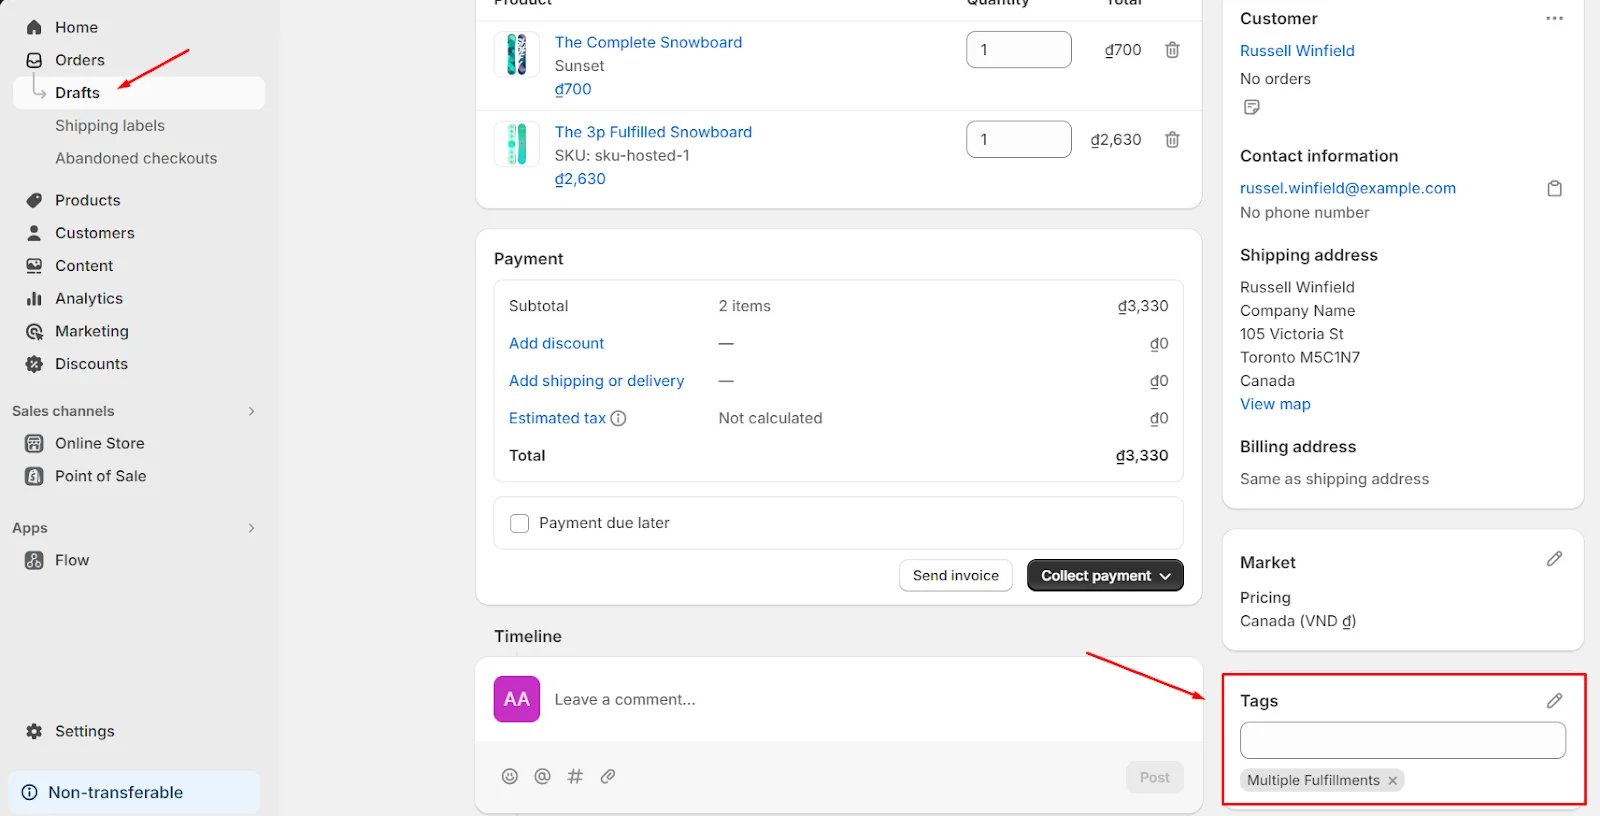
Draft order example
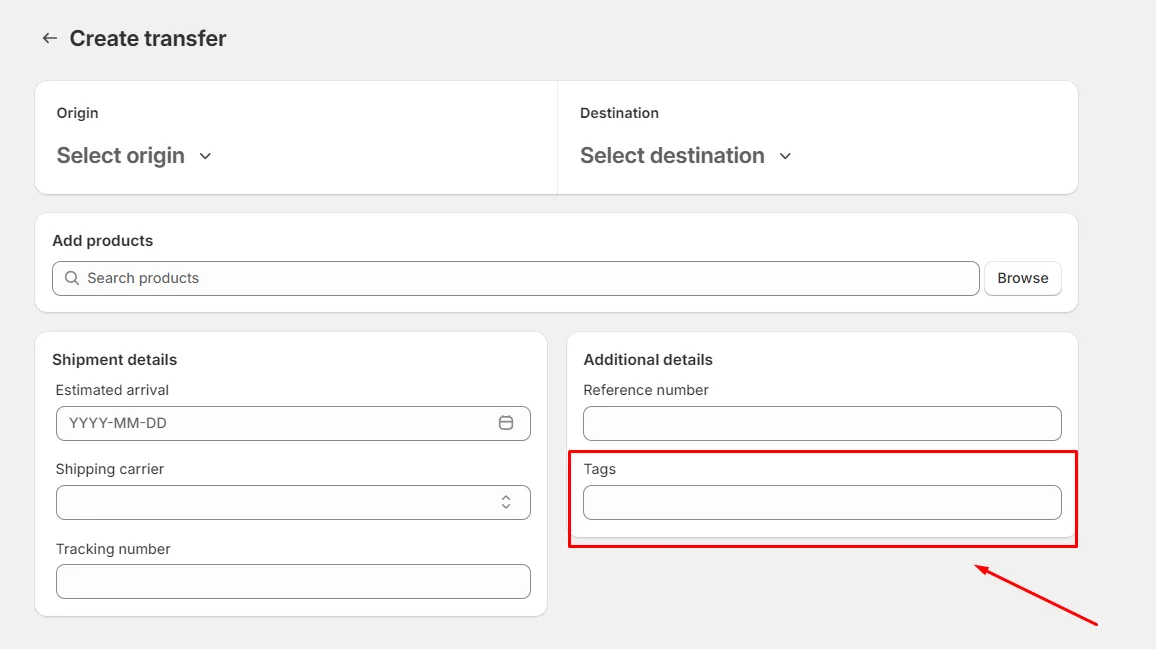
Transfer example
- Then click “Save“ to complete.
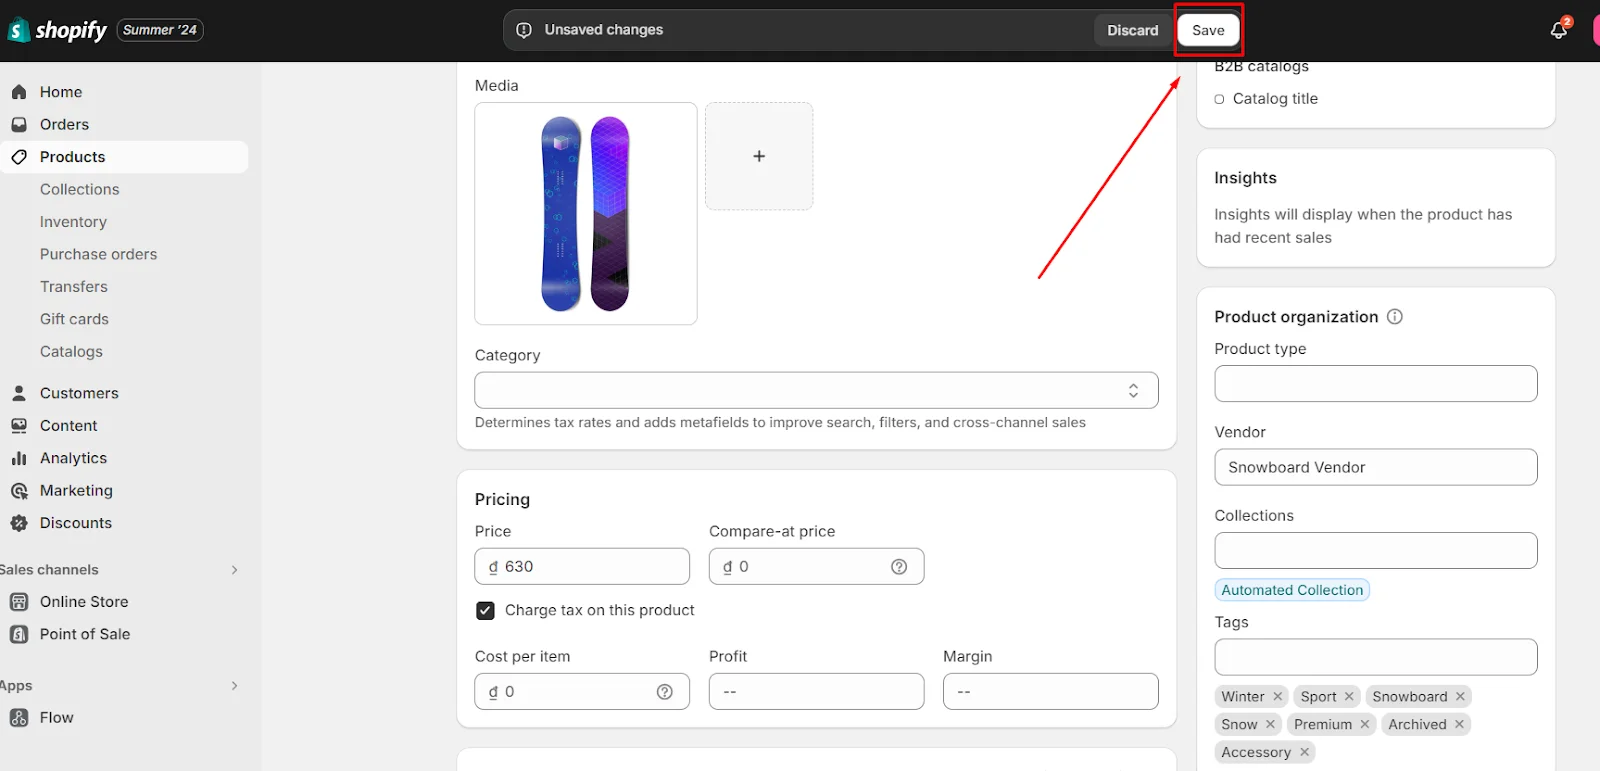
2: Remove tags on Shopify
Follow these steps when you want to remove tags manually from your Shopify store:
- Again, browse your Shopify store’s product, transfer, customer, blog post, order, or draft order page.
- Click on the x next to the tag to get rid of it.
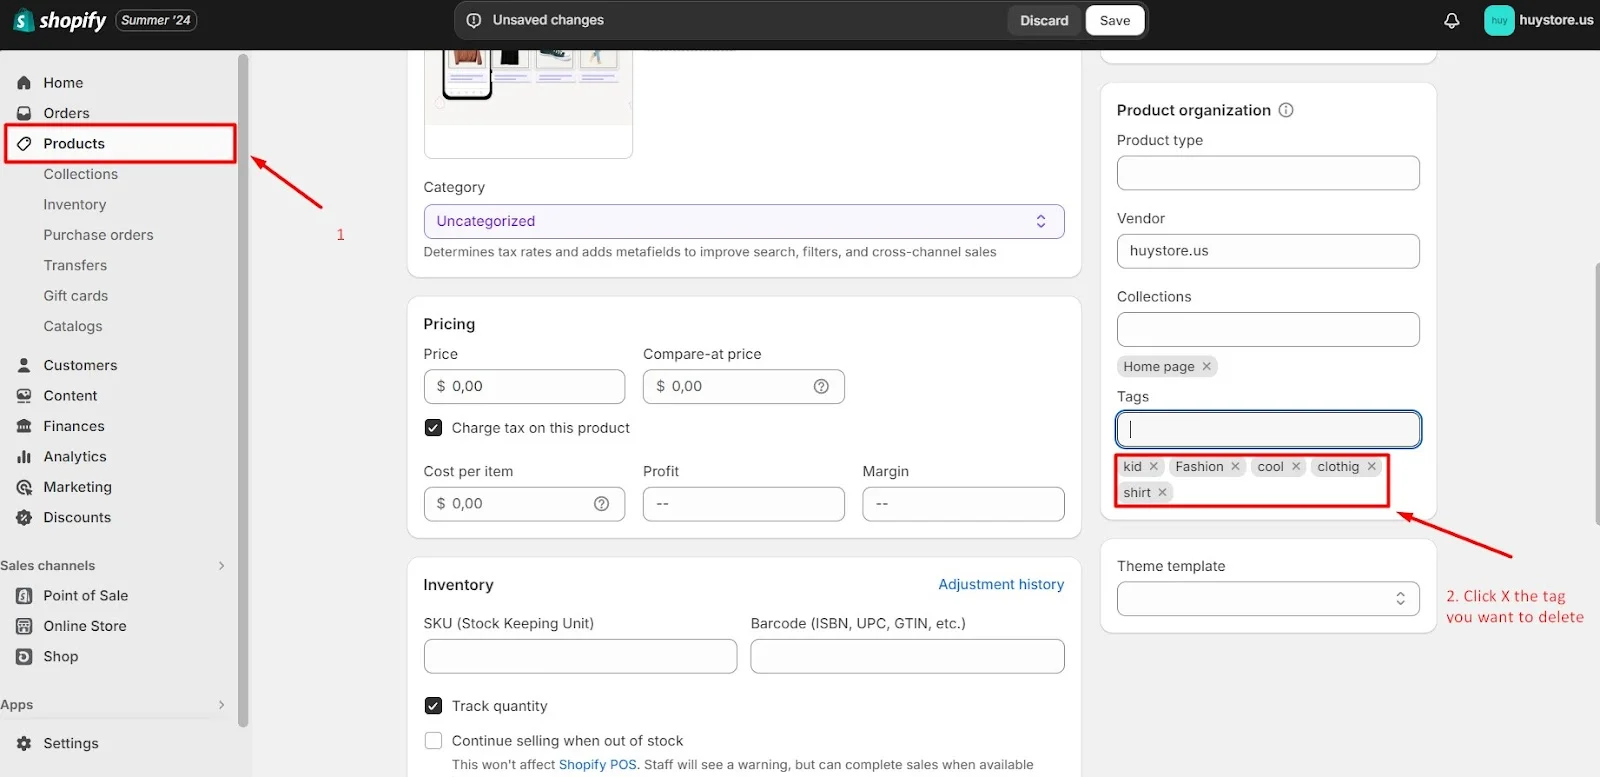
- Then click “Save“ to complete.

3: Add or remove tags in bulk
Go to the appropriate Shopify admin page and pick numerous goods to bulk modify tags and save time. After that:
- Select “Add/Remove tags”.
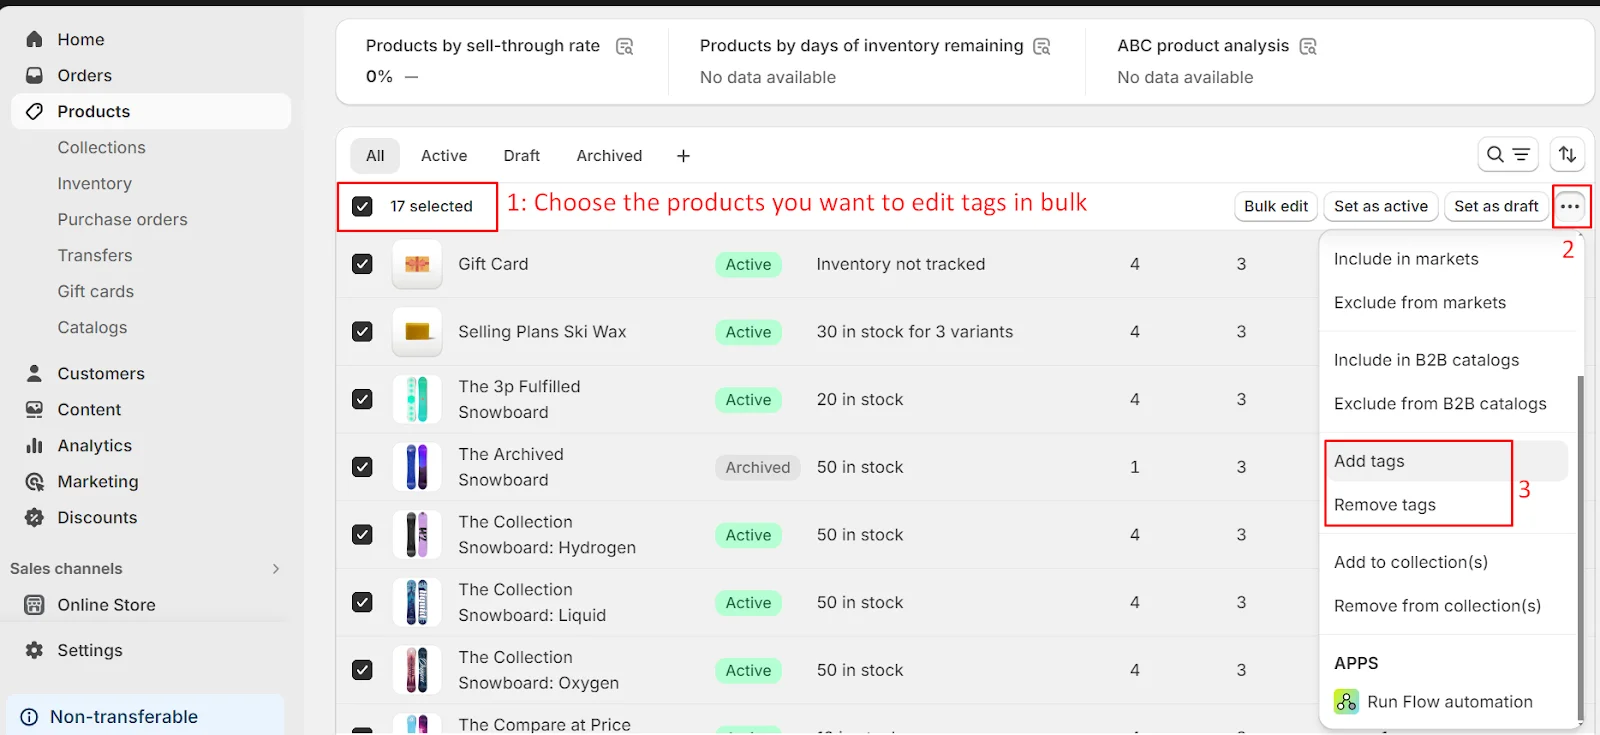
- Choose appropriate tags.
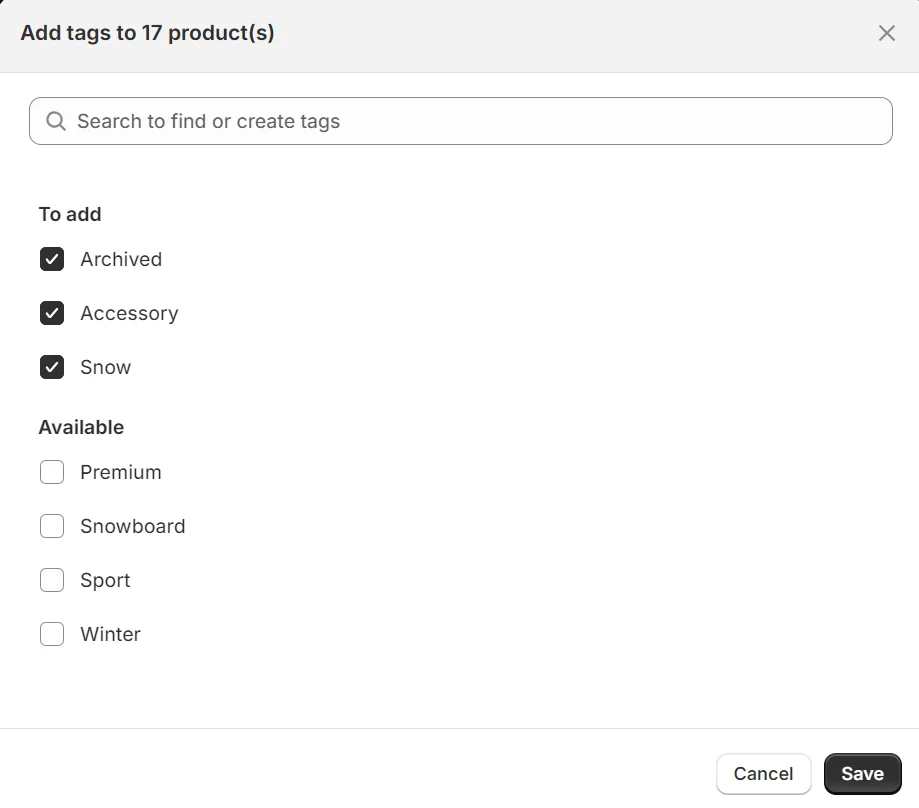
Add tags in bulk
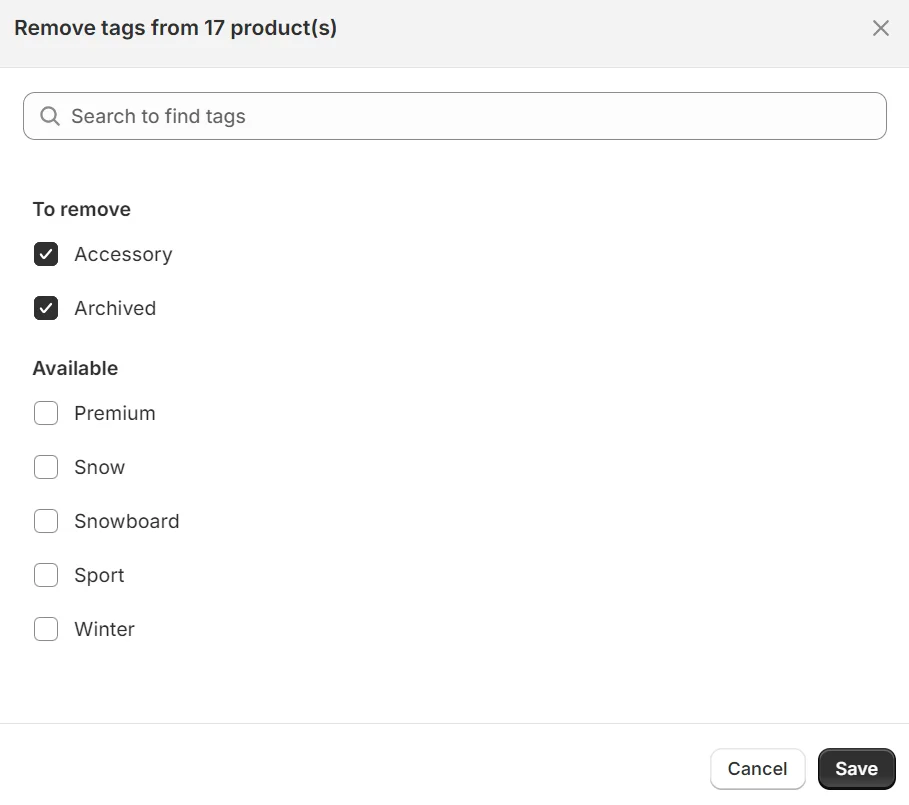
Remove tags in bulk
- Click “Save” to finish.
3 Popular Use Cases of Shopify Tags to Streamline Your Store
Shopify tags are powerful tools that help store owners organize, manage, and optimize their stores. By using tags effectively, you can streamline various aspects of your store’s operations. Here are some popular use cases for Shopify tags:
1. Make use of tags in searches
Tags can make it much easier to look in Shopify for goods, transfers, users, blog posts, sales, or draft orders. Here’s how:
- Simply enter the tag name into the Shopify admin search bar.
- Examine the search results and select the relevant item.
For instance, searching for the tag “low risk” will provide a list of low-risk customers who have placed orders. Similarly, typing in “summer” will bring up all summer-specific products in your store.
While tags remain invisible to customers, they can be used to enhance customer-facing features. When customers search for terms that match your product tags, they will see the corresponding product pages, improving their search experience and helping them find the desired items.
2. Make use of tags in the filter
-
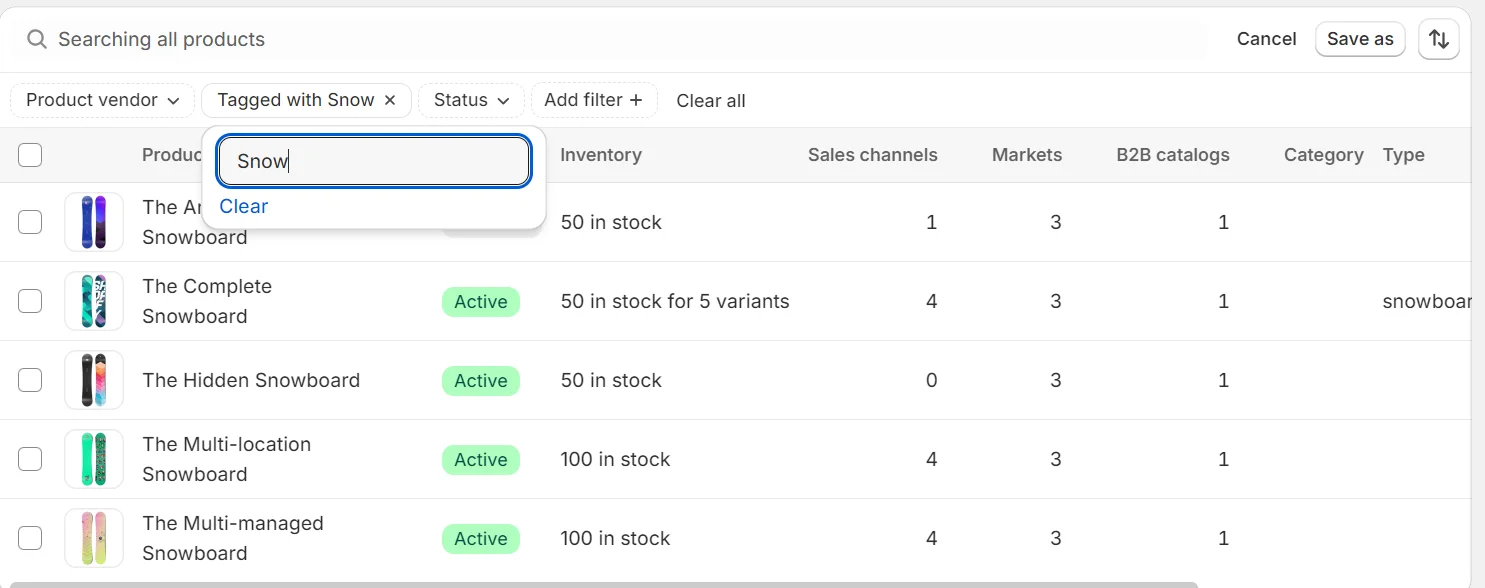
Tags are a powerful tool to keep your Shopify store organized and efficient. Here’s a straightforward way to filter by a specific tag:
-
In your Shopify admin, go to Products, Transfers, Customers, Blog posts, Orders, or Draft Orders.
-
Click on the Search and Filter button.

- Choose Tagged with and start searching for your needed tags by entering the tag names

- Here’s an example of snow products:
3. Develop an automatic collection
These tags can automatically group similar products together based on specific criteria you set. For instance, if you tag products with seasonal labels like “summer” or “fall,” Shopify can automatically populate collections that match these tags.
To set up an automatic collection:
- Begin by tagging products within your manual collection with the appropriate labels
- Navigate to Products > Collections in your Shopify admin panel and select “Create collection”

- Use the tags you assigned in the previous step as conditions for your new automated collection
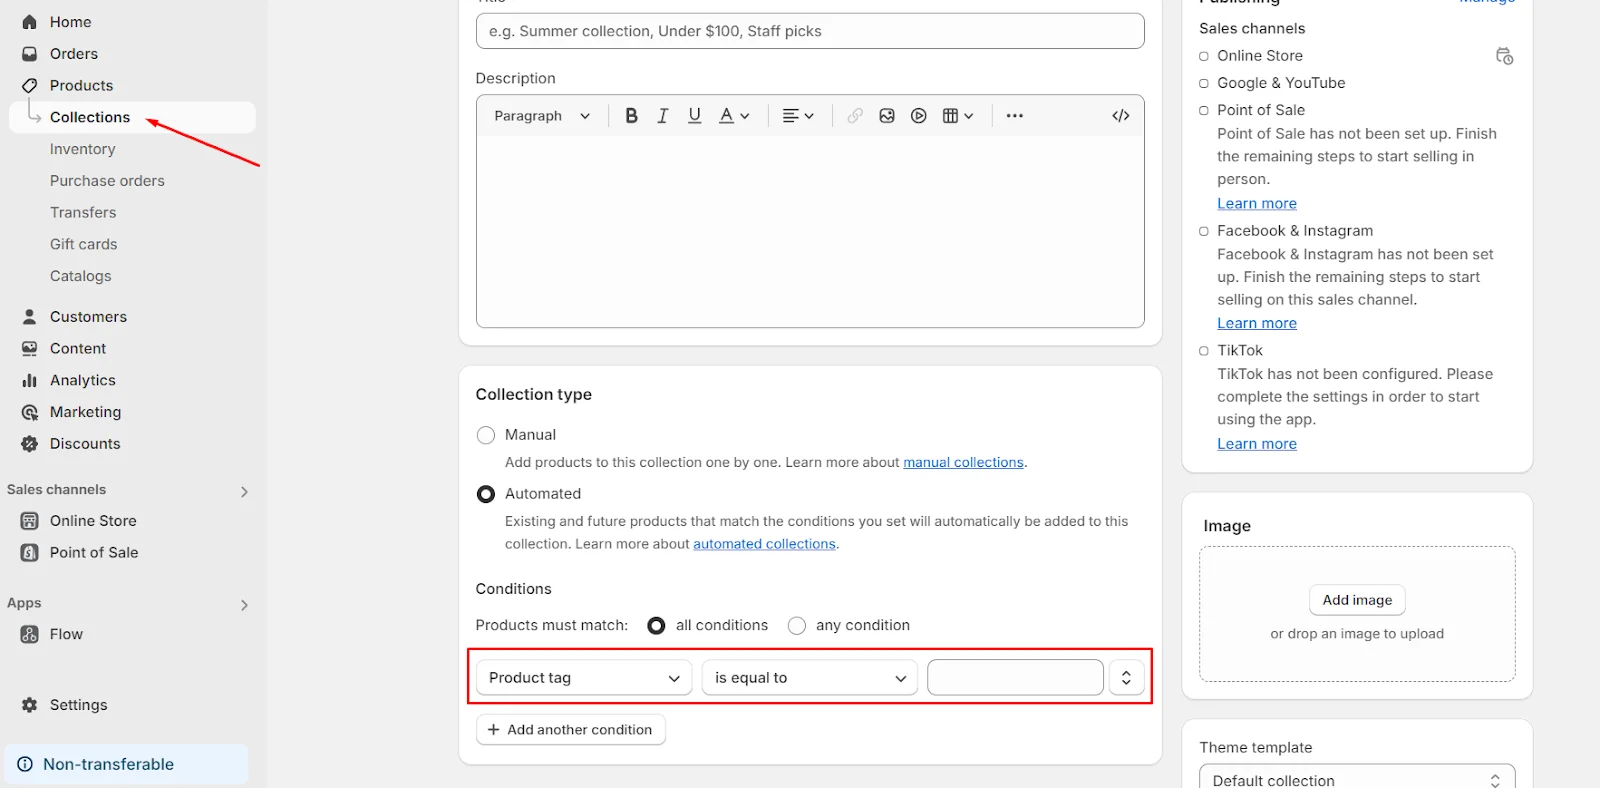
By leveraging this feature, you can eliminate the need for manual sorting and ensure that related products are consistently grouped. This is particularly useful for managing large inventories or seasonal promotions, helping to enhance the browsing experience for your customers while saving you valuable time.
6 Tagging Best Practices You Should Use for Better Store Management

Shopify tags are a powerful tool for organizing your store and boosting efficiency. Here are some key practices to maximize their potential:
Descriptive & Relevant: You should use clear, concise tags that accurately describe your products or customers. Think of keywords people might use to search for your offerings.
Consistency is Key: Maintain a consistent tagging system across your store. This makes it easier to find what you need and ensures accurate product categorization.
Embrace Specificity: Don’t just use generic tags like “clothing.” Include specific details like “women’s dress,” “cotton t-shirt,” or “summer sandals.” This allows for more granular filtering and targeted marketing.
Think Beyond Products: Tags aren’t just for products! Utilize them for customer segments (e.g., “wholesale customer”) or order attributes (e.g., “rush order”).
Avoid Overstuffing: While including relevant keywords is important, resist the urge to cram every possible word into a tag. This can make them cumbersome and hinder organization.
Regular Review & Refinement: Take time to periodically review your tags. Remove unused ones and adjust existing ones to reflect changes in your inventory or customer base.
By following these best practices, you’ll transform your Shopify tags from a simple organizational tool into a strategic asset that streamlines management and enhances the customer experience.
Bottom Line
In conclusion, mastering Shopify tags is crucial for efficiently managing store data and enhancing the overall organization of your eCommerce operations. By implementing these tagging strategies effectively, you can streamline inventory management, improve customer navigation, and optimize marketing efforts.
Shopify tags empower you to categorize products intuitively, create automated collections, and personalize customer experiences. This systematic approach not only simplifies backend operations but also enhances front-end usability, making it easier for customers to find what they need quickly. As you continue to refine your tagging practices, you’ll discover new opportunities to leverage data-driven insights for driving sales and fostering long-term customer loyalty.


